Why centralize your app development?
From large integrated systems to monorepos, every code organization strategy comes with trade-offs. A monorepo approach means housing several projects within a single version-controlled repository.
Projects inside a monorepo can reference one another, which opens the door for sharing code. As an example, a shared interface could be defined once and consumed by both frontend and backend teams.
Modifications to one project do not automatically trigger rebuilds for everything else. Instead, only the projects directly impacted by the change get rebuilt or retested. This keeps your Continuous Integration pipeline fast and gives each team in the monorepo greater autonomy.
In this guide, we will demonstrate how to structure code in a monorepo fashion and craft a straightforward yet scalable Angular application that runs on iOS, Android, and desktop systems such as Windows, Linux, and macOS.
The case for Angular
Angular ships with tooling that lets developers produce features rapidly using expressive declarative templates. Familiarity with Angular and its recommended practices is assumed here. If you are new to the framework, I recommend you give it a shot.
There is no shortage of comparisons between Angular and other JavaScript frameworks, yet my own experience building applications with Angular has been thoroughly enjoyable. I have delivered a presentation explaining why Angular remains my preferred framework; you can view it here.
The Angular.io documentation states: “Learn one way to build applications with Angular and reuse your code and abilities to build apps for any deployment target. For web, mobile web, native mobile and native desktop”. That quote captures the essence of this article perfectly.
The case for Electron
Electron is a framework for building desktop applications with JavaScript, HTML, and CSS. These apps can be packaged to run natively on macOS, Windows, or Linux, and can also be distributed through the Mac App Store or the Microsoft Store.
Conventionally, building a desktop app for a specific OS requires using that OS’s native frameworks. Electron removes that barrier, letting you write the application once with technologies you already know.
The case for Capacitor
Capacitor is an open source native runtime for web-based native apps. It enables cross-platform iOS, Android, and Progressive Web Apps (PWAs) using JavaScript, HTML, and CSS. Furthermore, it gives you access to the full Native SDKs on each platform, allowing deployment to the App Stores while still supporting the web target.
You might be curious why we are not using Cordova, a tool you may recognize. The straightforward answer is that I wanted to explore an unfamiliar technology. Additionally, Capacitor supports Cordova plugins, so you are not constrained. You can find the official comparison from the Capacitor.js team here.
A look at the sample project (and the tools involved)
The demo project is an Angular-CLI application structured as a multi-project workspace. We will walk through each integration step for the target platforms, beginning with Electron, then Android, and finally iOS. If you already own an Angular application, this walkthrough will show you where and how to layer support for additional platforms.
If you are starting fresh, or if you simply want the final result (or to fork the code), the repository is available here.
Regardless, I urge every reader to follow the details closely, as this knowledge will be useful later when your app grows and you need to debug it.
Why should this matter to you?
Betty Eats Carrots And Uncle Sells Eggs – a mnemonic a child might use to remember how to spell the word “because”. Such prompts and memory aids are especially valuable when learning new material. The more cues you have, the faster and more effectively you retain new knowledge.
In this article, I will demonstrate how to leverage your Angular expertise to build a game using the Angular framework. By default, the game will run on the web. Then we will add Electron so the game can be installed on a computer. Finally, we will make the game deployable on mobile devices to maximize its audience. All of this comes from a single (and straightforward) repository.
As a side note, for those interested in game development with Angular, this article is a great resource and serves as the foundation for our game. I will not spend much time on game construction since that article covers it thoroughly from the ground up. Our focus here is on combining different technologies, not just to grasp every piece, but also to maximize the number of platforms we can reach. With that in mind, let us begin!
Initial project setup
First, install Angular-CLI globally:
npm install -g @angular/cli
Since the workspace will contain several applications, we start by creating an empty workspace with ng new and the –createApplication flag set to false:
ng new cross-platform-monorepo --createApplication=false
Next, add the first Angular application to the workspace:
ng generate application tetris
This setup separates the workspace name from the initial app name and guarantees that every application (and library) ends up in the /projects folder, aligning with the workspace configuration described in angular.json.
Then add a second Angular application (as a placeholder) to the workspace:
ng generate application tetris2
To maximize code reuse, we take advantage of the Angular multi-project structure by creating a library project that will contain the core game engine logic.
ng generate library game-engine-lib
By separating the application shells from the logic layer, we guarantee that the code stays maintainable, reusable, and easy to extend, and that other development teams can share it without friction.
With the core structure ready, we can move on to adding the game code.
As noted, the game is based on this article, which includes a link to its GitHub repository here. I have slightly altered the original code to demonstrate the use of native APIs (like file system access) on both desktop and mobile. More details on that later.
Consuming libraries in Angular applications
Angular makes it easy to build npm libraries. We do not need to publish a library to the npm registry to use it locally, but a library has to be built before it can be imported. Let us do that now.
Note: “lib” and “library” are used interchangeably here – both refer to an Angular library as defined here
In your preferred terminal, run:
ng build game-engine-lib
A successful build should produce output similar to this:

To keep things smooth, let us add a few convenience scripts to package.json:
"scripts": {
    "ng": "ng",
    "start:tetris": "ng serve tetris -o",
    "build:tetris": "ng build tetris",
    "test:tetris": "ng test tetris",
    "lint:tetris": "ng lint tetris",
    "e2e:tetris": "ng e2e tetris",
    "start:tetris2": "ng serve tetris2 -o",
    "build:game-engine-lib": "ng build game-engine-lib --watch",
    "test:game-engine-lib": "ng test game-engine-lib",
    "lint:game-engine-lib": "ng lint game-engine-lib",
    "e2e:game-engine-lib": "ng e2e game-engine-lib"
  }
Finally, we will rely on TypeScript path mapping for NPM peer dependencies so our apps can reference the library easily.
In the root tsconfig.json, inside compilerOptions, adjust the configuration as follows:
"paths": {
      "@game-engine-lib": ["dist/game-engine-lib"]
}
Note: I like to prefix the library name with “@” so it stands out from local file imports.
In game-engine-lib.service.ts, add the following getter:
get testing(): string {
    return "GameEngineLibService works!";
  }
Whenever the library changes, it must be rebuilt. Alternatively, the –watch flag can be used to rebuild automatically on save.
Rebuild the lib using one of the scripts we added:
npm run build:game-engine-lib
Now, let us check that the exports from public-api.ts can be consumed correctly.
In app.module.ts of the tetris app, import the library so it is available throughout the application:
import {GameEngineLibModule} from "@game-engine-lib";
Then, add the library module to the imports array of the @NgModule decorator in the same file:
imports: [GameEngineLibModule]
In app.component.ts of the tetris app, add the following code:
constructor(private engineService: GameEngineLibService) {
    console.info(engineService.testing);
  }
Finally, in the terminal, start the tetris app using one of the scripts we defined earlier:
npm run start:tetris
After compilation finishes and the browser opens, you should see this:

Give yourself a round of applause, take a quick break, and when you are ready, let us dive into the fun(ky) parts.
Note: The next section involves copying files from the tetris repository into our monorepo. If you get lost, compare your file structure with the final project.
Bringing in the game code
Since this is a multi-project repository, we need to restructure the game code. Utility logic goes into the library, while the application shell stays in the tetris project. The tetris2 app will remain untouched for now.
To keep things tidy, we create a components subfolder within the lib folder (specifically projects/game-engine-lib/src/lib):
ng g c components/board // add --dry-run and ensure files are created in the correct folder
In the same lib directory, create a piece folder and rename the GameEngineLibComponent class to _Piece:_
Copy the board (.ts and .html) and piece (.ts) files from the tetris repo into their respective board and piece component folders in our monorepo. Also, take the constants.ts file and place it in projects/game-engine-lib/src/lib.
Move the contents of game.service.ts into game-engine-lib.service.ts (renaming GameService to GameEngineLibService). Fix all imports accordingly and install the ng-zzfx npm package.
A few more adjustments are needed before we can test.
In the GameEngineLibModule of the lib, add the following code:
import {CommonModule} from "@angular/common";

@NgModule({
  declarations: [BoardComponent],
  imports: [CommonModule], // Contains the basic Angular directives (i.e. NgIf, NgForOf etc)
  exports: [BoardComponent],
})
Finally, expose the Board component in the public API of game-engine-lib so that apps can import it:
export * from "./lib/components/board/board.component"
Your code structure should now resemble this:

The game engine logic is now ready to be used in the tetris app (or any other app you add later).
In the tetris app (i.e. /projects/tetris/src/app), replace the placeholder content with:
app.component.html:
<game-board></game-board>
Do not forget to also copy the styles.scss content into the corresponding file.
Now, rebuild the library using one of the scripts (unless it is already running with the –watch flag) and verify everything works:
npm run build:game-engine-lib
Then launch the tetris game (npm run start:tetris). If everything is correct, your browser should display the following:

I have to confess that I got distracted and spent far too much time playing Tetris instead of writing this article ☺

You, of course, are a disciplined developer who does not get sidetracked easily. Excellent. Let us move on to our first platform integration – Electron.js.
Wiring Electron into the workspace
Reaching this point means you satisfy the prerequisites for installing Electron.js. From a development perspective, an Electron app is essentially a node.js application, and Angular itself requires node.js/npm. For a comprehensive guide on setting up a standalone Electron app, refer to this resource.
For our tetris game, the first step is installing Electron.js:
npm install --save-dev electron@11.0.5
Like any Node.js app, an Electron app uses the package.json file as its entry point. Let us modify package.json accordingly:
{
...
"name": "cross-platform-monorepo",
 "version": "0.0.0",
 "description": "Cross-platform monorepo Angular app",
 "author": {       // author and description fields are required for packaging (electron-builder)
    "name": "your name",
    "email": "your@email.address"
  },
 "main": "main.js", // Electron entry-point
...
}
Anyone who has written substantial Angular code or worked on large codebases understands how valuable TypeScript (TS) is. So instead of writing error-prone plain JavaScript (JS), we will create a main.ts file. When the tetris app is built, the TS compiler (tsc) transpiles main.ts into the main.js file, which is then served to Electron.
Create the main.ts file and populate it with the following:
import { app, BrowserWindow, screen } from "electron";
import * as path from "path";
import * as url from "url";

let win: BrowserWindow = null;
const args = process.argv.slice(1),
  serve = args.some((val) => val === "--serve");

function createWindow(): BrowserWindow {
  const electronScreen = screen;
  const size = electronScreen.getPrimaryDisplay().workAreaSize;

  // Create the browser window:
  win = new BrowserWindow({
    x: 0,
    y: 0,
    width: size.width,
    height: size.height,
    webPreferences: {
      nodeIntegration: true,
      allowRunningInsecureContent: serve ? true : false,
      contextIsolation: false, // false if you want to run e2e tests with Spectron
      enableRemoteModule: true, // true if you want to run e2e tests with Spectron or use remote module in renderer context (i.e. Angular apps)
    },
  });

  if (serve) {
    win.webContents.openDevTools();

    require("electron-reload")(__dirname, {
      electron: path.join(__dirname, "node_modules", ".bin", "electron"),
    });
    win.loadURL("http://localhost:4200");
  } else {
    win.loadURL(
      url.format({
        pathname: path.join(__dirname, "dist/index.html"),
        protocol: "file:",
        slashes: true,
      })
    );
  }

  // Emitted when the window is closed.
  win.on("closed", () => {
    // Deference from the window object, usually you would store window
    // in an array if your app supports multi windows, this is the time
    // when you should delete the corresponding element.
    win = null;
  });

  return win;
}

try {
  // This method will be called when Electron has finished
  // initialization and is ready to create browser windows.
  // Some APIs can only be used after this event occurs.
  // Added 400ms to fix the black background issue while using a transparent window.
  app.on("ready", () => setTimeout(createWindow, 400));

  // Quit when all windows are closed.
  app.on("window-all-closed", () => {
    // On OS X it is common for applications and their menu bar
    // to stay active until the user quits explicitly with Cmd + Q
    if (process.platform !== "darwin") {
      app.quit();
    }
  });

  app.on("activate", () => {
    // On OS X it's common to re-create a window in the app when the
    // dock icon is clicked and there are no other windows open.
    if (win === null) {
      createWindow();
    }
  });
} catch (e) {
  // handle error
}
Now, add a couple of npm scripts to handle compilation and serving of the Electron app:
{
...
"start": "npm-run-all -p electron:serve start:tetris",
"electron:serve-tsc": "tsc -p tsconfig.serve.json",
"electron:serve": "wait-on tcp:4200 && npm run electron:serve-tsc && npx electron . --serve"
...
}
Looking at those scripts, you will notice a few files and packages are still required. Let us create them.
First, install the needed npm packages:
npm install wait-on // wait for resources (e.g. http) to become available before proceeding
npm install electron-reload // load contents of all active BrowserWindows when files change
npm install npm-run-all // run multiple npm-scripts in parallel
Then, create a tsconfig.serve.json file at the root with this content:
{
  "compilerOptions": {
    "sourceMap": true,
    "declaration": false,
    "moduleResolution": "node",
    "emitDecoratorMetadata": true,
    "experimentalDecorators": true,
    "target": "es5",
    "types": [
      "node"
    ],
    "lib": [
      "es2017",
      "es2016",
      "es2015",
      "dom"
    ]
  },
  "files": [
    "main.ts"
  ],
  "exclude": [
    "node_modules",
    "**/*.spec.ts"
  ]
}
That is all – let us give it another test spin. If everything is in order, we should be playing Tetris on the desktop.
Use the script we added earlier:
npm start

Congratulations! We now have an Electron desktop app with hot module reload!
Before heading to the next part, let us clean up the code and add some helper services to simplify communication between Electron and Angular. We also want to package the game into an installable binary for each OS. This is where electron-builder comes in.
First, update the Electron main.ts file:
win.loadURL(
      url.format({
        pathname: path.join(__dirname, "dist/tetris/index.html"), // add “/tetris” in the path
        protocol: "file:",
        slashes: true,
      })
    );
Next, at the root, create an electron-builder.json file with this content:
{
  "productName": "name-of-your-app",
  "directories": {
    "output": "release/"
  },
  "files": [
    "**/*",
    "!**/*.ts",
    "!*.code-workspace",
    "!LICENSE.md",
    "!package.json",
    "!package-lock.json",
    "!src/",
    "!e2e/",
    "!hooks/",
    "!angular.json",
    "!_config.yml",
    "!karma.conf.js",
    "!tsconfig.json",
    "!tslint.json"
  ],
  "win": {
    "icon": "dist/tetris/assets/icons",
    "target": ["portable"]
  },
  "mac": {
    "icon": " dist/tetris/assets/icons",
    "target": ["dmg"]
  },
  "linux": {
    "icon": " dist/tetris/assets/icons",
    "target": ["AppImage"]
  }
}
Now install electron-builder from the terminal:
npm i electron-builder -D
In package.json, add the scripts for packaging the game:
{
...
"postinstall": "electron-builder install-app-deps",
"build": "npm run electron:serve-tsc && ng build tetris --base-href ./",
"build:prod": "npm run build -- -c production",
"electron:package": "npm run build:prod && electron-builder build"
...
}
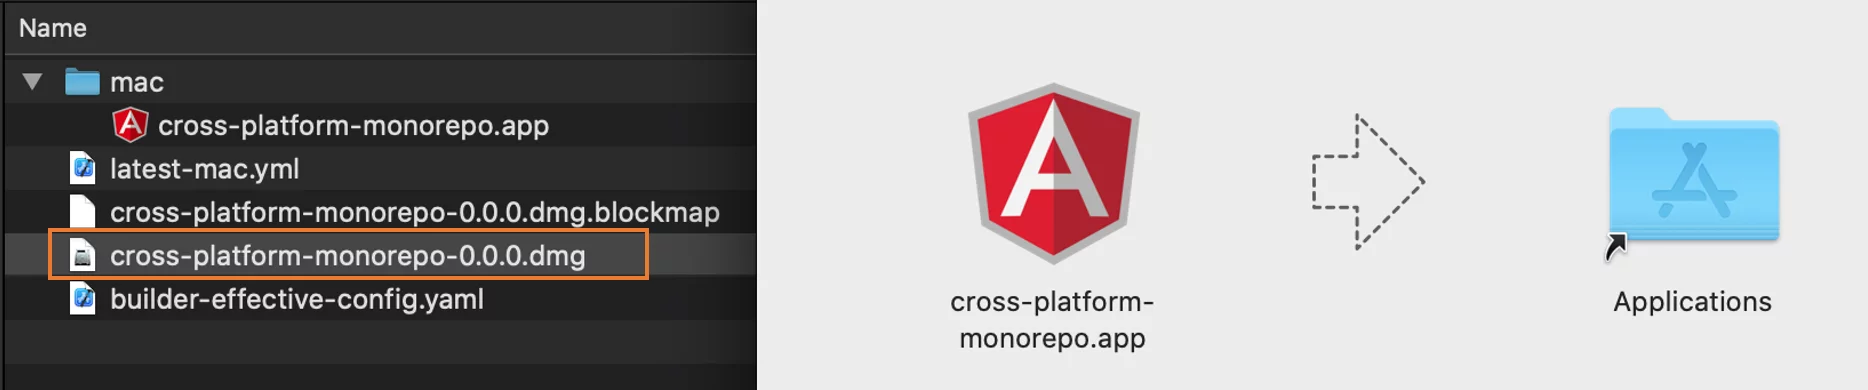
That is it! Build and package the application with npm run electron:package. Depending on your OS, an installer will be generated (in the new /release folder) for Linux, Windows, or macOS, complete with “auto update” support!
Here is how it appears on macOS:
Electron and Angular: communication
The Angular app cannot directly access all Electron APIs. To enable smooth communication between Electron and Angular, we use Inter-Process Communication (IPC). This OS-level mechanism lets two separate processes (main process and browser process) exchange messages.
Let us create a service in projects/tetris/src/app to handle this communication:
ng generate module core
ng generate service core/services/electron
Add this code inside the newly created file (electron.service.ts):
import { Injectable } from "@angular/core";
import { ipcRenderer, webFrame, remote } from "electron";
import * as childProcess from "child_process";
import * as fs from "fs";

@Injectable({
  providedIn: "root",
})
export class ElectronService {
  ipcRenderer: typeof ipcRenderer;
  webFrame: typeof webFrame;
  remote: typeof remote;
  childProcess: typeof childProcess;
  fs: typeof fs;

  get isElectron(): boolean {
    return !!(window?.process?.type);
  }

  constructor() {
    if (this.isElectron) {
      this.ipcRenderer = window.require("electron").ipcRenderer;
      this.webFrame = window.require("electron").webFrame;

      // If you want to use remote object, set enableRemoteModule to true in main.ts
      // this.remote = window.require('electron').remote;

      this.childProcess = window.require("child_process");
      this.fs = window.require("fs");
    }
  }
}
Finally, register the electron service in app.module.ts:
imports: [BrowserModule, GameEngineLibModule, CoreModule]
And use it in app.component.ts (or any other file in the project):
export class AppComponent {
  title = "tetris";
  constructor(private electronService: ElectronService) {

    if (electronService.isElectron) {
      console.log("Run in electron");
      console.log("Electron ipcRenderer", this.electronService.ipcRenderer);
      console.log("NodeJS childProcess", this.electronService.childProcess);
    } else {
      console.log("Run in browser");
    }
  }
}
That was comprehensive. Reflect on what we have built. With this setup, you have the ability to use your Angular skills to create applications like VS Code, Slack, Twitch, Superpowers, and any other app you can think of, distributing them across major desktop platforms.
Now, let us move to our final platform integration – Mobile.
Adding iOS and Android support
For mobile support, we will use Capacitor.js. This open source native runtime builds web-based native apps and enables cross-platform iOS, Android, and PWA development with Angular or any modern web framework.
As with most node.js/npm technologies, the first step is installing the package. Note that there are other pre-requisites to satisfy before proceeding.
Once those dependencies are in place, run the following command at the root:
npm install @capacitor/core@2.4.5 @capacitor/cli@2.4.5
Next, initialize Capacitor with the app details:
npx cap init // npx is a utility that executes local binaries or scripts to avoid global installs.
Follow the prompts until completion. When done, you should see this output:

This will create a capacitor.config.json file with the following content:
{
  "appId": "com.tetris.game",
  "appName": "cross-platform-game",
  "bundledWebRuntime": false,
  "npmClient": "npm",
  "webDir": "www",
  "plugins": {
    "SplashScreen": {
      "launchShowDuration": 0
    }
  },
  "cordova": {}
}
Now, let us add the platforms. We will start with Android:
npx cap add android
Running the above command will likely produce the error below:
Error: Capacitor could not find the web assets directory "/path/to/your/root/repo/www"
To fix it, update capacitor.config.json as follows:
{
...
"webDir": "www", // replace www with “dist/tetris”
...
}
Capacitor follows a three-step build process: first, web code is built (if needed); second, the built code is copied to each platform; third, the app is compiled using that platform's tools. There is a recommended developer workflow worth following.
Run the script again:
npx cap add android

Once Android is added successfully, a collection of Android-specific files will appear in the new android folder. These files should be committed to version control.
Capacitor relies on each platform’s IDE to run and test your app.
So, we need to open Android Studio to test the game. Simply run:
npx cap open android
Inside Android Studio, you can build, emulate, or run the app using the standard workflow.
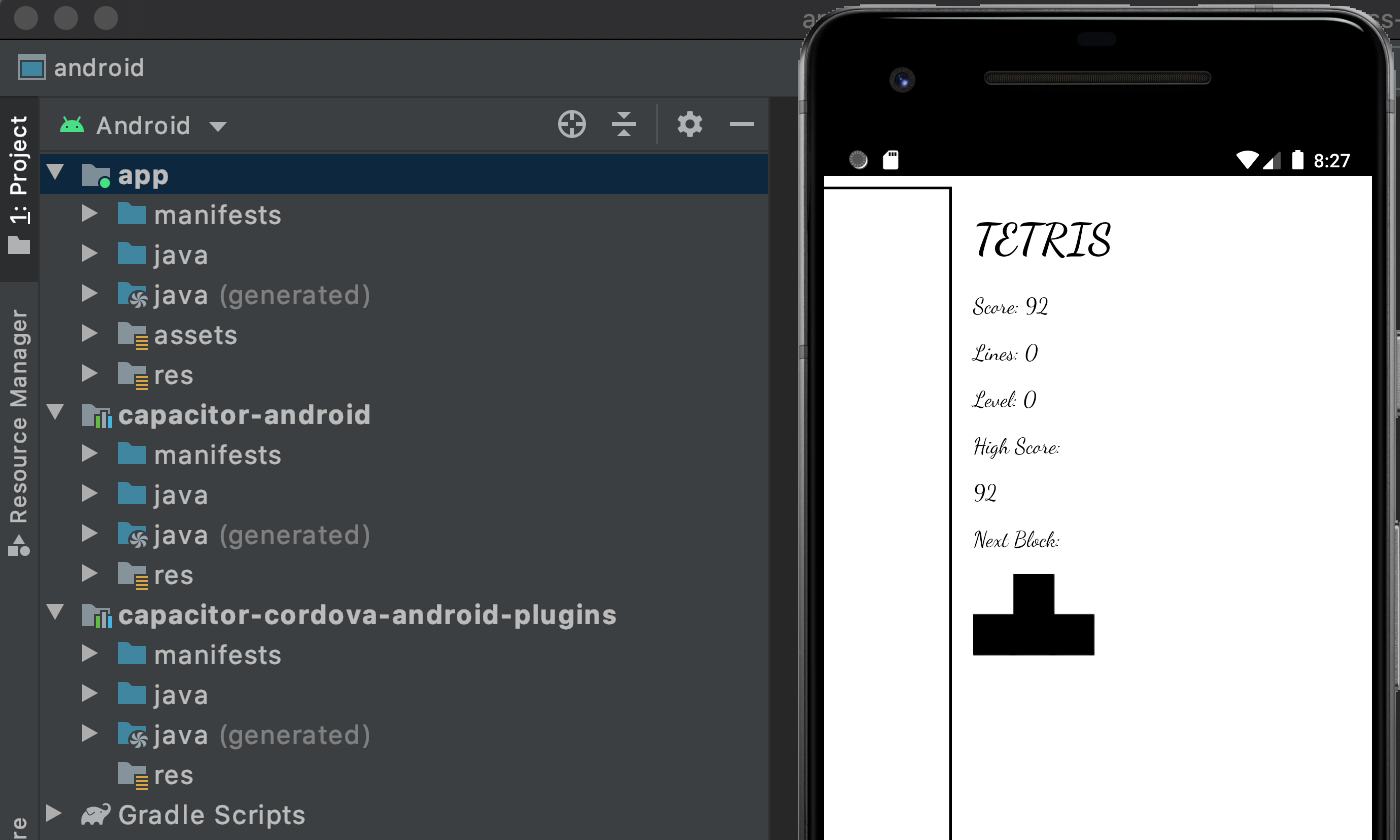
Android Studio’s workflow is beyond the scope of this article, but plenty of documentation is available if you need help.
As one final step, let us add iOS support in the same way:
npx cap add ios

Similar to Android, after iOS is added you will see a set of iOS-specific files in the new ios folder. These should also be committed to source control.
To open Xcode and build the app for the simulator, run:
npx cap open ios
After building and running the app in Xcode, you should see the output below:

Capacitor packages your web assets and forwards them to Xcode. The rest of the development is up to you.
Capacitor also includes a native iOS bridge that allows communication between JavaScript and Swift or Objective-C code. This gives you the flexibility to use its various APIs, Capacitor or Cordova plugins, or your own custom native code to finish your app.
As shown in the Capacitor developer workflow, each build requires copying app assets into the mobile platform folders. Let us add scripts to automate this:
package.json
{
...
"copy-android": "npx cap copy android",
"copy-ios": "npx cap copy ios",
"open:android-studio": "npx cap open android",
"open:xcode": "npx cap open ios",
"add-android": "npx cap add android",
"add-ios": "npx cap add ios"
...
}
Organizing shared code
Staying true to our clean and simple multi-project architecture, and now that we maintain another platform, it is wise to create a new Angular library to hold all services, components, directives, and other items common across platforms:
Create the lib:
ng g library shared-lib // use –dry-run to ensure your files are in the correct folder

As with the earlier library, it must be built before use – add a script for that and run it:
{
...
"build:shared-lib": "ng build shared-lib --watch"
...
}

In tsconfig.json under compilerOptions, add:
"paths": {
      "@game-engine-lib": [
        "dist/game-engine-lib"
      ],
      "@shared-lib": [               // the newly created lib
        "dist/shared-lib"
      ]
    }
Move all services from projects/tetris/src/app/core/services to projects/shared-lib/src/lib/services and ensure the classes are exported through the lib’s public API (public-api.ts).
Finally, let us add a new service that will be needed in the next section:
Run this command in the projects/shared-lib/src/lib/services folder:
ng g s /capacitor/capacitorstorage
Then add this code:
import { Injectable } from "@angular/core";
import { Plugins } from "@capacitor/core";

const { Storage } = Plugins;

@Injectable({
  providedIn: "root",
})
export class CapacitorStorageService {
  constructor() {}

  async set(key: string, value: any): Promise<void> {
    await Storage.set({
      key: key,
      value: JSON.stringify(value),
    });
  }

  async get(key: string): Promise<any> {
    const item = await Storage.get({ key: key });
    return JSON.parse(item.value);
  }

  async remove(key: string): Promise<void> {
    await Storage.remove({
      key: key,
    });
  }
}
With that in place, we are ready to use shared-lib anywhere in the project.
Warning: libs may import other libs, but avoid importing services, modules, or directives defined in the apps into libs. This frequently leads to circular dependencies that are difficult to trace.
Connecting all the dots
We are nearing the end. Let us bring CapacitorStorageService into the game-engine-lib, specifically into the board.component.ts file:
import { CapacitorStorageService } from "@shared-lib";
  constructor(
    private capStorageService: CapacitorStorageService
  ) {}
To preserve the highscore after a page refresh, or when the app is reopened on mobile or desktop, we modify these methods:
async ngOnInit() {
    const highscore = await this.localStorageGet("highscore");  // newly added
    highscore ? (this.highScore = highscore) : (this.highScore = 0);  // newly added
    this.initBoard();
    this.initSound();
    this.initNext();
    this.resetGame();
  }

gameOver() {
   …
    this.highScore = this.points > this.highScore ? this.points : this.highScore;
    this.localStorageSet("highscore", this.highScore);  // newly added
    this.ctx.fillStyle = "black";
   …
}
Also, add the localStorageSet and localStorageGet methods inside board.component.ts:
 async localStorageGet(key: string): Promise<any> {
    return await this.capStorageService.get(key);
  }

  localStorageSet(key: string, value: any): void {
    this.capStorageService.set(key, value);
  }
LocalStorage is considered transient, meaning data may eventually be lost. The same applies to IndexedDB, at least on iOS. Android offers the persisted storage API to make IndexedDB persistent.
Capacitor provides a native Storage API that sidesteps such eviction issues, but it is designed for simple key-value data. This API falls back to localStorage when not on mobile. Therefore, localStorage works for our web app, Electron, and mobile platforms alike.
Wrapping up
The final workspace layout and npm scripts should match this – clean and minimal:

Here are all platforms running simultaneously:

Excellent work! You have reached the conclusion of the article. Take a moment to appreciate what you have built ☺
Summary
We have explored the rationale behind setting up a monorepo-style workspace with Angular and witnessed how straightforward it is to extend support to non-web platforms. What initially seemed like a daunting workload evolved into a surprisingly pleasant experience.
So far, we have only touched upon the capabilities of the modern web, and consequently, as shown throughout this guide, the reach you can achieve as a developer across a wide array of user devices.
For those just starting in software development, I trust this read has piqued your curiosity and encourages you to explore further. For the seasoned professionals, I equally hope this content has offered fresh perspective and that you might pass along these insights (and this article) to your peers and teams.
Credits
I appreciate you joining me on this exploration, and your feedback and remarks are highly valued. Additionally, I extend my gratitude to my coworkers, whose technical prowess and humility continue to motivate me. To the article's reviewers (Agnieszka, Andrej, Diana, Hartmut, Игорь Кацуба, Max, Nikola, René, Stacy, Torsten, Wiebke) – a heartfelt thank you for your invaluable contributions.
Looking ahead
Consider experimenting with Nx devtools (the ready-to-use tooling for monorepos). There is also NestJS – a backend solution that integrates seamlessly with the existing tech stack, namely Angular with Node.js. Do you recall the tetris2 project placeholder we generated? Feel free to flesh that out with the subsequent tetris iteration, enhancing its visual appeal and playability—perhaps by incorporating native keyboard controls. As the saying goes, the possibilities are virtually endless.
About the author
Richard Sithole serves as a dedicated frontend developer at OPTIMAL SYSTEMS Berlin, where he spearheads the development, upkeep, and enhancement of enaio® webclient, a rich proprietary Enterprise Content Management solution. In a prior role at one of Africa's largest banking institutions, his focus spanned full-stack development, application architecture, software developer recruitment, and mentorship. Reach out and say "hallo" on Twitter @sliqric
Reference material
- Bootstrap and package your project with Angular and Electron – Maxime Gris
- Desktop Apps with Electron and Angular – Jeff Delaney
- Why we’re using a single codebase for GitLab Community and Enterprise editions
- Angular and Electron – More than just a desktop app with Aristeidis Bampakos
- Give Your Angular App Unlimited Powers with Electron – Stephen Fluin
- Capacitor Workflow for iOS and Android Applications – Joshua Morony
The end.