Angular with Vercel
For developers new to Angular, sharing projects with the outside world is often a key goal. The official documentation outlines several deployment methods using services such as Firebase, Github Pages, or Netlify. Each of these services follows its own unique deployment workflow. Over the course of an upcoming series, we will explore several of these options in detail. In this installment, we turn our attention to Vercel.
Understanding Vercel
Vercel provides a robust platform for deploying dynamic web applications. While it is closely associated with Next.js, Vercel is fully capable of handling projects built with a variety of technologies, including Angular. The free Hobby Plan is an excellent choice for fueling your side projects without incurring costs.
Project Setup
To start, we will create a fresh application using the Angular CLI. In place of the standard npm, I will opt for pnpm as the package manager. Pnpm serves as an alternative to npm, offering faster package installations and improved overall performance. This becomes particularly relevant when we consider build times during deployment. The --package-manager={npm|yarn|pnpm|cnpm} flag can be added to the command to specify this preference.
ng new ng-vercel-app --package-manager=pnpmUsing the Vercel CLI
Once the project is ready, there are two primary ways to deploy it on Vercel: we can connect the application to a repository on platforms like GitHub, or we can utilize the Vercel CLI. Linking a remote repository is entirely adequate for standard platform usage. Before that, we'll install the Vercel CLI globally through pnpm.
pnpm i -g vercel
After installation, a quick check confirms that the package is properly set up.
$ vercel --version
> Vercel CLI 28.15.6
With the CLI installed, we can proceed with deployment. From the root directory of the project, we run the vercel command, which initiates the configuration wizard on the platform. First-time users of the CLI will be guided through the login process.
$ vercel
> Vercel CLI 28.15.6
> ? Set up and deploy “~/projects/ng-vercel-app”? [Y/n] y
> ? Which scope do you want to deploy to? dyqmin
> ? Link to existing project? [y/N] n
> ? What’s your project’s name? ng-vercel-app
> ? In which directory is your code located? ./
> Local settings detected in vercel.json:
> Auto-detected Project Settings (Angular):
> - Build Command: ng build
> - Development Command: ng serve --port $PORT
> - Install Command: `yarn install`, `pnpm install`, or `npm install`
> - Output Directory: dist
>   ? Want to modify these settings? [y/N] n
>   ?  Linked to dyqmin/ng-vercel-app (created .vercel and added it to .gitignore)
>   ?  Inspect: https://vercel.com/dyqmin/ng-vercel-app/HJMawZjUPo5NUD4PjVeHLYTttZgY [1s]
>   ✅  Production: https://ng-vercel-app.vercel.app [49s]
>   ?  Deployed to production. Run `vercel --prod` to overwrite later (https://vercel.link/2F).
>   ?  To change the domain or build command, go to https://vercel.com/dyqmin/ng-vercel-app/settings
Vercel quickly identifies our project as an Angular application and starts the configuration using a built-in preset. The output provides us with links to both the production environment and the project dashboard on Vercel.
Initial Deployment Cycle
Let's introduce a small modification to the codebase and observe the deployment process triggered by the vercel deploy command.
$ vercel deploy
> Vercel CLI 28.15.6
> ?  Inspect: https://vercel.com/dyqmin/ng-vercel-app/8PkfJv7MvqKwKuDz5kYi6sCFF6BYw [4s]
> ✅  Preview: https://ng-vercel-app-dyqmin.vercel.app [31s]
> ?  To deploy to production (ng-vercel-app.vercel.app), run `vercel --prod`
For every deployment, Vercel generates a preview environment, allowing us to test changes before they go live. We can review the modifications through this visual preview and then promote them to production, a step the CLI will prompt us to do. The vercel –prod command accomplishes this final push.
Linking a GitHub Repository
In the previous section, we connected a local Angular project to Vercel. It is important to note that Vercel also supports deploying directly from repositories hosted on GitHub, GitLab, or Bitbucket, which is often a more streamlined approach. To set this up, we head to the project we just created in the Vercel dashboard.
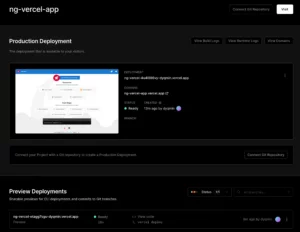
A button at the top navigates us to the project settings, where we can see a list of repositories associated with the connected Vercel account.
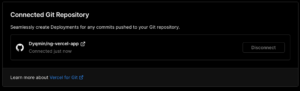
Once linked, any push to the repository will automatically initiate a new deployment of the application.
Observations on the Preview Experience
As demonstrated, deploying an Angular app on Vercel is remarkably straightforward. When we open the preview URL, however, we notice an extra UI panel fixed at the bottom of the page.
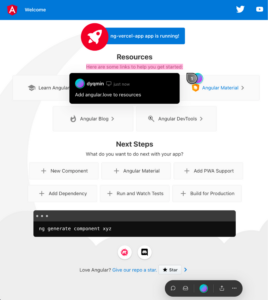
This is a platform-specific overlay that offers several features, including the ability to leave comments anchored to specific parts of the page. It serves as a useful tool for team collaboration on feedback. The panel is entirely interactive—users can tag colleagues, participate in threads, and receive notifications. On the free Hobby plan, it can also function as a simple note-taking tool. If this overlay becomes distracting, it can be hidden or disabled entirely through the settings.
Exploring Integrations
Vercel's ecosystem of integrations connects your projects with various external services and internal tools. Options range from monitoring and analytics to CMS platforms. The catalog is continuously expanding. For our Angular project, we will enable Vercel Analytics as the first integration. While it is currently in Beta and free, this pricing model could change. This feature is activated under the "Analytics" tab in the project's main dashboard. You can choose between Web Vitals or Audiences; we will explore the "Audiences" section. It functions as a simplified version of Google Analytics, offering core statistics like page views, traffic sources, and visitor counts. Simply click the "Enable" button to activate it.

Integrating Analytics into Angular
To begin tracking, we first need to add the official package:
pnpm install @vercel/analyticsThe only remaining step is to initialize the analytics script during our application's bootstrap process. We achieve this by adding the necessary code snippet to the main.ts file.
import { APP_INITIALIZER, isDevMode } from "@angular/core";
import { bootstrapApplication } from "@angular/platform-browser";
import { provideRouter } from "@angular/router";
import { inject } from "@vercel/analytics";

import { AppComponent } from "./app/app.component";
import { routes } from "./app/routes";

bootstrapApplication(AppComponent, {
  providers: [
    provideRouter(routes),
    {
      provide: APP_INITIALIZER,
      useFactory: () => {
        inject({ mode: isDevMode() ? 'development' : 'production' })
      }
    }
  ]
})
  .catch(err => console.error(err));
Once the application is served, the console displays logs prefixed with [Vercel Analytics], providing debug information for events being sent. This debugging mode is automatically active when the NODE_ENV environment variable is set to development or test, though it can be turned off by adding a specific flag to the inject properties:
inject({ debug: false })Moreover, inspecting the document's head reveals that the inject function has successfully appended the Vercel script:
<script src="https://cdn.vercel-insights.com/v1/script.debug.js" defer="" data-sdkn="@vercel/analytics" data-sdkv="0.1.11"></script>
This confirmation indicates that everything is functioning as intended! We can now commit our changes, push them, and wait for the deployment to complete. After testing the production link, we return to the dashboard, where we can verify that analytics data is being collected properly.
Analytics is just one of the fundamental integrations available. We may explore others in the future.
Getting Started with Serverless Functions
Vercel simplifies the creation of serverless functions directly within your project. These functions are automatically mapped and deployed alongside the main application. Let's examine how easy the setup process is.
On the free Hobby plan, you are limited to a maximum of 12 functions. Additionally, each function has an execution time limit of 10 seconds.
To ensure faster response times, we should check the deployment region in the project settings. The default location was set to the US; I will change it to Frankfurt, which is geographically closer to me.
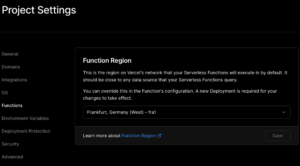
Working with Vercel functions requires installing a couple of packages, which are specifically for TypeScript types.
pnpm install -D @vercel/node @types/nodeCreate an 'api' folder in the project's root directory. Any *.js or *.ts file within this folder is treated as a serverless function. The file's path determines its endpoint. For instance, 'cats.ts' would be mapped to '/api/cats'. Similarly, an 'index.ts' file inside a subfolder, like 'dogs', would map to the '/api/dogs' path.
Creating Our First Endpoint
Let's build a simple endpoint by creating a file named hello.ts. This will be accessible at the /api/hello path.
import { VercelRequest, VercelResponse } from "@vercel/node";

export default function (request: VercelRequest, response: VercelResponse) {
  response.status(200).send({
    message: 'Hello World!',
  });
};
The function receives a request and response object, giving us access to cookies, query parameters, and other properties of the Request interface. This is reminiscent of how one would create an endpoint in a library like express.js. As shown in the code, the response is modified by setting a status of 200 and sending back a JSON object with a 'message' field.
Setting Up TypeScript
To prevent TypeScript compilation errors, we should include a tsconfig.json file within the api folder.
{
  "compilerOptions": {
    "target": "ES2015",
    "module": "CommonJS",
    "moduleResolution": "node",
    "lib": [
      "ES2020",
    ],
    "strict": true,
    "noImplicitAny": true,
    "strictNullChecks": true,
    "strictFunctionTypes": true,
    "strictBindCallApply": true,
    "strictPropertyInitialization": true,
    "noImplicitThis": true,
    "alwaysStrict": true,
    "esModuleInterop": true,
    "types": ["node"]
  },
}
The standard ng serve command is not aware of the api directory and cannot handle our functions on its own. This is where the Vercel CLI's local development server comes in. The vercel dev command effortlessly emulates serverless functions, defaulting to port 3000. You can easily change this to port 4200 using the listen argument.
vercel dev --listen 4200Testing the API Route
After starting the server, we can navigate to localhost:4200/api/hello to verify our endpoint is operational.
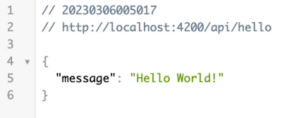
Excellent! With the endpoint working, we can now connect it to the frontend by creating a new Angular service.
import { inject, Injectable } from '@angular/core';
import { HttpClient } from '@angular/common/http';
import { map, Observable } from 'rxjs';

@Injectable()
export class ApiService {
  private readonly _http = inject(HttpClient);

  getMsg(): Observable<string> {
    return this._http.get<{ message: string }>('/api/hello').pipe(
      map((res) => res.message),
    );
  }
}
To put the service into action, I created a new component that triggers the request using an async pipe.
import { Component, inject } from '@angular/core';
import { ApiService } from './api.service';
import { AsyncPipe } from '@angular/common';

@Component({
  selector: 'app-home',
  template: `{{ msg$ | async }}`,
  imports: [AsyncPipe],
  standalone: true,
})
export class HomeComponent {
  private readonly _apiService = inject(ApiService);
  readonly msg$ = this._apiService.getMsg();
}
Now we can see the result in our browser!
Implementing Dynamic Routes
Earlier, the file-to-path mapping was explained, but one particularly useful feature was left out: dynamic paths. Files or folders whose names are enclosed in square brackets are treated as dynamic path segments. This means they will match any string of characters. To illustrate, I will create a [name].ts file that captures an ID from the URL at the designated position:
import { VercelRequest, VercelResponse } from "@vercel/node";

export default function (request: VercelRequest, response: VercelResponse) {
  response.status(200).send({
    message: 'Hello World!',
  });
};
In an express.js application, achieving this outcome would look like this:
app.get('/:name', (req , res) => {
  // implementation
});
It is also possible to create paths with multiple dynamic fragments by nesting them in the file structure. An example directory layout might be:
api/
└── users/
    └── [userId]/
        └── posts/
            └── [postId].ts
As shown above, the dynamic segments are passed along as query parameters.
export default function (request: VercelRequest, response: VercelResponse) {
  const { userId, postId } = request.query;

  if (!userId || !postId) {
    response.status(400).send({
      message: 'Missing parameters',
    });
    return;
  }

  response.status(200).send({
    userId,
    postId,
  });
};
Implementing Caching
To improve the execution time of our functions, we can implement response caching. This is done by setting the Cache-Control header. Vercel suggests using a specific combination of directives to manage the caching mechanism on their infrastructure while preventing the browser from storing the response.
The recommended header value is max-age=0, s-maxage=86400, where 86400 is the number of seconds the response should be cached for.
For our welcome message function, the code would be updated to:
import type { VercelRequest, VercelResponse } from '@vercel/node';

export default function (request: VercelRequest, response: VercelResponse) {
  const { name = 'World' } = request.query;

  response.setHeader('Cache-Control', 'max-age=0, s-maxage=86400');

  response.status(200).send({
    message: `Hello ${name}!`,
  });
};
Working with Environment Variables
Creating API routes might require access to specific environment variables. These can be added both through the dashboard and via the command line:
$ vercel env add FINANCE_API_KEY
> Vercel CLI 28.16.12
> ? What’s the value of FINANCE_API_KEY? XXX
> ? Add FINANCE_API_KEY to which Environments (select multiple)? Production, Preview, Development
> ✅  Added Environment Variable FINANCE_API_KEY to Project ng-vercel-app [749ms]
When setting an environment variable, you can specify which environments it should apply to. This is particularly useful when you have different development, staging, and production services with distinct credentials.
It is important to note that environment variables are not passed when building your Angular application. To use them within the application itself, you would need custom webpack configuration, a topic our colleague Fanis covers excellently in a video on his YT channel: https://www.youtube.com/watch?v=7ljEz52zdUM.
If you've added environment variables through the dashboard, you can pull them down to your local environment using a specific command.
vercel env pullConnecting a Database
Vercel has recently introduced integrations, including its own database service, which simplifies access from API routes. The Postgres service is currently in its Beta phase, so details like pricing or the API are subject to change.
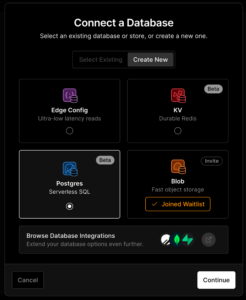
When you add a database to your project, the necessary credentials are automatically injected into the environment variables.
The panel includes a query console, which we can use to create our initial table.
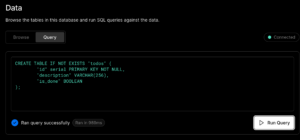
With that, we have our table for managing todos! Now we can connect to the database from within our application.
Writing Database Queries
We'll set up an endpoint in the api/todos.ts file to manage the `todos` table:
import { VercelRequest, VercelResponse } from "@vercel/node";
import { db } from "@vercel/postgres";

export default async function (request: VercelRequest, response: VercelResponse) {
  const client = await db.connect();

  switch (request.method) {
    case 'GET':
      const todosQuery = await client.sql
        `SELECT * FROM todos;`;

      response.status(200).json({
        todos: todosQuery.rows,
      });
      break;
    case 'POST':
      const q = request.body;

      const createTodoQuery = await client.sql
        `INSERT INTO todos (description, is_done) VALUES (${q['description']}, false);`;

      response.status(200).json({
        todos: createTodoQuery.rows,
      });
      break;
    default:
      response.status(405).send({
        message: `Method not supported`,
      });
  }
};
Linking the API to Angular
Our endpoint is complete; now it just needs to be handled from the Angular side.
@Injectable()
export class TodosService {
  private readonly _http = inject(HttpClient);

  getTodos(): Observable<Todo[]> {
    return this._http.get<{ todos: Todo[] }>('/api/todo').pipe(
      map((resp) => resp.todos)
    );
  }

  addTodo(description: string): Observable<void> {
    return this._http.post<void>('/api/todo', {
      description
    });
  }
}
And with that, we've successfully built a full-stack todo application!
Fine-tuning local production previews
Up to this point, we relied on the vercel dev command to power our local server. One might wonder about the default configuration options Angular CLI typically brings, like those found with ng serve. Suppose we want to test the production build locally. Vercel gives us the ability to craft a configuration file where we can customize the commands that execute.
To accomplish this, place a vercel.json file in the project's root directory and insert the relevant line for the setting you wish to adjust. The devCommand key controls how the development server starts. It’s essential to also include the port that the Vercel CLI expects.
{
  "devCommand": "ng serve --configuration production --port $PORT"
}
When you execute vercel dev again, your configuration and modified commands are picked up automatically. Yet, this approach isn’t ideal since switching between different setups demands editing that file repeatedly. A smarter tactic is to rename the file so it escapes automatic detection—say, to vercel.prod.json. Then, we can specify this file during development using the local-config flag.
vercel dev --local-config vercel.prod.jsonWrapping up
For deploying Angular apps, Vercel stands out as a strong option. It brings a rich set of features and integrations, an intuitive dashboard, and fully automated continuous deployment workflows. The complimentary Hobby Plan covers most needs for personal projects.
We’ve merely skimmed the surface of what’s possible. To dive deeper, check out the official docs at https://vercel.com/docs. The sample Angular+Vercel project featured in this guide lives in a GitHub repository at https://github.com/Dyqmin/ng-vercel-app.