A quick recap before we deploy
This tutorial picks up where the earlier parts of the series left off. If you haven’t worked through at least the first guide yet, you’ll want to go back and complete that before jumping into the deployment steps.
[
How to create a Micro Frontend application using React
Simple step by step guide to get a run time React micro frontend up and running
 Geek CultureRichard Bell

](https://medium.com/geekculture/how-to-create-a-micro-frontend-application-using-react-ef88c38b2fe6)
[
How to add Vue (or another framework) to your React Micro Frontend
In my previous post I walked you through how to create a basic hello-world micro frontend application which leveraged the use of webpack and React to integrate components at run time.
 Geek CultureRichard Bell

](https://medium.com/geekculture/how-to-add-vue-or-another-framework-to-your-react-micro-frontend-1d1a7cddc198)
Both articles include a link to the source code in case you’d rather skip straight to the AWS portion of this setup.
Once you’re comfortable with the codebase, we can get it deployed.
What we’re building
For each of our applications, we need to compile the code and push it out to the web. The container app then has to know how to locate those individual apps so it can assemble everything at runtime. Concretely, that means:
- Pushing our code to GitHub
- Adding a production webpack configuration
- Setting up a CI/CD pipeline with GitHub Actions
- Creating an S3 bucket for our build artifacts
- Configuring a CloudFront distribution to serve those files from S3
- Provisioning a user for GitHub to use during deployment
You’ll need an AWS account for this walkthrough. A free tier account works fine — they’ll ask for a credit card, but as long as you stick to the resources in this guide, you shouldn’t see any charges.
Getting the code into GitHub
If you followed along with the earlier tutorials, you’ll want to commit your work and push it to a fresh GitHub repository. I’ll assume you’re comfortable with that process, so let’s move on.
Production webpack configuration
In the earlier guides, each app received a dev and a common configuration file inside its config folder. The common config was meant to hold settings shared between environments. Now that deployment is on the table, it’s time to create the missing production config, starting with the container.
const { merge } = require('webpack-merge')
const ModuleFederationPlugin = require('webpack/lib/container/ModuleFederationPlugin')
const commonConfig = require('./webpack.common')
const packageJson = require('../package.json');

const domain = process.env.PRODUCTION_DOMAIN;

const prodConfig = {
    mode: 'production',
    output: {
        filename: '[name].[contenthash].js',
        publicPath: '/container/latest/'
    },
    plugins: [
        new ModuleFederationPlugin({
            name: 'container',
            remotes: {
                helloReact: `helloReact@${domain}/helloReact/latest/remoteEntry.js`,
                helloVue: `helloVue@${domain}/helloVue/latest/remoteEntry.js`
            },
            shared: packageJson.dependencies
        })
    ]
}

module.exports = merge(commonConfig, prodConfig)
container/config/webpack.prod.js
Much of this mirrors what you saw in the dev config. Let’s look closely at the helloReact remote entry within the ModuleFederationPlugin.
helloReact: helloReact@${domain}/helloReact/latest/remoteEntry.js
The structure is consistent with before: the name, followed by an @ sign, and then the location of the remoteEntry.js file. What changed is the destination — we now expect the file to live on a ${domain}, and that domain comes from the PRODUCTION_DOMAIN environment variable defined on line 6. We’ll wire that variable up in the CI/CD pipeline shortly.
The mode has also been flipped to production, which tells webpack to apply various optimizations during compilation.
The output section is another new addition. The filename pattern tells webpack how to name each compiled output — it will be the original file name combined with a hash of its contents. This is mainly a caching strategy, which we’ll come back to, but in short it ensures browsers fetch the newest version of our code rather than a stale cached copy. The publicPath will prefix the filename anytime it’s referenced within the app. Since our S3 bucket will hold multiple child applications, it’s essential we specify the container’s path here.
Once the config file is done, we need to add a build script to package.json so we can actually run the compilation.
Once we’re done with the config file, we need to add a new script to package.json to allow us to actually build it.
"scripts": {
    "start": "webpack serve --config=config/webpack.dev.js",
    "build": "webpack --config=config/webpack.prod.js"
},
container/package.json scripts section
A quick sanity check: from the container directory in your terminal, run npm run build. It should complete without errors and produce a dist folder filled with minified assets. If something goes wrong, check for typos, or take a look at my repo to compare against the state of the code at this stage.
Next up, the config for the helloReact child app:
const { merge } = require('webpack-merge')
const ModuleFederationPlugin = require('webpack/lib/container/ModuleFederationPlugin')
const commonConfig = require('./webpack.common')
const packageJson = require('../package.json');

const domain = process.env.PRODUCTION_DOMAIN;

const prodConfig = {
    mode: 'production',
    output: {
        filename: '[name].[contenthash].js',
        publicPath: '/helloReact/latest/'
    },
    plugins: [
        new ModuleFederationPlugin({
            name: 'helloReact',
            filename: 'remoteEntry.js',
            exposes: {
                './HelloReactApp': './src/bootstrap'
            },
            shared: packageJson.dependencies
        })
    ]
}

module.exports = merge(commonConfig, prodConfig)
Notice that the ModuleFederationPlugin here is identical to what you had in the dev build. You could pull that into the common config if you prefer, but leaving it in place makes the diff between environments easier to follow in this tutorial.
We added the same filename and publicPath entries as in the container’s prod config. Just like before, you’ll want to drop a build script into package.json and verify it runs:
"build": "webpack --config=config/webpack.prod.js"
Finally, do the same for helloVue. Copy the helloReact/config/webpack.prod.js file, then swap every reference to helloReact for helloVue. Add the build script and run it to confirm there are no problems.
If you ran into trouble, check my code at this point here.
Setting up the CI/CD pipeline
The idea is simple: whenever code gets merged to master, the pipeline automatically ships it to production. GitHub Actions is our tool of choice for this.
Inside your project’s root, create a directory called .github/workflows and add a file named container.yml:
name: deploy-container

on:
  push:
      branches:
        - master
      paths:
        - 'packages/container/**'

defaults:
  run:
    working-directory: packages/container

jobs:
  build:
    runs-on: ubuntu-latest

    steps:
      - uses: actions/checkout@v2
      - run: npm install
      - run: npm run build
        env:
          PRODUCTION_DOMAIN: ${{ secrets.PRODUCTION_DOMAIN }}

      - uses: ItsKarma/aws-cli@v1.70.0
        with:
          args: s3 sync packages/container/dist s3://${{ secrets.AWS_S3_BUCKET_NAME }}/container/latest
        env:
          AWS_ACCESS_KEY_ID: ${{ secrets.AWS_ACCESS_KEY_ID }}
          AWS_SECRET_ACCESS_KEY: ${{ secrets.AWS_SECRET_ACCESS_KEY }}

      - uses: ItsKarma/aws-cli@v1.70.0
        with:
          args: cloudfront create-invalidation --distribution-id ${{ secrets.AWS_DISTRIBUTION_ID }} --paths "/container/latest/index/"
        env:
          AWS_ACCESS_KEY_ID: ${{ secrets.AWS_ACCESS_KEY_ID }}
          AWS_SECRET_ACCESS_KEY: ${{ secrets.AWS_SECRET_ACCESS_KEY }}
At first glance it looks like a lot, but breaking it down line by line makes it clear. We start by giving the workflow a name — this shows up on the Actions tab.
Next we declare that this workflow triggers whenever master is pushed and files under packages/container/ have changed. If you’ve set up separate repos for each application, your configuration may differ.
We then set the default working directory to packages/container, so every command that follows runs from within that folder.
The build and deploy logic comes next. We specify the runner image (ubuntu latest), check out the code, install dependencies, and run npm run build to compile.
This is also where the PRODUCTION_DOMAIN environment variable, referenced earlier in the webpack config, gets defined. To avoid committing secrets to a public repository, we’re pulling them from GitHub secrets.
From there, we leverage the ItsKarma/aws-cli Docker image to upload the compiled files to S3 and then trigger a CloudFront invalidation.
The S3 upload is straightforward: point it at your dist folder and sync it to the bucket.
The CloudFront invalidation step clears the cache so the new build is served immediately. These two steps should become clearer as we configure the AWS resources.
Before diving into AWS, let’s verify the pipeline works from GitHub’s side. It will fail — we haven’t supplied any AWS credentials yet — but we can at least confirm dependencies install and the build completes. To trigger it, make a small edit in packages/container, commit, and push. A simple change like updating the name field in container/package.json to container works well.
After the push, the Actions tab will show the workflow running:
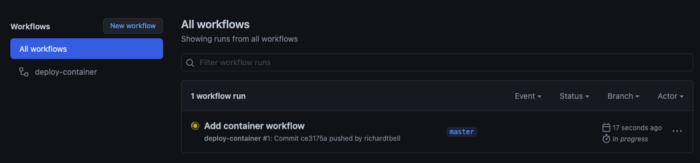
deploy-container Workflow running
It won’t take long to fail:
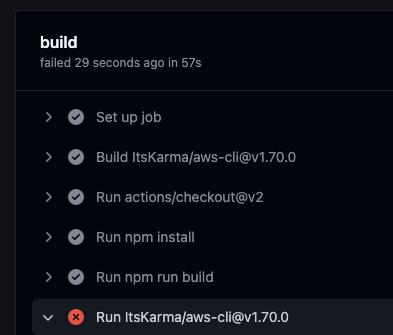
Failed on first AWS command
That’s progress — dependencies installed and the build succeeded. Now let’s get AWS ready.
Creating the S3 Bucket
If you haven’t set up your AWS account yet, do that now. Once you’re in, search for S3 and you should find a “Create bucket” button. Click it, and you’ll land on a page like this:
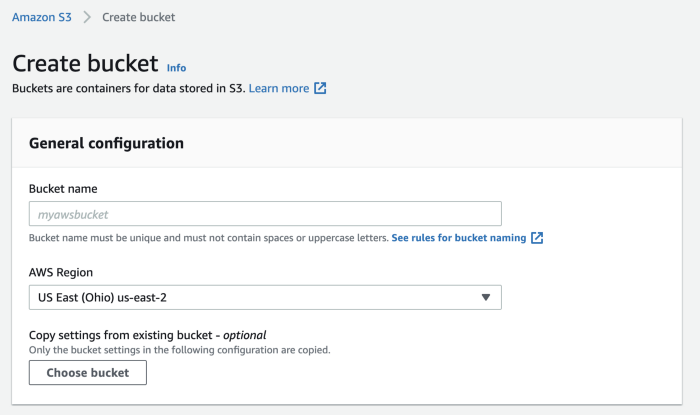
AWS S3 create bucket page
Pick a unique name for your bucket. The default AWS Region is fine — just make a note of the region code on the right, since we’ll need it shortly (mine is us-east-2). Leave the other settings as they are and hit “Create bucket”.
Your new bucket will appear in a table with “Bucket and objects not public” listed under access. That’s the default for new S3 buckets, but for our use case we explicitly need the contents to be public.
Click the bucket name and go to the “Properties tab”. Scroll to “Static website hosting” and hit edit.
Switch the setting to “Enable” and enter index.html as the index document. Everything else stays blank.

Screenshot of settings to change
Keep scrolling and click “Save changes”.
Now head over to the “Permissions” tab and find “Block public access (bucket settings)”. Uncheck that box and save.

Screenshot of Block public access bucket settings
A warning will pop up letting you know that objects in the bucket will become publicly accessible — which is precisely what we want.
We now have an S3 bucket that can store production files. CloudFront will serve them, but first we need a bucket policy that officially grants CloudFront the right to interact with our bucket.
Setting up a Bucket Policy
On the same page where we adjusted “Block public access (bucket settings)”, look for the “Bucket policy” section and click edit.
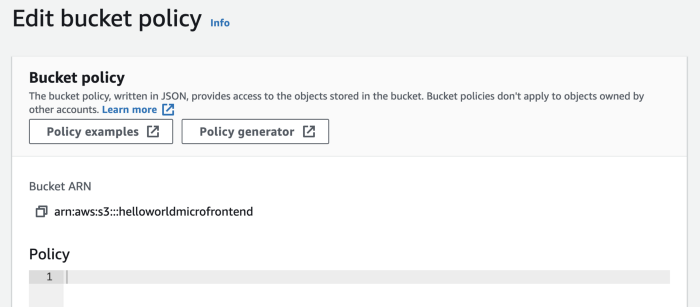
Screenshot of Edit bucket policy page
Copy your Bucket ARN first (the value will differ based on the bucket name you chose). Then click the “Policy generator” button.
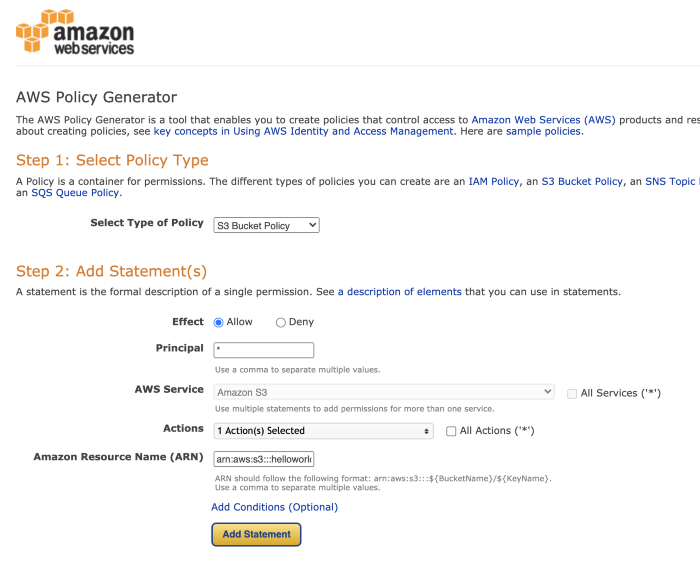
Values to add for the statement
Pick “S3 Bucket Policy” as the type. In Principal, enter an asterisk. For Actions, scroll and select “GetObject”. Paste your ARN into the field and append a /*. In my case that looks like arn:aws:s3:::helloworldmicrofrontend/*
Click “Generate policy”, then copy everything inside the box that appears (you can see the highlighted text in the screenshot below).
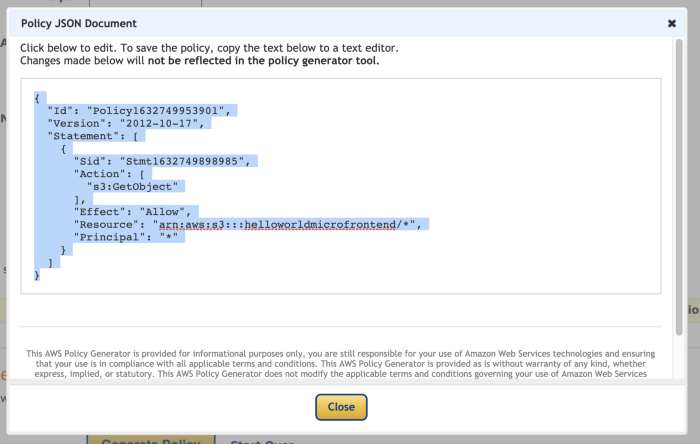
Generated Policy
Back on the “Edit bucket policy” page, paste that code into the Policy text area.
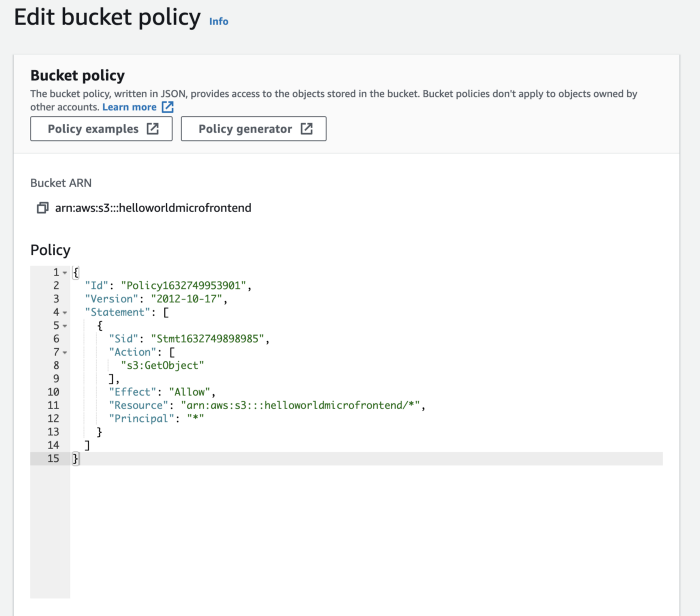
Policy pasted into “Edit bucket policy” page
Save the policy, and the bucket setup is done. Next up: creating a CloudFront distribution.
Setting Up CloudFront Distribution
Open a fresh browser tab, navigate to AWS, and look up “CloudFront”. When you land on the service page, hit the “Create distribution” button. The interface may seem overwhelming at first, but rest assured — only a handful of adjustments are needed.
Start by selecting the “Origin domain” — click the input field and pick the S3 bucket you created earlier. Leave everything else in this area untouched. Scroll down to the section labeled “Default cache behaviour” and locate “Viewer protocol policy”. Switch it to “Redirect HTTP to HTTPS”.
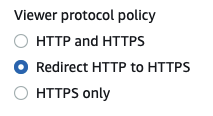
Adjusting the viewer protocol policy
From there, jump straight to the bottom of the page and click “Create distribution”. Once it finishes deploying, a couple more tweaks are required. You should land on a page resembling the screenshot provided; if not, simply click the distribution name to get there.
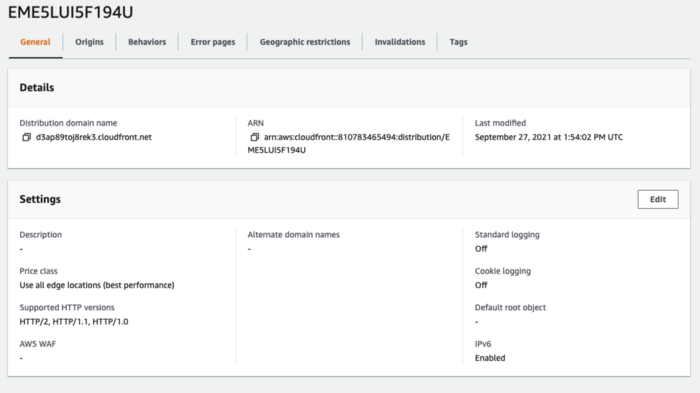
CloudFront distribution overview
Hit the “Edit” button. Look for the “Default root object” field and type in /container/latest/index.html before saving your changes.
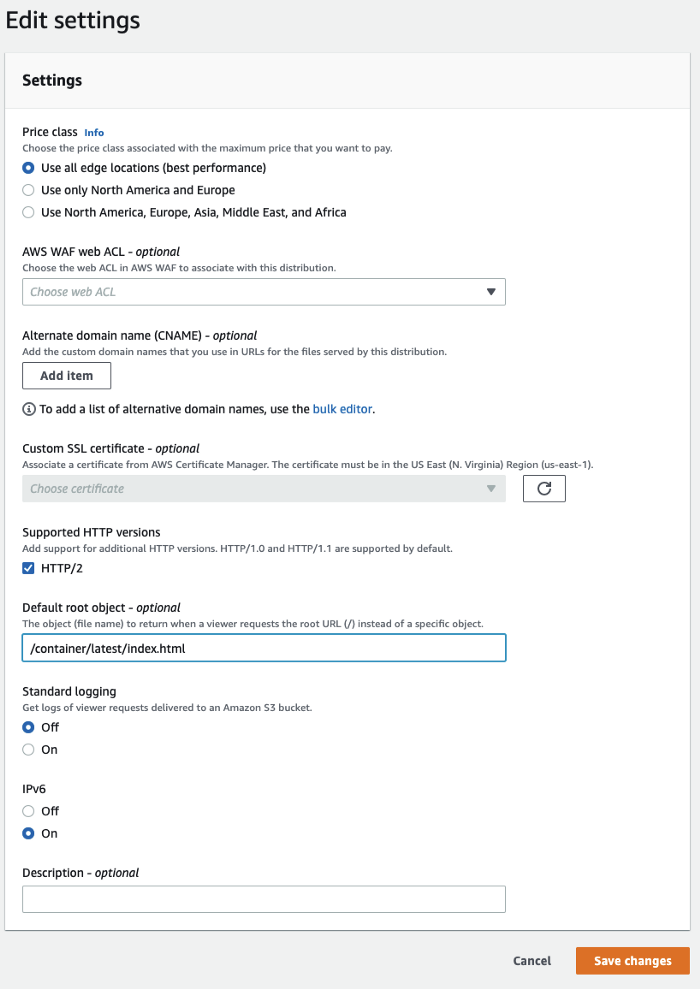
Configuration options
Now switch over to the “Error pages” tab and press “Create custom error response”. From the first dropdown, pick 403: Forbidden. Then enable the customised error response option, enter the exact same path as before — /container/latest/index.html — and set the response code to 200: OK.
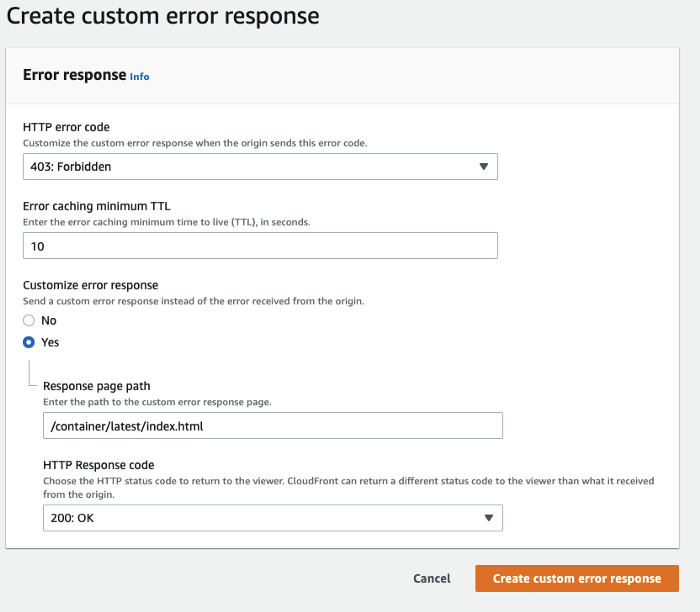
That covers nearly everything for the AWS side. One remaining task is to store your AWS credentials in GitHub secrets so your workflow file can access them. Remember, we have AWS_ACCESS_KEY_ID and AWS_SECRET_ACCESS_KEY — these function like a username and password combo for reaching your AWS account. To obtain them, we'll create a dedicated user for GitHub to use.
Creating a GitHub User in AWS
Open yet another AWS tab and look for IAM. On the left-hand side, click “Users” and then select “Add user”.
Pick a name that makes sense to you and tick the box for “Programmatic access”.
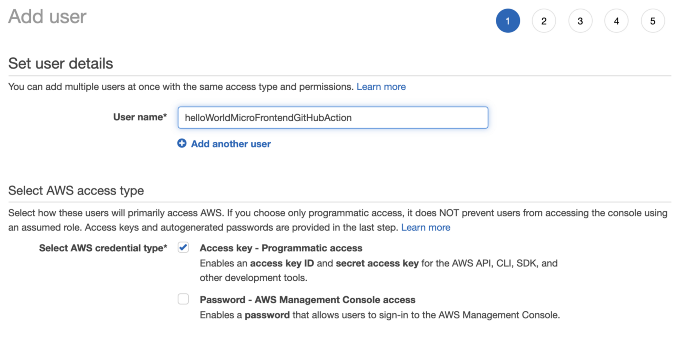
Entering user information
After clicking “Next”, you'll arrive at the permissions page. Ideally, you'd spend time figuring out the most restrictive policies for your use case. For the sake of speed here, I'm granting broad permissions since I'll remove this user after wrapping up the tutorial.
Choose “Attach existing policies directly” and mark “AmazonS3FullAccess”.
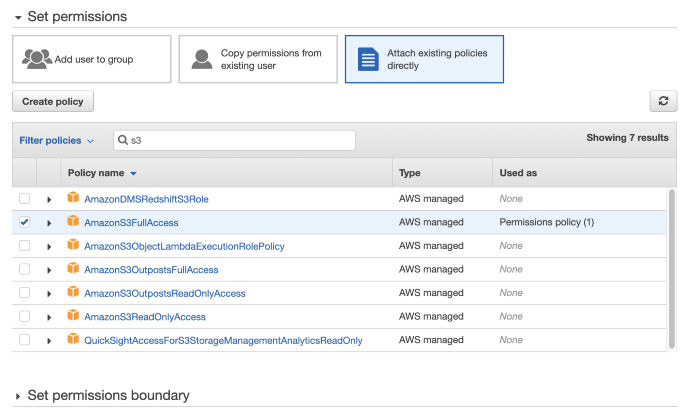
Choosing S3 access policy
Now search for CloudFront and tick “CloudFrontFullAccess”.
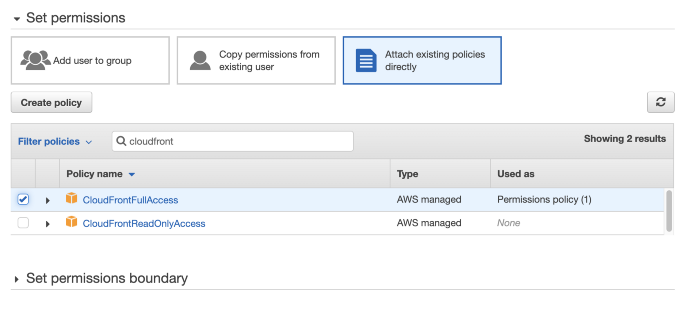
Choosing CloudFront access policy
Keep clicking “Next” until you reach “Create user”. Once created, the screen will display the credentials we need. Keep this tab open — those values appear only this one time.
Storing Secrets in GitHub
Open GitHub in another tab and go to the repository you've been using. Head to “Settings”, then locate “Secrets” in the sidebar.
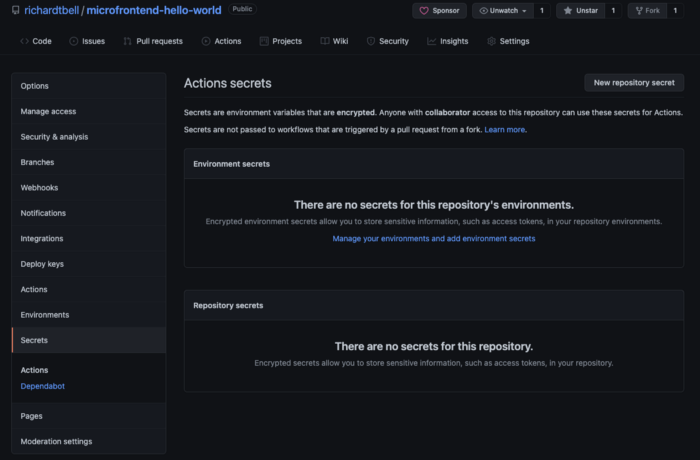
Repository secrets page
Press “New repository secret” to add our Access Key ID.
Give it a name that matches what we defined in our workflow file, AWS_ACCESS_KEY_ID, and copy the value from that other tab you've kept open.
Do the same for AWS_SECRET_ACCESS_KEY.
There are two more secrets worth adding now:
AWS_S3_BUCKET_NAME— the unique identifier you assigned to your S3 bucket. If it slipped your mind, check the S3 service for the list of buckets.AWS_DISTRIBUTION_ID— head over to CloudFront and look at the ID, which appears as the first item in each row.
With those secrets in place, the GitHub workflow should now run successfully. Go to GitHub, locate the previously failed action, and you'll find a “Re-run job” button.
Deploying Child Applications
With the container deployed, you can check it in production. Over in CloudFront, alongside where you grabbed the AWS_DISTRIBUTION_ID, there's also a “Distribution domain name”. Visiting that URL now will show a blank screen plus some console errors — that's expected for the moment.
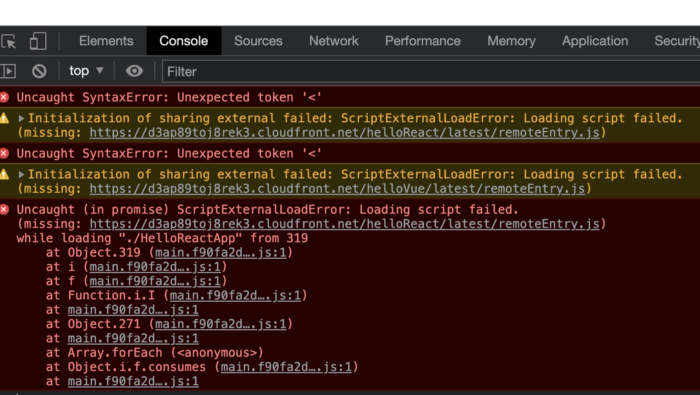
Console errors from the production container
The errors come from the container fetching for helloReact and helloVue, which haven't been deployed yet.
Building the workflows is straightforward: duplicate the container.yml workflow file, then replace every instance of “container” with “helloReact” and “helloVue”. You'll end up with two separate files.
name: deploy-helloReact

on:
  push:
      branches:
        - master
      paths:
        - 'packages/helloReact/**'

defaults:
  run:
    working-directory: packages/helloReact

jobs:
  build:
    runs-on: ubuntu-latest

    steps:
      - uses: actions/checkout@v2
      - run: npm install
      - run: npm run build
        env:
          PRODUCTION_DOMAIN: ${{ secrets.PRODUCTION_DOMAIN }}

      - uses: ItsKarma/aws-cli@v1.70.0
        with:
          args: s3 sync packages/helloReact/dist s3://${{ secrets.AWS_S3_BUCKET_NAME }}/helloReact/latest
        env:
          AWS_ACCESS_KEY_ID: ${{ secrets.AWS_ACCESS_KEY_ID }}
          AWS_SECRET_ACCESS_KEY: ${{ secrets.AWS_SECRET_ACCESS_KEY }}

      - uses: ItsKarma/aws-cli@v1.70.0
        with:
          args: cloudfront create-invalidation --distribution-id ${{ secrets.AWS_DISTRIBUTION_ID }} --paths "/helloReact/latest/index/"
        env:
          AWS_ACCESS_KEY_ID: ${{ secrets.AWS_ACCESS_KEY_ID }}
          AWS_SECRET_ACCESS_KEY: ${{ secrets.AWS_SECRET_ACCESS_KEY }}
name: deploy-helloVue

on:
  push:
      branches:
        - master
      paths:
        - 'packages/helloVue/**'

defaults:
  run:
    working-directory: packages/helloVue

jobs:
  build:
    runs-on: ubuntu-latest

    steps:
      - uses: actions/checkout@v2
      - run: npm install
      - run: npm run build
        env:
          PRODUCTION_DOMAIN: ${{ secrets.PRODUCTION_DOMAIN }}

      - uses: ItsKarma/aws-cli@v1.70.0
        with:
          args: s3 sync packages/helloVue/dist s3://${{ secrets.AWS_S3_BUCKET_NAME }}/helloVue/latest
        env:
          AWS_ACCESS_KEY_ID: ${{ secrets.AWS_ACCESS_KEY_ID }}
          AWS_SECRET_ACCESS_KEY: ${{ secrets.AWS_SECRET_ACCESS_KEY }}

      - uses: ItsKarma/aws-cli@v1.70.0
        with:
          args: cloudfront create-invalidation --distribution-id ${{ secrets.AWS_DISTRIBUTION_ID }} --paths "/helloVue/latest/index/"
        env:
          AWS_ACCESS_KEY_ID: ${{ secrets.AWS_ACCESS_KEY_ID }}
          AWS_SECRET_ACCESS_KEY: ${{ secrets.AWS_SECRET_ACCESS_KEY }}
.github/workflows/
After that, tweak each package so the workflow gets triggered — same trick we used for the container. Adjusting the package.json name should be all it takes.
Once the workflows complete, refresh your production URL and everything should work. If problems pop up, the finished code lives on GitHub.