Getting Started
Angular does an excellent job of helping you organize your codebase into distinct contexts. However, as your project expands, the time the CLI needs to build or serve your application grows considerably. At the same time, keeping those contexts free from unintended dependencies becomes increasingly challenging.
Nx takes your codebase to the next level. It provides the tools you need to modularize your project and enforce architectural boundaries, which supports maintainability and scalability. Nx also offers a visual representation of your modules through a project graph, and it leverages that information to enhance your developer experience. In addition, it can cut down on the time you spend on repetitive tasks.
Understanding Nx
If you visit the nx.dev site, you’ll see it described as a “Smart, Fast, Extensible Build System.” At its heart, Nx is a robust CLI that comes with utilities aimed at boosting developer productivity. This includes things like task execution, speeding up CI, and code scaffolding.
Nx originally started as a way to enhance the Angular CLI. Today, it works across many frameworks and is not tied to any single one. You can use it with Angular, React, WebComponents, and Node applications, all of which have official support from the Nx team. Beyond that, Nx is extensible, meaning it can handle other technologies such as C#, Java, or Kotlin as well.
There are official plugins and packages maintained by the core team, as well as community packages. And if you have specific needs, you can build your own plugin from scratch or customize an existing one.
Before moving ahead, it’s worth clarifying what Nx aims to accomplish in your repository. Nx is designed to improve the developer experience by:
- minimizing wasted time during CI and in your daily workflow
- offering automated upgrades so your tooling stays current
- eliminating the tedious and boring parts of development
- letting the team spend its energy on delivering business value
Setting Up a Project with Nx
Let’s get started with Nx. To create a new project, you run a single command:
`> npm create nx-workspace`
You can use npm, yarn, or pnpm. Whichever you prefer, the details are available on the official website.
After you run the command and hit Enter, the script will prompt you for a few pieces of information:
- Where would you like to create your workspace? wp.angular.love
This name serves two purposes. It becomes the folder name for your repository, and it’s also used as the npm scope for your packages. - Which stack do you want to use? None
Nx offers a few options here: None, Angular, React, or Node. Choosing None gives you a completely empty project where you configure and install plugins yourself. The other options come pre-configured for their respective technology. - Package-based or integrated? Integrated
Technically, Nx projects fall into a couple of categories:
– monorepos (either package-based or integrated)
– standalone (single-project workspaces, similar to what the Angular CLI produces; these are not monorepos) - Enable distributed caching to make your CI faster Yes
We’ll discuss caching in more detail later, but this option helps speed up things like building and testing, saving time for both developers and CI pipelines.
Once that’s done, here’s what the result looks like:
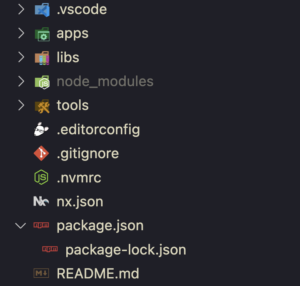
As you can see, the project structure is straightforward, with three main folders:
- apps: this is where all the applications in your Monorepo live.
- libs: this folder holds all the libraries for your Monorepo. It’s a key part of the setup because it encourages splitting your code into small, focused packages that handle specific concerns or utilities.
- tools: this folder is for custom scripts that automate your workflows.
Before moving forward, you need to configure the repository so it can handle Angular projects. To do that, you’ll install your first plugin. Head back to the terminal and type:
`> npm i -D @nx/angular`
This adds the @nx/angular library to your dev dependencies, and now you’re ready to create your first Angular application with Nx.
You can find the code here.
Creating Your First Application
Now let’s build your first Angular application with Nx. As mentioned, Nx is a CLI, so you can do this with a command:
`> npx nx generate @nx/angular:application –prefix=ngl`
This command is interactive, so you’ll be asked a few questions to tailor the setup to your needs:
- What name would you like to use for the application? E-commerce
- Which stylesheet format would you like to use? scss
- Would you like to configure routing for this application? yes
- Would you like to use Standalone Components? Yes
These questions should be pretty self-explanatory if you’re familiar with Angular, so I won’t dwell on them.
If you’ve never used Nx before, the result might look a bit surprising. You’ll now see two new projects in the apps folder: e-commerce and e-commerce-e2e. The first is your Angular application, ready for the features you want to build. The second is a Cypress project meant for end-to-end testing of your e-commerce app. I won’t get into the details of Cypress e2e testing here, but if you’re curious, there’s plenty of material on the Cypress website or the Nx website.
Alright, let’s take a closer look at your new Angular application.
First things first, you can run it with a simple command:
`> npx nx serve e-commerce`
Once it’s running, open your browser and go to http://localhost:4200/. You should see this:
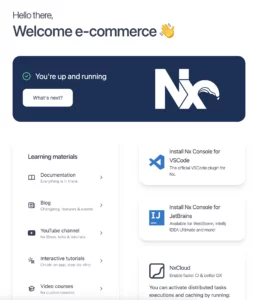
That’s the default page Nx sets up for you.
Now, let’s get your application ready for the features you’re planning to add.
Navigate to apps/e-commerce/src/app and delete the files nx-welcome.component.ts, app.component.html, app.component.scss, and app.component.spec.ts.
Next, edit app.component.ts to remove the NxWelcome component.
Here’s what you should have after those changes:
import { Component } from '@angular/core';
import { RouterModule } from '@angular/router';


@Component({
standalone: true,
imports: [RouterModule],
selector: 'ngl-root',
template: `<router-outlet></router-outlet>`,
})
export class AppComponent {}
Your application is now a blank slate, ready for whatever you want to build.
If you’re already comfortable with Angular, there’s nothing new here. It’s essentially a standard Angular app using standalone components.
When working with Nx, it’s helpful to think of your applications as the orchestrators. They’re responsible for tying together all the libraries you create. You shouldn’t put business logic directly inside the applications themselves.
Instead, applications should focus on wiring up your libraries, and those libraries are where your business rules belong. I know these concepts can feel a bit abstract right now, but by the end of this article, you’ll see how these two principles — and Nx itself — make a real difference.
With that in mind, let’s move on. We’ll look at libraries and create your first one.
Code available here
Setting Up Your First Library
To scaffold a library, you'll need to execute another command:
> npx nx generate @nx/angular:library pages –buildable –directory=libs/home –inlineStyle –inlineTemplate –prefix=ngl –standalone
This command looks intimidating at first glance. I'll demonstrate how to streamline this process using the Nx Console extension shortly, but first, let's break down what each part accomplishes.
The npx nx segment invokes the Nx CLI. The word generate tells Nx you want to scaffold something. In this instance, the @nx/angular:library syntax specifies that you're creating a library from the @nx/angular module. The name of your library is pages. Most of the other flags are self-explanatory: directory specifies where the library lives in the repository, inlineStyle and inlineTemplate embed the CSS and HTML directly within the TypeScript file rather than keeping them separate, and prefix sets the selector prefix for your Angular components. Finally, standalone generates a library using standalone components.
Let's focus on the buildable flag for a moment.
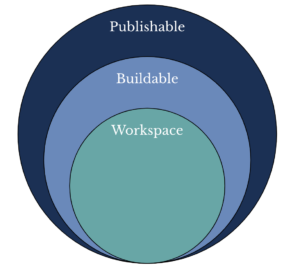
Nx distinguishes between three library categories: Workspace, Buildable, and Publishable.
Workspace libraries have no associated build script. You can lint or test them, but they don't generate a distributable artifact.
Buildable libraries resemble workspace ones, but they include a build command. This allows you to compile the library and produce an artifact. I'll discuss the performance advantages this brings to your development and CI processes later, but know that artifact creation is key to why Nx can speed up your builds.
Publishable libraries take buildable libraries one step further by adding a publish command. This enables you to push your library to an npm registry, whether that's npm, GitHub, or any other package repository.
Here's a visual comparison of the three types:
With that overview out of the way, let's inspect what the command actually generated.
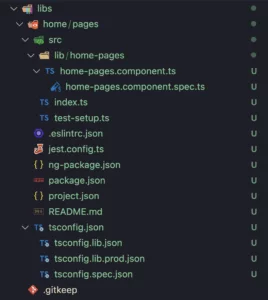
You'll notice a new home/pages subfolder within the libs directory. The code inside is straightforward, so I won't go into detail. However, the project.json file deserves some attention.
For Nx, project.json plays a role similar to what angular.json does for the Angular CLI. It defines the commands available to the library and their respective configurations. These commands live under the targets node; it's useful to remember that in Nx terminology, commands are called "targets." You can learn more here.
Now, let's see this in action. Open apps/e-commerce/src/app/app.routes.ts and add a new route. The updated file should resemble this:
export const appRoutes: Route[] = [
  {
    path: '',
    pathMatch: 'full',
    loadComponent() {
       return import('@wp.angular.love/home/pages').then(
         (c) => c.HomePagesComponent
       );
    },
  },
];
Next, run the serve command:
> npx nx serve e-commerce
Your browser should display the new component with the text "home-pages works!".
Let's add another library, this time for products, so you have a more substantial project structure:
> npx nx generate @nx/angular:library pages –buildable –directory=libs/products –inlineStyle –inlineTemplate –prefix=ngl –standalone
Now we need to connect this library to the app.
apps/e-commerce/src/app/app.routes.ts
import { Route } from '@angular/router';


export const appRoutes: Route[] = [
  {
    path: 'products',
    loadComponent() {
      return import('@wp.angular.love/products/pages').then(
        (c) => c.ProductsPagesComponent
      );
    },
  },
  …
];
Restart the application. When you navigate to the /product path, you should see the product page.
At this point, you have a functional e-commerce application at your disposal.
Before wrapping up this section on libraries, there's one more crucial concept about Nx libraries. To achieve true scalability, you should break your codebase into distinct library types. For frontend applications, these typically fall into Feature, UI, Data-access, and Utility libraries. How you partition your code is a matter of business judgment. There's no single "right" way — there are established patterns you can follow, and you'll develop your own over time through trial and error. Iterating to find the best architecture for each project is a standard practice, as every project has its own constraints. Nx provides some guidance on this topic in the official documentation.
A question I've been asked is how to split an application from the bottom up, starting from code rather than business contexts. I've thought about this extensively. In my view, understanding your bounded contexts is essential before any code splitting can be meaningful; otherwise, you risk building a codebase that doesn't reflect your business value. Another risk is creating unnecessary coupling between different parts of the code. The business should dictate the structure of your code, not the other way around. A good codebase brings value to the company, and that means its architecture should mirror the business logic. Given this, I find a bottom-up approach nearly impossible to execute effectively. I could be proven wrong someday, but right now, I don't see a viable path. If your code is truly chaotic, considering Conway's law might be a valuable exercise — perhaps improving communication would help more than refactoring code.
Code available here
Using Tags to Control Dependencies
Now that you can create apps and libraries, you might find it easy to create improper internal dependencies.
There are two ways to address this. You can rely on your team to be careful, which is simple but often leads to problems by the time they're noticed. The recommended approach is to leverage Nx tags in conjunction with ESLint.
Tags are labels the team defines to categorize libraries and applications by their technical role and their business context.
Let's first define these tags and then look at an example.
For technical tags, Nx recommends using the concepts we discussed earlier: feature, UI, data-access, and utility. It's suggested to prefix these tags with type:, yielding tags like type:feature, type:ui, type:data-access, and type:utility. There are also two additional tags, type:app and type:e2e, to categorize your applications and e2e test apps.
The second set of tags describes the business domain. These use a scope: prefix followed by the business area, for instance, scope:home, scope:products, or scope:shared. The team is responsible for identifying all the different business scopes in their projects.
You can dive deeper into tagging here.
Now, let's turn this into tangible enforcement. First, open the root-level .eslintrc.json. This file contains linting rules for your repository. By default, Nx allows any dependency between modules. You can see this in the context of the file, which contains the following snippet:
"rules": {
  "@nx/enforce-module-boundaries": [
    "error",
    {
       "enforceBuildableLibDependency": true,
       "allow": [],
       "depConstraints": [
         {
           "sourceTag": "*",
           "onlyDependOnLibsWithTags": ["*"]
         }
       ]
    }
  ]
}
To set up dependency constraints, you modify the depConstraints array and add your rules.
Here's what I used for the application in this article:
"rules": {
  "@nx/enforce-module-boundaries": [
    "error",
    {
      "enforceBuildableLibDependency": true,
      "allow": [],
      "depConstraints": [
        {
          "sourceTag": "type:e2e",
          "onlyDependOnLibsWithTags": ["type:app"]
        },
        {
          "sourceTag": "type:app",
          "onlyDependOnLibsWithTags": ["type:feature", "type:util"]
        },
        {
          "sourceTag": "type:feature",
          "onlyDependOnLibsWithTags": [
            "type:data-access",
            "type:ui",
            "type:util"
          ]
        },
          {
            "sourceTag": "type:ui",
            "onlyDependOnLibsWithTags": ["type:ui", "type:util"]
          },
          {
            "sourceTag": "type:data-access",
            "onlyDependOnLibsWithTags": ["type:api", "type:util"]
          },
          {
            "sourceTag": "scope:shared",
            "onlyDependOnLibsWithTags": ["scope:shared"]
          },
          {
            "sourceTag": "scope:home",
            "onlyDependOnLibsWithTags": ["scope:shared", "scope:home"]
          },
          {
            "sourceTag": "scope:products",
            "onlyDependOnLibsWithTags": ["scope:shared", "scope:products"]
          }
        ]
      }
    ]
  }
},
The technical part of this configuration is portable across projects. The scope-based rules, however, need to be redefined in each project to reflect its specific business areas.
With constraints defined, the next step is to tag your libraries and apps. You can do this either in the package.json or the project.json file of each module.
For this article, I've added tags to the project.json files; for instance:
{
  "name": "products-pages",
  "$schema": "../../../node_modules/nx/schemas/project-schema.json",
  "sourceRoot": "libs/products/pages/src",
  "prefix": "ngl",
  "tags": [
    "type:feature",
    "scope:products"
  ],
…
}
The rest of the configuration is available here.
To demonstrate a real-world scenario, let's add another library:
> npx nx generate @nx/angular:library ui –buildable –directory=products –inlineStyle –inlineTemplate –prefix=ngl –standalone –style=scss –tags=type:ui,scope:products
This creates a UI library for the products domain.
If you attempt to use a component from this new UI library within home/pages, you'll see a problem arise.
libs/home/pages/src/lib/home-pages/home-pages.component.ts
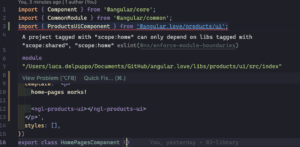
With VS Code and the ESLint extension installed, you'll see an error in the editor. The message will state that a project with "scope:home" can only depend on libraries tagged as "scope:shared" or "scope:home".
If you prefer not to use the extension, you can run this command:
> npx nx run-many –target=lint
You'll get the same result:

As you might expect, this upfront configuration prevents even accidental violations in your dependency graph.
When you remove the ProductsUiComponent from the home component and move it to the products page component, the error goes away, and everything works as expected.
Code available here.
Faster Commands Thanks to Caching
By now you've likely noticed that Nx ships with a broad set of commands. It's natural to worry that running all of them will slow down your workflow, leaving you staring at your terminal for long stretches.
That's where one of Nx's standout features comes in. The tool caches the output of your commands and reuses that cached result later. This cuts down on wait time and makes your day-to-day developer experience noticeably smoother.
Take a look at the nx.json file in your project root — there's a revealing property there that explains the behavior.
"cacheableOperations": ["build", "lint", "test", "e2e"],That property is what tells Nx which targets should be cached.
To see how this works in practice, run this:
> npx nx run-many –target=build –skip-nx-cache
or the shorter variant:
> npx nx run-many -t build –skip-nx-cache
You'll probably wait a few seconds for this to finish, because the cache is being bypassed entirely.
Now run the same command without the flag:
> npx nx run-many –target=build
This time it should complete in milliseconds. If it doesn't on the first try, run it again — you'll see a dramatic speedup. The same applies to test, lint, and e2e targets.
What determines whether Nx can reuse cached artifacts? It's based on several inputs: the versions of your dependencies in package.json, the file hashes, and other metadata. If you edit a file and rerun the command, Nx will only rerun the tasks for the code that was actually affected by your change.
Say I modify the text inside libs/home/pages/src/lib/home-pages/home-pages.component.ts and then trigger the build:
> npx nx run-many –target=build
Here's what the output will look like:
✔ nx run products-ui:build:production [existing outputs match the cache, left as is]
✔ nx run products-pages:build:production [existing outputs match the cache, left as is]
✔ nx run home-pages:build:production (1s)
✔ nx run e-commerce:build:production (2s)
Notice that only home-pages and e-commerce were rebuilt. The product modules weren't touched by the change, so Nx reuses their existing artifacts. That kind of efficiency is a real boost for both local development and CI.
Speaking of CI — Nx also offers a product called Nx Cloud that lets you share cached artifacts across machines. If someone on your team has already built a certain version, your CI can simply pull those artifacts and skip the heavy lifting. Nx Cloud isn't free, but you can look at the details here. For open-source or personal projects, you can use it at no cost.
Nx Console for a Smoother DX in VsCode and WebStorm
Given all the commands we've covered, it's easy to feel overwhelmed. The Nx team anticipated that. They've built two polished extensions — one for VsCode and one for WebStorm — both named Nx Console. These give you a clean UI over the CLI, so you can run builds, tests, and linting, generate new apps or libraries, execute commands for a single project, and handle other everyday utilities without touching the terminal.
Here's a look at what the VsCode version offers:
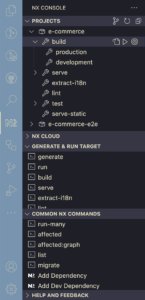
What you'll see are a few distinct areas: projects, generate & run target, Nx Cloud, and common Nx commands. With this interface, you no longer have to memorize every CLI flag. You just pick what you want to do, and the extension either runs it straight away or opens a tab for you to fill in the parameters. It's a practical, guided approach that makes a real difference in daily work — you focus on the what, not the how.
Visualize Your Workspace with Project Graph
Before wrapping up, there's one more Nx capability worth mentioning.
For me, Project Graph is the standout tool in the Nx ecosystem. The idea is simple but powerful: when you build a workspace out of many small libraries and apps, understanding the connections between them becomes crucial. Project Graph gives you that view — a graphical representation of your repo where you can see how modules relate and where dependency ties come from. You can launch it either from the CLI or through the Nx Console extension.
Let's use the terminal approach for now. Run:
> npx nx graph
That opens a new browser tab with a view like this:

If some projects are missing, hit "Show all projects" on the left panel.
You'll see the entire set of modules in your repository, each with its relation lines drawn out. Clicking on a connection arrow reveals two things: the file that creates the link and the type of relationship, either dynamic or static.
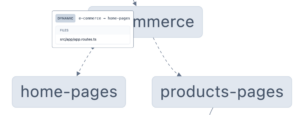
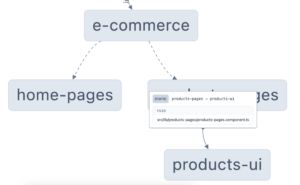
Project Graph has another handy view. It can show you the downstream effect of your changes. Suppose you edit a file like wp.angular.love/libs/products/ui/src/lib/products-ui/products-ui.component.ts to add some text, then run:
> npx nx affected:graph
The output looks different this time:

The affected modules are highlighted in a different color. This gives you an immediate sense of how far your change reaches — how many other libraries or apps might be impacted. It's a valuable aid for team discussions, especially when estimating the fallout of a new feature or a hotfix.
It's also worth noting that the affected model isn't just for visualization. Nx uses it behind the scenes to optimize execution. When you run build, test, or lint, Nx limits itself to the modules affected by your latest changes, skipping the rest.
Conclusion
That's it for this article. We started with the basics of Nx and how to scaffold a workspace. You've created an application with the Nx CLI and seen why breaking a monolith into libraries is a smart move. We covered the different library types Nx recognizes and how scoping rules stop you from creating invalid dependencies between them. I hope the value of building small, reusable modules for a scalable app is clear by now.
Task caching should feel familiar at this point — use it well, and it will save you a ton of time going forward.
Nx Console, in turn, polishes the developer experience in your editor. It gets you past the CLI learning curve and walks you through command setup step by step.
Finally, Project Graph gives you a live map of your repository and shows you not just relations but also the blast radius of your changes.
Nx might look like a lot to take in at first. In practice, though, it's quite approachable. Once you've worked through the ideas in this article and put in some hands-on practice, you'll likely find it indispensable — not just for Angular, either.
One more thing: this article looked at the monorepo approach, but Nx has been expanding into another setup called standalone projects. That lets you enjoy Nx's benefits in a repo with a single application. If that sounds relevant, you can learn more here.
I hope this was useful. For deeper learning, the Nx docs and the Nx YouTube channel are great starting points.
Thanks for sticking with me 🙂
The source code for this article is available here.