
Outsmarting Angular CLI for Lazy-Loaded Components
This post and the accompanying code are the result of a collaborative effort with my teammates Zack Ream, Ryan Kara, Ben Kindle, and Jason Lutz.
The code shown here draws inspiration from the work of George Kalpakas, from PR#18428.
Transitioning from a multi-page application to a single-page application brings a significant concern: the size of the initial payload. By default, an Angular application compiles everything into one bundle. As the application expands, this single bundle grows, leading to slower loading times.
The standard remedy is to use the router for lazy loading modules, following the official Angular documentation. This approach works well for content tied to routes. But what about components that don't correspond to a dedicated route?
This article demonstrates how to use the Angular CLI to carve out separate bundles for individual components, enabling on-demand loading only when they're actually needed.
Deceiving the Angular CLI
During the build process, the Angular CLI (more precisely, the @ngtools/webpack package) performs a static analysis of the application to pinpoint all lazy-loaded router paths. As Webpack processes each of these paths, it generates a separate chunk. This chunk is only fetched when its corresponding route is triggered and contains the necessary ModuleFactory.
Splitting bundles without relying on the router has traditionally been a tricky endeavor, and it's a feature that has been explicitly requested. However, we can manipulate the existing static analysis mechanism to persuade the Angular CLI into chunking our component modules. This clever workaround empowers us to load components dynamically.
Let's explore this technique by building a dynamic MessageComponent!
Building the First Dynamic Component
First, establish a directory named "dynamic-modules" to organize our components.
Inside that, create a subdirectory called "message" for our MessageComponent. Then, insert the following code:
import { Component, OnInit } from '@angular/core';

@Component({
  selector: 'app-message',
  template: 'Hello World',
})
export class MessageComponent implements OnInit {
  constructor() { }

  ngOnInit() { }
}
The next step is to create a module that declares this component. We'll name it MessageModule.
import { NgModule } from '@angular/core';

import { DYNAMIC_COMPONENT } from '../../dynamic-component-loader/dynamic-component-manifest';
import { MessageComponent } from './message.component';

@NgModule({
  declarations: [
    MessageComponent,
  ],
  imports: [
  ],
  providers: [
  ],
  entryComponents: [
    MessageComponent,
  ],
})
export class MessageModule {}
It's crucial to remember that for a [ComponentFactory](https://angular.io/api/core/ComponentFactory) to be generated, the component must also be listed in the module's entryComponents.
The Dynamic Component Manifest
To streamline how we consume these dynamic components, we'll define a simple manifest interface. This interface is modeled directly on the [Route](https://angular.io/api/router/Route) interface from @angular/router.
export interface DynamicComponentManifest {
  componentId: string;
  path: string;
  loadChildren: string;
}
The underlying concept is straightforward: we'll create a new manifest entry for every component we want to load on the fly.
It's essential for this interface to mirror the Route type. The static analysis triggered during build time inspects the [ROUTES](https://angular.io/api/router/ROUTES) token. When it does, @ngtools/webpack generates factories for all paths that have a loadChildren property. The path property itself is flexible; it just needs to be a unique string that doesn't clash with any actual application routes. We also add componentId to give each component a unique identifier for loading.
The Dynamic Component Loader Module
Next, we'll build a module with two main responsibilities: presenting the manifests to the compiler for static analysis, and offering a service to find and return the ComponentFactory instances.
Let's create a new folder named "dynamic-component-loader" to host this logic. Inside, we define a new module called DynamicComponentLoaderModule.
Our module provides a static forRoot() method that accepts an array of DynamicComponentManifest. This forces anyone using this module to supply their manifest list at application bootstrap.
Now comes the clever part: we need to make the CLI process this array during its static analysis.
The trick is to take the incoming DynamicComponentManifest array and simply feed it to the ROUTES multi-provider.
@NgModule({
  providers: []
})
export class DynamicComponentLoaderModule {
  static forRoot(manifests: DynamicComponentManifest[]): ModuleWithProviders {
    return {
      ngModule: DynamicComponentLoaderModule,
      providers: [
        // provider for Angular CLI to analyze
        { provide: ROUTES, useValue: manifests, multi: true }
      ],
    };
  }
}
Creating a Factory Locator Service
With the supplier in place, we now need to implement the service that will locate and deliver the compiled ComponentFactory objects.
Our service will rely on the [SystemJsNgModuleLoader](https://angular.io/api/core/SystemJsNgModuleLoader), so we must add it to the module's providers:
providers: [
{ provide: NgModuleFactoryLoader, useClass: SystemJsNgModuleLoader }]
For convenience, we'll also create a new [InjectionToken](https://angular.io/api/core/InjectionToken). This token will let our application's code access the manifests.
Create the token like this:
export const DYNAMIC_COMPONENT_MANIFESTS = new InjectionToken<any>(‘DYNAMIC_COMPONENT_MANIFESTS’);
Now, update DynamicComponentLoaderModule to include a provider that links this token to the manifests array.
@NgModule({
  providers: [
    { provide: NgModuleFactoryLoader, useClass: SystemJsNgModuleLoader },
  ],
})
export class DynamicComponentLoaderModule {
  static forRoot(manifests: DynamicComponentManifest[]): ModuleWithProviders {
    return {
      ngModule: DynamicComponentLoaderModule,
      providers: [
        { provide: ROUTES, useValue: manifests, multi: true },
        { provide: DYNAMIC_COMPONENT_MANIFESTS, useValue: manifests },
      ],
    };
  }
}
At this point, we can author our service, DynamicComponentLoader, and ensure it's included in the module's declarations.
In the service's constructor, we'll inject both the DYNAMIC_COMPONENT_MANIFESTS token and the NgModuleFactoryLoader.
@Injectable()
export class DynamicComponentLoader {

  constructor(
    @Inject(DYNAMIC_COMPONENT_MANIFESTS) private manifests: DynamicComponentManifest[],
    private loader: NgModuleFactoryLoader
  ) { }
}
Next, we'll implement a public method called getComponentFactory.
This method takes a componentId, searches the manifests for the corresponding module, loads it via the NgModuleFactoryLoader, and instantiates that module.
getComponentFactory<T>(componentId: string, injector?: Injector): Observable<ComponentFactory<T>> {
  const manifest = this.manifests
    .find(m => m.componentId === componentId);

  const p = this.loader.load(manifest.loadChildren)
    .then(ngModuleFactory => {
      const moduleRef = ngModuleFactory.create(injector || this.injector);

      // Problem! How do we get at the component this module provides?
    });

  return ObservableFromPromise(p);
}
However, we hit a snag here. We have a moduleRef holding the ComponentFactory we want, but we can only resolve components by type.
To pinpoint the right component factory, we need each dynamic module to nominate a default component. This leads us to a convention: each module must provide a token representing the dynamic component's type. When we resolve a module, we can then use its Injector to find this token and, consequently, the correct component type.
First, let's create a new InjectionToken:
export const DYNAMIC_COMPONENT = new InjectionToken<any>(‘DYNAMIC_COMPONENT’);
We'll revisit MessageModule to provide this token, mapping it to MessageComponent.
@NgModule({
  declarations: [
    MessageComponent,
  ],
  providers: [
    { provide: DYNAMIC_COMPONENT, useValue: MessageComponent },
  ],
  entryComponents: [
    MessageComponent,
  ],
})
export class MessageModule {}
Now we can update the getComponentFactory method in the DynamicComponentLoader service to use the moduleRef's injector for locating the token.
Once the token is found, we can use the [ComponentFactoryResolver](https://angular.io/api/core/ComponentFactoryResolver) from the moduleRef to locate the appropriate ComponentFactory.
getComponentFactory<T>(componentId: string, injector?: Injector): Observable<ComponentFactory<T>> {
    const manifest = this.manifests
      .find(m => m.componentId === componentId);

    const p = this.loader.load(manifest.loadChildren)
      .then(ngModuleFactory => {
        const moduleRef = ngModuleFactory.create(injector || this.injector);

        // Read from the moduleRef injector and locate the dynamic component type
        const dynamicComponentType = moduleRef.injector.get(DYNAMIC_COMPONENT);
        // Resolve this component factory
        return moduleRef.componentFactoryResolver.resolveComponentFactory<T>(dynamicComponentType);
      });

    return fromPromise(p);
  }
Declaring the Manifest
With the DynamicComponentModule infrastructure finished, we can define a manifest in our AppModule.
Navigate to app.module.ts and set up a new manifests array.
const manifests: DynamicComponentManifest[] = [
  {
    componentId: 'message',
    path: 'dynamic-message',
    loadChildren: './dynamic-modules/message/message.module#MessageModule',
  },
];
In this example, we've set the componentId to "message", which serves as the key for retrieving the correct ComponentFactory. The loadChildren property points to the module's relative path, just like a lazy-loaded route. The path is arbitrary, as long as it doesn't conflict with other routes.
Next, modify the AppModule to pass the manifests array to the forRoot method of DynamicComponentLoaderModule.
@NgModule({
  declarations: [
    AppComponent,
  ],
  imports: [
    BrowserModule,
    DynamicComponentLoaderModule.forRoot(manifests),
  ],
  providers: [],
  bootstrap: [
    AppComponent,
  ],
})
export class AppModule { }
With that, we're ready to lazy load this component!
Placing the Component in a Template
We now have a service that can hand us a ComponentFactory directly, managing the lazy-loading automatically. The only remaining task is to use that factory to instantiate the component in whichever way you prefer (ViewContainerRef, Angular CDK Portals, etc.).
For this walkthrough, we'll use a ViewContainerRef.
Insert the following into your `app.component.html` file:
<button type="button" (click)="loadComponent()">Load!</button>

<div #testOutlet></div>
Then, in app.component.ts, add this logic:
@Component({
  selector: 'app-root',
  templateUrl: './app.component.html',
})
export class AppComponent {

  @ViewChild('testOutlet', {read: ViewContainerRef}) testOutlet: ViewContainerRef;

  constructor(
    private dynamicComponentLoader: DynamicComponentLoader,
  ) { }

  loadComponent() {
    this.dynamicComponentLoader
      .getComponentFactory<MessageComponent>('message')
      .subscribe(componentFactory => {
        this.testOutlet.createComponent(componentFactory);
      }, error => {
        console.warn(error);
      });
  }
}
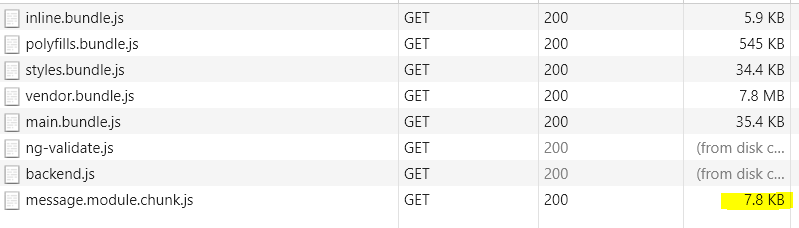
Launch the application and press the "Load!" button. Not only will the component appear, but if you look at the network requests, you'll see that Webpack generated a distinct chunk just for this component.
What's the Point?
Now that we've mastered this technique, you might wonder: why bother? While there are several situations where this approach shines, it's important to note this isn't a strategy for all components. The overhead involved would eventually outweigh the benefits. But when used thoughtfully, it can provide a meaningful performance boost.
The most obvious candidates are large or infrequently-used components. For example, a component with a hefty payload might be better loaded after the core application is interactive. Similarly, if a particular component is only relevant to a small fraction of users, deferring its load can noticeably reduce the initial download size.
There are also less obvious applications for dynamic loading. Consider the solution in the pull request mentioned at the top of this PR for Angular.io. Their site begins as a static HTML page and hydrates specific Angular components lazily. This ensures the page's initial load is minimal, incurring the cost of Angular's payload only when parts of the page become interactive.
Given the vast content on Angular.io, a visitor won't typically view all of it in one visit.
We're eager to hear about other creative uses for this. Share your experiences in the comments!
You can find a working demo and the complete source code here: https://github.com/devboosts/dynamic-component-loader
Further Reading
For a deeper dive into dynamic components, check out Max NgWizard’s post on the topic.