
Dynamic components revisited: Angular 9 and the component tree
It has been over four years since we first explored dynamic components in Angular 2. Now that Angular 9 is here, it is time to refresh that knowledge and see what has changed. What exactly defines a dynamic component? What tools does Angular offer for creating components at runtime? How can we assemble a dynamic component tree, and what purpose does it serve? These are the questions we will tackle in this piece.
What are dynamic components?
Many excellent resources already cover the fundamentals of dynamic components. To summarize: a dynamic component is one whose selector never appears in another component’s template. Instead, it gets instantiated imperatively via its class, which means we have to handle the setup work that Angular normally performs automatically for ordinary components.
What kind of setup are we referring to?
Suppose we have already written our component. Here is one way to bring it to life dynamically:
- Inject a ComponentFactoryResolver into the component that will act as the "loader"
- The older Angular 8 flow (which may be deprecated in Angular 11):
Register the dynamic component in both the declarations and entryComponents arrays of the module that depends on it. Then, generate a factory for the component by handing the component type to the resolveComponentFactory method on the ComponentFactoryResolver instance.
The Angular 9 approach:
There is no longer any need to declare the component anywhere. Its code stays out of the initial bundle, though we lose access to conveniences like CommonModule (there is a workaround, which we will explore shortly) since there is no module in play. To obtain a component factory, use the dynamic import syntax with the path to the module or TypeScript file where the dynamic component is exported. This import resolves to a Promise carrying the module, with the freshly loaded class accessible under the component’s name. That class can then be passed to resolveComponentFactory.
import ("src/app/my-dynamic/my-dynamic.component").
({MyDynamicComponent} => {
 const factory = this.componentFactoryResolver(MyDynamicComponent);
}).
3. Next, we need to identify a location in the view for the dynamic component, which requires a reference to the ViewContainer. We get that by placing our "loader" in the template and then retrieving the associated "template reference variable" via ViewChild, instructing it to read as ViewContainerRef:
@ViewChild ("viewContainer", {read: ViewContainerRef, static: false})
viewContainerRef
- Finally, invoking the create method on the ViewContainer with our component factory brings the dynamic component into existence. That call also hands back a reference to the new instance, which is useful for adjusting properties or triggering its cleanup later.
Admittedly, this sequence feels clunky. Is there a more straightforward option in Angular?
There is a simpler path, but it comes with limitations that narrow its usefulness to specific scenarios.
NgComponentOutlet
This structured directive wraps the complexity of the steps above into a single package. Its usage looks like this:
<ng-container *ngComponentOutlet = "componentTypeExpression;
                                   injector: injectorExpression;
                                   content: contentNodesExpression;"
</ng-container>
We indicate which component to load by referencing its class – in Angular 9, a dynamic import is still required to pull in the chunk containing that class. Additionally, we have the option to supply a custom injector (by default, it is derived from the viewContainer, overlaid with the directive), and we can transpose content into the ng-content slot of the dynamic component.
So, where does this solution fall short?
Primarily in two areas:
- There is no direct access to the component references.
- Binding inputs and outputs is not supported.
To pass data, we would need to inject a service into the dynamic component, or more directly, provide an injector with an injectionToken that carries the data.
The dynamic component tree
To illustrate a more intricate use case, consider a specific challenge:
Picture an application that functions as a builder, where users assemble a structure from predefined elements. Some elements can nest other elements, and those nested elements may themselves contain further elements, and so on. Moreover, this structure can be persisted server-side, fetched via an API, and rendered back for the user.
Let’s work through a simplified variant of this scenario:
- we have a pool of "defined elements", each backed by a dynamic component
- an object holds the configuration for a dynamic component, which includes the component type and potential configurations for nested components (this mirrors what a JSON payload from the backend might look like)
- from that object, we need to load and display a tree of Angular dynamic components
First, we define an interface for this configuration:
export interface DynamicComponentConfig {
 content: DynamicComponentConfig[];
 type: DynamicComponentType;
}
This data structure is recursive and comprises two fields:
- content, an array of configurations in case the dynamic component has children
- type, an enum that enumerates the possible strings identifying the component type
export enum DynamicComponentType {
				 cmp1 = 'cmp1',
				 cmp2 = 'cmp2',
				 cmp3 = 'cmp3',
				 cmp4 = 'cmp4'
				}
We have four distinct dynamic component types to build later: cmp1, cmp2, and so on. Now, we create a utility that returns a locked object conforming to the interface above
export class MockedDataUtil {
  static getDynamicComponentConfig(): DynamicComponentConfig {
    return {
      type: DynamicComponentType.cmp1,
      content: [{
        type: DynamicComponentType.cmp2,
        content: [{
          type: DynamicComponentType.cmp4,
          content: []
        }]
      },
        {
          type: DynamicComponentType.cmp2,
          content: [{
            type: DynamicComponentType.cmp3,
            content: []
          }, {
            type: DynamicComponentType.cmp3,
            content: []
          },
            {
              type: DynamicComponentType.cmp1,
              content: [{
                type: DynamicComponentType.cmp2,
                content: [{
                  type: DynamicComponentType.cmp4,
                  content: []
                },
                  {
                    type: DynamicComponentType.cmp1,
                    content: []
                  }]
              }]
            }]
        }
      ]
    };
  }
}
From this object, we must construct a tree of dynamic components and show it to the user. Notice that the root component is of type "cmp1" with two children, each of type "cmp2".
Setting up the boilerplate
Let’s generate the boilerplate for components cmp1 through cmp4. In the same file as each component, we also add an @NgModule that declares the component and imports the modules, components, directives, and other pieces it relies on. This module does not need (and should not) be exported. It gets discovered and compiled because a dynamic import points to the file containing both the module and the component. Each dynamic component and module file will result in a separate chunk, and crucially, it will not be flagged as initial:
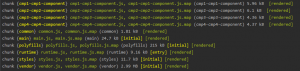
Additionally, Angular automatically manages dependencies, avoiding duplication of imports already present in loaded chunks. In effect, we could have up to a thousand dynamic components in the app, yet users would only fetch the ones relevant to the current view.
@Component({
 selector: 'app-cmp1',
 templateUrl: './cmp1.component.html',
 styleUrls: ['./cmp1.component.scss'],
})
 export class Cmp1Component extends DynamicComponentBaseComponent {
}

@NgModule({
 declarations: [Cmp1Component],
 imports: [SharedModule]
})
class Cmp1Module {
}
SharedModule
SharedModule houses all the common utilities our dynamic components depend on:
@NgModule({
 exports: [
  CommonModule
 ],
 imports: [CommonModule]
})
export class SharedModule {
}
We then set up an object that maps configuration strings to functions returning the respective component paths:
const dynamicComponentImportsMap = {
 [DynamicComponentType.cmp1]: () => import('src/app/dynamic-components/cmp1/cmp1.component'),
 [DynamicComponentType.cmp2]: () => import('src/app/dynamic-components/cmp2/cmp2.component'),
 [DynamicComponentType.cmp3]: () => import('src/app/dynamic-components/cmp3/cmp3.component'),
 [DynamicComponentType.cmp4]: () => import('src/app/dynamic-components/cmp4/cmp4.component')
}
Loading dynamic components
With our declarations complete, we shift to the next phase – loading the dynamic components.
Let’s employ a struct directive for this purpose, akin to ngComponentOutlet but customized to fit our needs. It should be declared and exported in SharedModule:
@Directive({
 selector: '[appDynamicComponentLoader]'
})
export class DynamicComponentLoaderDirective {
 constructor(private componentFactoryResolver: ComponentFactoryResolver, private viewContainerRef: ViewContainerRef) {
 }

 @Input() set appDynamicComponentLoader(dynamicComponentConfig: DynamicComponentConfig) {
  this.loadComponent(dynamicComponentConfig);
 }

 private loadComponent(dynamicComponentConfig: DynamicComponentConfig) {
  this.resolveCmpClass(dynamicImportsMap[dynamicComponentConfig.type]).then(cmpClass => {
	 const cmpFactory = this.componentFactoryResolver.resolveComponentFactory(cmpClass);
	 const cmpRef = this.viewContainerRef.createComponent(cmpFactory);
         (cmpRef.instance as DynamicComponentBaseComponent).dynamicComponentConfigs = dynamicComponentConfig.content;
   });
  }

 private resolveCmpClass(importFn: () => any): Promise<Type> {
  return importFn().then(module => {
	 const cmpClass = Object.values(module).find(val => val.hasOwnProperty('ɵcmp'));
	 if (!cmpClass) {
         	 throw new Error('No exported component found!');
         }
	 return cmpClass;
	 });
  }
}
At its core, this follows the procedure outlined earlier, except it is parameterized via an input that carries the configuration. Based on the type from that configuration, we invoke the matching function in dynamicComponentImportsMap. To locate the component class, we scan the imported module’s first value that has the property "ɵcmp" (in Angular 9, the component decorator gets transformed to this form). The only remaining piece to clarify is DynamicComponentBase. This abstract class gives our dynamic components a shared API. For now, we expose a single input tied to the configuration array there.
@Component({template: ''})
export abstract class DynamicComponentBaseComponent {
 @Input() dynamicComponentConfigs: DynamicComponentConfig[];
}
Our components then inherit access to the configuration:
export class Cmp1Component extends DynamicComponentBase {
}
The final step is to actually put our DynamicComponentLoader directive to work. In the main component, we add:
app.component.ts
export class AppComponent {
 dynamicComponentConfig = MockedDataUtil.getDynamicComponentConfig();
}
app.component.html
<ng-template [appDynamicComponentLoader]="dynamicComponentConfig"></ng-template>
And inside our dynamic components, to recursively load any children:
cmp1.component.html
<h1 class="dynamic-component__label">
 C1
</h1>
<ng-container *ngFor="let dynamicComponentConfig of dynamicComponentConfigs">
 <ng-template [appDynamicComponentLoader]="dynamicComponentConfig">
 </ng-template>
</ng-container>
The resulting structure
Once styles are applied, our structure takes this shape:
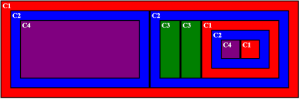
Find the full code here.
In the upcoming article, we will dive into more advanced territory – handling inputs and outputs, scalability, and addressing UX or optimization issues with the current approach.