Moving Beyond Static Configuration
The earlier installment in this series demonstrated how Webpack Module Federation can pull separately compiled Micro Frontends into a host application. That setup, however, required the shell to declare all Micro Frontends in its webpack configuration ahead of time.
This article explores a more flexible scenario. Here, the shell has no prior knowledge of the Micro Frontends. Instead, it discovers them at runtime through a configuration file. Although the examples rely on a static JSON file, the same data could easily be served from a Web API.
Note: The content here targets Angular and Angular CLI 14 or newer. Ensure your environment matches these versions before running the samples. For migration specifics, refer to this migration guide.
The diagram below illustrates the core concept:
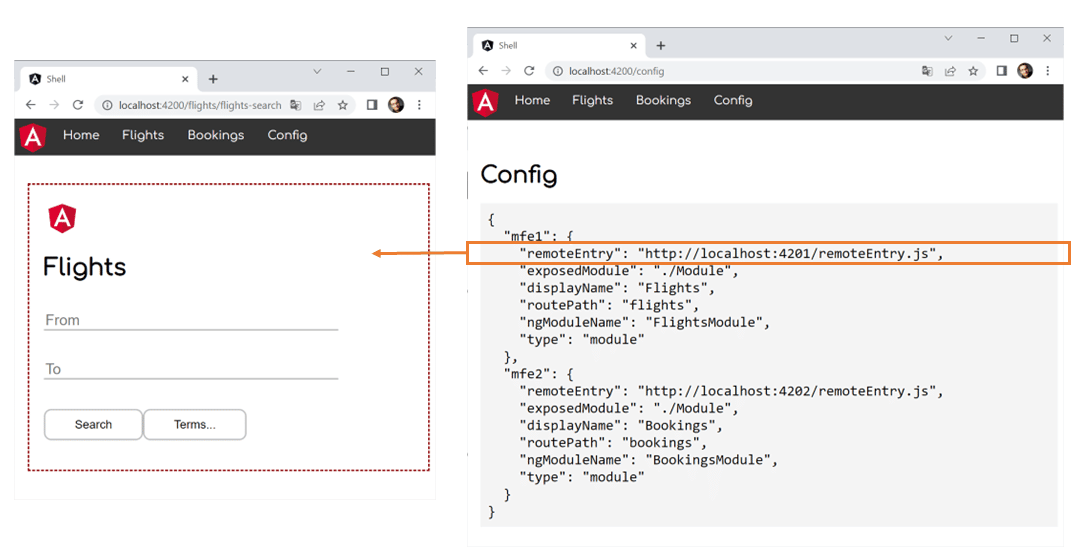
For every Micro Frontend the shell learns about at runtime, a menu entry is generated. Selecting an entry prompts the router to load and render the corresponding Micro Frontend.
📂 Source Code (simple version, see branch: simple)
A Straightforward Dynamic Approach
We begin with a basic implementation. In this scenario, we still know which Micro Frontends exist. Our goal is merely to swap their URLs at runtime, perhaps to align with different deployment environments. A more advanced technique, where the count of Micro Frontends is unknown, follows later.
Enabling Module Federation
The demo workspace includes a shell and two Micro Frontends named mfe1 and mfe2. Consistent with the prior article, we apply and configure the Module Federation plugin for each Micro Frontend:
npm i -g @angular-architects/module-federation -D

 ng g @angular-architects/module-federation --project mfe1 --port 4201 --type remote

 ng g @angular-architects/module-federation --project mfe2 --port 4202 --type remote
Creating a Manifest
Starting with plugin version 14.3, you can generate a dynamic host. This host retrieves essential Micro Frontend details from a JSON file, known as the Micro Frontend Manifest, during runtime:
ng g @angular-architects/module-federation --project shell --port 4200 --type dynamic-hostThis command produces:
- a webpack configuration
- the manifest itself
- code in
main.tsto load the manifest
The generated manifest lives at projects/shell/src/assets/mf.manifest.json. Its contents resemble this:
{
     "mfe1": "http://localhost:4201/remoteEntry.js",
     "mfe2": "http://localhost:4202/remoteEntry.js"
 }
After generating the manifest, verify that the configured ports match your setup.
Reading the Manifest
The generated main.ts takes care of loading the manifest:
import { loadManifest } from '@angular-architects/module-federation';

 loadManifest("/assets/mf.manifest.json")
   .catch(err => console.error(err))
   .then(_ => import('./bootstrap'))
   .catch(err => console.error(err));
By default, the loadManifest function fetches not only the manifest but also the remote entry points it references. This gives Module Federation the metadata required to download Micro Frontends on demand.
Fetching the Micro Frontends
To render the Micro Frontends described in the manifest, we define routes as follows:
import { Routes } from '@angular/router';
 import { HomeComponent } from './home/home.component';
 import { loadRemoteModule } from '@angular-architects/module-federation';

 export const APP_ROUTES: Routes = [
     {
       path: '',
       component: HomeComponent,
       pathMatch: 'full'
     },
     {
       path: 'flights',
       loadChildren: () => loadRemoteModule({
           type: 'manifest',
           remoteName: 'mfe1',
           exposedModule: './Module'
         })
         .then(m => m.FlightsModule)
     },
     {
       path: 'bookings',
       loadChildren: () => loadRemoteModule({
           type: 'manifest',
           remoteName: 'mfe2',
           exposedModule: './Module'
         })
         .then(m => m.BookingsModule)
     },
 ];
The type: 'manifest' option instructs loadRemoteModule to extract the necessary configuration from the loaded manifest. The remoteName property specifies the key used within the manifest.
Setting Up the Micro Frontends
Each Micro Frontend is expected to expose an NgModule with child routes via the './Module' key. This module is exposed through the webpack.config.js file in each Micro Frontend project:
// projects/mfe1/webpack.config.js

 const { shareAll, withModuleFederationPlugin } = require('@angular-architects/module-federation/webpack');

 module.exports = withModuleFederationPlugin({

   name: 'mfe1',

   exposes: {
     // Adjusted line:
     './Module': './projects/mfe1/src/app/flights/flights.module.ts'
   },

   shared: {
     ...shareAll({ singleton: true, strictVersion: true, requiredVersion: 'auto' }),
   },

 });
// projects/mfe2/webpack.config.js
const { shareAll, withModuleFederationPlugin } = require('@angular-architects/module-federation/webpack');
module.exports = withModuleFederationPlugin({
name: 'mfe2',
exposes: {
// Adjusted line:
'./Module': './projects/mfe2/src/app/bookings/bookings.module.ts'
},
shared: {
...shareAll({ singleton: true, strictVersion: true, requiredVersion: 'auto' }),
},
});Running the Demo
For every route that loads a Micro Frontend, the shell's AppComponent provides a corresponding routerLink:
<!-- projects/shell/src/app/app.component.html -->
 <ul>
     <li><img src="../assets/angular.png" width="50"></li>
     <li><a routerLink="/">Home</a></li>
     <li><a routerLink="/flights">Flights</a></li>
     <li><a routerLink="/bookings">Bookings</a></li>
 </ul>

 <router-outlet></router-outlet>
That covers the basics. Launch all three applications, for instance with npm run run:all. The key difference from the previous article is that the shell now discovers the Micro Frontends at runtime. To point the shell at different Micro Frontends, simply modify the manifest.
Embracing True Dynamism
The current solution suits many practical needs. Using a manifest allows you to tailor the application to various environments without a rebuild. Replacing the static file with a REST endpoint could even enable strategies like A/B testing.
Yet, there are times when you may not even know how many Micro Frontends exist. That scenario is addressed next.
Extending the Manifest with Custom Data
To build routes dynamically, we require additional metadata. The manifest can be enriched accordingly:
{
     "mfe1": {
         "remoteEntry": "http://localhost:4201/remoteEntry.js",

         "exposedModule": "./Module",
         "displayName": "Flights",
         "routePath": "flights",
         "ngModuleName": "FlightsModule"
     },
     "mfe2": {
         "remoteEntry": "http://localhost:4202/remoteEntry.js",

         "exposedModule": "./Module",
         "displayName": "Bookings",
         "routePath": "bookings",
         "ngModuleName": "BookingsModule"
     }
 }
Aside from remoteEntry, every other field is custom.
Typing the Custom Configuration
To work with this extended configuration, we introduce types within the shell:
// projects/shell/src/app/utils/config.ts

 import { Manifest, RemoteConfig } from "@angular-architects/module-federation";

 export type CustomRemoteConfig = RemoteConfig & {
     exposedModule: string;
     displayName: string;
     routePath: string;
     ngModuleName: string;
 };

 export type CustomManifest = Manifest<CustomRemoteConfig>;
The CustomRemoteConfig type defines each entry in the manifest, while CustomManifest represents the entire file.
Constructing Routes Dynamically
Next, we create a utility function that loops through the manifest and generates a route for each Micro Frontend:
// projects/shell/src/app/utils/routes.ts

 import { loadRemoteModule } from '@angular-architects/module-federation';
 import { Routes } from '@angular/router';
 import { APP_ROUTES } from '../app.routes';
 import { CustomManifest } from './config';

 export function buildRoutes(options: CustomManifest): Routes {

     const lazyRoutes: Routes = Object.keys(options).map(key => {
         const entry = options[key];
         return {
             path: entry.routePath,
             loadChildren: () =>
                 loadRemoteModule({
                     type: 'manifest',
                     remoteName: key,
                     exposedModule: entry.exposedModule
                 })
                 .then(m => m[entry.ngModuleName])
         }
     });

     return [...APP_ROUTES, ...lazyRoutes];
 }
This yields the same route structure we previously defined manually.
The shell's AppComponent brings everything together:
@Component({
   selector: 'app-root',
   templateUrl: './app.component.html'
 })
 export class AppComponent implements OnInit  {

   remotes: CustomRemoteConfig[] = [];

   constructor(
     private router: Router) {
   }

   async ngOnInit(): Promise<void> {
     const manifest = getManifest<CustomManifest>();

     // Hint: Move this to an APP_INITIALIZER
     //  to avoid issues with deep linking
     const routes = buildRoutes(manifest);
     this.router.resetConfig(routes);

     this.remotes = Object.values(manifest);
   }
 }
The ngOnInit method retrieves the manifest (still loaded in main.ts as shown earlier) and feeds it to buildRoutes. These dynamically created routes are then registered with the router. Simultaneously, the manifest's key/value pairs are stored in the remotes field. This collection drives the template's menu generation:
<!-- projects/shell/src/app/app.component.html -->

 <ul>
     <li><img src="../assets/angular.png" width="50"></li>
     <li><a routerLink="/">Home</a></li>

     <!-- Dynamically create menu items for all Micro Frontends -->
     <li *ngFor="let remote of remotes"><a [routerLink]="remote.routePath">{{remote.displayName}}</a></li>

     <li><a routerLink="/config">Config</a></li>
 </ul>

 <router-outlet></router-outlet>
Testing the Fully Dynamic Version
Now, let's see this "dynamic dynamic" approach in action. Start the shell and both Micro Frontends, for example using npm run run:all.
Digging Deeper
So far, we've relied on the plugin's high-level helpers. For scenarios requiring finer control, several lower-level functions are available:
-
loadManifest(...): The function used earlier accepts a second argument calledskipRemoteEntries. When set totrue, it prevents the loading of entry points, fetching only the manifest:loadManifest("/assets/mf.manifest.json", true) .catch(...) .then(...) .catch(...) -
setManifest(...): This function lets you assign the manifest directly, which is handy when the data originates from another source. -
loadRemoteEntry(...): For those avoiding the manifest, this function loads a remote entry point directly:Promise.all([ loadRemoteEntry({ type: 'module', remoteEntry: 'http://localhost:4201/remoteEntry.js' }), loadRemoteEntry({ type: 'module', remoteEntry: 'http://localhost:4202/remoteEntry.js' }) ]) .catch(err => console.error(err)) .then(_ => import('./bootstrap')) .catch(err => console.error(err)); -
loadRemoteModule(...): Likewise, you can bypass the manifest and load a Micro Frontend straight away:{ path: 'flights', loadChildren: () => loadRemoteModule({ type: 'module', remoteEntry: 'http://localhost:4201/remoteEntry.js', exposedModule: './Module', }).then((m) => m.FlightsModule), },
I anticipate that most projects will adopt the manifest approach. Even if loading from a JSON file via loadManifest isn't suitable, you can still define it manually with setManifest.
The type: 'module' property indicates that a genuine EcmaScript module is being loaded, as opposed to a standard JavaScript file. This configuration has been necessary since Angular CLI 13. If you're loading artifacts not built with CLI 13 or newer, you'll likely need to set this to script. The manifest can also specify this:
{
     "non-cli-13-stuff": {
         "type": "script",
         "remoteEntry": "http://localhost:4201/remoteEntry.js"
     }
 }
When a manifest entry omits the
typeproperty, the plugin defaults tomodule.
Looking Ahead: Architectural Considerations
Module Federation offers a straightforward path to Micro Frontends with Angular. Nevertheless, several broader questions naturally arise:
- What criteria should guide the decomposition of a large application?
- Which access control strategies are appropriate?
- What well-established patterns should we adopt?
- How can we steer clear of common Module Federation pitfalls?
- What advanced use cases are achievable?
Our complimentary eBook, roughly 100 pages, addresses all these topics and further:
Feel free to download it here now!
Final Thoughts
Dynamic Module Federation introduces significant flexibility by enabling the loading of Micro Frontends that were not known at compile time. Crucially, you don't even need to know their total number upfront. This capability stems from webpack's runtime API. To simplify its adoption, the @angular-architects/module-federation plugin wraps these low-level features into convenient helper functions.