Adopting the View State Selector in Angular
If you've spent any time building web applications, you've likely encountered the same monotonous chore over and over: show a spinner while an HTTP request is in flight, then swap in the primary view or an error message once the call settles. I've spotted this recurring boilerplate in my own work and in the code of my colleagues. What’s more frustrating is that there’s often no safeguard to flag when a state's view is left out—like a missing loading indicator or an unhandled error template.
<div *ngIf="data$ | async as data">
  <ng-container *ngIf="data && !error">
    ...
  </ng-container>

  <ng-container *ngIf="error && !loading">
	...
  </ng-container>

  <ng-container *ngIf="loading">
	Loading...
  </ng-container>
</div>
Here’s a typical snippet from a project I’ve been involved with, though it can show up in various forms. It includes a main view wrapper, some logic to deduce the current state, a loader template, and a block for handling errors.
The View State Selector is a design approach that ties a component’s state directly to its view template. Essentially, it handles the injection of the proper template based on the component’s current state. Take a component that relies on data fetched via HTTP: it starts in a loading state, which prompts the loader to appear, and then, based on whether the request succeeds or fails, it transitions to the data view or the error view.
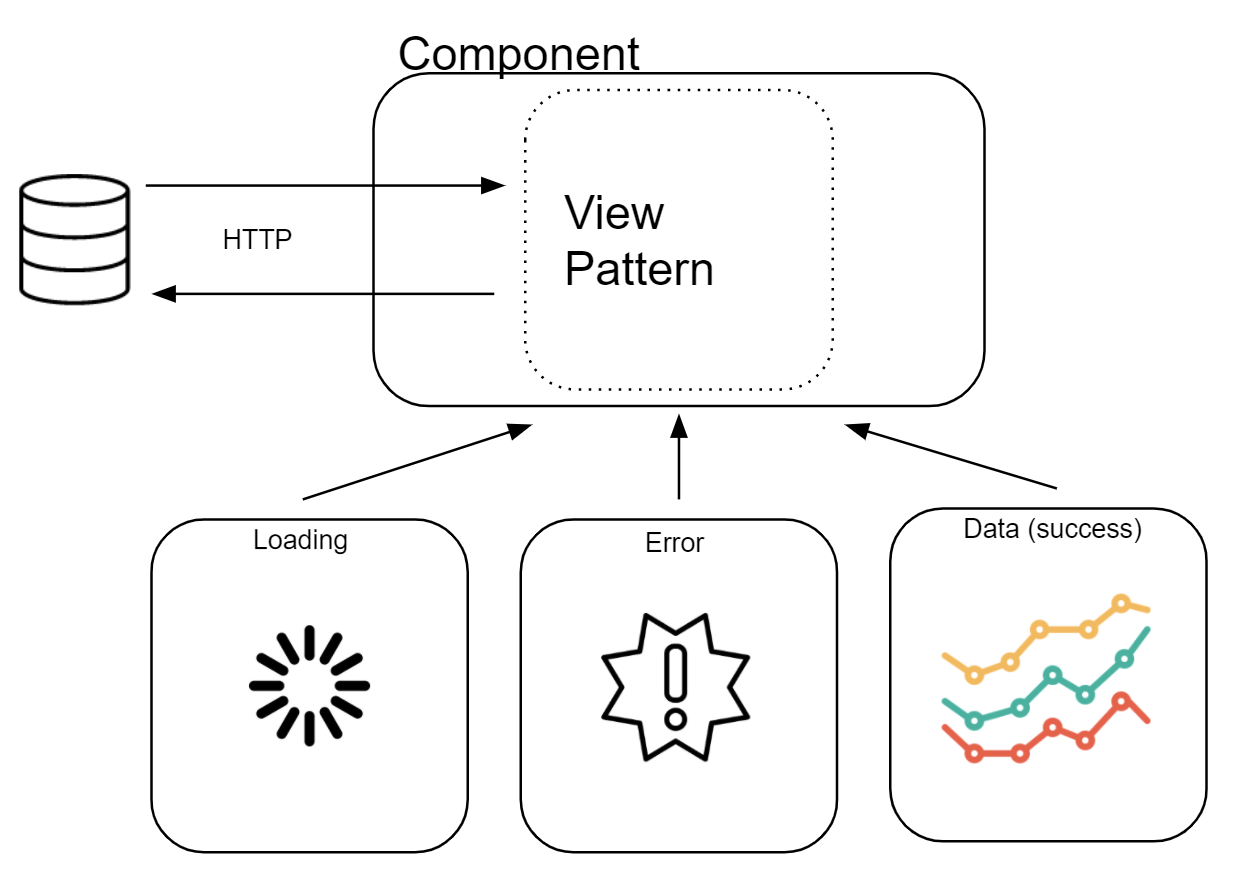
In the following sections, I’ll walk through my View State Selector Pattern. While this pattern is flexible enough to pick between any number of exclusive views given any state input, our focus here will be on the typical scenario: switching views according to the status of an asynchronous HTTP call. Let’s get into it.
How to Use the Pattern
Working with the "View State Selector" pattern feels a lot like using ngSwitchCase. You provide a state, and the matching template gets rendered:
<div *viewContainer="view$ | async;
                     main mainTmp;
                     error errorTmp;
                     loading loaderTmp">
</div>

<ng-template #mainTmp let-v="view">...</ng-template>

<ng-template #errorTmp let-v="view">...</ng-template>

<ng-template #loaderTmp>...</ng-template>
In that example, the state is represented by the view$ observable, which emits one of three states: main, error, or loading. Each state is linked to a template, and the rendered template changes based on the value emitted by view$.
This pattern shines over a standard ngSwitchCase in several situations:
- It cuts down on the repetitive conditional logic that decides which template is active. That logic gets tucked away inside the
viewContainer. - It handles more intricate states or cases where multiple states are active simultaneously. For instance, you could implement a skeleton loader by combining the loading state with the data state at the same time.
- It’s especially useful for complicated states that fit a state-machine model. In those instances, a plain
ngSwitchmight work, but you’d have to write extra code to transform the state into an enum for the switch to consume.
Building the Pattern
**Defining the View Type**
To make this pattern reusable, the first step is to set up an interface that holds the View states. In simple terms, a View is an object that maps out the different states of your UI. You can include as many states as your component needs, but I’ll stick to the three that are most common:
Loading – This is the state that exists before the async request finishes. It triggers the Loader template to be shown.
Data – Once a successful response arrives, the returned data gets bound to the main template.
Error – If the request fails, this state stores the error details and gives the error template instructions on how to present them.
export class View<T> {
  data?: T; // Store view data of type T
  loader?: boolean;
  error?: Error;
}
After that, we can use the map operator to transform our state into the View structure defined earlier. The observable will startWith the loading state; from there, a successful emission (carrying the data T) gets mapped into a View<T>. If something goes wrong, a catchError handles it by mapping the failure into the error state.
const view$: Observable<View<T>> =
	this.httpClient<T>(<url>).pipe(
  		startWith({loader: true}),
  		map(response => ({data: response})),
  		catchError(error => of({error})));
A quick note: T is just a stand-in for the actual response type.
The viewContainer
At this stage, we’ve got an observable that emits View objects. The next move is to build a structural directive (or a component) that takes a View (which represents a state) and injects the appropriate view template.
Put simply, the ViewContainer takes on the job of adding the correct template for whichever view state is provided.
<div
  *viewContainer="view$ | async;
                          main mainTmp;
                          error errorTmp;
                          loading loaderTmp"
>
  <div>
    <ng-template #mainTmp>...</ng-template>
    <ng-template #errorTmp>...</ng-template>
    <ng-template #loaderTmp>...</ng-template>
  </div>
</div>
Applying the View State Selector through a structural directive
<view-container
  *ngIf="view$ | async as view"
  [appViewMain]="mainTmp"
  [errorTmp]="errorTmp"
  [loaderTmp]="loaderTmp"
  [view]="view"
>
</view-container>

<ng-template #mainTmp>...</ng-template>
<ng-template #errorTmp>...</ng-template>
<ng-template #loaderTmp>...</ng-template>
**Inside the ViewContainer Directive**
The logic behind the Directive and the Component versions is nearly identical, so I’ll zero in on the Directive implementation.
To begin, we’ll scaffold an empty Directive.
@Directive({ selector: '[viewContainer]' })
export class ViewContainerDirective<T> implements AfterViewInit {
  ngAfterViewInit(): void {
    // Verify all the templates defined, throw an error otherwise
  }
}
Next, we’ll declare the properties that will hold the template references.
  private _mainTemplateRef: TemplateRef<AppViewContext<T>> = null;
  private _errorTemplateRef: TemplateRef<AppViewContext<T>> = null;
  private _loaderTemplateRef: TemplateRef<AppViewContext<T>> = null;
To connect the template reference variables (#<name>) to those properties, we add the following:
@Input() set viewContainerMain(templateRef: TemplateRef<any>) {
    this._mainTemplateRef = templateRef;
}

@Input() set viewContainerError(templateRef: TemplateRef<any>) {
    this._errorTemplateRef = templateRef;
}

@Input() set viewContainerLoading(templateRef: TemplateRef<any>) {
    this._loaderTemplateRef = templateRef;
}
If you’re curious about how that connection works, take a look at the microsyntax for directives. In essence, the setter’s name is formed by joining the directive’s name (the prefix) with the attribute’s name (the suffix).
Inside the ngAfterViewInit hook, we’ll verify that every template has been supplied. If any one of them is absent, we’ll raise an error that’s impossible to overlook.
ngAfterViewInit(): void {
    if (!this._errorTemplateRef) throw new Error('Missing Error Template')
    if (!this._loaderTemplateRef) throw new Error('Missing Loader Template')
    if (!this._mainTemplateRef) throw new Error('Missing Main Template')
  }
That means no more silent gaps for loaders or error handlers!
For the final piece, each time the View changes, we need to insert the corresponding template into the container. To do this, we can leverage the createEmbeddedView API. First, we’ll inject the ViewContainerRef service.
constructor(private _viewContainer: ViewContainerRef) { }
One of the optional parameters for createEmbeddedView is a context. By providing it, we can expose the data (T—the same type from View<T>) for use within the template.
private _context: AppViewContext<T> = new AppViewContext<T>();
With all that in place, we’re ready to write the setter:
@Input() set viewContainer(view: View<T>) {
    if (!view) return;

    this._context.$implicit = view; // expose the view object to the template
    this._viewContainer.clear(); // Clears the old template

    if (view.loader)
      this._viewContainer.createEmbeddedView(this._loaderTemplateRef, this._context);

    if (view.error && !view.loader) // Defines the conditions to display each template in single place
      this._viewContainer.createEmbeddedView(this._errorTemplateRef, this._context);

    if (view.data && !view.error)
      this._viewContainer.createEmbeddedView(this._mainTemplateRef, this._context);
  }
Bringing It All Together
The "View State Selector" we’ve put together offers a way to streamline our components, cutting down on boilerplate, keeping templates flat, and surfacing errors when templates go missing. Along the way, it also lowers the odds of subtle bugs by giving us immediate feedback if something is out of place.
For more examples and the complete implementation, check out this Github Repository.