User experience is largely defined by how an application starts up, especially on mobile devices. Research indicates that 53% of mobile users will abandon a site if it takes more than 3 seconds to load. This is not just a mobile issue; it applies to all applications.
The perceived performance of an application is critical to its success. While the entire application should be performant, the immediate first impression matters the most.
To create a positive initial experience, we should display some content to the user as soon as possible, minimizing the time to first paint. A particularly effective method for achieving this improved user experience is to use an App Shell.
Understanding the App Shell Concept
The goal is to make the initial view of the page visible very quickly. This generally includes a navigation bar, a loading indicator, and other foundational elements of the page's layout. To accomplish this, we integrate the HTML and CSS for these specific above-the-fold elements directly into the initial HTTP response when the index.html file is loaded for our Single Page Application (SPA).
This static combination of page skeleton, styles, and a loading state, which is shown to the user immediately, is what we call the Application Shell.
This guide will demonstrate exactly how to add an App Shell to an Angular application using the Angular CLI.
Note: The App Shell feature is separate from Service Workers and does not require a server-side rendered Angular Universal application in production to function.
Plan of Action
We will build everything from scratch, starting with an empty folder. We'll scaffold a new Angular application and then use the Angular CLI to add an App Shell that is generated at build time.
We'll examine the process under the hood. The following steps will be covered:
- Step 1 - Setting up a new Angular PWA project
- Step 2 - Inspecting the
index.htmlbefore an App Shell - Step 3 - Measuring Startup Performance Before an App Shell
- Step 4 - Adding Angular Universal for pre-rendering
- Step 5 - Generating the App Shell with the Angular CLI
- Step 6 - Building the Application with the App Shell in Production Mode
- Step 7 - Evaluating the App Shell performance impact
This article is a part of the broader Angular PWA Series. You can find other relevant posts here:
- Service Workers - Practical Guided Introduction (several examples)
- Angular App Shell - Boosting Application Startup Performance
- Angular Service Worker - Step-By-Step Guide for turning your Application into a PWA
- Angular Push Notifications - Step-by-Step Guide
Let's begin our guided tour of Angular App Shell creation.
Step 1 of 7 - Scaffolding an Angular PWA Application with the Angular CLI
The CLI can provide a functional application with an App Shell quickly. First, we need to ensure we have the latest version of the Angular CLI installed:
npm install -g @angular/cli@latest
If you prefer to try out the next, unreleased version, you can install it like this:
npm install -g @angular/cli@next
Now we can scaffold a new Angular application. For the App Shell to function, it is crucial to have the Angular Router configured, as we will discuss later.
We'll create a new project with routing set up using this command:
ng new my-app-shell --routing
This creates a new folder named my-app-shell containing an Angular application with the Router pre-configured.
Step 2 of 7 - Inspecting the index.html before an App Shell
To grasp the purpose of the App Shell, let's first observe how the application behaves without it. We'll build the default project for production:
ng build --prod
The production build output is in the dist folder. Opening the index.html file, we see a mostly empty page composed of:
- the application's global styles
- the referenced Javascript bundles
When this page is loaded, users will see nothing for several seconds. The browser's initial paint is not a meaningful one since the page is blank.
All of the content is rendered dynamically via JavaScript, leaving no static content in the HTML. We can confirm this by launching the app and examining it with Chrome Dev Tools.
Step 3 of 7 - Profiling Application Startup Before using an App Shell
Let's serve the production build to measure its startup performance.
ng serve --prod
Next, navigate to localhost:4200 and profile the page loading process:
- Open Developer Tools and go to the Performance tab.
- Ensure the "Screenshots" checkbox is enabled.
- Click "Start Profiling and Reload Page."
- Stop the recording once content is visually displayed.
Looking at the profile output, we can observe the following:
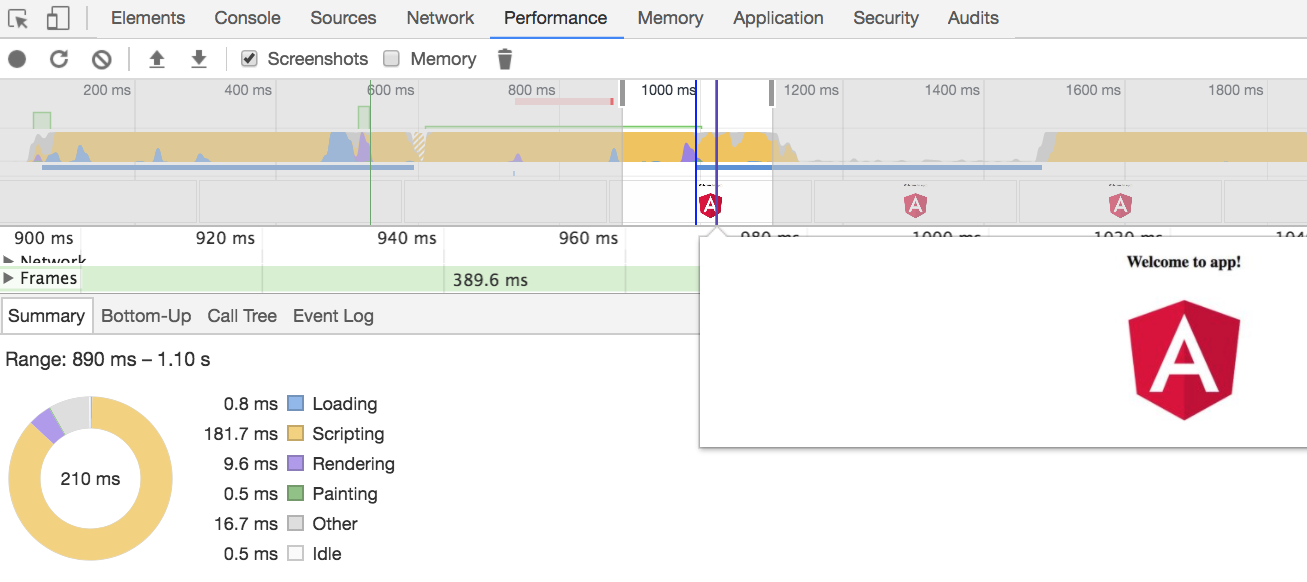
The browser starts rendering the page around 1000ms (shown in purple). Although there was an initial paint attempt at around 600ms, the page was blank because Angular had not yet loaded and rendered any content. This is the best-case scenario for a simple Hello World app. A typical, more complex SPA will take even longer to render visible content.
Let's examine how we can improve this.
Strategies for Improving Startup Time?
The only real improvement is to include more useful HTML and CSS directly in the index.html body. During the initial page load, the Angular library bundles are still being downloaded, and the framework is not yet operational.
We can achieve this by taking the HTML output from the main app.component.ts file and its associated styles, and moving part of it into index.html. This should include the page's primary skeleton, such as the navigation menu.
However, the main component contains a router outlet in its template, which sits empty until Angular fully boots.
So, we need to pre-render this component to get the HTML and CSS for the App Shell. In place of the router outlet, we will specify alternative content to include.
Connecting the App Shell and Angular Universal
We will pre-render the main component at build time using Angular Universal and inject its output into our index.html.
Rather than placing the full content of the / home route in the router-outlet, we likely want something lighter. The home route could generate too much HTML and CSS for an initial shell.
Instead, showing a simple loading spinner or a condensed version of the page for that area would be more practical.
A straightforward method is to create an auxiliary route, perhaps at the path /app-shell-path. We pre-render the content of this route, then paste that pre-rendered HTML into our index.html. That, in essence, forms our App Shell!
To pre-render, we need Angular Universal. Let's add a Universal version of our application to the project.
Step 4 of 7 - Scaffolding an Angular Universal Application
We can add pre-rendering capabilities using the following Angular CLI command:
ng generate universal ngu-app-shell --client-project <project name>
The client project name is defined in the angular.json file. Since a project can contain multiple client applications, we need to confirm the correct project name.
The output of this command is as follows:
CREATE src/main.server.ts (220 bytes)
CREATE src/app/app.server.module.ts (318 bytes)
CREATE src/tsconfig.server.json (245 bytes)
UPDATE package.json (1353 bytes)
UPDATE angular.json (3677 bytes)
UPDATE src/main.ts (430 bytes)
UPDATE src/app/app.module.ts (359 bytes)
added 3 packages and removed 3 packages in 10.619s
This command introduces a new application named ngu-app-shell and adds a corresponding build configuration entry to the Angular CLI angular.json file.
Purpose of the Angular Universal Application
This gives us the ability to pre-render our application with renderModuleFactory. Pre-rendering has several use cases, such as:
- Using it in a backend Node server (like Express) to deliver fully server-side rendered routes directly to the browser (see instructions).
- Angular bootstraps itself and takes over the pre-rendered page as a standard SPA.
- Calling pre-rendering from a CLI tool to generate a plain HTML version of a page for static hosting on a CDN like Amazon Cloudfront.
For our App Shell, we will use pre-rendering from the command line to generate the necessary HTML and CSS.
Step 5 of 7 - Adding the App Shell using the Angular CLI
We can add an App Shell to our application with this command:
ng generate app-shell my-loading-shell
    --universal-project=ngu-app-shell
    --route=app-shell-path
    --client-project=<project name>
Let's analyze this command step by step:
- The
ng generatecommand is used to create and configure the App Shell, assigning it a name. - The
--universal-projectoption specifies which Angular Universal application to use for the pre-rendering from those potentially defined inangular.json. - The
--routeoption dictates the specific route to be fully pre-rendered. Since your application can have multiple routes, the home route/is not always the best choice.
The output of the ng generate app-shell command
Let's review the command output:
CREATE src/app/app-shell/app-shell.component.css (0 bytes)
CREATE src/app/app-shell/app-shell.component.html (28 bytes)
CREATE src/app/app-shell/app-shell.component.spec.ts (643 bytes)
CREATE src/app/app-shell/app-shell.component.ts (280 bytes)
UPDATE angular.json (3940 bytes)
UPDATE src/app/app.module.ts (425 bytes)
UPDATE src/app/app.server.module.ts (599 bytes
We have created a new component named app-shell by running this command. This component was then connected to the /app-shell-path route only within the Angular Universal application, not in the regular client app.
This /app-shell-path route is an internal mechanism for the CLI. End users will not be able to navigate to it; it exists solely as a build-time construct.
The routing configuration was added exclusively to app.server.module.ts (and not in the main app.module.ts), which we can see here:
This route links the /app-shell-path to AppShellComponent. This component will be rendered in place of the router-outlet during the pre-rendering process. AppShellComponent is a standard scaffolded Angular component like any other generated by ng generate.
You can modify this component to include any content you want in the App Shell. For instance, here's an example with a basic loading indicator:
In addition to the route and component, a new configuration object has been added to the angular.json file:
This configuration instructs the production application build to perform the following:
Pre-render the route
app-shell-pathwith the Angular Universal applicationngu-app-shelland apply the resulting output as the App Shell.
Our setup is complete. Let's proceed to build the application, examine the result, and quantify the performance changes.
Step 6 of 7 - Building the Application with the App Shell in Production Mode
Now, let's execute the app shell build. Suppose your project is named app-shell-test, as specified at the top of your angular.json file.
We can build the App Shell by running the command:
ng run app-shell-test:app-shell
This time, the generated index.html in the dist folder is much different. Let's take a look at it:
The page is no longer a blank HTML document. The styles for the AppShellComponent are inlined (as CSS does in the CLI), and the HTML for the navigation menu and a loading indicator is present.
The Angular CLI has essentially taken the pre-rendered output of the app shell route and placed that HTML into the body of the index.html file.
So, with more meaningful content in the initial HTML, we have a functional App Shell!
Step 7 of 7 - Measuring the Performance Improvements from the App Shell
Let's build the project for production and measure the effect.
ng serve --prod
We can then serve the app from the distribution folder using a simple HTTP server:
npm install -g http-server
cd dist
http-server -c-1 .
App Shell Performance Results
With the server running, navigate to localhost:8080 for profiling. Let's see how long it takes for the app shell to appear:
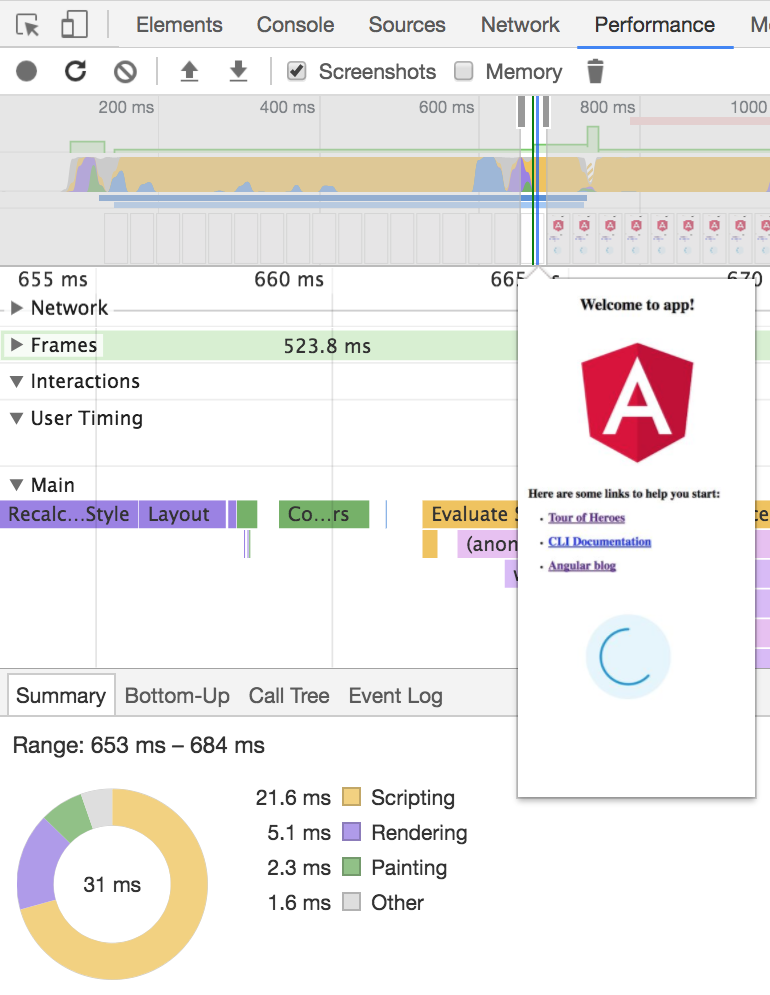
Significant improvement in time to first paint
In this test, the App Shell is visible at roughly 660ms. The time to first meaningful paint for the page was reduced to nearly half its initial time with a simple static shell.
This is a major improvement compared to a typical SPA's first paint, which could easily be a couple of seconds. Imagine the total gains for a complex, content-heavy application.
We have several options to further optimize this:
- Inlining a Base64-encoded image for the loading indicator instead of an external file, thus removing an unnecessary HTTP request.
- Moving or duplicating critical styles from external stylesheets into the App Shell to ensure a quicker render.
The right set of optimizations will vary per application, but the App Shell is the foundation upon which you can achieve that nearly instantaneous perceived startup speed.
Summary
The Angular CLI's App Shell feature is a valuable performance tool that offers out-of-the-box improvement that benefits all applications.
Experiencing a first paint at roughly half a second feels near-instant to the user, even if the rest of the application is still initializing and fetching data.
While the exact time will depend on the application, the App Shell is the key to making that time as short as possible.
Although often associated with PWAs, the App Shell mechanism is a standalone feature and can be used independently without the other PWA services like a service worker.
I hope this guide has been helpful in demonstrating the power of the Angular App Shell.
To dive deeper into building PWAs with Angular, the Angular PWA Course provides a much more comprehensive guide.
Check out these related posts in the series for more on Angular PWA features:
- Service Workers - Practical Guided Introduction (several examples)
- Angular App Shell - Boosting Application Startup Performance
- Angular Service Worker - Step-By-Step Guide for turning your Application into a PWA
Please leave any questions or comments below, and I will answer them.
To stay updated on new posts, feel free to subscribe to our newsletter:
Other posts on Angular
You might also be interested in some of our other well-known articles:
- Getting Started With Angular - Development Environment Best Practices With Yarn, the Angular CLI, Setup an IDE
- Why a Single Page Application, What are the Benefits ? What is a SPA ?
- Angular Smart Components vs Presentation Components: What's the Difference, When to Use Each and Why?
- Angular Router - How To Build a Navigation Menu with Bootstrap 4 and Nested Routes
- Angular Router - Extended Guided Tour, Avoid Common Pitfalls
- Angular Components - The Fundamentals
- How to build Angular apps using Observable Data Services - Pitfalls to avoid
- Introduction to Angular Forms - Template Driven vs Model Driven
- Angular ngFor - Learn all Features including trackBy, why is it not only for Arrays ?
- Angular Universal In Practice - How to build SEO Friendly Single Page Apps with Angular
- How does Angular Change Detection Really Work ?