Builders in Angular
Angular relies on builders to execute a range of repetitive operations: compiling the application, running the linter, executing unit tests, or deploying the output to a hosting service. The official documentation describes them like this:
Several Angular CLI commands trigger a complicated sequence of actions on your source code, including linting, building, or testing. These commands rely on …builders, which invoke secondary tools to get the job done.
Angular ships with … builders that power CLI commands such as
ng build,ng test, andng lint. Default target settings … are listed in the "architect" section of the workspace configuration file,angular.json, where they can also be adjusted.Extending or customizing Angular is possible by writing your own builders, which you can invoke with the
[ng run](https://angular.io/cli/run)CLI command.
Before diving into the mechanics of how builders are constructed, it's worth clarifying their purpose. When you type ng build, the CLI is, in fact, executing the handler function associated with the build builder. Let's trace what happens behind the scenes, step by step.
Keep in mind that your monorepo project might contain multiple applications, and
angular.jsondefines a specific builder for each one. To target a particular project's builder, append the project name to the command, e.g.,ng build app1(more on this in my monorepo article here)
- Parse the configuration in
angular.jsonand locate the relevant builder (under projects->projectName->architect->**build->**builder)
"builder": "@angular-devkit/build-angular:browser", // original

OR

"builder": "@angular-builders/custom-webpack:browser", // custom
The source code for the build-angular:browser builder is available for review.
2. Instantiate the builder and execute it
export default createBuilder<json.JsonObject & BrowserBuilderSchema>(buildWebpackBrowser);
3. The builder then performs its core sequence of operations:
- assertCompatibleAngularVersion
- buildBrowserWebpackConfigFromContext and runWebpack (webpack then kicks off the TypeScript compiler for your source files)
- copyAssets
- generateBundleStats
- generate index.html
- Apply service worker if enabled
At the end of this process, you get the output bundles (index.html, CSS, and JS files) in the ./dist folder.
What is the role of builders?
In practice, builders can handle virtually any operation tied to your codebase: building, dev-server, unit testing, linting, and more:
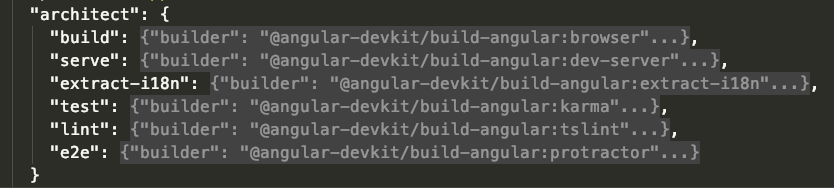
This also explains what the ng add command does—among other things, it inserts new entries into angular.json (typically adding a new builder). The ng add command will be covered in more detail shortly. To illustrate, imagine running ng add [@angular/fire](http://twitter.com/angular/fire) in your project; let's look at what changes in angular.json:
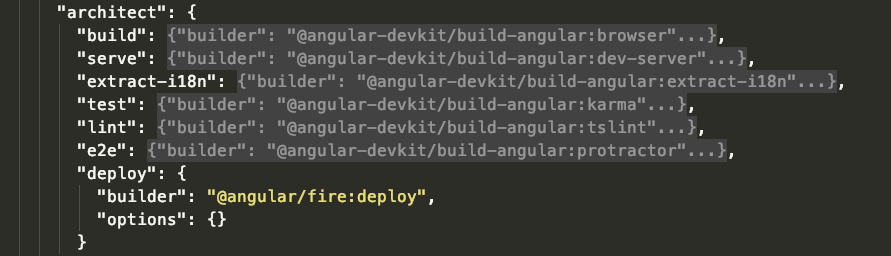
deploy builder was added
As shown, a fresh deploy builder is registered, enabling the ng deploy command to upload the bundled files to FireBase hosting.
Standard builders shipped with Angular CLI
The diagram above confirms that the standard Angular CLI builders live within the @angular-devkit package, specifically in the build-angular collection.
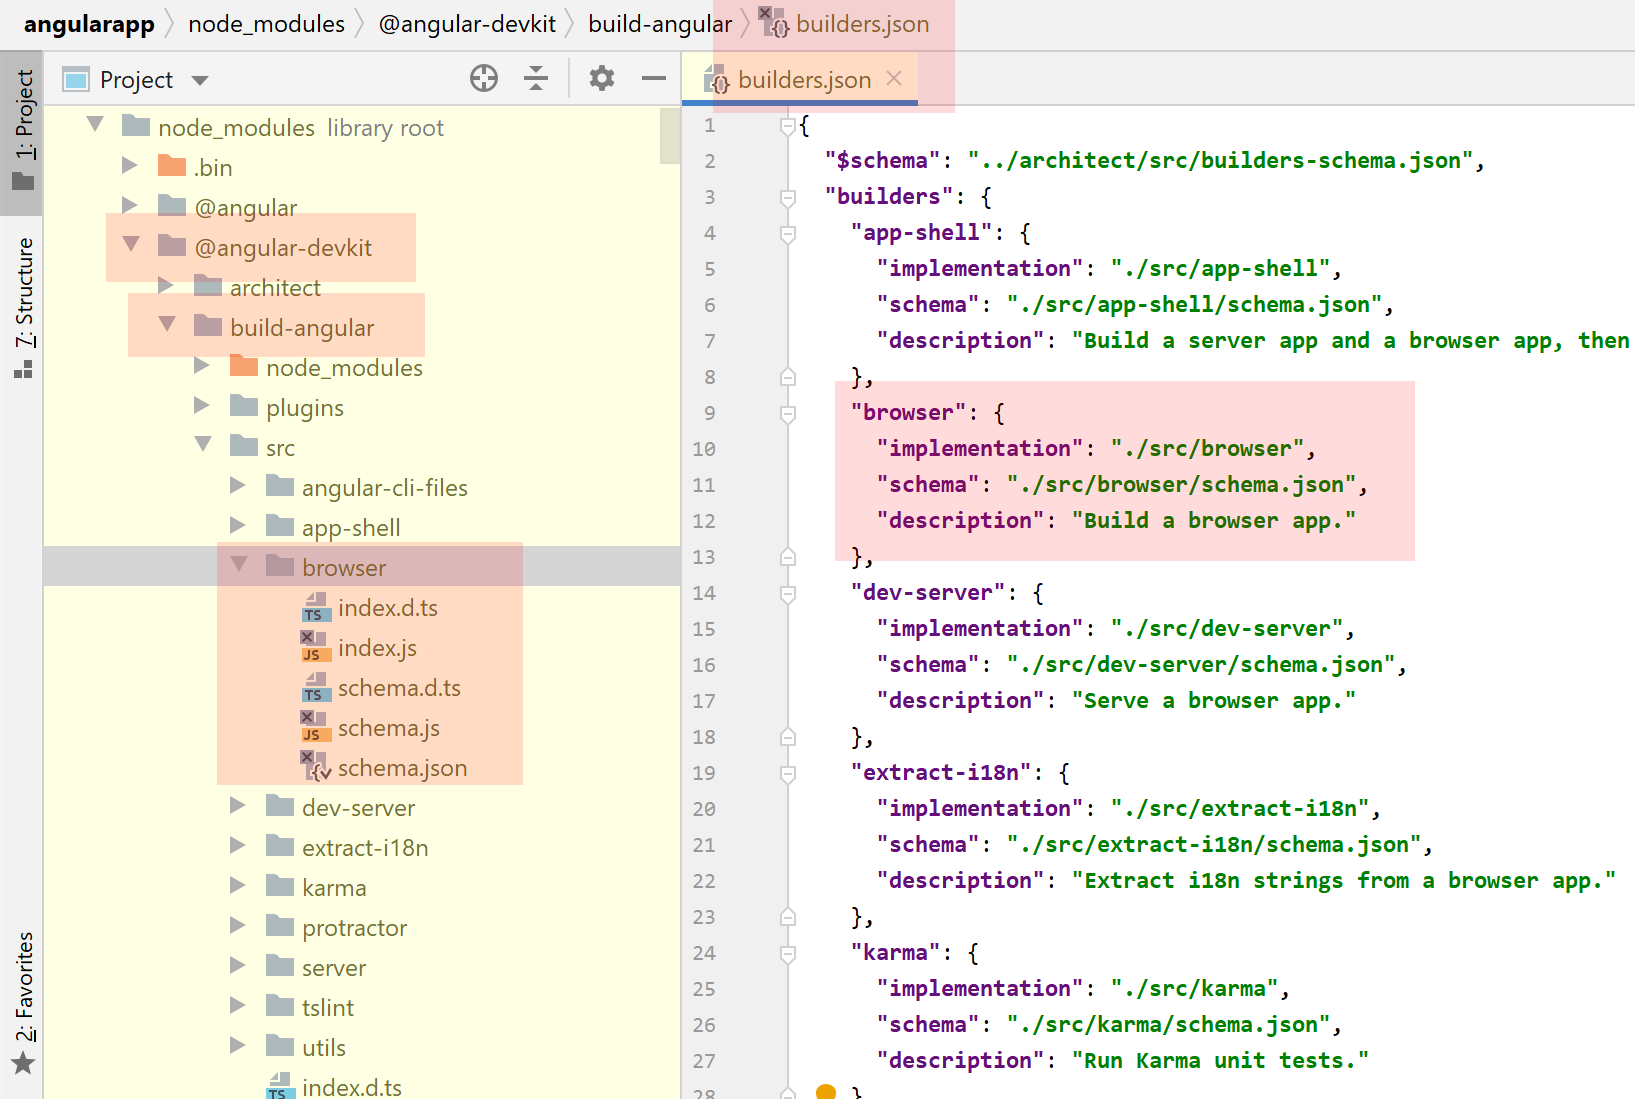
This is where you'll find all the predefined builders—such as build, karma, browser, dev-server—along with their implementations.
Writing your own builders
Creating a custom builder is also an option for specific needs. Common use cases include:
- Adding extra options to the Webpack config (custom-webpack builders from JeB Barabanov)
- Combining the generated JS output files (ngx-build-plus builder from Manfred Steyer)
- Automating any other repetitive workflow for you (e.g., the configure and run source-map-explorer example from Santosh Yadav)
Further reading
- Angular CLI builders (official doc)
- Angular CLI under the hood — builders demystified by JeB Barabanov
- Custom Angular builders list page by Santosh Yadav
Wrap-up
To summarize, builders handle the standard repetitive tasks in Angular: compiling, linting, testing, and deploying. Moreover, you have the freedom to build your own to automate extra operations or add features—whether that's tweaking Webpack configs, running shell scripts, or merging the bundled JS files.
Schematics
Schematics are responsible for transforming your project—they can modify existing files, install dependencies, or scaffold new components, modules, directives, and other units. The official documentation offers this description:
Schematics are used by the Angular CLI to apply transformations to a web-app project (creating or modifying project files)…. The commands
**ng generate**, and **ng add**run schematics by default.When you publish a new version of your library that introduces breaking changes, you can supply an update schematic so the
**ng update**command can automatically address those changes in the target project (adjusting project code to align with the new API).
Additionally, this article elaborates:
Schematics serve as a workflow tool for the modern web; they can apply transforms to your project, such as generating a new component, or updating your code to resolve breaking changes in a dependency. Alternatively, you might want to introduce a new configuration option or framework to an existing project.
That explanation might still feel somewhat abstract. Let's ground it with a concrete example.
Recall how, in the previous section, we enabled FireBase hosting deployment using **ng add **[**@angular/fire**](http://twitter.com/angular/fire)? That command relied on schematics. What exactly did those schematics handle for us?
Here's the breakdown:
- Installed packages such as
@angular/fire,firebase, andfirebase-tools, while also updatingpackage.json. The@angular/firepackage includes a builder for deploying build output to FireBase. - Prompted for certain options during execution (to gather configuration choices).
- Modified
angular.jsonby adding thedeploybuilder configuration, enabling theng deploycommand:
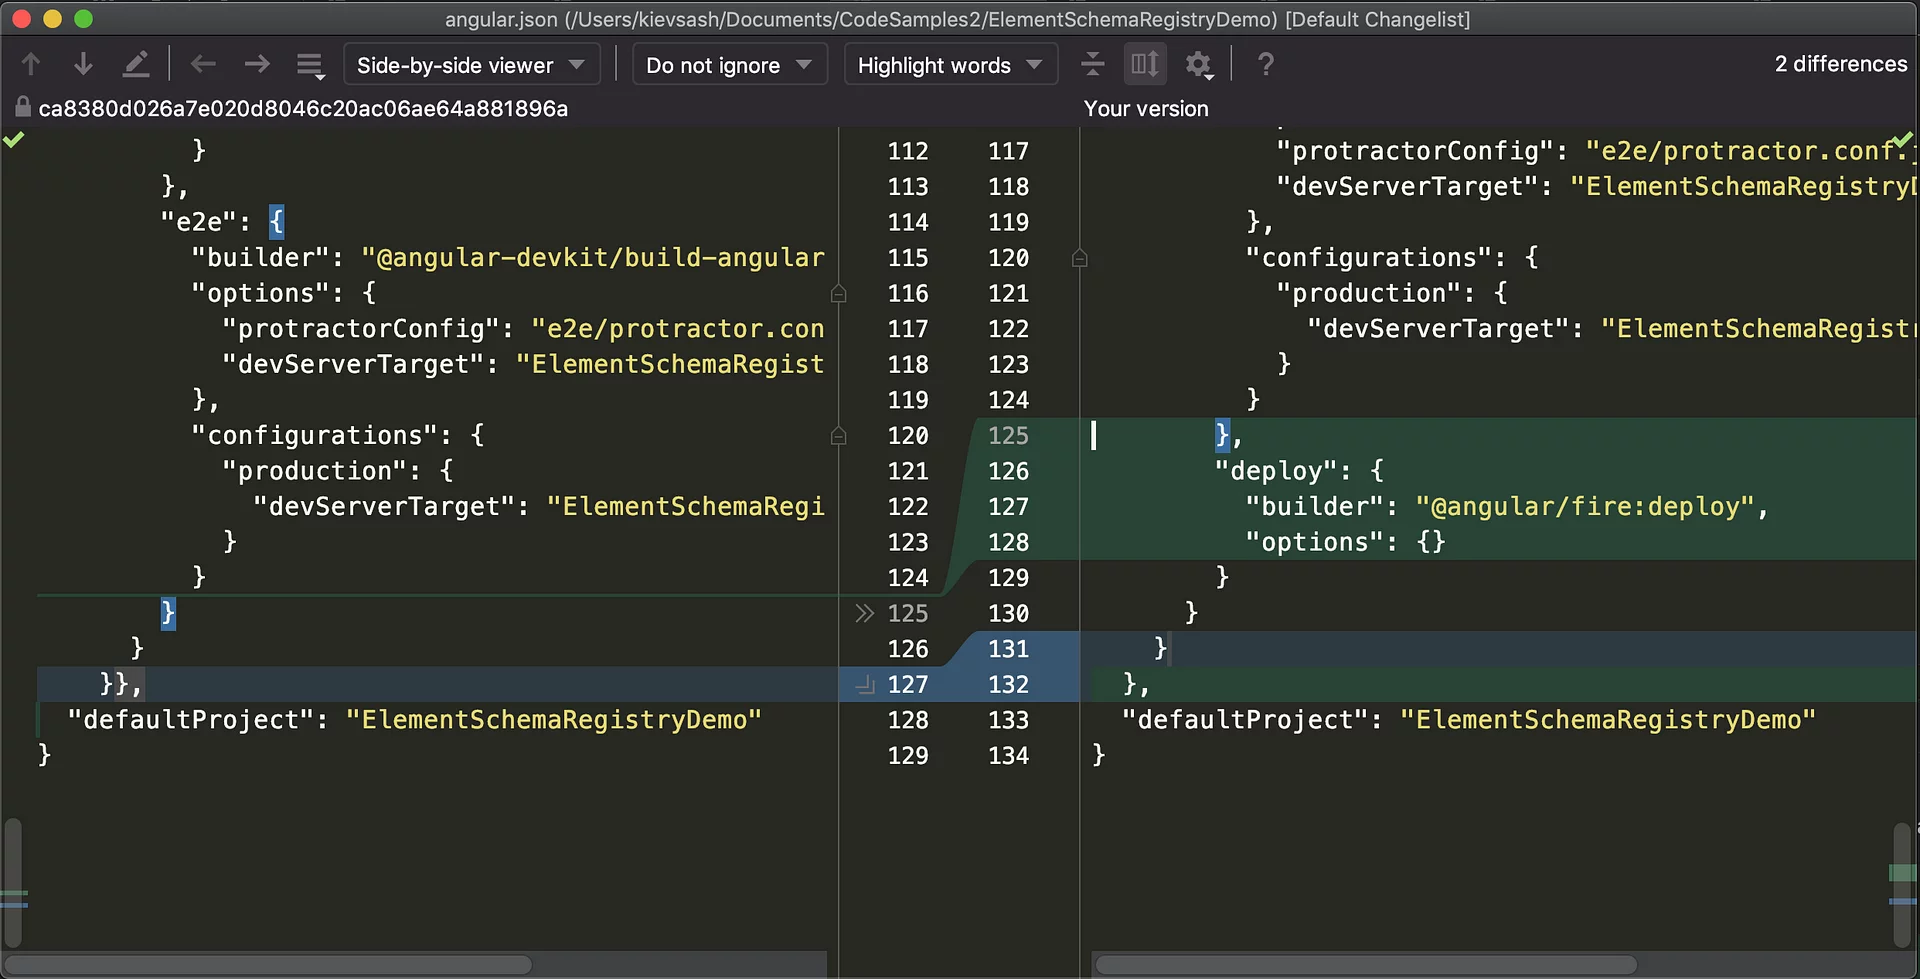
In essence, schematics handled all the setup so we could immediately leverage the deploy builder—dependencies were installed and configuration files were adjusted.
How to invoke schematics
ng new <appName>andng generate <unitType> <unitName>run the appropriate schematic (utilizing the default schematics collection from the @schematics/angular package).
Default options for these commands can be defined in the angular.json file—see this resource for guidance. Alternatively, schematics options can be passed as command-line arguments.
The default schematics collection for ng commands can also be overridden by editing the project's angular.json (specifically,angular.json>cli > defaultCollection).ng add <packageName>installs the package, then triggers the ng-add schematics defined within it (as referenced in its package.json).ng update** <packageName>installs a newer package version and then runs the migration schematics from it (also declared in its package.json).- Schematics can also be executed directly via the schematics CLI command.
For a deeper look, refer to this talk: A Schematic Odyssey by Kevin Schuchard & Brian Love.
For a thorough overview of
angular.jsonstructure, check out "Understanding the Angular CLI Workspace File" by @nitayneeman.
Where do the standard Angular schematics live?
You're likely aware that ng generate component <some-component> produces a set of component files. But where do those file templates originate? They're located inside the @schematics package:
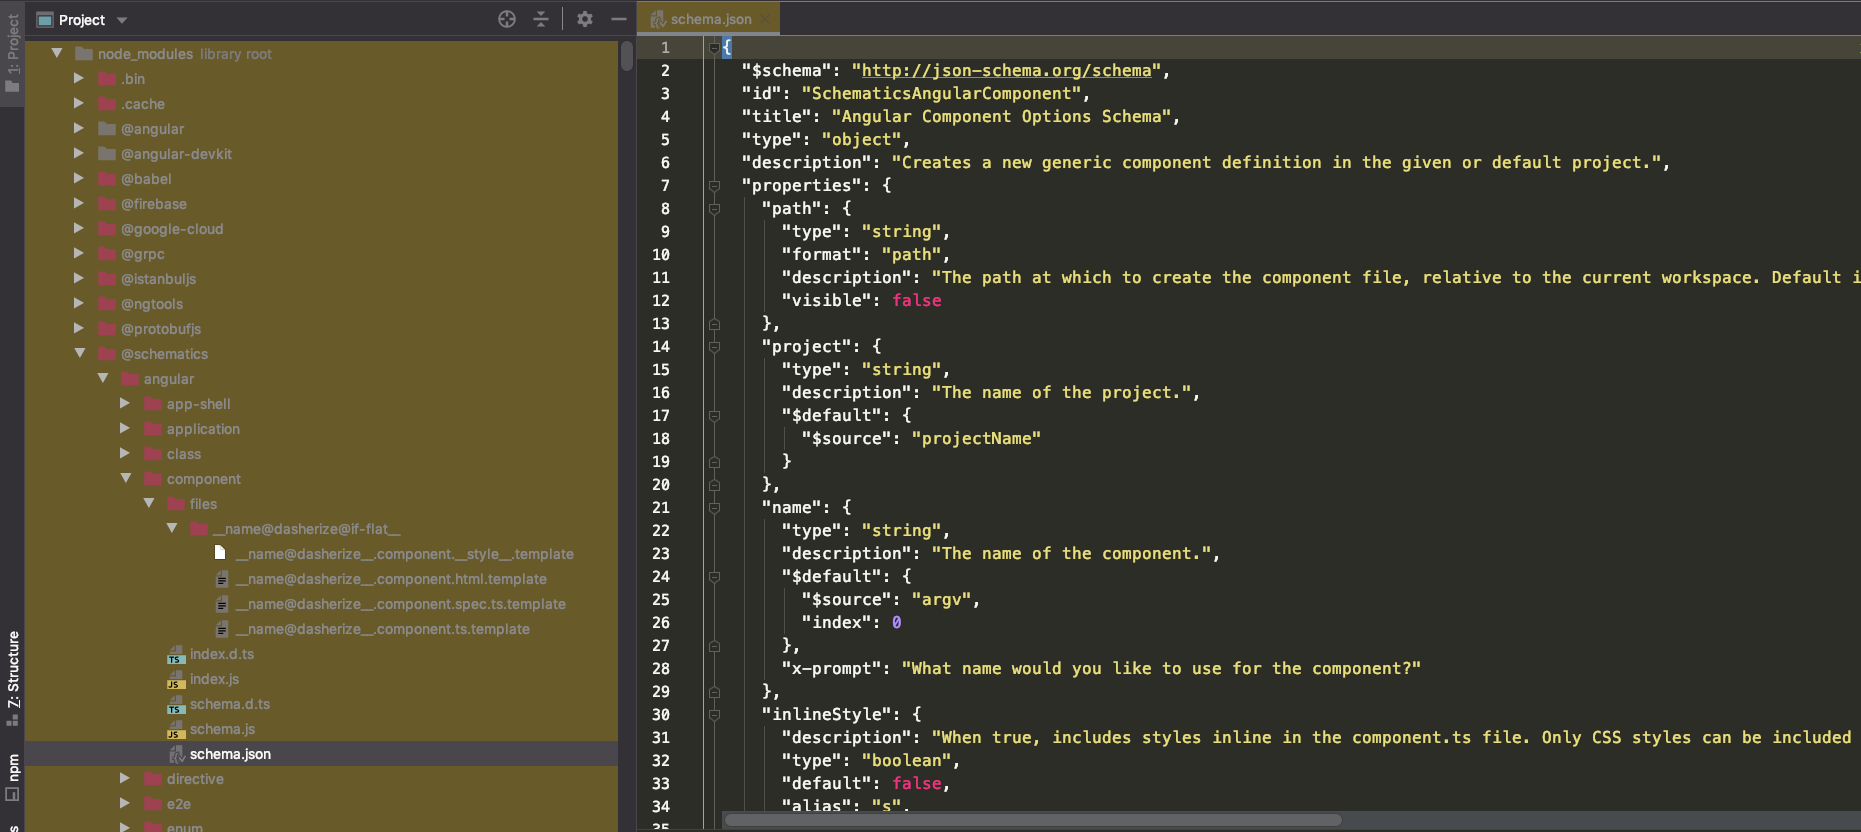
So the ng generate command simply executes the component schematic. The same applies to other schematics like directive, pipe, module, and so on.
Key takeaways
- Builders in Angular handle recurring tasks: compiling code, running lint checks, executing unit tests, and deploying to hosting providers.
- Schematics alter the structure of your project—files are updated, packages are added, and new components/modules/directives/etc. are generated.
- Planning to create your own builder? Ship it alongside schematics (usable via
ng add) that adjust angular.json (registering the builder) and install the required packages.
@angular/fireserves as a good reference. It includes both a builder (here and here) and schematics forng add(here).
I won't dig into the implementation specifics at this point. If that piques your interest, here's a curated list of resources to get you started.
Further reading
- Generating code using schematics
- Schematics — An Introduction
- Effective automated scaffolding with Angular Schematics
- Overriding Angular Schematics
- ngx-deploy-starter — build your own deploy builder (and schematics)
Custom tslint/eslint rules for Angular
What role does tslint play? It flags when developers deviate from the project's code style conventions. Why does that matter? Consistent style makes code more readable, which in turn boosts maintainability. Beyond style, certain rules are designed to prevent specific bugs (such as those offered by rxjs-tslint-rules).
To begin using newly installed rules, you install them and then modify the project's tslint.json file. For example:
npm install rxjs-tslint-rules --save-dev
//tslint.json

{  "extends": [
     "rxjs-tslint-rules"
   ],
   "rules": {
      "rxjs-add": { "severity": "error" },
      "rxjs-no-unused-add": { "severity": "error" }
   }
}
For a comprehensive guide to rxjs-tslint-rules, consult its README.
When you fire off the ng lint command, the sequence unfolds as follows:
- The Angular CLI locates the lint builder in angular.json, instantiates it, and runs it.
- The builder launches tslint.
- tslint reads the tslint.json file to gather all rules, then inspects your code for adherence to those rules.
I'll skip the intricate details of creating custom tslint rules since that falls outside the scope of this piece, but the resources listed below cover that topic thoroughly.
Wrapping up
- Builders in Angular handle recurring tasks: compiling code, running lint checks, executing unit tests, and deploying to hosting providers.
- Schematics alter the structure of your project—files are updated, packages are added, and new components/modules/directives/etc. are generated.
- The lint builder invokes tslint, which loads rules and validates your code against them—custom rules can extend this to match your coding standards.
- Angular CLI isn't a prerequisite for running tslint through the lint builder—you can execute it directly via the tslint command (if installed globally) or npx tslint (if tslint is only a local project dependency).
Further reading
- Custom TSLint rules with TSQuery
- Migrating a TSLint Rule to ESLint
- rxjs-tslint-rules
- Writing custom TSLint rules from scratch
- Custom TSLint rules — easier than you think
Incidentally, were you aware that:
- TSLint is being deprecated.
- The angular-eslint project originated as a port of codelyzer.
- The eslint-plugin-rxjs is a port of rxjs-tslint-rules.
Further details are available in the article Migrating a TSLint Rule to ESLint.
Custom TypeScript Transformers
In his piece Custom TypeScript Transformers with Angular CLI, David makes the following observation:
The Angular CLI uses the AngularCompilerPlugin to transpile TypeScript. It is a webpack plugin that uses the TypeScript compiler together with various TypeScript transformers to transpile the TypeScript to workable JS code for the browser.
Let's now position it within the larger workflow:
- We trigger
ng build - The Angular CLI (ng) locates the appropriate builder inside
angular.json

@angular-devkit/build-angular:browser builder
- That builder launches webpack, which in turn relies on AngularCompilerPlugin.
AngularCompilerPluginkicks off the TypeScript compiler (to compile the project's.tsfiles) and supplies specific transforms to that compiler as well (more on that here).- You can also hook in additional TypeScript transforms of your own (that's where we come in).

Photo by N.
What do the standard AngularCompilerPlugin transforms do?
Take the "Inline resource" transform as an example: it reads the templateUrl value from a component decorator (a file path), loads that file, and swaps in a template property whose value is the file's contents.
The full set of transformers is available here.
Alexey Zuev covers a good number of them in his insightful article "Do you know how Angular transforms your code?".
Why would you write your own custom transforms?
- You want to introduce your own syntax into Angular templates and have Angular understand it. ngx-template-streams follows this route (video).
- You need to extract information from one file and apply changes to another during the build. (This article walks through such a case.)
- You want to scan your Angular project for all RxJS observables and automatically inject unsubscribe logic (a nice write-up from Christian Janker demonstrates exactly that).
- etc.
So how do you get your custom transformer in front of the TypeScript compiler?
AngularCompilerPlugin exposes a transformers property where all Angular standard transformers are collected. The idea is simple: modify that list and append your own custom transformer. But how do you reach it?
There's a dedicated ngx-build-plus:browser builder (which replaces the standard builder backing the ng build command) from ngx-build-plus (by Manfred Steyer). This builder allows you to tamper with the internal webpack configuration of an Angular project (recall that ng build eventually ends up running a builder that starts webpack, right?).
Given that the builder holds a reference to the webpack instance, you can hand it a plugin of your own. Inside that plugin, you can reach the AngularCompilerPlugin instance and extend its _transformers array with your custom transformer.
Let's spell it out step by step:
- Install ngx-build-plus. After that, launching ng build switches over to the ngx-build-plus:browser builder (previously, the standard Angular CLI builder — @angular-devkit/build-angular:browser — was in charge).
- The ngx-build-plus:browser builder can accept your plugin (this isn't a TypeScript transformer but rather a webpack configuration transformer) that lets you mutate the webpack config. Here's a sample plugin illustrating the idea.
- Inside that webpack-modifying plugin, you gain access to the AngularCompilerPlugin instance and extend its _transformers property by pushing your custom transformer onto the list.
- Once ngx-build-plus:browser has applied your webpack-config-modifying plugin and obtained the updated webpack config, it proceeds to run the webpack build for your project.
- As the build unfolds, webpack invokes the AngularCompilerPlugin transformers (with your transformer sitting among them) — here's a minimal dummy transformer authored by David Kingma.
Phew! 🐷
Further reading
- Having fun with Angular and TypeScript Transformers
- Hacking the Angular compiler with your own syntax [Video]
- Custom TypeScript Transformers with Angular CLI
- Do you know how Angular transforms your code?
- Converting TypeScript decorators into static code using tsquery, tstemplate and transforms!
- Writing a Custom TypeScript AST Transformer
- Using the Compiler API
Wrap up
Let's revisit everything one more time (yes, you guessed it — I spent years as a teacher, and so did my mom 😉):
- Builders handle routine operations: compiling the code, executing lint checks, running unit tests, deploying to a host-provider.
- Schematics reshape your project: they modify files, add dependencies, generate new component/module/directive/etc. files.
- The lint builder launches tslint, which loads rules and then evaluates your code (via the TypeScript parser) against those rules — and you can craft custom ones to enforce your own code-style preferences.
- To compile Angular code (which includes Angular-specific template constructs like *ngIf, [someProp], (click), etc.), webpack depends on AngularCompilerPlugin. It rewrites Angular syntax into something the TypeScript compiler can process. You can introduce your own template syntax (or even TypeScript code syntax) for specific goals and get Angular (via webpack) to recognize it too by supplying a custom transformer.
Alternatively, you can use a transformer purely to inject or alter code at build time.
Keep in mind, transformers operate exclusively during the build phase.
AST Conclusion
A good number of the Angular CLI components (and related tools) we've reviewed lean on Abstract Syntax Trees to fulfill their tasks. To avoid any awkward silences, let's clarify that concept as well.
The TypeScript compiler's parser can represent every .ts file as an AST.
A linter traverses an Abstract Syntax Tree (AST). Each individual lint-rule implementation is responsible for spotting patterns in the code (more precisely, within the AST).
TypeScript transformers also operate on the AST of one or more files to scan and alter them.
Schematics work on a Tree — a representation of the project's file system. You make changes to that Tree, and those modifications are then written back to the actual filesystem. (The Tree differs from the TypeScript parser's AST — see here for details.)
Builders don't touch the AST at all. A BuilderHandler (the function implementing the builder) receives only input parameters and an architectural context object (BuilderContext). That context merely carries project-related metadata (ProjectMetadata, currentDirectory, and the like).
Homework
Take it easy — just kidding about the homework. Go feed your bear, tinker with your nuclear reactor, and don't forget your vodka (joking... or am I? 😄).
This post is part of my own learning journey. If you spot anything inaccurate or partially off — please call it out in the comments.
Let's stay connected on Twitter! Cheers!