Building Angular Elements: Bundle Strategies
When it comes to compiling and packaging web components, two primary strategies exist. You can package all library components together with the Angular runtime into a single bundle, or you can treat the runtime and library components as separate, standalone packages. In the latter scenario, the runtime and its dependencies are configured as what webpack calls externals.
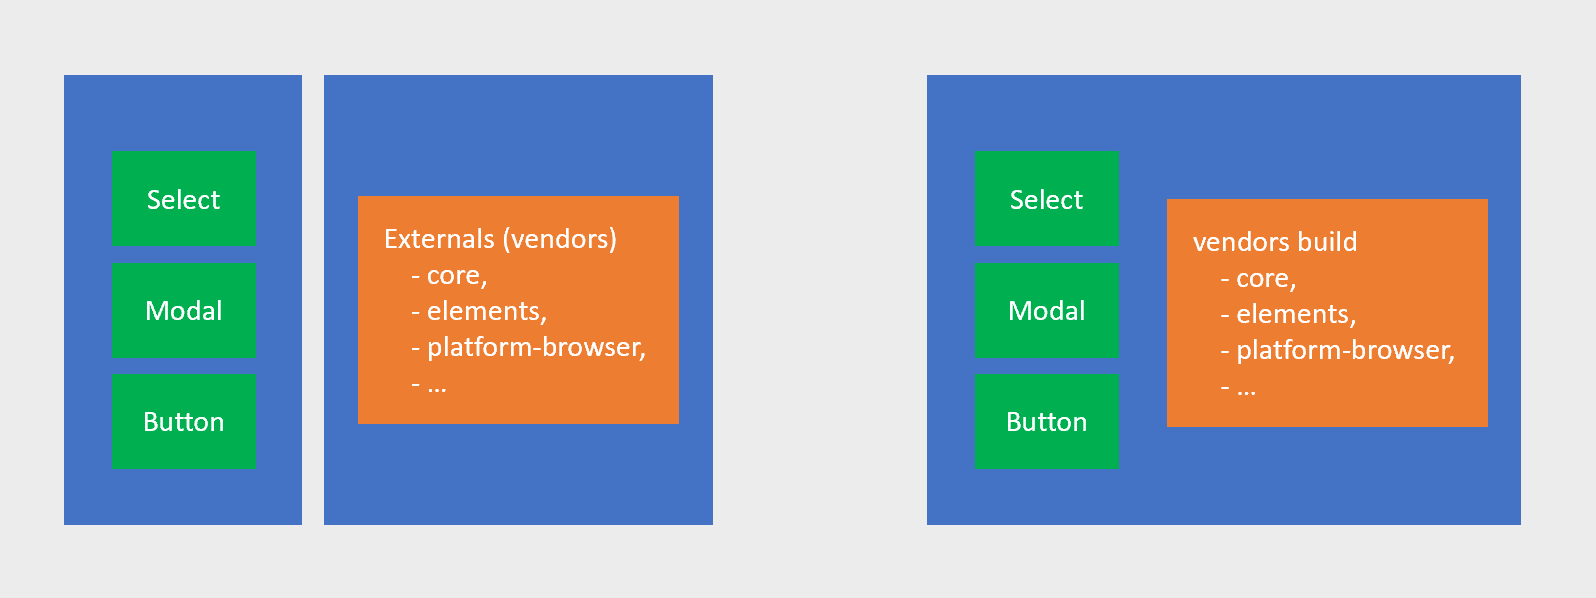
Each of these methods carries its own set of trade-offs. Let's examine them in detail.
Including Runtime with Library Components
Currently, @angular/elements transforms your Component into a Custom Element. While this works well, even with a --prod build, you will notice the output bundle is quite hefty. This bloated size stems from the inclusion of the Angular runtime and all necessary libraries within the bundle.
This approach isn't ideal because both the bundle size and the time-to-interactive metrics suffer. On the positive side, it allows for effective tree shaking, since Angular can identify which components and framework features are unused during the build process.
Configuring Runtime as Externals
The core idea here is to separate shared libraries from the Web Component bundle, leaving only the code indispensable for the component's execution. The consuming applications are then responsible for supplying these shared dependencies.
In the webpack ecosystem, this is known as "externals" and is configured through the webpack configuration file. The official documentation describes it as follows:
The externals configuration option provides a way of excluding dependencies from the output bundles. Instead, the created bundle relies on that dependency to be present in the consumer's (any end-user application) environment. This feature is typically most useful to library developers, however there are a variety of applications for it.
If you are working with the Angular CLI, Manfred's ngx-build-plus library is your best bet for adding externals to the webpack configuration.
When shared dependencies are built and loaded onto the browser's window as a standalone package, you gain the ability to lazy-load individual components on demand. Additionally, shipping externals separately from the Web Component allows the runtime to be cached efficiently by the server, a CDN, or the browser itself.
Leveraging externals can dramatically reduce bundle size. However, it imposes a requirement on the consuming application to import these shared dependencies, which slightly moves away from the true plug-and-play philosophy. Depending on your specific use case, this trade-off might be perfectly acceptable.
Consuming Angular Elements with Ivy
With Ivy now officially available, it's an opportune moment to explore the new possibilities it brings to Web Components and Custom Elements.
Angular has provided @angular/elements for some time, but it has its drawbacks—bundle size being a significant concern. This is where some of Angular's private APIs can be incredibly useful. Let's delve into these APIs and consider what the future might hold.
The following is based on my personal exploration and understanding of Angular's internals. The goal is to highlight current challenges and spark thinking about the future direction. Much of this involves private APIs that are subject to change. This is not a how-to guide; nothing discussed here is intended for production environments.
All the code is available in this Angular workspace on GitHub.
Let's look at two distinct methods for consuming and generating a Web Component with Angular Ivy and the challenges that surface with each.
The first method involves manually creating a Custom Element and using the private Angular API ɵrenderComponent to attach an Angular Component to the DOM. As mentioned in the previous article, this requires you to manually configure custom events, attributes, properties, and the mapping of properties back to attributes.
import { ɵdetectChanges, ɵrenderComponent } from '@angular/core';
import { EventManager, ɵDomEventsPlugin, ɵDomSharedStylesHost, ɵDomRendererFactory2 } from '@angular/platform-browser';
import { AppComponent } from './app.component';
import { CustomDomRendererFactory2 } from './custom/customDomRendererFactory2';

export class HelloWorldElement extends HTMLElement {
  static get observedAttributes() {
    return ['title'] as Array<keyof AppComponent>;
  }

  private component: AppComponent;

  constructor() {
    super();
    this.component = ɵrenderComponent(AppComponent, {
      host: this,
      rendererFactory: new CustomDomRendererFactory2(
        new EventManager([new ɵDomEventsPlugin(document)], null),
        new ɵDomSharedStylesHost(document),
        null
      )
    });
  }

  attributeChangedCallback(name: keyof AppComponent, oldValue: any, newValue: any) {
    switch (name) {
      case 'title':
        this.component.title = newValue;
        break;
    }
  }

  get title(): string {
    return this.component.title;
  }
  set title(value: string) {
    this.component.title = value;
    ɵdetectChanges(this.component);
  }
}
The second method uses the @angular/elements method createCustomElement(). While this handles all the manual work from the first method, it doesn't harness the full power of Ivy's renderer. However, you can utilize Angular's Dependency Injection to override providers and force it to use the Ivy renderer.
import {
  ApplicationRef,
  ComponentFactory,
  ComponentFactoryResolver,
  Injector,
  RendererFactory2,
  Type,
  ViewRef,
  ɵNG_COMP_DEF,
  ɵRender3ComponentFactory
} from '@angular/core';
import { createCustomElement, NgElementConfig, NgElementConstructor } from '@angular/elements';
import { EventManager, ɵDomEventsPlugin, ɵDomRendererFactory2, ɵDomSharedStylesHost } from '@angular/platform-browser';

class IvyComponentFactoryResolver extends ComponentFactoryResolver {
  resolveComponentFactory<T>(component: Type<T>): ComponentFactory<T> {
    return new ɵRender3ComponentFactory(component[ɵNG_COMP_DEF]);
  }
}

class NoopApplicationRef {
  attachView(_viewRef: ViewRef): void {}
}

export function createCustomIvyElement<P>(component: Type<any>, config2?: NgElementConfig): NgElementConstructor<P> {
  const config = { injector: Injector.NULL };

  config.injector = Injector.create({
    name: 'IvyElmentInjector',
    parent: config.injector,
    providers: [
      {
        provide: ApplicationRef,
        useFactory: () => new NoopApplicationRef()
      },
      {
        provide: ComponentFactoryResolver,
        useFactory: () => new IvyComponentFactoryResolver()
      },
      {
        provide: RendererFactory2,
        useFactory: () =>
          new ɵDomRendererFactory2(
            new EventManager([new ɵDomEventsPlugin(document)], null),
            new ɵDomSharedStylesHost(document),
            null
          )
      }
    ]
  });

  return createCustomElement(component, config);
}
Method 1: Building a Custom HTMLElement
In this approach, we extend the native HTMLElement class and use Ivy's rendering capabilities within the constructor:
export class HelloWorldElement extends HTMLElement {
...
  constructor() {
    super();

    const host = document.createElement('app-component');

    this.component = ɵrenderComponent(AppComponent, { host: this });

    const shadowRoot = this.attachShadow({ mode: 'open' });
    shadowRoot.appendChild(host);

  }

...
}
Subsequently, in your main.ts file, you register this new element with the browser:
customElements.define('h-w', HelloWorldElement);
Serving this project reveals that the Angular component renders on the screen, but it is completely missing its styles!
Why is this happening?
First, let's clarify what ɵrenderComponent actually does:
Bootstraps a Component into an existing host element and returns an instance of the component.
It accomplishes this through a rendererFactory. By default, it uses the domRendererFactory3:
export const domRendererFactory3: RendererFactory3 = {
  createRenderer: (hostElement: RElement | null, rendererType: RendererType2 | null): Renderer3 => {
    return getDocument();
  }
};
getDocument(): Ivy calls this whenever it needs access to the 'document' object.
Notice that this specific renderer simply returns the document object and has no logic for handling styles.
How can we fix this?
Since ɵrenderComponent accepts a rendererFactory, we can fortunately leverage another private factory that fits our needs: ɵDomRendererFactory2:
this.component = ɵrenderComponent(AppComponent, {
  host: this,
  rendererFactory: new ɵDomRendererFactory2(
    new EventManager([new ɵDomEventsPlugin(document)], null),
    new ɵDomSharedStylesHost(document),
    01
  )
});
The ɵDomRendererFactory2 uses a switch statement to determine which renderer to return based on the type of encapsulation used by the component.
The EventManger, in conjunction with the ɵDomEventsPlugin, is responsible for registering DOM events, while the ɵDomSharedStylesHost enables sharing styles across multiple components.
When a component is set to use viewEncapsulation.ShadowDom, the ɵDomRendererFactory2 will supply the ShadowDomRenderer.
The ShadowDomRenderer automatically attaches the ShadowDom, allowing us to remove that boilerplate logic from our CustomElement class definition… neat!
Is everything working now?
Running the code as-is will throw an error:
platform-browser.js:1343 Uncaught DOMException: Failed to execute 'attachShadow' on 'Element': Shadow root cannot be created on a host which already hosts a shadow tree.
Why does this occur?
The issue lies in ɵrenderComponent, which uses the factory to create a new renderer multiple times, each time generating a fresh instance.
For components using ViewEncapsulation.Emulated, there's a guard to return the same renderer instance:
...
case ViewEncapsulation.Emulated: {
  let renderer = this.rendererByCompId.get(type.id);
  if (!renderer) {
    renderer = new EmulatedEncapsulationDomRenderer2(this.eventManager, this.sharedStylesHost, type, this.appId);
    this.rendererByCompId.set(type.id, renderer);
  }
  (<EmulatedEncapsulationDomRenderer2>renderer).applyToHost(element);
  return renderer;
}
...
However, this safeguard is absent for the ViewEncapsulation.Native and ViewEncapsulation.ShadowDom cases… So, for the time being, you'll need to implement this check manually.
...
  case ViewEncapsulation.Native:
  case ViewEncapsulation.ShadowDom: {
    let renderer = this.rendererByCompId.get(type.id);
    if (!renderer) {
      renderer = new ShadowDomRenderer(this.eventManager, this.sharedStylesHost, element, type);
      this.rendererByCompId.set(type.id, renderer);
    }
    return renderer;
  }
...
Check the provided GitHub repository for the complete custom class.
With this adjustment, your Custom Element should now correctly render the root app component along with any nested components, complete with styles. Whew, what a relief!
Method 2: Leveraging createCustomElement
The @angular/elements method createCustomElement() abstracts away the boilerplate required to create the HTMLElement class. Unfortunately, it doesn't tap into Ivy's rendering capabilities by default.
Fortunely, the same modifications we made in Method 1 can be applied here, albeit through a different mechanism.
Since createCustomElement() relies on Angular's dependency injection, we can simply provide the correct classes in the injector's providers array:
export function createCustomIvyElement<P>(component: Type<any>, config2?: NgElementConfig): NgElementConstructor<P> {
  const config = { injector: Injector.NULL };

  config.injector = Injector.create({
    name: 'IvyElmentInjector',
    parent: config.injector,
    providers: [
      {
        provide: ApplicationRef,
        useFactory: () => new NoopApplicationRef()
      },
      {
        provide: ComponentFactoryResolver,
        useFactory: () => new IvyComponentFactoryResolver()
      },
      {
        provide: RendererFactory2,
        useFactory: () =>
          new ɵDomRendererFactory2(
            new EventManager([new ɵDomEventsPlugin(document)], null),
            new ɵDomSharedStylesHost(document),
            null
          )
      }
    ]
  });

  return createCustomElement(component, config);
}
The
IvyComponentFactoryResolverreturns theɵRender3ComponentFactory.
Serving your application now should work without any additional tweaking!
Why is the standard ɵDomRendererFactory2 sufficient here?
The distinction is that createCustomElement() relies on a componentFactory rather than a rendererFactory (which ɵrenderComponent uses). The componentFactory verifies whether it's creating the root element and only then creates a single ShadowDomRenderer instance.
It's been quite intriguing to explore the differences between createCustomElement() and ɵrenderComponent and how they can be adapted to leverage Ivy and apply styles.
There appears to be a divergence between the two methods that may not be strictly necessary.
Syncing State with the View in Angular Elements
Let's now examine how to manage change detection when working with Angular elements, and address the following common problem:
I'm aiming for the minimal bundle size discussed earlier but I'm using a third-party directive. It correctly calls
markForCheck()to flag the component as dirty. However, the changes never get picked up, so the view is stale. How can I resolve this?
Fortunately, there's a private API that saves the day: ɵmarkDirty(). Unlike markForCheck, this method invokes scheduleTick(), which actively triggers change detection.
But how do we apply it?
Angular generates a new ChangeDetectorRef (also known as ViewRef) for every componentView. When a view is marked as dirty using markForCheck, it traverses up the view tree, flagging all parent components as dirty. We can intercept this process by monkey-patching the method to use the private API ɵmarkDirty() instead.
In the root component, you do the following:
...
export class AppComponent {
...
  constructor(private cdr: ChangeDetectorRef) {
    this.cdr.__proto__.markForCheck = () => ɵmarkDirty(this);
  }
...
Now, whenever a new ViewRef is created (for the third-party directive), it will be instantiated with one that uses the ɵmarkDirty() API, ensuring that changes are properly reflected in the view.
The Angular Tooling Ecosystem
Within the Angular ecosystem, there are several excellent tools designed to facilitate the building and consumption of Web Components.
Ngx-build-plus
Ngx-build-plus is a valuable tool that extends the Angular CLI's default build behavior. Here are some of its key features:
Single Bundle Output
It consolidates the multiple bundle outputs from a standard Angular build into a single, easy-to-consume bundle. This is particularly useful for integrations with @angular/elements.
Externals Support
It allows you to create a partial webpack configuration that runs alongside Angular's internal one. This partial configuration can specify webpack's "externals" option, which prevents the bundling of specific Angular packages and instead loads these external dependencies at runtime. (Refer to the earlier section on externals.)
Angular-extensions
This fantastic library alleviates many of the headaches associated with orchestrating the loading of Web Components into your application. With a minimal amount of configuration, the library's Angular directive handles the injection of the script tag and the Custom Element tag into your HTML. From dynamic loading and caching to advanced template bindings, it's a powerful asset in the Angular Web Components toolbox.
That's all for this exploration. I hope you've gained insights into some of Angular's private APIs and the future potential Ivy holds for Custom Elements.