A fresh approach to writing conditionals, alternate branches, switch statements, and iterations within Angular templates!

Kevin Kreuzer
@nivekcode
Oct 24, 2023
5 min read

(📸 by Javier Martínez)
The upcoming release of Angular 17 brings a fresh template capability called control flow. This approach redefines how developers write if statements, if-else statements, switch-case statements, and for loops.
On top of that, Angular 17 is set to ship “Deferable Views,” a compelling new option that we’ll explore in a separate post. Join our newsletter so you don't miss it!{:target="_blank"}
Let's look ahead at Angular's evolution and see how we'll structure our if-else, switch-case, and for loops. Our starting point is the simplest and most essential case: the basic if condition.
The @if conditions
Previously, Angular enabled simple if statements via the NgIf directive.
<div *ngIf="condition">Content</div>
Compiling this code required the NgIf directive to be included in the component’s imports array. Here is the full component structure that would be used.
@Component({
  standalone: true,
  template: `<div *ngIf="condition">Content</div>`,
  imports: [NgIf],
})
export class MyComponent {}
Now it’s time to see how Angular 17’s brand-new control flow syntax lets us rework this same code in a more dynamic way.
@if (condition) {
  <div>Content</div>
}
The syntax here looks nearly identical to a standard JavaScript function, with the sole exception being the @ prefix preceding the if keyword.
That was straightforward. Now, how do we handle an if-else scenario?
If this syntax feels new, simply consider how you would structure an
if/elsein vanilla JavaScript, then place an@symbol before each keyword.
@if (streamingService === 'Netflix'){
  <div>Peaky Blinders</div>
} @else {
  <div>Ted Lasso</div>
}
It really is that simple. You simply add an @ before both if and else, and then have your functions return templates rather than printing logs.
Alright, an if-else block—what’s the big deal? Right now, replicating this behavior requires the code below.
<div *ngIf="streamingService === 'Netflix'; else appleTVShow">
  Peaky Blinders
</div>

<ng-template #appleTVShow>
  <div>Ted Lasso</div>
</ng-template>
In my view, the new syntax significantly enhances clarity. On top of that, it is far simpler to explain, given its strong resemblance to plain JavaScript.
What is your take? Which option do you find clearer? Share your thoughts in the comment section below.
That covers everything about control flow and if-else—now let's move on to switch-case statements.
The @switch case
The Switch-Case statement lets you assess an expression and run distinct code sections depending on the case that matches, proving to be a valuable approach for managing various branching scenarios.
With the current Angular release, constructing a switch-case statement required adding these directives to our components or modules imports array: NgSwitch, NgSwitchCase, and NgSwitchDefault. Consequently, the HTML structure appeared as follows:
<div [ngSwitch]="streamingService">
  <div *ngSwitchCase="'AppleTV'">Ted Lasso</div>
  <div *ngSwitchCase="'Disney+'">Mandalorian</div>
  <div *ngSwitchDefault>Peaky Blinders</div>
</div>
Let’s transition this to the updated control flow syntax.
@switch(streamingService) {
  @case ('Disney+') {
    <div>'Mandalorian'</div>
  } @case ('AppleTV') {
    <div>'Ted Lasso'</div>
  } @default {
    <div>'Peaky Blinders'</div>
  }
}
Once more, this syntax mirrors JavaScript but swaps
:for curly braces when writing case statements.
Excellent—who's eager to tackle loops next?
The @for loops
Nearly every app relies on loops as essential constructs for handling arrays and datasets. In its current form, Angular gives us the ngFor directive for this purpose.
<ul>
  <li *ngFor="let streamingService of streamingServices">
    {{streamingService}}
  </li>
</ul>
Here's how a loop of this kind is implemented in an Angular template with the newly introduced control flow syntax.
<ul>
  @for (streamingService of streamingServices; track streamingService) {
    <li>{{streamingService}}</li>
  }
</ul>
Several differences stand out here. For one, the let keyword no longer appears before the variable declaration; for another, a track function is now introduced.
A superior "track" alternative
Does track sound familiar? It likely brings to mind the optional trackBy function that we’ve relied on with ngFor up to this point.
Within Angular, the
trackByfunction pairs with thengFordirective to streamline list rendering. It tags each list item with a distinct identifier, enabling Angular to efficiently refresh or adjust individual entries without rerendering the full list. The result is better performance, particularly for extensive lists.
☝️ Seen lag with large lists before? That might stem from omitting the
trackByfunction. Research into performance conducted by the Angular team uncovered thatNgForiterating over immutable data with notrackByranks among the most frequent sources of performance slowdowns in Angular apps.
Given the potential for performance degradation, the track function is now mandatory for for loops.
What’s great about track is that the full expression can be written directly inline, making a dedicated function within the template unnecessary.
@for (product of products; track product.id) {
 {{ product.title }}
}
The
trackByfunction can still be called usingtrack, primarily to support migration scenarios.
@for (product of products; track productId($index, product)) {
  {{ product.title}}
}
Implicit variables
Within the updated control flow syntax, these variables become accessible inside a for row view.
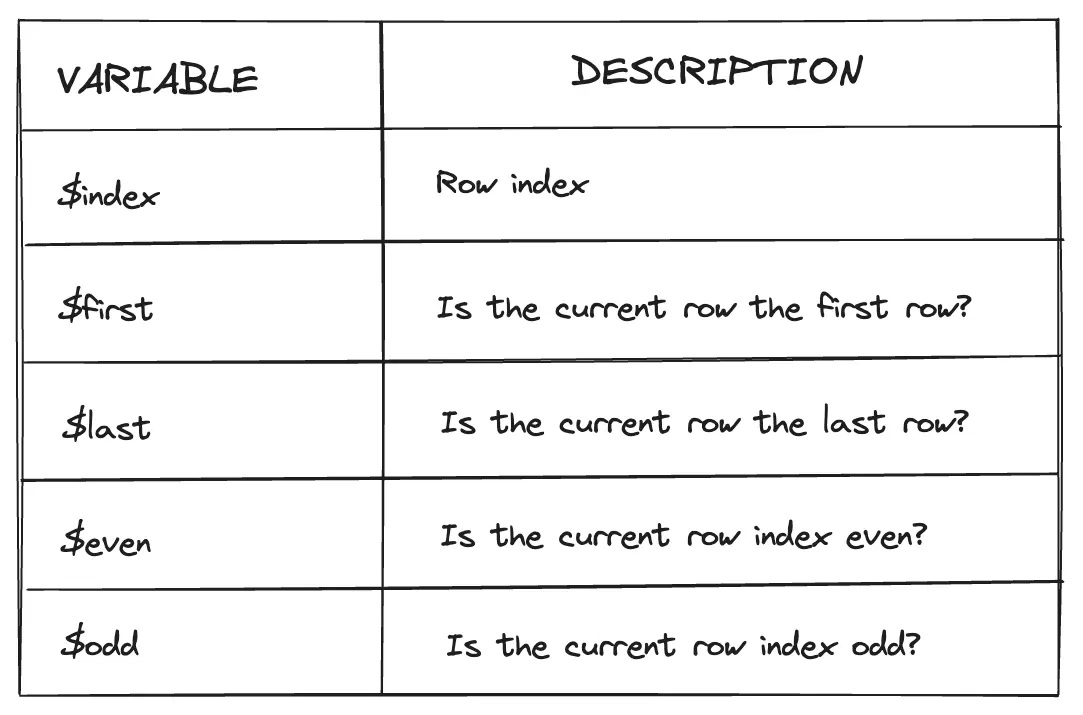
In order to read those values, the let keyword must be used, which lets us bind them to a variable name we pick.
<ul>
  @for (service of streamingServices; track service; let i =
    $index; let first = $first; let last = $last; let even = $even; let odd = $odd
  ) {
    <li>{{i}} {{first}} {{last}} {{even}} {{odd}}</li>
  }
</ul>
Pretty exciting, right? Yet there’s even more on offer—an @empty block is the latest addition.
Empty block
The @empty block enables us to show an element even if the list contains no items.
Imagine we’ve got a list showing every streaming service the user subscribes to. When the user subscribes to nothing, a div with a message appears. That scenario is exactly where the @empty block fits in.
@for (streamingService of streamingServices; track stramingService) {
  <div>{{ streamingService }}</div>
} @placeholder {
  <div>No streaming services available</div>
}
Automated migration
If you're someone who, much like me, appreciates the cleaner, more legible syntax, you may be tempted to spruce up your entire codebase with this modern control flow style. Yet that might involve considerable effort, given that ngIf and ngFor directives are sprinkled throughout your whole project.
However, there’s no need for concern — Angular ships with a powerful migration tool that can convert our app over to the new control flow syntax.
ng g @angular/core:control-flow
To wrap up, the revised control flow syntax brings more than just cleaner code — it adds a layer of intuitiveness and grace to the way we write. I’m genuinely impressed by these updates and see them as a meaningful leap forward, helping us keep our codebases tidy and streamlined.
We’d love to hear what you think, so drop your feedback in the comments — your take on this exciting shift matters to us. Happy coding!
Further resources
For those looking to dive deeper into the standout control flow feature, head over to my Stream VOD and give the intro video a spin. It’s a great, lighthearted way to get the essentials on everything control flow delivers.
Like what you see in the code preview? Check out our fresh theme plugin
Skol - the definitive IDE theme

Bring the aurora borealis experience directly into your development environment. This clean yet robust dark theme not only looks polished but also reduces eye strain.
Create more intuitive interfaces by combining Angular with AI
Learning Angular Through AI-Powered Video

A practical workshop on bringing AI into your Angular projects, showing how Hash Brown can help craft responsive and smart user interfaces.
Walk through real examples covering streaming conversations, tool invocation, generative UIs, and structured responses — all explained incrementally.
If you find this useful and are curious about keeping your Angular app maintainable over the long haul, there's more to explore.
Angular Enterprise Architecture eBook

Discover the approach to structuring both greenfield and established enterprise-scale Angular projects using robust, tool-supported automated architecture validation.
By doing so, you guarantee that your codebase remains easy to maintain, ready for growth, and capable of sustaining fast feature delivery across the entire lifespan of the application!
Are you finding this useful and eager to dive deep into Angular's innovative Signal Forms?
Angular Signal Forms: Comprehensive Practitioner Workshop

Dive into Angular's latest Signal-Forms across 12 step-by-step chapters, blending theory with practical exercises.
Explore core form concepts, validation logic, bespoke controls, nested forms, and transition tactics—and much more!

Never miss a story
from the blog again
Join the Angular Experts Content Updates & News mailing list, and we will let you know the moment a fresh post about Angular, Ngrx, RxJs, or any other compelling Frontend topic goes live.
Your email stays private — rest assured, unsubscribing is always just one click away!
Join the discussion
Feel free to post your questions, insights, or share your unique point of view on the subject
You might also like
Discover more related content, such as Modern Angular , by browsing these additional posts from the Angular Experts team!
Angular Signal Forms: Custom Controls Without ControlValueAccessor
Build reusable Angular custom controls with FormValueControl, model(), touch events, and schema-driven validation—without writing a ControlValueAccessor.
Kevin Kreuzer
@nivekcode
Aug 12, 2026
7 min read
Angular Signal Forms: The Missing Create/Edit Pattern
Learn a practical Angular Signal Forms pattern for create and edit flows, with route-based mode, edit data loading, linkedSignal prefilling, submit branching, and validation context.
Kevin Kreuzer
@nivekcode
Aug 1, 2026
6 min read

Angular Signal Forms Essentials
Understand the core concepts behind modern Angular Forms. Learn how to create Signal Forms, wire them up in templates, use built-in and custom validators, handle cross-field validation, submit forms, and more.
Kevin Kreuzer
@nivekcode
Feb 14, 2026
12 min read
Empower your team with our extensive experience
Angular Experts have accumulated years of consulting with both enterprises and startups, delivering workshops and tutorials, and sustaining a rich ecosystem of open source resources. Our pride in modern front-end expertise is immense, and we are eager to see your business thrive with our support.