Approaches for Building Nested Forms
There are several common strategies for implementing nested forms in Angular, each with its own trade-offs.
- Using a Sub-Form Component that provides
ControlContainer.
This method differs between template-driven and reactive forms.
Recommended for small projects where only one form module is in use and you simply need to break up a lengthy form into more manageable pieces.
Advantage: Fast to set up and get running.
Disadvantage: Tied to a single form module.
2. Passing the FormGroup instance into child components via an Input and referencing it directly within the child templates. Several solid tutorials cover this pattern.
The downside here is that it creates a tight coupling between the parent form group and the child group.
3. Implementing Composite CVAs.
Advantages: Highly reusable and portable. Offers better encapsulation since the internal form controls of the component don't have to be exposed to the parent. This approach shines when your project includes multiple form modules, which is typical in larger applications.
Disadvantage: Implementing the CVA interface results in some boilerplate code.
Let's dive into the third approach.
Understanding ControlValueAccessor (CVA)
According to the Angular team at Google:
The
ControlValueAccessorinterface is the foundation for building value accessors for elements like radio buttons, selects, and inputs in the core library. It requires just three methods:
writeValue(value: any): void— receives a value and applies it to the form control element (model to view).
registerOnChange(fn: (value:any) => void): void— registers a callback that should be invoked with the new value when the form control element's value changes (view to model).
registerOnTouched(fn: () => void): void— registers a callback to be invoked when the control is touched (this can be left empty if the touched state is irrelevant).
Building Composite CVAs
This section assumes familiarity with reactive forms, especially FormGroup, FormControl, and validation concepts.
Here is a sample reactive form component I've created, called billing-info-unnested.
import { Component, OnInit } from '@angular/core';
import { FormGroup,FormControl, Validators,AbstractControl, ValidationErrors } from "@angular/forms";

@Component({
  selector: 'app-billing-info-unnested',
  template: `
<div class="container">
  <form [formGroup] ="nestedForm" (ngSubmit) = "onSubmit()">
<div class="row">
  <label for="Full Name"> Full Name </label>
    <input type="text" formControlName="fname" class="">
</div>
<div class="row">
  <label for="Email"> Email </label>
    <input type="text" formControlName="email" class="">
</div>
<div class="row">
  <label for="addressLine"> Street Address </label>
    <input type="text" formControlName="addressLine" class="">
</div>
<div class="row">
  <label for="Area"> Area Code </label>
    <input type="text" formControlName="areacode" class="">
</div>
<button type="submit" [disabled]="nestedForm.invalid">Place Order</button>
</form>
</div>`,
  styleUrls: ['./billing-info-unnested.component.css']
})
export class BillingInfoUnnestedComponent implements OnInit {

public nestedForm: FormGroup = new FormGroup({
  fname: new FormControl("", [Validators.required]),
  email: new FormControl("", [Validators.required, Validators.email]),
addressLine: new FormControl("", [Validators.required]),
areacode: new FormControl("", [Validators.required, Validators.maxLength(5)])
})
  constructor() { }

  ngOnInit() {
  }
public onSubmit(){
  // if(this.nestedForm.invalid){
  //   return
  // }

  console.log(" Billing Form", this.nestedForm);
}
}
This is what it renders:
nestedForm {
fname:"",
email: "",
addressLine: "",
areacode: ""
}
Now, suppose new requirements come in and we need to reuse these controls alongside additional fields—for instance, shipping types in a checkout form, or password, gender, and age fields in a signup form.
We can handle this by grouping those elements into reusable components and treating each as a form control. Essentially, we'll construct our component as a composite control value accessor. We can even enforce validation at the component level. This technique is quite powerful.
Let's extract the __name__ and __email__ fields into a BasicInfoComponent, and move __addressLine__ and __areacode__ into an __AddressComponent__.
We'll use BasicInfoComponent as our example.
<ng-container [formGroup]="basicInfoForm">
<div class="row">
  <label for="Full Name"> Full Name </label>
    <input type="text" formControlName="fname" class="">
</div>
<div class="row">
  <label for="Email"> Email </label>
    <input type="text" formControlName="email" class="">
</div>
</ng-container>
The corresponding .ts file is as follows:
import { Component, OnInit, forwardRef } from '@angular/core';
import { ControlValueAccessor,FormControl, FormGroup, Validators } from "@angular/forms";

@Component({
  selector: 'app-basic-info',
  templateUrl: './basic-info.component.html',
  styleUrls: ['./basic-info.component.css'],

})
export class BasicInfoComponent implements OnInit {

public basicInfoForm: FormGroup = new FormGroup(
  {
fname: new FormControl("",[Validators.required]),
email: new FormControl("", [Validators.required])
});
  constructor() { }

  ngOnInit() {
  }
}
And the rendered output looks like:
basicInfoForm: {
fname: "",
email: ""
}
Apply the same pattern to AddressComponent.
The parent form component, BillingInfo, can then be simplified to:
import { Component, OnInit } from '@angular/core';
import { FormGroup, FormControl} from "@angular/forms";

@Component({
  selector: 'app-billing-component',
  template:`
<div class="container">
  <form [formGroup] ="nestedForm" (ngSubmit) = "onSubmit()">
<app-basic-info formControlName="basicInfo"></app-basic-info>
<app-address-info formControlName = "address"></app-address-info>
<button type="submit" [disabled]="nestedForm.invalid">Place Order</button>
</form>
</div>
`,
  styleUrls: ['./billing-info.component.css']
})
export class BillingInfoComponent implements OnInit {

public nestedForm: FormGroup = new FormGroup({
  basicInfo: new FormControl(""),
  address: new FormControl("")
});
  constructor() { }

  ngOnInit() {
  }

public onSubmit(){
  console.log("Billing Info", this.nestedForm.value);
}
}
Let's run this. Here's a Stackblitz demo.
An Unexpected Error
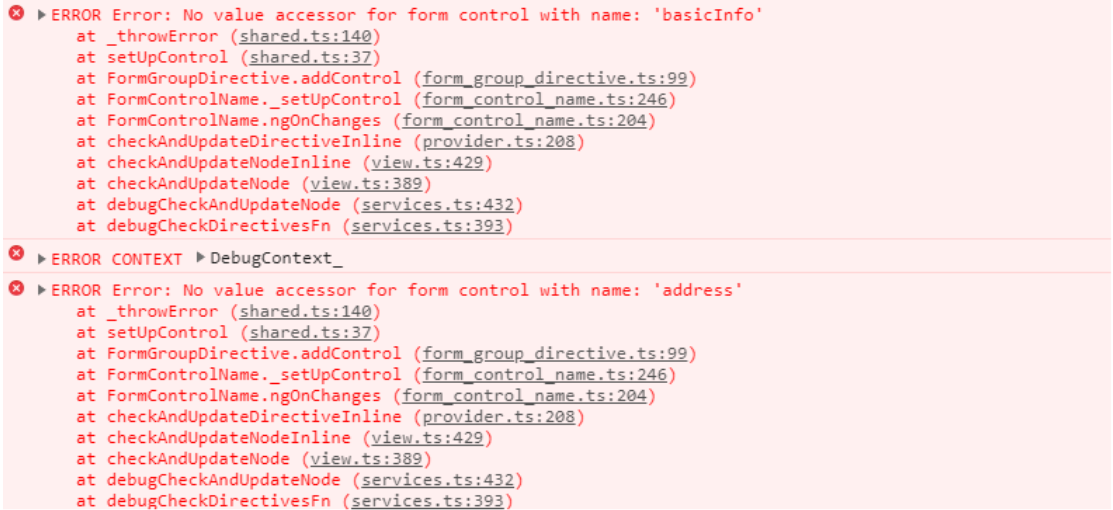
Running the demo, however, produces an error.
Error: No value accessor for form control with name: 'basicInfo'
Let's review the built-in value accessors that Angular provides.
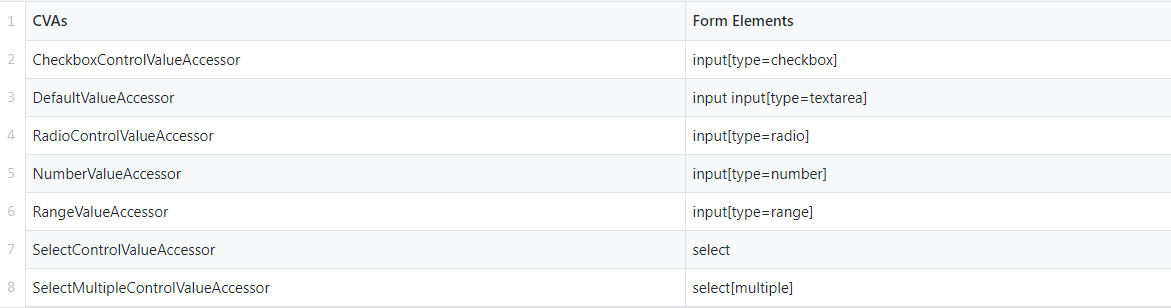
Since our custom component doesn't fall into any of these categories, the Angular compiler throws an error saying no value accessor is available.
For a custom form control to work with Angular forms, it must implement
ControlValueAccessor.
Making Custom Controls Work with Angular Forms
We'll now implement the ControlValueAccessor interface and its methods in both BasicInfoComponent and AddressInfoComponent. Here's how AddressComponent is structured:
import { Component, OnInit } from '@angular/core';
import { ControlValueAccessor,NG_VALUE_ACCESSOR, NG_VALIDATORS, FormGroup,FormControl, Validator, Validators,AbstractControl, ValidationErrors } from "@angular/forms";

@Component({
  selector: 'app-address-info',
  templateUrl: './address-info.component.html',
  styleUrls: ['./address-info.component.css']
})
export class AddressInfoComponent implements OnInit, ControlValueAccessor {

public addressForm: FormGroup = new FormGroup({
  addressLine: new FormControl("",[Validators.required]),
  areacode: new FormControl('', [Validators.required, Validators.maxLength(5)])
});
  constructor() { }
  ngOnInit() {
  }

  public onTouched: () => void = () => {};

  writeValue(val: any): void {
    val && this.addressForm.setValue(val, { emitEvent: false });
  }
  registerOnChange(fn: any): void {
    console.log("on change");
    this.addressForm.valueChanges.subscribe(fn);
  }
  registerOnTouched(fn: any): void {
    console.log("on blur");
    this.onTouched = fn;
  }
  setDisabledState?(isDisabled: boolean): void {
    isDisabled ? this.addressForm.disable() : this.addressForm.enable();
  }
}
After implementing the accessor, we must tell Angular which value accessor applies to the <app-address-info></app-address-info> element.
The Provider Mechanism
Let's examine how DefaultValueAccessor is registered in the Angular Forms Package.
export const DEFAULT_VALUE_ACCESSOR: any = {
provide: NG_VALUE_ACCESSOR,
useExisting: forwardRef(() => DefaultValueAccessor),
multi: true
};
Let's break down the syntax.
- It registers
DefaultValueAccessorusing the built-in tokenNG_VALUE_ACCESSOR. forwardRef()is a way to reference a class that hasn't been defined yet. It instructs Angular to use the instance ofDefaultValueAccessoronce it's created.useExisting()ensures that only one instance ofDefaultValueAccessoris created.- The
multi: trueproperty allows multiple handlers to be registered for the same DI token. This is key for registering our custom CVA with theNG_VALUE_ACCESSORtoken.
We'll apply the same pattern to BasicInfoComponent and AddressInfoComponent and re-run the demo.
StackBlitz demo after implementing CVAs
The previous error is resolved. But another issue remains.
Our "Place Order" button is supposed to be disabled when the form is invalid, but it's currently enabled.
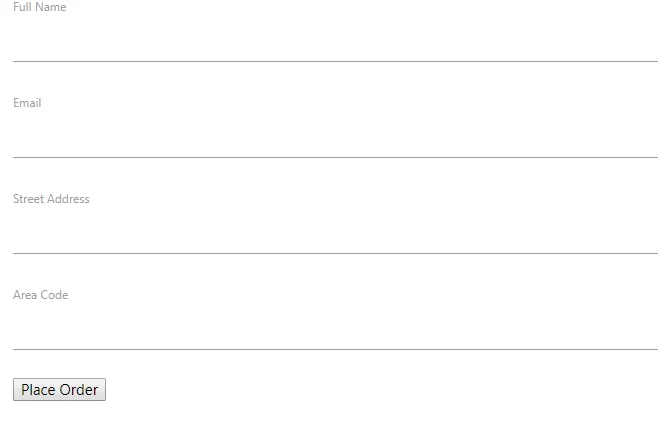
Here's the relevant HTML code:
<button type=”submit” [disabled]=”nestedForm.invalid”>Place Order</button>
Let's inspect this in the developer tools.
The Child Components' Validation Status
Upon inspection, the status of the custom form control (<app-basic-info></app-basic-info>) shows as valid, even though the form controls nested inside it are marked invalid.
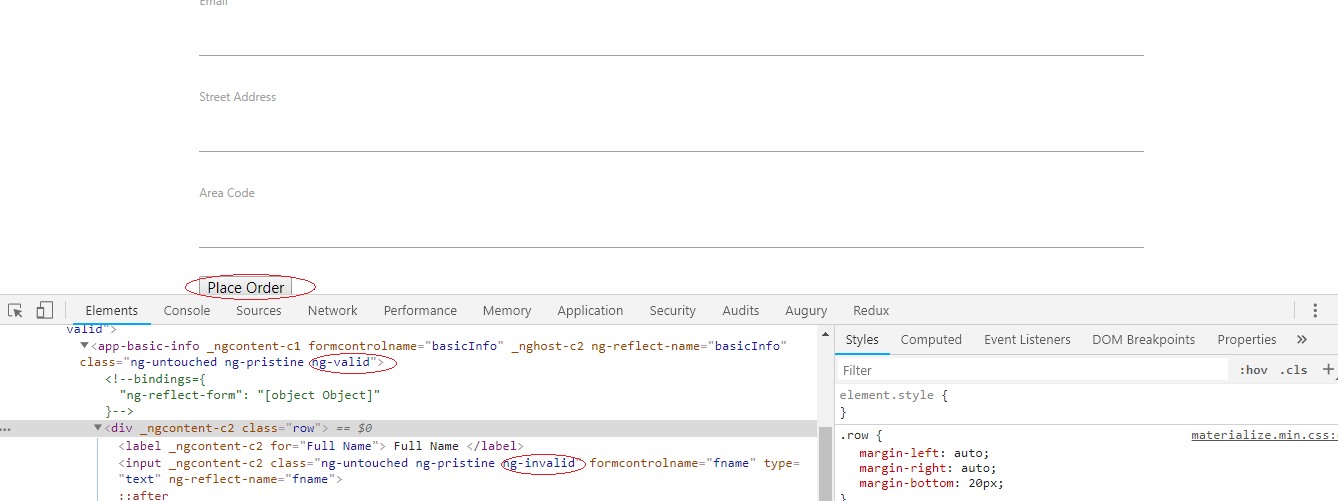
From the previous section, we learned that implementing ControlValueAccessor is necessary for custom control integration.
To also integrate validation, we need to implement the Validator interface as well and provide our custom control as a multi-provider for the NG_VALIDATOR token.
Why Validation Doesn't Propagate
For validation to be re-evaluated and included in the parent form's status, the validators need to be applied at the top-level form component, not within the child component.
In our case, that means we need validators at the BillingInfoComponent level. To achieve this, we need to make our component act as a validator directive, similar to built-in ones like required, min, and max.
So, let's implement the Validator interface in our child components.
Here's how the required directive is provided in the Angular forms package.
export const REQUIRED_VALIDATOR: StaticProvider = {
provide: NG_VALIDATORS,
useExisting: forwardRef(() => RequiredValidator),
multi: true };
We'll do the same for our custom form validator. We register it with the built-in NG_VALIDATORS token and use multi: true in the provider object to add our validator to the existing collection.
import { Component, OnInit, forwardRef } from '@angular/core';
import { ControlValueAccessor,FormControl, NG_VALUE_ACCESSOR,NG_VALIDATORS, FormGroup, Validator, AbstractControl, ValidationErrors } from "@angular/forms";

@Component({
  selector: 'app-basic-info',
  template: `
<ng-container [formGroup]="basicInfoForm">
<div class="row">
  <label for="Full Name"> Full Name </label>
    <input type="text" formControlName="fname" class="">
</div>
<div class="row">
  <label for="Email"> Email </label>
    <input type="text" formControlName="email" class="">
</div>
</ng-container>`,
  styleUrls: ['./basic-info.component.css'],
  providers: [
       {
      provide: NG_VALUE_ACCESSOR,
      useExisting: forwardRef(() => BasicInfoComponent),
      multi: true
    },
     {
      provide: NG_VALIDATORS,
      useExisting: forwardRef(() => BasicInfoComponent),
      multi: true
    }
  ]
})
export class BasicInfoComponent implements OnInit, ControlValueAccessor, Validator {

public basicInfoForm: FormGroup = new FormGroup(
  {
fname: new FormControl(""),
email: new FormControl("")
});
  constructor() { }

  ngOnInit() {
  }

public onTouched: () => void = () => {};

  writeValue(val: any): void {
    val && this.basicInfoForm.setValue(val, { emitEvent: false });
  }
  registerOnChange(fn: any): void {
    console.log("on change");
    this.basicInfoForm.valueChanges.subscribe(fn);
  }
  registerOnTouched(fn: any): void {
    console.log("on blur");
    this.onTouched = fn;
  }
  setDisabledState?(isDisabled: boolean): void {
    isDisabled ? this.basicInfoForm.disable() : this.basicInfoForm.enable();
  }

  validate(c: AbstractControl): ValidationErrors | null{
    console.log("Basic Info validation", c);
    return this.basicInfoForm.valid ? null : { invalidForm: {valid: false, message: "basicInfoForm fields are invalid"}};
  }
}
After this, <app-basic-info></app-basic-info> and <app-address-info></app-basic-info> will be re-validated—the validate method runs, which in turn validates all form controls within the child component—and their status gets propagated to the parent form.
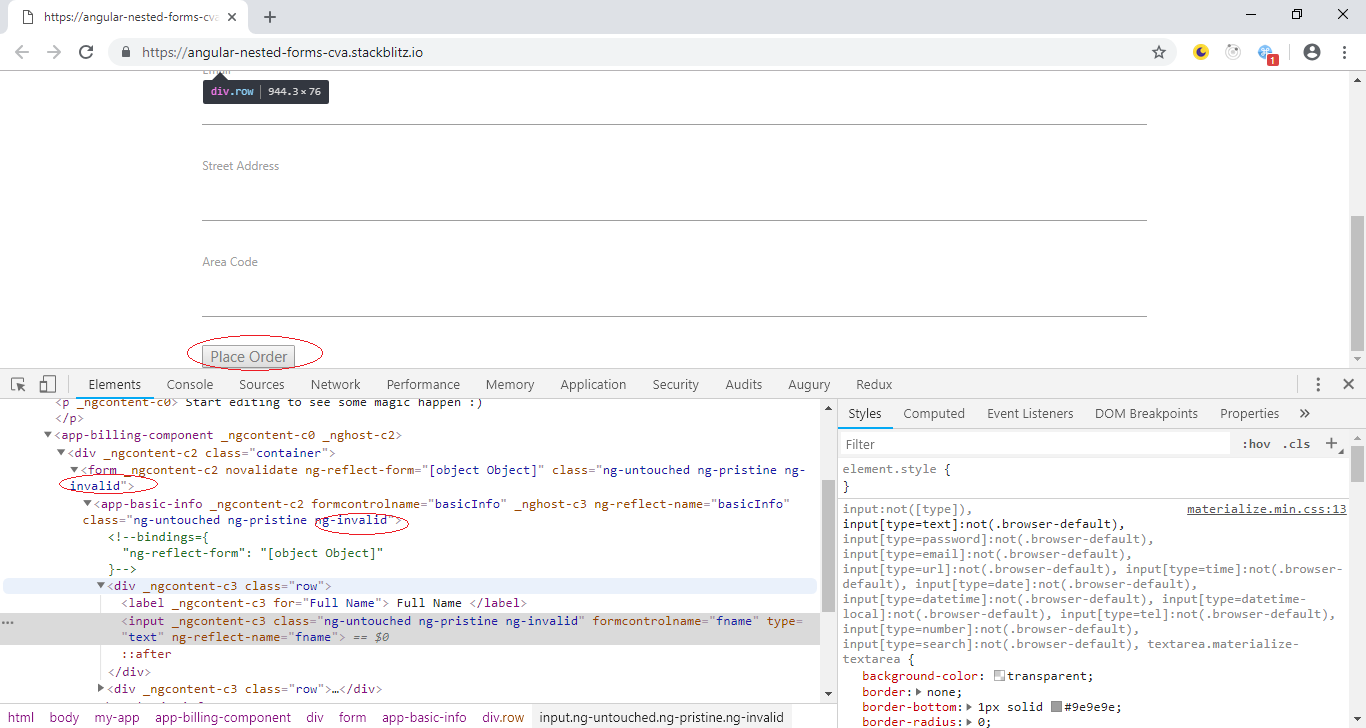
We've done it successfully.
Here is the complete StackBlitz demo.
Thanks for reading! Your feedback is always appreciated. If you found this useful, please feel free to share.
Connect with me on Twitter to say hello or chat about music.