This guide walks through a full implementation of Web Push Notifications in an Angular application, relying on the Angular Service Worker.
These are the same native notifications you might see on a mobile home screen or desktop, except they originate from a web app instead of a native application.
Thanks to Service Workers, notifications can reach users even when every tab of the application is closed. Used thoughtfully, push notifications are an effective way to bring users back into an app.
This is a hands-on, step-by-step tutorial, so you’re encouraged to follow along and apply the changes to an existing project.
Along the way, we’ll also examine how Push Notifications operate at a high level, tracing the complete journey of a single notification.
The Angular PWA series
This post belongs to the Angular PWA Series. Here is the full set of articles:
- Service Workers - Practical Guided Introduction (several examples)
- Angular App Shell - Boosting Application Startup Performance
- Angular Service Worker - Step-By-Step Guide for turning your Application into a PWA
- Angular Push Notifications - Step-by-Step Guide
Table of Contents
Here is what this post covers:
- How do Push Notifications work?
- Browser Push Service Providers
- What is a VAPID key pair?
- generating a VAPID key pair using node webpush
- Subscribing to Push Notifications
- showing again the Allow/Deny Notifications popup
- Understanding the PushSubscription object and its properties
- How to use the Push Subscription?
- Sending Push Notifications from a Node backend
- Push Notifications In Action - Demo
- Source Code + Github Running Example (complete Angular PWA)
Let’s move straight into the details of handling Push Notifications with the Angular Service Worker.
Introduction to Push Notifications
Web Push Notifications are built on two distinct browser standards:
-
Push API - responsible for delivering messages from a server to a browser, even when the site is not in focus or the browser itself is closed
-
Notifications API: responsible for showing native system notifications to the end user
In short, the Push API transports the message from the server to the browser, while the Notifications API handles its display once it arrives.
However, our own server cannot deliver notifications directly to a user’s browser. Instead, only designated servers—chosen by browser vendors such as Google or Mozilla—are permitted to send push messages to a given browser.
These intermediaries are called a Browser Push Service. Chrome and Firefox, for instance, use completely different Push Services, with each one controlled by its respective browser company.
Browser Push Service Providers
Push Notifications have the potential to be highly intrusive, so browser creators work to maintain a positive experience for their users.
This is why browser vendors reserve the right to suppress certain notifications, especially if they arrive too frequently.
To enforce this, browsers like Chrome and Firefox route all push traffic through servers they manage.
For Chrome, each push message reaches the browser through Firebase Cloud Messaging and NOT directly from an application server.
In this case, Firebase Cloud Messaging serves as the Push Service for Chrome. The Push Service associated with a browser is fixed and chosen by the browser provider.
To securely target a specific user, the Push Service identifies them anonymously, protecting their privacy. Moreover, since messages are encrypted, the Push Service never sees their content.
Let’s walk through the complete lifecycle of a message to see how each piece fits together, starting with how our server gets uniquely identified.
Why identify our server as a Push source?
The initial step is to uniquely identify our server to the various Browser Push Services.
Each Push Service looks at the behavior of incoming messages to prevent poor user experiences. By consistently identifying our server and using push correctly over time, we improve the chances that our messages get delivered promptly.
To start, we’ll give our Application server a unique identity using a VAPID key pair.
What is a VAPID key pair?
VAPID stands for Voluntary Application Server Identification for Web Push protocol. A VAPID key pair is a set of cryptographic keys—one public, one private—used as follows:
- the public key serves as our server’s unique identifier when asking users to subscribe to notifications from that server
- the private key must remain secret (unlike the public key) and is used by the application server to sign each message before it is sent to the Push Service
Generating a VAPID key pair using node web-push
We’ll generate a VAPID key using the node webpush library. Start by installing the webpush library globally so it can be used as a command line tool:
npm install web-push -g
Then run this command to create a VAPID key pair:
web-push generate-vapid-keys --json
Here’s an example of what a generated VAPID key pair looks like:
With the VAPID Public Key in hand, we can now subscribe to Push Notifications using the Angular Service Worker.
Subscribing to Push Notifications
First, you’ll need the Angular Service Worker. This guide explains how to integrate it into an existing Angular app.
Once the Angular Service Worker is set up, we can ask the user for permission to send Push Notifications:
Let’s examine this code sample in detail:
-
the user triggers the flow by clicking the Subscribe button, which calls the
subscribeToNotifications()method -
via the
swPushservice, we request permission from the user, identifying our server with the VAPID public key -
the
requestSubscription()method returns a Promise that resolves with the push subscription object if permission is granted -
a browser popup will appear asking the user to allow or deny the request:
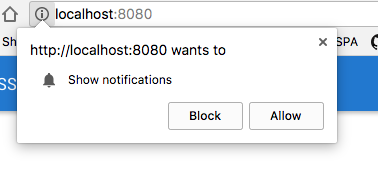
- if the user allows it, the Promise from
requestSubscription()resolves successfully, handing the push subscription object to.then()
Showing again the Allow/Deny Notifications Popup
While testing on localhost, you might accidentally select the wrong option in the popup. If that happens, clicking Subscribe again will not bring the popup back.
Instead, the Promise will be rejected, and the catch block in the code above will run.
To get the popup to show again, follow these steps:
- open chrome://settings/content/notifications
- scroll down to the Block list, where all sites banned from showing notifications are listed
- remove localhost from that Block list
- hit the Subscribe button once more
The popup should appear again, and selecting Allow will generate a Push Subscription object.
The PushSubscription object
Here is what the push subscription object looks like when it arrives in the then() clause:
Let’s unpack the subscription object to better understand how Push Notifications function:
endpoint: This is a unique URL pointing to a Firebase Cloud Messaging endpoint. It is a public yet unguessable address to the Browser Push Service, which the application server uses to send push notifications for this subscriptionexpirationTime: certain messages are time-sensitive and can be skipped if a deadline passes. This is handy, for example, when a message includes an authentication code that expires after 1 minutep256dh: a public encryption key our server uses to encrypt the message payload before handing it to the Push Serviceauth: an authentication secret that feeds into the message content encryption process
Everything contained in the subscription object is required to deliver push notifications to that specific user.
How to use the Push Subscription object?
After obtaining a push subscription, we need to store it somewhere for later use, when we choose to send a message.
In this example, the entire subscription object is sent to the backend via an HTTP request from the NewsletterService, and the full object is persisted in the database for future use.
Sending Push Notifications from a Node Backend
With subscription objects saved in the database, we can now send push messages using the webpush library.
We’ll set up a REST endpoint with Express that, when called, sends a notification to every subscriber.
Here, we’re sending a notification to announce that a new newsletter is available:
Let’s break down this example. The webpush module is used again, this time to encrypt, sign, and deliver a push notification to all subscribers:
-
we first initialize the
webpushmodule by passing the VAPID key pair -
for simplicity, the keys are hardcoded in this example, which is NOT recommended. A better approach is to pass a reference to a JSON file containing the key pair via a command line argument
-
next, we set up an Express app and define an HTTP POST endpoint at
/api/newsletter
Our application can trigger this endpoint by sending an HTTP POST request to /api/newsletter.
Keep in mind that this endpoint should be secured with both authentication and authorization middleware, so only an admin can trigger newsletter sends.
Building the Push Message body
For the Angular Service Worker to render the message correctly, the payload must use the format shown in the code.
Specifically, the payload should be a single root object with one property named notification; otherwise, the messages will not be shown to the user.
Along with the notification’s text and image, we can also define a mobile vibration pattern using the vibrate property.
Sending the Push Notification using webpush
Once the message payload is ready, we send it to a subscriber by calling webpush.sendNotification():
-
the first argument is the push subscription object, exactly as received in the browser after the user clicks Allow
-
the second argument is the JSON notification payload
Here’s what the webpush library does under the hood:
-
the message payload is encrypted using the
p256dhpublic key and theauthauthentication secret -
the encrypted payload is then signed using the VAPID private key
-
finally, the message is sent to the Firebase Cloud Messaging endpoint listed in the
endpointproperty of the subscription object
What happens at the level of the Push Service?
When the Push Service (here, Firebase Cloud Messaging) gets the message, it uses the unique URL in the endpoint to figure out which browser instance should receive it.
The Push Service cannot read the message content because it is encrypted, so it has no way to inspect it or decide based on content.
Still, the Push Service might choose to hold back a message if, for example, the subscriber has already gotten too many pushes.
Usually, though, the Push Service forwards the payload to the user’s browser.
Push Notification Demo
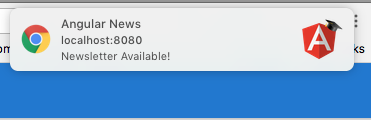
Once the Push Service sends the message to the user’s browser, it gets decrypted and handed over to the Angular Service Worker.
The Angular Service Worker then uses the browser’s Notifications API to present a notification to the user.
The outcome is a system notification quite like the ones we routinely see from mobile apps:
Source Code + Github Running Example (complete PWA)
A working version of the full code is available here on this branch on Github. The PWA features covered include:
- Application Download & Installation
- Application Version Management
- One-Click Install with App Manifest
- Application Data Caching
- Application Shell
- Push Notifications
- sample Express Server using
webpush
We hope this post helps you get started with Push Notifications and proves useful!
To dive deeper into Angular Progressive Web Applications, we recommend the Angular PWA Course, where PWAs are explored in greater depth.
If you have questions or feedback, please leave a comment below and we’ll respond.
To stay updated on upcoming articles about Progressive Web Applications and other Angular topics, feel free to join our newsletter:
If you are new to Angular, consider the Angular for Beginners Course:
