The Navigation Cycle at Work
Routing is fundamental to any frontend framework or library. It enables single page applications by allowing us to load the app once and then swap content client-side as the user interacts.
Getting started with Angular's router is straightforward, but have you ever paused to consider what happens under the hood when a link is clicked? This article seeks to answer that. Much can be learned about Angular by examining the router's navigation cycle in depth.
By the time you finish reading, you'll understand the three core questions the router poses during navigation:
- Given a URL, which set of components should I navigate to?
- Can I navigate to those components?
- Should I prefetch any data for those components?
We'll also explore these concepts in detail:
- The complete navigation flow, from click to rendered output
- How the router constructs and leverages a tree of ActivatedRouteSnapshot objects for each navigation
- Rendering components through
<router-outlet>directives
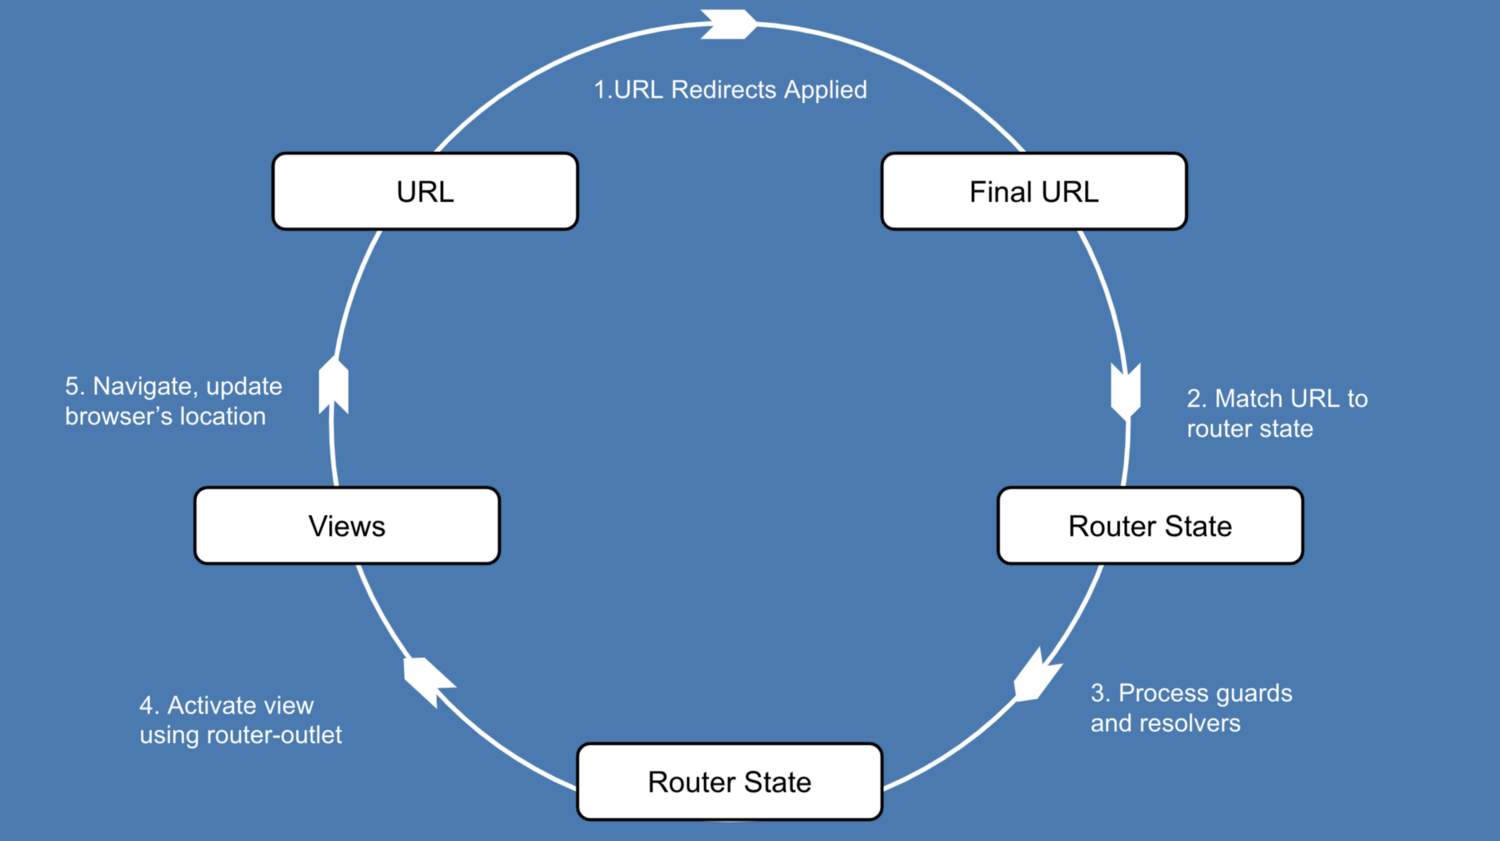
Let's walk through the router's lifecycle step by step.
What Is Navigation?
Angular applications are single page apps by design, meaning the browser never actually loads a fresh page from the server when the URL changes. Instead, the router performs navigation within the browser, a capability that is central to the SPA model. It allows us to update both the visible content and the URL simultaneously, without any page refresh.
Navigation occurs whenever the URL changes. Standard anchor tags with href cause full page reloads, so Angular provides the [routerLink] directive instead. When the user clicks an element with this directive, it instructs the router to update the URL and display content through <router-outlet> directives, all in the same page load.
<!-- without a routerLink -->
<a href='localhost:4200/users'>Users</a>  <!-- not what we want! -->
<!-- with a routerLink -->
<a [routerLink]="['/users']">Users</a>  <!-- router will handle this -->
Every navigation goes through a pipeline of steps before new components hit the screen. That pipeline is known as the router navigation lifecycle.
If navigation succeeds, components are rendered using <router-outlet>, and a tree of ActivatedRoute objects is created—a queryable history of the navigation. (If you're curious about activated routes and router states, see my earlier piece: "The Three Pillars of the Angular Router.") For now, just know that these routes are used by both Angular and developers to retrieve details like query parameters and component metadata from the navigation.
A Simple Example App
To make things concrete, we'll use a minimal application. Here's the router configuration.
const ROUTES = [
  { path: 'users',
    component: UsersComponent,
    canActivate: [CanActivateGuard],
    resolve: {
      users: UserResolver
    }
  }
];
The code example is available on StackBlitz.
This app uses a single route, /users. Before showing the list of usernames (pulled from a mock API), it inspects a query parameter to see whether the user is logged in (login=1).
The details of the app aren't important—it serves merely as a backdrop to observe the navigation cycle in action.
Observing Events During Navigation
One of the easiest ways to watch the navigation cycle is to subscribe to the events observable from the Router service:
constructor(private router: Router) {
  this.router.events.subscribe( (event: RouterEvent) => console.log(event))
}
In development, you might also enable enableTracing: true in the router configuration for a similar output.
RouterModule.forRoot(ROUTES, {
  enableTracing: true
})
The developer console shows each event emitted while navigating to /users:
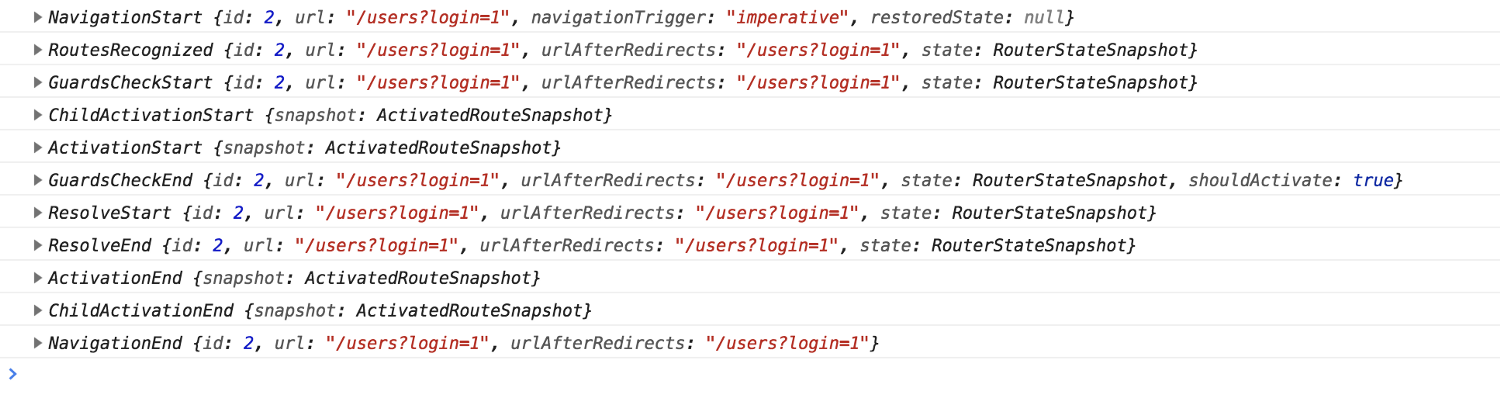
These are navigation events. Notice we're passing the login query parameter—we'll come back to that in the route guards section.
These events are excellent for debugging or studying the router, and you could easily hook into them to show a loading indicator while a navigation is in progress.
ngOnInit() {
  this.router.events.subscribe(evt => {
    if (evt instanceof NavigationStart) {
      this.message = 'Loading...';
      this.displayMessage = true;
    }
    if (evt instanceof NavigationEnd) this.displayMessage = false;
  });
}
A snippet from app.component.ts—shows a loading message when navigation starts and clears it when navigation finishes.
Now, let's trace through a navigation to /users.
The Beginning: NavigationStart
events: NavigationStart
In our app, the user triggers navigation by clicking the following link:
<a [routerLink]="['/users']" [queryParams]="{'login': '1'}">Authorized Navigation</a>
Navigates to /users with the login query parameter (we'll discuss this under route guards)
When a click on a routerLink is detected, the router kicks off the navigation cycle. Programmatic navigation is also possible using the Router's navigate and navigateByUrl methods.
While older versions allowed concurrent navigations (which is why each one gets a navigation id), that behavior has changed—now only one navigation runs at a time.
Matching the URL and Handling Redirects
events: RoutesRecognized
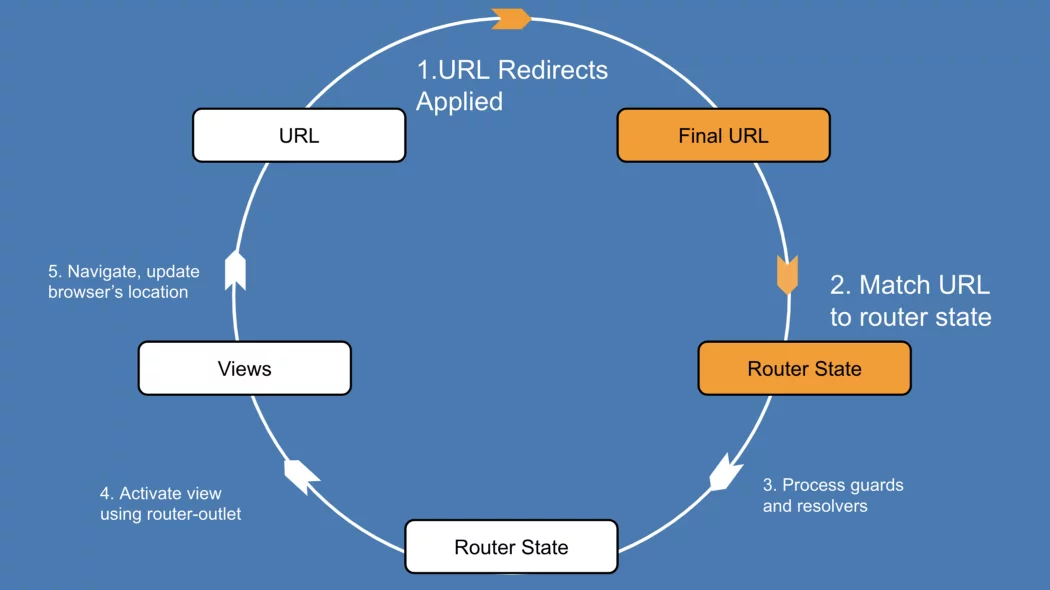
Steps 1 and 2 of the cycle—redirects and matching
First, the router runs a depth-first scan through the configuration array (our ROUTES), trying to match /users against each path, while applying any redirect rules it encounters along the way.
In our case, there are no redirects, and the URL /users aligns directly with one entry in ROUTES:
{ path: 'users', component: UsersComponent, ... }
Any lazy-loaded modules required by the matched path are fetched at this stage.
Once a match is found, the router broadcasts a RoutesRecognized event. This confirms it has found both a URL match and a component to display (UsersComponent), which answers the first question: "What do I display?" But the router won’t proceed yet—it must confirm permission to visit this route. Enter route guards.
Controlling Access with Route Guards
events: GuardsCheckStart, GuardsCheckEnd
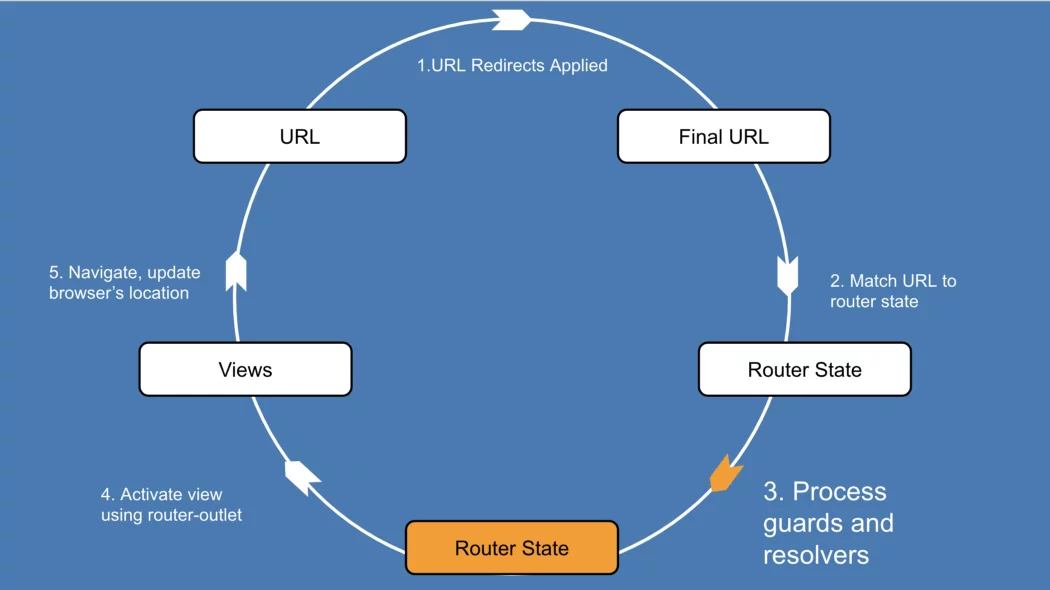
Route guards are boolean functions used to determine whether a navigation is permitted. As developers, we rely on guards to enforce access rules. In our sample app, a canActivate guard is applied via the route configuration to check login status.
{ path: 'users', ..., canActivate: [CanActivateGuard] }
Here is the guard function:
canActivate(route: ActivatedRouteSnapshot, state: RouterStateSnapshot): boolean {
    return this.auth.isAuthorized(route.queryParams.login);
}
isAuthorized returns true if login=1 is present in the query parameter
This guard sends the login query parameter into an auth service (auth.service.ts in the example).
If isAuthorized(route.queryParams.login) evaluates to true, the guard passes. A failure triggers NavigationCancel and cuts the navigation short entirely.
Other guards exist for different scenarios, such as canLoad (whether a lazy-loaded module should be fetched), canActivateChild, and canDeactivate (useful for blocking a user from leaving a page mid-form).
Guards work like services—they're injectable and registered as providers—and are re-run whenever the URL changes.
Because there's no point fetching data for a route that can't load, canActivate runs before any data resolution takes place. Once the guard succeeds, the router resolves its second question—"Is this navigation allowed?"—and moves on to prefetching data via resolvers.
Prefetching Data with Resolvers
events: ResolveStart, ResolveEnd
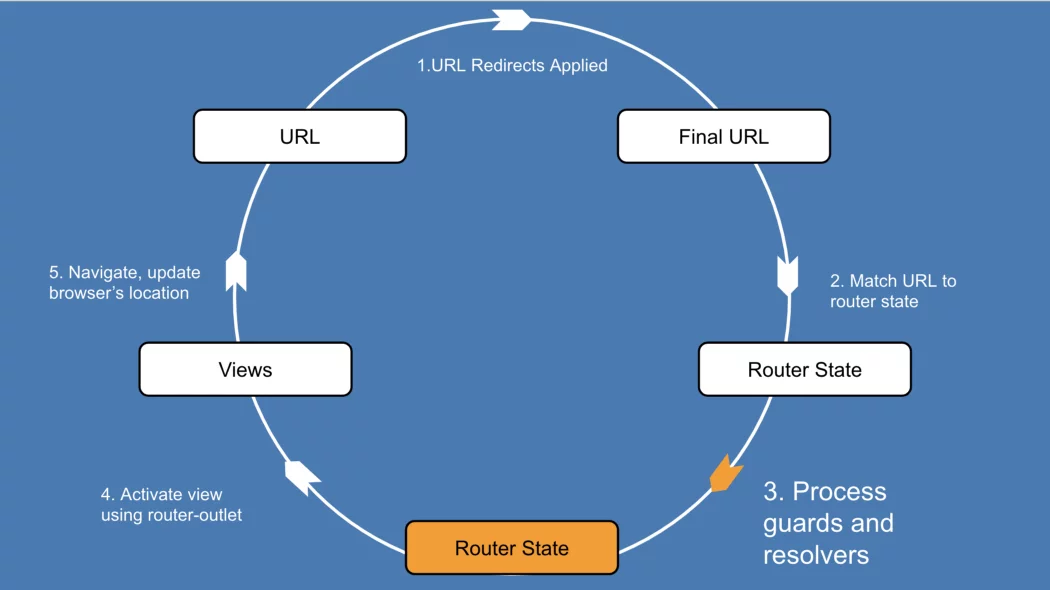
Resolvers allow us to load data during navigation, before the router paints a single component. They are declared in the route config using the resolve property:
{ path: 'users', ..., resolve: { users: UserResolver } }
export class UserResolver implements Resolve<Observable<any>> {
  constructor(private userService: MockUserDataService) {}

  resolve(): Observable<any> {
    return this.userService.getUsers();
  }
}
Once the URL is matched and all guards pass, the router invokes the resolve method in UserResolver. The result is then stored on the ActivatedRoute's data object under the key users, which you can access by subscribing to the data observable.
activatedRouteService.data.subscribe(data => data.users);
The ActivatedRoute service is injected into UsersComponent to retrieve the data coming from the resolver.
export class UsersComponent implements OnInit {
  public users = [];

  constructor(private route: ActivatedRoute) {}

  ngOnInit() {
    this.route.data.subscribe(data => this.users = data.users);
  }
}
Resolvers let us compile component data before the component shows up. This approach can prevent the flicker of partially formed templates. Since the template becomes visible in OnInit, any data that must appear during rendering should ideally be loaded ahead of time to avoid a blank or broken UI.
But sometimes, a delay is actually better for user experience. A page that appears promptly—and fills in bits progressively with a loading spinner—often feels quicker than one that waits on data before displaying anything. This trade-off is yours to make, but in most cases a partial page with an animation beats a fully blocked resolver.
Under the hood, the router calls a runResolve method that executes the resolver and parks the result on the ActivatedRoute snapshot.
future.data = {...future.data,
               ...inheritedParamsDataResolve(future, paramsInheritanceStrategy).resolve};
"future" refers to an ActivatedRouteSnapshot
With all resolvers complete, the router moves to its final task: rendering components through the appropriate router outlets.
Bringing Components to Life
events: ActivationStart, ActivationEnd, ChildActivationStart, ChildActivationEnd
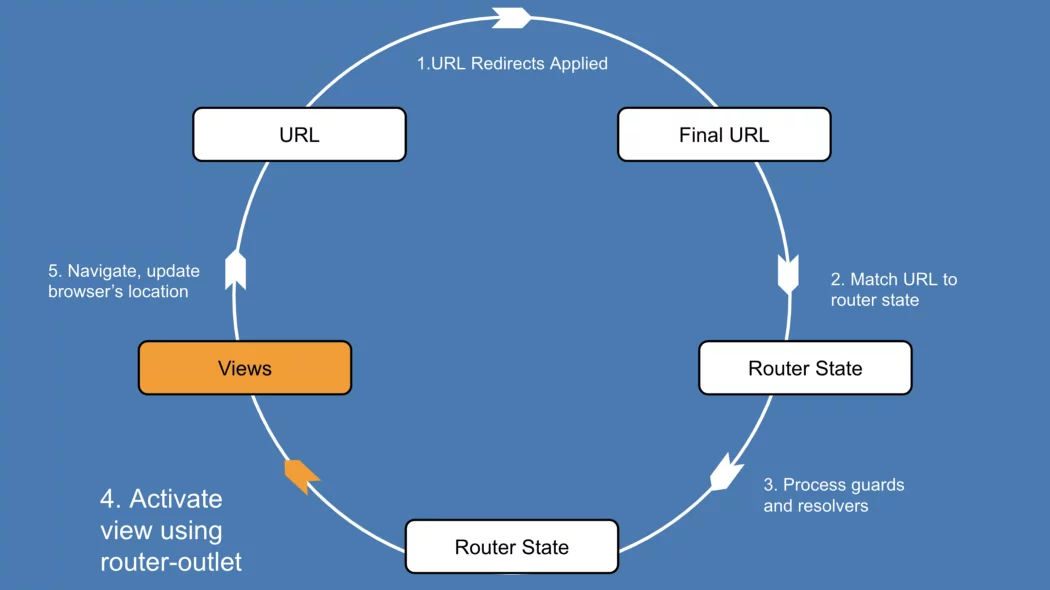
At this stage, the router is ready to instantiate the components and mount them via the designated <router-outlet>. All the data required for this operation is drawn from the pre-constructed tree of ActivatedRouteSnapshot objects, assembled during the earlier phases of the navigation journey.
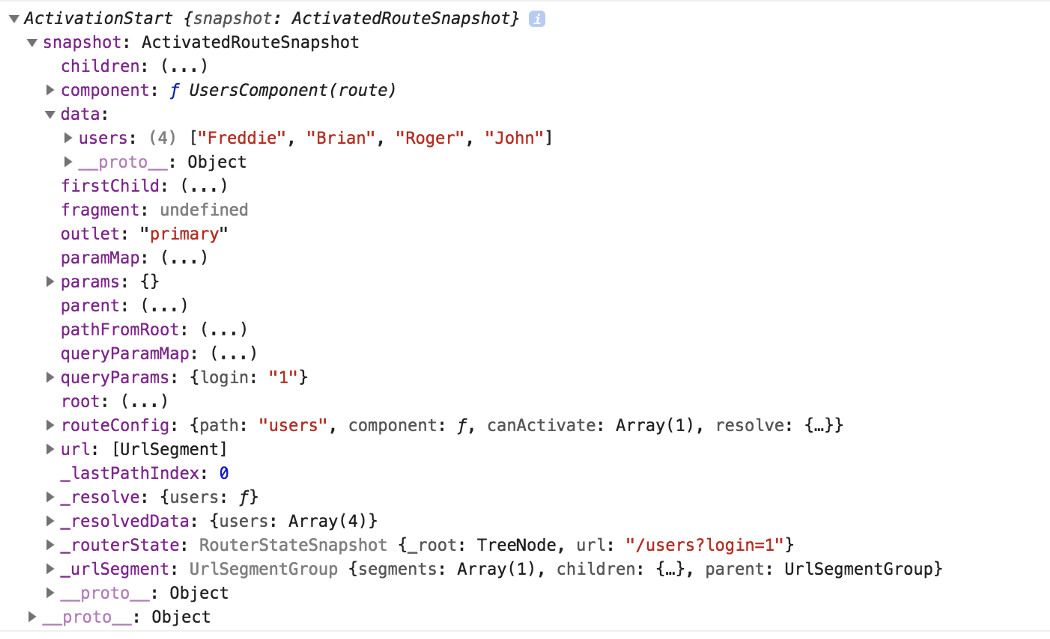
The component field instructs the router to build and activate a fresh instance of UsersComponent. Additionally, the user records retrieved earlier are accessible through the data.users property.
If you are not yet familiar with dynamic component creation in Angular, you can find thorough discussions on this external blog. All the heavy lifting is performed inside the router's internal activateWith routine:
activateWith(activatedRoute: ActivatedRoute, resolver: ComponentFactoryResolver|null) {
  if (this.isActivated) {
    throw new Error('Cannot activate an already activated outlet');
  }
  this._activatedRoute = activatedRoute;
  const snapshot = activatedRoute._futureSnapshot;
  const component = <any>snapshot.routeConfig !.component;
  resolver = resolver || this.resolver;
  const factory = resolver.resolveComponentFactory(component);
  const childContexts = this.parentContexts.getOrCreateContext(this.name).children;
  const injector = new OutletInjector(activatedRoute, childContexts, this.location.injector);
  this.activated = this.location.createComponent(factory, this.location.length, injector);
  // Calling `markForCheck` to make sure we will run the change detection when the
  // `RouterOutlet` is inside a `ChangeDetectionStrategy.OnPush` component.
  this.changeDetector.markForCheck();
  this.activateEvents.emit(this.activated.instance);
}
code snippet taken from router_outlet.ts
There's no need to memorize every line; here’s a concise walkthrough of the core logic:
- In line 9, a
ComponentFactoryResolveris leveraged to instantiateUsersComponent. The type information is obtained from theActivatedRouteSnapshotin line 7. - The actual component creation occurs on line 12. Here,
locationrefers to theViewContainerReffor the targeted<router-outlet>. If you’ve ever noticed that the rendered content appears beside, rather than inside, the outlet tag, the rationale is explained within the implementation details of[createComponent](https://github.com/angular/angular/blob/master/packages/core/src/view/refs.ts#L199). - Once the component is live, the router proceeds with
activateChildRoutes(omitted from the snippet). This step ensures that any nested<router-outlet>directives—representing child routes—are also processed.
The outcome is that the router renders the top-level component. If that component template contains any inner <router-outlet> tags, the router repeats this process for each one, ensuring the entire view hierarchy is populated.
Syncing the Browser Address

The final action in this cycle is to bring the browser's URL in line with the new state, changing it to /users.
private updateTargetUrlAndHref(): void {
  this.href = this.locationStrategy.prepareExternalUrl(this.router.serializeUrl(this.urlTree));
}
With the URL updated, the router is once again idle and attentive, ready to respond to the next navigation trigger and begin the sequence anew.
Look out for the concluding part of this series, where we will dissect the router’s lazy-loading strategy in detail. Your readership is appreciated—see you in the next one!