
Controlling Access and Data Flow with Guards and Resolvers
Guards determine whether navigation is permitted, while resolvers take charge of loading data ahead of time. They work together to safeguard routes and ensure essential information is available when needed. While these features are commonly used, their underlying mechanics are often not fully grasped. I discovered gaps in my own understanding while researching this topic, and putting this article together helped me bridge those gaps.
Getting Started with Guards
Guards function as checkpoints, evaluating whether a route can be accessed. Their logic dictates what happens depending on whether the access request is approved or rejected.
Creating guards
Angular simplifies guard creation with build-in tooling. A new guard can be scaffolded directly from the command line interface.
[terminal]
ng generate guard GUARD_NAME
After running the command, you will be asked to select one of four available guard types:
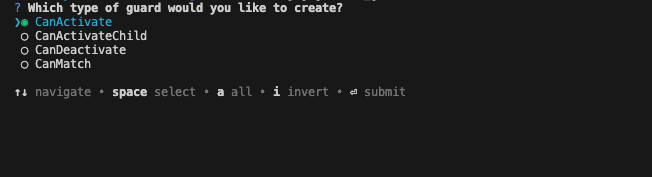
These types serve varied purposes, which we’ll examine in detail. Visual Studio Code can be used to create these files manually; the only requirement is a TypeScript file. Adhering to a convention like the `.guard.ts` suffix helps delineate a guard's role within the application.
Possible return values
All guards support a set of shared return types, providing adaptable methods for managing navigation and user flow.
- Boolean – approves or rejects navigation. Within the CanMatch guard, a `false` value triggers a search for other route matches instead of halting navigation outright.
- UrlTree or a route command – provides a path to a different route rather than simply denying access.
- Promise or Observable – uses the resulting value to determine whether to continue with the navigation or stop it.
Exploring guard types
Before covering each type in detail, it is important to note that guards can leverage services registered at the routing level and access data present in the route arguments. The example below is sourced directly from the official documentation:
export const routes: Routes = [
 {
   path: 'admin',
   providers: [
     AdminService, // Only loaded with admin routes
     { provide: FEATURE_FLAGS, useValue: { adminMode: true } },
   ],
   loadChildren: () => import('./admin/admin.routes'),
 },
 {
   path: 'shop',
   providers: [
     ShoppingCartService, // Isolated shopping state
     PaymentService,
   ],
   loadChildren: () => import('./shop/shop.routes'),
 },
];
CanActivate
This guard is likely the most used and determines if the targeted route is reachable. Authentication and authorization is where it’s most often applied, dictating the user's entry. The guard receives two arguments:
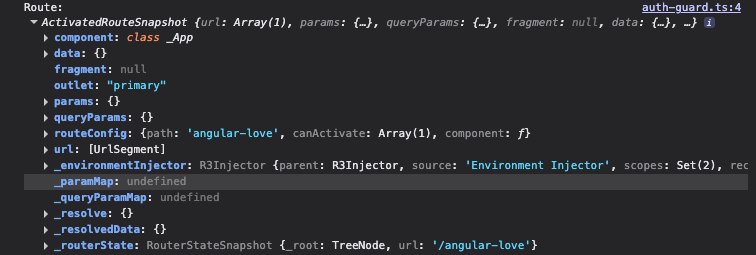
- route: ActivatedRouteSnapshot – represents a point-in-time snapshot of the route awaiting activation.
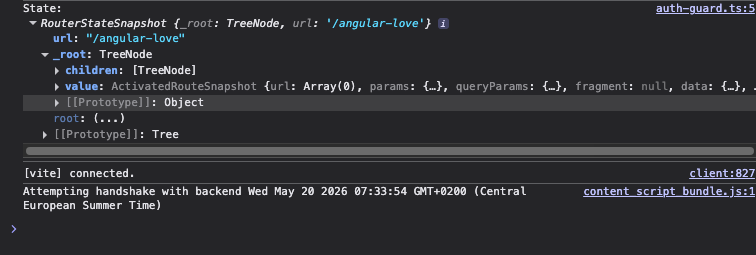
- state: RouterStateSnapshot – details the router’s current state data.
The navigation proceeds only if the guard returns `true`. A `false` return aborts navigation. When a `UrlTree` is returned, the present navigation is stopped and a new one starts based on that tree. This is illustrated in the code example below:
export const authGuard: CanActivateFn = (
 route: ActivatedRouteSnapshot,
 state: RouterStateSnapshot,
) => {
 const authService = inject(AuthService);
 return authService.isAuthenticated();
};
The CanActivateFn type is the specific definition for a guard used in route configurations.
Practical application
Let’s look at a frequently applied pattern that combines two checks: preventing unauthenticated access to protected routes, while also stopping already-authenticated users from viewing the login page. The route setup in app.routes.ts looks like this:
import { inject } from '@angular/core';
import { CanActivateFn, Router } from '@angular/router';
import { AuthService } from './auth-service';


export const createAuthGuard = (requiresAuth: boolean, redirectUrl: string): CanActivateFn => {
 return () => {
   const router = inject(Router);
   const authService = inject(AuthService);


   if (authService.isLoggedIn() === requiresAuth) {
     return true;
   }


   return router.createUrlTree([redirectUrl]);
 };
};


export const requireAuth = (redirectUrl = '/login') => createAuthGuard(true, redirectUrl);
export const requireNoAuth = (redirectUrl = '/dashboard') => createAuthGuard(false, redirectUrl);
app.routes.ts
export const routes: Routes = [
 {
   path: 'login',
   canActivate: [requireNoAuth()],
   loadComponent: () => import('./pages/login/login').then((c) => c.Login),
 },
 {
   path: 'dashboard',
   canActivate: [requireAuth()],
   loadComponent: () => import('./pages/dashboard/dashboard').then((c) => c.Dashboard),
 },
 {
   path: '',
   redirectTo: '/login',
   pathMatch: 'full',
 },
];
An efficient and concise solution.
CanActivateChild
These guards protect the set of child routes for a given parent segment. This is particularly powerful for securing an entire nested route structure at a single point. The trigger happens for every descendant, regardless of the nesting depth. The guard's arguments are:
- childRoute: ActivatedRouteSnapshot – snapshot of the child route being navigated to
- state: RouteStateSnapshot – data for the navigation target
In terms of returns, it behaves exactly like `CanActivate`: `true` continues, `false` cancels, and a `UrlTree` provokes a redirect. This snippet illustrates its use:
export const adminChildGuard: CanActivateChildFn = (
 childRoute: ActivatedRouteSnapshot,
 state: RouterStateSnapshot,
) => {
 const authService = inject(AuthService);
 return authService.hasRole('admin');
};
The type associated with its route configuration is CanActivateChildFn.
CanDeactivate
Instead of concerning entry, this guard manages exit from a current route. Its main role is to help prevent data loss, functioning well for scenarios involving forms where the user attempts a premature exit. Its parameters are:
- component: T – an instance of the component that is about to be abandoned
- currentRoute: ActivatedRouteSnapshot – a snapshot of the route you are leaving
- currentState: RouterStateSnapshot – the router state before the change
- nextState: RouterStateSnapshot – the desired target router state
The return types are consistent with other guards: `true` continues, `false` cancels the navigation, and a `UrlTree` redirects. The referenced code segment is from official documentation:
export const unsavedChangesGuard: CanDeactivateFn<Form> = (
 component: Form,
 currentRoute: ActivatedRouteSnapshot,
 currentState: RouterStateSnapshot,
 nextState: RouterStateSnapshot,
) => {
 return component.hasUnsavedChanges()
   ? confirm('You have unsaved changes. Are you sure you want to leave?')
   : true;
};
The guard’s type definitions are denoted by CanDeactivateFn.
CanMatch
This last guard examines whether the route in question is a candidate for matching. What distinguishes it is its behavior when returning `false`: rather than canceling, Angular proceeds with matching other configurations. This makes it ideal for situations such as checking feature flags, A/B testing, or conditional module loading. The following arguments are provided:
- route: Route – the configuration of the route being evaluated
- segments: UrlSegment[] – the components of the URL that have not yet been matched
Behaves similarly with booleans and UrlTree; a `false` result simply moves on to the next match.
Code demonstration:
export const featureToggleGuard: CanMatchFn = (route: Route, segments: UrlSegment[]) => {
 const featureService = inject(FeatureService);
 return featureService.isFeatureEnabled('newDashboard');
};
You can also dynamically choose a specific component for the same path:
const routes: Routes = [
 {
   path: 'dashboard',
   component: AdminDashboard,
   canMatch: [adminGuard],
 },
 {
   path: 'dashboard',
   component: UserDashboard,
   canMatch: [userGuard],
 },
];
The signature for this route config is CanMatchFn.
Before CanMatch: The discontinued CanLoad
Though deprecated, legacy codebases might include `CanLoad`. Its role was to decide if loading the children of a route was necessary. All guards must resolve `true` for navigation to continue; a single `false` blocks it. Returning a `UrlTree` ceases the current navigation and initiates a new one.
Integration with Route Definitions
After creating guards, they are placed in an array in the `Routes` configuration. Applying multiple checks to one route is achieved in this fashion. The execution order matters: they run sequentially in the order they appear. The router picks the first path that matches the URL and passes all of its attached guards, so configuration order is crucial.
const routes: Routes = [
 // Basic CanActivate - requires authentication
 {
   path: 'dashboard',
   component: Dashboard,
   canActivate: [authGuard],
 },
 // Multiple CanActivate guards - requires authentication AND admin role
 {
   path: 'admin',
   component: Admin,
   canActivate: [authGuard, adminGuard],
 },
 // CanActivate + CanDeactivate - protected route with unsaved changes check
 {
   path: 'profile',
   component: Profile,
   canActivate: [authGuard],
   canDeactivate: [canDeactivateGuard],
 },
 // CanActivateChild - protects all child routes
 {
   path: 'users', // /user - NOT protected
   canActivateChild: [authGuard],
   children: [
     // /users/list - PROTECTED
     {path: 'list', component: UserList},
     // /users/detail/:id - PROTECTED
     {path: 'detail/:id', component: UserDetail},
   ],
 },
 // CanMatch - conditionally matches route based on feature flag
 {
   path: 'beta-feature',
   component: BetaFeature,
   canMatch: [featureToggleGuard],
 },
 // Fallback route if beta feature is disabled
 {
   path: 'beta-feature',
   component: ComingSoon,
 },
];
Data Resolvers
Resolvers ensure data is in place before reaching a destination route. Components receive necessary information before they are rendered on the page. This can eliminate the need for a UI loader and reduces visual jank. However, this may introduce a wait time before navigation finishes. Weighing the benefits of both strategies is essential when deciding the best UX.
Defining their purpose and benefits
A resolver is a ResolveFn or class designed to prep the data before activating a route. They execute ahead of navigation, allowing a component to pull pre-fetched information via ActivatedRoute. These functions can access route-scoped services and specfic metadata from the route argument. The main advantages are:
- no placeholder screens – the UI doesn't display stateful loader placeholders after components mount
- smoother user experience – eliminating spinners and skeleton loaders contributes to better UX
- centralised problem handling – data errors can catch navigation up front, giving you better precedence on what the user flashes next
- consistency – rendering logic relies on data being loaded, which is vital with SSR (Server-Side Rendering) to guarantee that the content is ready before delivery
Building resolvers
Defining a resolver simply means creating a function that conforms to a `ResolveFn` type. This function is given both ActivatedRouteSnapshot and RouterStateSnapshot. The official documentation examples show a standard pattern, which fetches user data before the route is rendered:
import {inject} from '@angular/core';
import {UserStore, SettingsStore} from './user-store';
import type {ActivatedRouteSnapshot, ResolveFn, RouterStateSnapshot} from '@angular/router';
import type {User, Settings} from './types';
export const userResolver: ResolveFn<User> = (
 route: ActivatedRouteSnapshot,
 state: RouterStateSnapshot,
) => {
 const userStore = inject(UserStore);
 const userId = route.paramMap.get('id')!;
 return userStore.getUser(userId);
};
export const settingsResolver: ResolveFn<Settings> = (
 route: ActivatedRouteSnapshot,
 state: RouterStateSnapshot,
) => {
 const settingsStore = inject(SettingsStore);
 const userId = route.paramMap.get('id')!;
 return settingsStore.getUserSettings(userId);
};
Registering them in routes
You can attach multiple resolvers to a single route. They are specified within the `Routes` setup. An example is:
import {Routes} from '@angular/router';
export const routes: Routes = [
 {
   path: 'user/:id',
   component: UserDetail,
   resolve: {
     user: userResolver,
     settings: settingsResolver,
   },
 },
];
The `resolve` key contains a dictionary of keys and their corresponding resolvers. After execution, this data will be exposed via ActivatedRoute.data.
Consuming Data in a Component
Using ActivatedRoute
A common pattern involves retrieving data from a snapshot property from ActivatedRoute. Within component logic it's easy to get access to the data through a signal, like this:
@Component({
 template: `
   <!-- We call user() and settings() as functions because they are Signals -->
   <h1>{{ user().name }}</h1>
   <p>{{ user().email }}</p>
   <div>Theme: {{ settings().theme }}</div>
 `,
})
export class UserDetail {
 // Inject the current route information
 private route = inject(ActivatedRoute);
 /**
  * toSignal converts the route.data Observable into a reactive Signal.
  * This Signal will update whenever the route parameters or data change.
  */
 private data = toSignal(this.route.data, { requireSync: true });
 /**
  * computed() creates a derived Signal.
  * It automatically recalculates whenever 'data' changes.
  * We cast 'as User' because route data is typed as 'any' by default.
  */
 user = computed(() => this.data().user as User);
 /**
  * Derived signal for settings.
  * This keeps the template clean and provides type safety.
  */
 settings = computed(() => this.data().settings as Settings);
}
Binding Inputs
Another method is enabling withComponentInputBinding() from `provideRouter`. This is a cleaner approach and routes endpoint data directly into component inputs, avoiding the need for ActivatedRoute. The functionality includes pairing values with:
- query parameters
- path data
- matrix parameters
- data coming from static routes as well as resolvers
import {bootstrapApplication} from '@angular/platform-browser';
import {provideRouter, withComponentInputBinding} from '@angular/router';
import {routes} from './app.routes';
bootstrapApplication(App, {
 providers: [provideRouter(routes, withComponentInputBinding())],
});
Direct input benefits by giving additional type safety while simplifying component design and making tests easier. This sheds couples components from injected Angular services:
import {Component, input} from '@angular/core';
import type {User, Settings} from './types';
@Component({
 template: `
   <h1>{{ user().name }}</h1>
   <p>{{ user().email }}</p>
   <div>Theme: {{ settings().theme }}</div>
 `,
})
export class UserDetail {
 user = input.required<User>();
 settings = input<Settings>();
}
Handling Errors in Resolvers
Appropriate error handling in resolvers is critical. Otherwise, a system default `NavigationError` is emitted, which could lead to a journey that is less than ideal for the user. Three main strategies are considered.
Global strategy with withNavigationErrorHandler
This approach employs a single place for handling all errors from navigation, which also includes errors that navigations from resolver trigger. Having is as one point fosters consistency and neat code across, promoting focus for each individual resolver:
import { bootstrapApplication } from '@angular/platform-browser';
import { provideRouter, withNavigationErrorHandler } from '@angular/router';
import { inject } from '@angular/core';
import { Router } from '@angular/router';
import { routes } from './app.routes';
bootstrapApplication(App, {
 providers: [
   provideRouter(
     routes,
     withNavigationErrorHandler((error) => {
       const router = inject(Router);
       if (error?.message) {
         console.error('Navigation error occurred:', error.message);
       }
       router.navigate(['/error']);
     }),
   ),
 ],
});
Here, each resolver has a responsibility and doesn’t embed unique error handling routines.
export const userResolver: ResolveFn<User> = (route) => {
 const userStore = inject(UserStore);
 const userId = route.paramMap.get('id')!;
 // No need for explicit error handling - let it bubble up
 return userStore.getUser(userId);
};
Listening on router events
A more granular strategy is having direct access where we observe NavigationError events and act specifically. Through adjusting in `router.events`, we create dedicated recovery flows tailored for unique cases:
import { Component, inject, signal } from '@angular/core';
import { Router, NavigationError } from '@angular/router';
import { toSignal } from '@angular/core/rxjs-interop';
import { map } from 'rxjs';
@Component({
 selector: 'app-root',
 template: `
   @if (errorMessage()) {
     <div class="error-banner">
       {{ errorMessage() }}
       <button (click)="retryNavigation()">Retry</button>
     </div>
   }
   <router-outlet />
 `,
})
export class App {
 private router = inject(Router);
 private lastFailedUrl = signal('');
 private navigationErrors = toSignal(
   this.router.events.pipe(
     map((event) => {
       if (event instanceof NavigationError) {
         this.lastFailedUrl.set(event.url);
         if (event.error) {
           console.error('Navigation error', event.error);
         }
         return 'Navigation failed. Please try again.';
       }
       return '';
     }),
   ),
   { initialValue: '' },
 );
 errorMessage = this.navigationErrors;
 retryNavigation() {
   if (this.lastFailedUrl()) {
     this.router.navigateByUrl(this.lastFailedUrl());
   }
 }
}
Internal to resolver
A third pattern, “handle it inside”, involves enclosing the returned data in a `catchError` within a resolver. Look at how our earlier example transforms considering error handler:
import { inject } from '@angular/core';
import { ResolveFn, RedirectCommand, Router } from '@angular/router';
import { catchError, of } from 'rxjs';
import { UserStore } from './user-store';
import type { User } from './types';


export const userResolver: ResolveFn<User | RedirectCommand> = (route) => {
 // Inject dependencies using the functional inject() API
 const userStore = inject(UserStore);
 const router = inject(Router);
 // Extract the 'id' parameter from the route URL (e.g., /users/:id)
 const userId = route.paramMap.get('id')!;
 // Fetch user data from the store and handle potential errors
 return userStore.getUser(userId).pipe(
   catchError((error) => {
     // Log the error for debugging purposes
     console.error('Failed to load user:', error);
     /**
      * If fetching fails (e.g., 404), return a RedirectCommand.
      * This stops the current navigation and redirects the user to the list page.
      */
     return of(new RedirectCommand(router.parseUrl('/users')));
   }),
 );
};
Additional insights about resolvers
Loading indicators
The aim isn't to eliminate delay altogether, but rather to show user feedback effectively during the loading operation. When getting data with the resolver, navigation can be temporarily frozen and that yields perceived delay. A way around is listening to router start, display a loader, then upon completion hide:
import { Component, inject } from '@angular/core';
import { Router } from '@angular/router';
@Component({
 selector: 'app-root',
 template: `
   @if (isNavigating()) {
     <div class="loading-bar">Loading...</div>
   }
   <router-outlet />
 `,
})
export class App {
 private router = inject(Router);
 isNavigating = computed(() => !!this.router.currentNavigation()); //new approach that replaced NavigationStart/End
}
Tree of parent data
Execution follows a floor. A parent resolver completes, which allows its information set, to be visible to children, which execute later.
import { inject } from '@angular/core';
import { provideRouter, ActivatedRouteSnapshot } from '@angular/router';
import { userResolver } from './resolvers';
import { UserPosts } from './pages';
import { PostService } from './services';
import type { User } from './types';
provideRouter([
 {
   path: 'users/:id',
   resolve: { user: userResolver }, // user resolver in the parent route
   children: [
     {
       path: 'posts',
       component: UserPosts,
       // route.data.user is available here while this resolver runs
       resolve: {
         posts: (route: ActivatedRouteSnapshot) => {
           const postService = inject(PostService);
           const user = route.parent?.data['user'] as User; // parent data
           const userId = user.id;
           return postService.getPostByUser(userId);
         },
       },
     },
   ],
 },
]);
Wrapping Up
These core concepts are essential for developing secure and efficient user interfaces. Comprehending them well ensures you create secure, maintainable, and performant architecture!