Understanding change detection fundamentals
My journey as a developer has led me to spend considerable time reverse-engineering web technologies. Change detection is the subject that captivates me most. This mechanism appears in nearly every web application you encounter. It's a fundamental component of the most widely-used web frameworks. Even sophisticated UI elements, such as datagrids or stateful jQuery plugins, rely on change detection. There's a strong possibility that change detection exists somewhere within your own application's codebase.
For anyone aspiring to become a software architect, a solid grasp of this mechanism is essential. I would go so far as to say that change detection constitutes the most critical element of any architecture, because it handles the visible aspects such as DOM updates. This area also has a major impact on how well an application performs. This article will significantly broaden your understanding of this subject.
We'll begin by examining change detection in a general sense. Following that, we'll build a straightforward change detection mechanism from scratch. Once we've grasped the core concepts, we'll dive deep into how Angular and React put change detection into practice.
My intention is that this knowledge will spark your curiosity and encourage you to explore the web platform, software architecture, and programming more deeply.
Defining change detection
Let's begin with a formal definition:
Change detection refers to the systematic process of monitoring alterations in an application's state and subsequently rendering that updated state to the user. The primary goal is to keep the user interface synchronized with the program's internal data at all times.
From this definition, we can extract two core components: tracking modifications and rendering output.
Let's first examine the rendering aspect. In every application, rendering takes the internal program state and translates it into a visible format for the user. In web development, this process converts data structures like objects and arrays into DOM elements such as images, buttons, and other visual components. While the implementation of rendering logic isn't always simple, the concept itself is quite direct.
The complexity increases significantly when we introduce data that changes over time. Modern web applications are interactive by nature. This means the application state can change at any moment due to user actions. There are also other potential triggers. For example, external events may update server data, and the client then retrieves those updates.
When our state changes, we must recognize that change and reflect it in the UI.
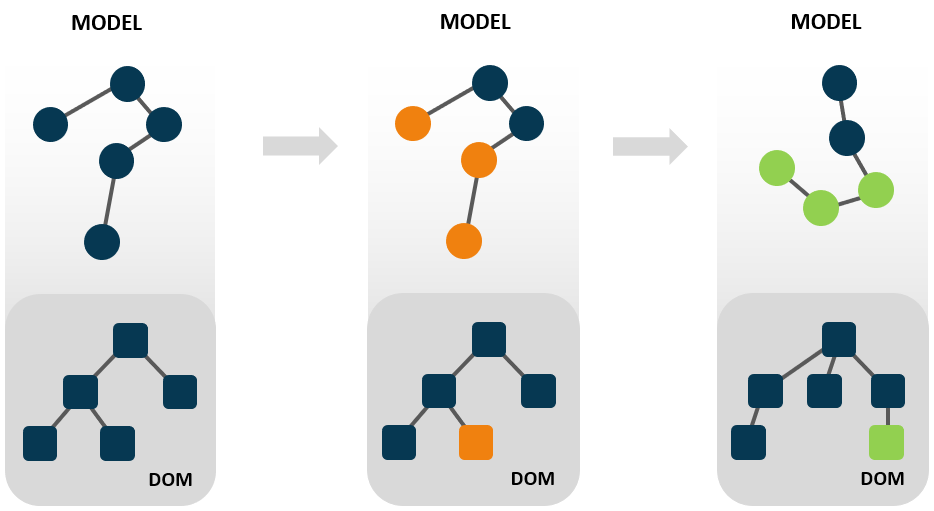
This concept might seem somewhat abstract, so let's explore a concrete example.
The rating widget example
Imagine we need to build a rating widget. The quantity of filled stars displayed represents the current rating value. Users can interact with this widget by clicking on any star to establish a new rating:

To keep track of the rating, we must store the current value somewhere. We'll establish a private _rating property as part of the widget's state:
export class RatingsComponent {
    constructor() {
        this._rating = 1;
    }
}
When we modify the widget's state, we must also update the screen to reflect those changes. Here's the DOM structure we'll use to render the widget interface:
<ul class="ratings">
    <li class="star solid"></li>
    <li class="star solid"></li>
    <li class="star solid"></li>
    <li class="star outline"></li>
    <li class="star outline"></li>
</ul>
I'm employing CSS classes solid and outline to display the appropriate star icon. Initially, the widget renders all list items as outlined stars. As the state changes, the corresponding items transform into solid stars.
Setting up the widget
The first step involves creating all the required DOM nodes. We'll place this initialization logic within the init method:
export class RatingsComponent {
    ...
    init(container) {
        this.list = document.createElement('ul');
        this.list.classList.add('ratings');
        this.list.addEventListener('click', (event) => {
            this.rating = event.target.dataset.value;
        });

        this.elements = [1, 2, 3, 4, 5].map((value) => {
            const li = document.createElement('li');
            li.classList.add('star', 'outline');
            li.dataset.value = value;
            this.list.appendChild(li);
            return li;
        });

        container.appendChild(this.list);
    }
}
This code constructs an unordered list along with its items. We then assign CSS classes to these items and attach an event listener for the click event.
Implementing change detection
We need a notification mechanism whenever the rating property changes value. For our basic change detection implementation, we'll utilize JavaScript's setter functionality. This means defining a setter for the rating property that triggers updates when its value changes. The DOM update involves swapping CSS classes on the list items. Let me show you the code:
export class RatingsComponent {
    ...
    set rating(v) {
        this._rating = v;

        // triggers DOM update
        this.updateRatings();
    }

    get rating() {
        return this._rating;
    }

    updateRatings() {
        this.elements.forEach((element, index) => {
            element.classList.toggle('solid', this.rating > index);
            element.classList.toggle('outline', this.rating <= index);
        });
    }
}
You can experiment with this implementation here. (This example uses font-awesome's far and fas classes rather than the solid and outline classes from our code).
Consider how much code was necessary for such a simple widget. Now imagine something far more complex, perhaps with multiple lists and conditional visibility logic. The code volume and complexity would increase exponentially. Ideally, during everyday development, we'd prefer to concentrate on application logic and delegate the state tracking and screen updates to someone else. This is precisely where frameworks become valuable.
The role of frameworks
Frameworks handle the synchronization between application state and user interfaces on our behalf. They don't just relieve us of this burden; they perform state tracking and DOM updates very efficiently.
Here's how we might implement our rating widget in both Angular and React. From a user's viewpoint, the template is the most significant component of a component configuration. Interestingly, templates are defined quite similarly across these frameworks.
The Angular template
<ul class="rating" (click)="handleClick($event)">
    <li [className]="'star ' + (rating > 0 ? 'solid' : 'outline')"></li>
    <li [className]="'star ' + (rating > 1 ? 'solid' : 'outline')"></li>
    <li [className]="'star ' + (rating > 2 ? 'solid' : 'outline')"></li>
    <li [className]="'star ' + (rating > 3 ? 'solid' : 'outline')"></li>
    <li [className]="'star ' + (rating > 4 ? 'solid' : 'outline')"></li>
</ul>
The React template
<ul className="rating" onClick={handleClick}>
    <li className={'star ' + (rating > 0 ? 'solid' : 'outline')}></li>
    <li className={'star ' + (rating > 1 ? 'solid' : 'outline')}></li>
    <li className={'star ' + (rating > 2 ? 'solid' : 'outline')}></li>
    <li className={'star ' + (rating > 3 ? 'solid' : 'outline')}></li>
    <li className={'star ' + (rating > 4 ? 'solid' : 'outline')}></li>
</ul>
The syntax differs, but the underlying concept is identical: using expressions as values for DOM element properties. In both templates, we're expressing that the DOM property className relies on the component's rating property. When the rating changes, that expression should be re-evaluated. If the result differs, the className property needs updating.
One clarification about the
clickevent listener. Event listeners aren't part of change detection in React or Angular. They typically initiate change detection, but they never form part of the detection process itself.
Behind the scenes of change detection
Despite the similar approach to using expressions for DOM properties, the underlying implementations in Angular and React are fundamentally different. Let's explore the internals of change detection in both frameworks.
How Angular handles change detection
During template compilation, Angular identifies component properties linked to DOM elements. For each association, the compiler generates a binding expressed as instructions. These bindings form the essence of Angular's change detection. Each binding defines a relationship between a component property (often within a broader expression) and a DOM element property.
After bindings exist, Angular no longer consults the template. Change detection executes instructions that process these bindings. These instructions verify whether an expression's value associated with a component property has changed and perform DOM updates as needed.
In our specific case, the rating property appears in the template bound to the className property through this expression:
[className]="'star ' + ((ctx.rating > 0) ? 'solid' : 'outline')"
For this template segment, the compiler generates instructions to set up a binding, perform dirty checks, and update the DOM. Here's the generated code for our template:
if (initialization) {
    elementStart(0, 'ul');
        ...
        elementStart(1, 'li', ...);

        // sets up the binding to the className property
        elementStyling();
        elementEnd();
        ...
    elementEnd();
}

if (changeDetection) {

    // checks if the value of the expression has changed
    // if so, marks the binding as dirty and update the value
    elementStylingMap(1, ('star ' + ((ctx.rating > 0) ? 'solid' : 'outline')));
    elementStylingApply(1);
    ...
}
A note about these instructions: they're produced by the new Ivy compiler. Earlier Angular versions follow the same binding and dirty-checking concept but implement it differently.
Assume Angular has created a binding for className and its current state is:
{ dirty: false, value: 'outline' }
When the rating value changes, Angular triggers change detection and processes the instructions. The first function evaluates the expression and compares the result to the binding's stored value. This comparison gives rise to the term "dirty checking." If the value differs, the function updates the binding and marks it as dirty.
{ dirty: true, value: 'solid' }
The second instruction examines the dirty flag and, if set, uses the new value to modify the DOM. Here, it updates the className property of our list item.
Processing bindings through dirty checks and refreshing the relevant DOM portions constitute the fundamental operations of Angular's change detection.
How React approaches change detection
React adopts a fundamentally different strategy. I was so accustomed to Angular's binding approach that deciphering React's algorithm took me considerable time. React doesn't use bindings at all. Instead, the foundation of React's change detection rests on Virtual DOM comparisons. How does this work?
Every React component implements a render method that returns a JSX template:
export class RatingComponent extends ReactComponent {
    ...
    render() {
        return (
            <ul className="rating" onClick={handleClick}>
                <li className={'star ' + (rating > 0 ? 'solid' : 'outline')}></li>
                ...
            </ul>
        )
    }
}
In React, a template compiles into a series of React.createElement function calls. In this example, I'm using the el variable as shorthand for that function:
const el = React.createElement;

export class RatingComponent extends ReactComponent {
    ...
    render() {
        return el('ul', { className: 'ratings', onclick: handleClick}, [
                 el('li', { className: 'star ' + (rating > 0 ? 'solid' : 'outline') }),
                    ...
        ]);
    }
}
Each React.createElement invocation produces a data structure we call a Virtual DOM node. This is simply a plain JavaScript object describing an HTML element, its attributes, and children. When these function calls accumulate, they form a Virtual DOM tree. Ultimately, the render method returns that Virtual DOM tree:
export class RatingComponent extends ReactComponent {
    ...
    render() {
        return {
            tagName: 'UL',
            properties: {className: 'ratings'},
            children: [
                {tagName: 'LI', properties: {className: 'outline'}},
                ...
            ]
        }
    }
}
Expressions involving component properties are evaluated at the moment the render function executes. The Virtual DOM node properties contain these evaluated results. Suppose our rating property has a value of 0. Then this expression:
{ className: rating > 0 ? 'solid' : 'outline' }
yields the value outline, which becomes the className property in the Virtual DOM. With this Virtual DOM tree, React creates the list item with the CSS class outline.
Now let's say rating changes to 1, and the expression
{ className: rating > 0 ? 'solid' : 'outline' }
now evaluates to solid. React performs change detection by invoking the render function, which produces a new Virtual DOM tree. In this updated tree, the className property holds the value solid. It's crucial to recognize that the ****render**** function executes during every change detection cycle. Therefore, each invocation might return an entirely different Virtual DOM tree.
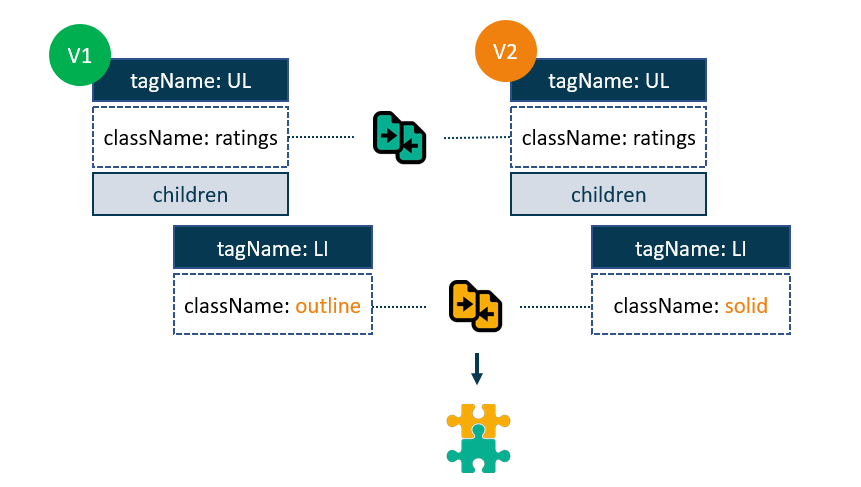
At this point, React has two Virtual DOM structures available:
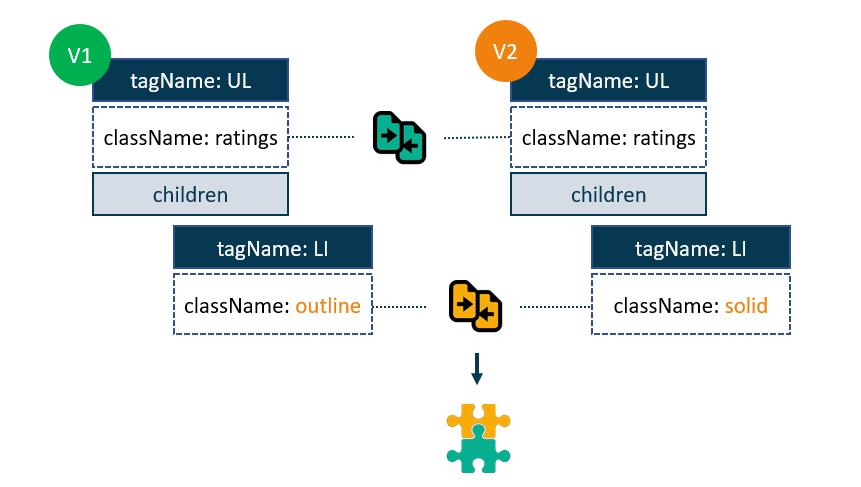
A diffing algorithm then runs on these two Virtual DOMs to identify the differences between them. In our example, the change appears as the modified className property on the list item. Once the discrepancy is identified, the algorithm generates a patch to update the corresponding DOM nodes. Our patch will set the className property to solid from the new Virtual DOM. React then uses this newly updated Virtual DOM for comparisons during the next change detection cycle.
Generating a fresh Virtual DOM tree from a component, comparing it against the previous version, producing a patch for dirty DOM updates, and applying those changes represent the core operations of change detection in React.
What triggers change detection?
There's one aspect we haven't explored yet. To fully grasp how change detection works, we need to understand the exact moment when React invokes the render function or when Angular executes the instructions responsible for processing bindings. In my view, the process that kicks off change detection should be analyzed independently from the process that actually identifies changes and carries out the rendering. Let's dig into that now.
When you think about it, there are essentially two approaches to starting the change detection process.
The first approach is to explicitly notify the framework that a change has occurred or might have occurred, prompting it to run change detection. In essence, this means initiating change detection by hand. The second approach is to let the framework figure it out—the framework detects when a change is possible and runs change detection on its own. And this is another area where the two frameworks diverge.
React
In React, we always begin the change detection cycle manually. This is done by invoking the setState method:
export class RatingComponent extends React.Component {
    ...
    handleClick(event) {
        this.setState({rating: Number(event.target.dataset.value)})
    };
}
There is no automatic mechanism for change detection in React. Every single change detection cycle is initiated by a call to the setState function.
Angular
Angular, however, offers both possibilities. You can use the Change Detector service to manually trigger change detection:
class RatingWidget {
    constructor(changeDetector) {
        this.cd = changeDetector;
    }

    handleClick(event) {
        this.rating = Number(event.target.dataset.value);
        this.cd.detectChanges();
    };
}
Alternatively, you can let the framework handle it automatically. In that case, you just update a property on a component:
class RatingWidget {
    handleClick(event) {
        this.rating = Number(event.target.dataset.value);
    };
}
So how does Angular decide when it's time to run change detection?
The key lies in the fact that Angular's own template binding mechanisms are used for UI events. This means Angular is aware of all UI event listeners. Consequently, it can intercept an event handler and schedule a change detection pass once the application code has completed its execution. It's an elegant solution, but it cannot cover every type of asynchronous event.
Because we don't use Angular-specific bindings for timing events like setTimeout or network requests like XHR, these don't trigger change detection automatically. To bridge this gap, Angular relies on a library called zone.js. This library patches all asynchronous events in the browser and notifies Angular when such an event takes place. Just like with UI events, Angular waits for the application code to finish executing before it automatically kicks off change detection.
We've covered a lot of ground. What should you read next? These articles are a great starting point!
Level Up Your Reverse Engineering Skills
A detailed account of reverse-engineering that draws from my own experience and offers practical guidelines and principles to help you begin your own exploration.
Practical application of reverse-engineering guidelines and principles
A look at the reasoning process behind reverse-engineering React. It demonstrates how these principles are put into practice by walking through the reverse-engineering of a small part of React, and it also highlights some interesting debugging strategies to speed up your work.
These 5 articles will make you an Angular Change Detection expert
If you want a thorough understanding of Angular's change detection, this series is essential reading. Each installment builds on the previous one, moving from a high-level view down to the nitty-gritty implementation details with source references.
In-depth overview of the new reconciliation algorithm in React
This series will give you insight into React's internal architecture. The article offers a detailed look at the key concepts and data structures tied to the algorithm, gradually building the foundation you need to understand the overall process and its main operations.