Thanks to the Angular Service Worker and the built-in Progressive Web App (PWA) support in the Angular CLI, transforming a standard web application into something that can be downloaded and installed, much like a native mobile app, has become remarkably straightforward.
This guide focuses on configuring the Angular CLI build process to produce applications that, when built in production mode, become installable and downloadable on the client's device.
Beyond the core setup, we will integrate an App Manifest, enabling a seamless one-click installation experience for the user.
Feel free to follow along. We'll start from a blank slate by creating a new project with the Angular CLI and systematically work through the configuration steps to unlock these native-like capabilities.
We'll also dissect the underlying changes the CLI makes, so you can manually add Service Worker support to an existing project if you choose not to scaffold a new one.
In the process, we'll explore the unique architecture of the Angular Service Worker, which differs significantly from other build-time generated service workers, and see how it manages the application lifecycle behind the scenes.
A Superior Installation Experience
The background download and installation process you are about to see happens entirely out of sight, without any disruption to the user. In fact, this mechanism is notably superior to the current system used for version updates in native mobile applications.
This PWA-based approach also inherently supports granular version updates. For instance, if only the CSS is modified in a new release, only that specific file needs to be re-downloaded, rather than forcing the entire application to be reinstalled.
Version upgrades can run transparently in the background. Users with multiple tabs open will always be presented with a single, consistent version of the app, and we have the option to proactively prompt them to update if they want the latest features immediately.
Enhanced Performance and Offline Readiness
By installing all JavaScript and CSS bundles directly in the user's browser, the performance gains can be dramatic—potentially ranging from several times faster to an order of magnitude faster application startup, depending on the project's complexity.
This performance benefit is universal and not exclusive to mobile. Any web application can leverage this PWA feature to achieve significant speed improvements.
Furthermore, having the entire application downloaded and installed is the fundamental prerequisite for enabling offline functionality. It's crucial to note, however, that a truly comprehensive offline experience requires more than just the initial download and installation.
As you can see, the advantages offered by this PWA-based installation are substantial. Let's delve into the details.
Navigating This Guide
Here's a breakdown of the topics we'll tackle:
- Step 1 - Creating an Angular PWA project with the Angular CLI
- Step 2 - A Manual Approach to Adding PWA Support
- Step 3 - The Angular Service Worker's Runtime Caching Strategy
- Step 4 - Executing and Deciphering the PWA Production Build
- Step 5 - Running Your Angular PWA in Production
- Step 6 - Managing New Versions and Understanding the Update Flow
- Step 7 - Enabling One-Click Installation with the App Manifest
- Summary and Key Takeaways
This is part of our comprehensive Angular PWA Series. You can explore the other articles here:
- Service Workers - Practical Guided Introduction (several examples)
- Angular App Shell - Boosting Application Startup Performance
- Angular Service Worker - Step-By-Step Guide for turning your Application into a PWA
- Angular Push Notifications - Step-by-Step Guide
This specific installments focuses on the CLI's role in configuring the Angular Service Worker for the specific goal of application download and installation.
Let's get started on turning your Angular application into a PWA!
Step 1 of 7 - Setting up an Angular PWA with the CLI
The CLI can generate a functional application with Download & Installation enabled using just a couple of commands. To begin, ensure you have the latest version of the Angular CLI installed:
npm install -g @angular/cli@latest
For those eager to test the newest features, you can also install the upcoming version:
npm install -g @angular/cli@next
With that done, you can scaffold a new Angular application and integrate Service Worker support in one step:
ng new angular-pwa-app --service-worker
If you're working on a current project, you can also add the Service Worker support using this command:
ng add @angular/pwa --project <name of project as in angular.json>
Step 2 of 7 - The Manual Process of Adding PWA Support
The newly scaffolded application is nearly identical to a standard one. Let's examine the specific changes the serviceWorker flag introduces, which is helpful if you need to modify an existing application manually.
The CLI will add the @angular/service-worker package to your package.json file and set a new serviceWorker flag to true in the angular.json configuration file.
Implications of the serviceWorker Flag
Setting this flag to true ensures that the production build includes two additional files in the output directory (dist):
- The Angular Service Worker script,
ngsw-worker.js - The runtime configuration file for the Service Worker,
ngsw.json
Note that
ngswis an abbreviation for Angular Service Worker.
We'll examine these files closely. For now, let's see what other PWA-related additions the CLI has made.
The Role of the ServiceWorkerModule
The CLI has also imported the Service Worker module into your application's root module (AppModule).
This module provides several crucial injectable services:
SwUpdate, used to manage application version updates.SwPush, for enabling server-side Web Push notifications.
Moreover, this module handles the registration of the Angular Service Worker in the browser (assuming it's supported). It does so by loading the ngsw-worker.js script through a call to navigator.serviceWorker.register().
This register() call triggers a separate HTTP request to fetch the ngsw-worker.js file. With this all in place, only one final piece is needed to make your Angular app a fully-fledged PWA.
Introducing the ngsw-config.json Build File
The last addition is a dedicated configuration file named ngsw-config.json. This file dictates the runtime behavior of the Angular Service Worker and comes pre-loaded with sensible defaults.
For many applications, you might not even need to tweak this file!
The default configuration looks like this:
There's a lot to unpack, so let's go through it methodically. Its primary purpose is to define the default caching rules for the static assets of your application, such as index.html, CSS, and JavaScript bundles.
Step 3 of 7 - A Closer Look at the Runtime Caching Mechanics
The Angular Service Worker is capable of caching a wide variety of HTTP requests in the browser's Cache Storage.
This JavaScript-based key/value caching system is distinct and independent from the standard HTTP Cache-Control mechanism, and the two can operate simultaneously without interference.
Within the ngsw-config.json, the assetGroups section is where you define precisely which HTTP requests the Service Worker should cache. The default configuration creates two distinct groups:
-
One group named
app, which is intended for all core Single Page Application files, includingindex.html, CSS, JavaScript bundles, and the favicon. -
A second group named
assets, for any other static resources shipped in the dist folder, like images, that may not be essential for every page's initial render.
Caching files that constitute the application
The files in the app group are the very application itself; a single page is rendered by combining its index.html with its CSS and JS bundles. These are essential for startup and cannot be lazy-loaded.
The caching strategy for these core files is designed to be as permanent and early as possible, which is precisely what the prefetch install mode in the app group does.
During the Service Worker installation, it will proactively download all these files and place them in the cache, not waiting for the application to request them.
This proactive approach is perfect for core application files because we know they will be required every single time the user visits. By fetching them upfront, the Service Worker can serve them instantly on subsequent loads.
Caching auxiliary static assets
The assets group, on the other hand, uses an lazy install mode. This means files in this group are only cached after they've been explicitly requested by the application. However, once a file is cached and a new version is detected, it will be re-downloaded proactively (this is what the prefetch update mode implies).
This is a highly efficient approach for resources like images, which might not be needed on every page visit. We avoid cluttering the cache with unused files.
However, if a user has viewed a page with a specific image, they're likely to do so again. Thus, when that image is updated, proactively downloading the new version ensures it's ready when needed.
These are the default strategies, but the configuration is flexible enough to be adapted to your needs. That said, the app group's prefetch strategy is so well-suited for the download/app-install use case that it's hard to imagine a reason to change it.
After all, the app caching configuration is the download and installation feature itself. If your application uses custom files outside of the CLI's build output, you would likely add a new group to this configuration.
It's vital to remember that with these default settings, we already have a downloadable and installable application. Let's put it to the test!
Step 4 of 7 - Building and Inspecting the PWA in Production
First, let's add a visual indicator to our app that will help clarify which version is currently running. We can easily do this by replacing the content in app.component.html with something simple.
Now, let's build the application. The Angular Service Worker is only active in production mode, so we must execute a production build:
ng build --prod
This will take a few moments, but once complete, you'll find the production-ready files in the dist folder.
A Look Inside the Production Build Folder
Let's inspect the contents of the build output to see all the generated files:
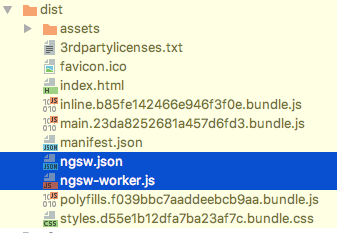
You'll notice that the serviceWorker flag has prompted the CLI to generate two additional files.
Decoding the ngsw-worker.js File
This file is the core Angular Service Worker script. Like all service workers, it's served as a separate file and the browser tracks its identity to manage the Service Worker's lifecycle.
It's the ServiceWorkerModule shown earlier that triggers the loading of this file indirectly by calling navigation.serviceWorker.register().
It's interesting to note that the ngsw-worker.js file remains identical with every build; the CLI simply copies it from node_modules.
This file will remain the same until you upgrade to a newer Angular version that includes an updated version of the Angular Service Worker.
Decoding the ngsw.json File
This is the runtime configuration that the Angular Service Worker uses. It's generated from the source ngsw-config.json file and contains all the necessary instructions, listing exactly which files to cache and when to cache them.
Here's a snippet of what the generated ngsw.json file looks like:
As you can see, this file is a fully expanded version of ngsw-config.json. All the URL glob patterns have been resolved into concrete file paths that match them.
How the Service Worker Utilizes the ngsw.json File
The Angular Service Worker will use these instructions to fetch and store files, either proactively (if in prefetch install mode) or upon first request (if in lazy install mode).
This initial fetching happens in the background while the user first loads the application. On subsequent page reloads, the Service Worker intercepts outgoing HTTP requests and serves these cached files, bypassing the network.
Pay close attention to the hashes associated with each file. If you change even a single character in any of these files and rebuild, its hash will be completely different.
This change in the hash table is how the Angular Service Worker learns that a new file version is available on the server and needs to be fetched and installed.
Now that we have a clear picture of the mechanics, let's see this in action!
Step 5 of 7 - Running the PWA in Production Mode
Let's get the application running in its production state. To do that, we'll need a basic HTTP server. http-server is a great choice, so let's install it:
npm install -g http-server
Next, navigate to the dist folder and start the server in production mode:
cd dist
http-server -c-1 .
The -c-1 flag disables server-side caching. The server will begin listening on port 8080 by default.
If port 8080 is already in use, the server will automatically pick the next available one (e.g., 8081, 8082, …). The assigned port is logged to the console at startup.
If you have a separate REST API running locally (say, on port 9000), you can proxy API calls to it using the following command:
http-server -c-1 --proxy http://localhost:9000 .
With the server running, open http://localhost:8080 and inspect the application in Chrome DevTools:
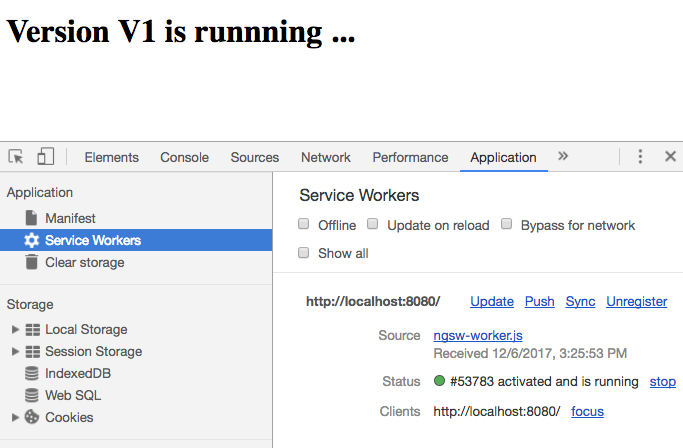
You should see that our version V1 is running, and the Service Worker from ngsw-worker.js has been successfully installed.
Locating the Installed Javascript and CSS Bundles
All the JavaScript, CSS files, and even the index.html have been automatically downloaded and stored for offline use.
You can view these cached files directly in the Cache Storage section of the Chrome DevTools:
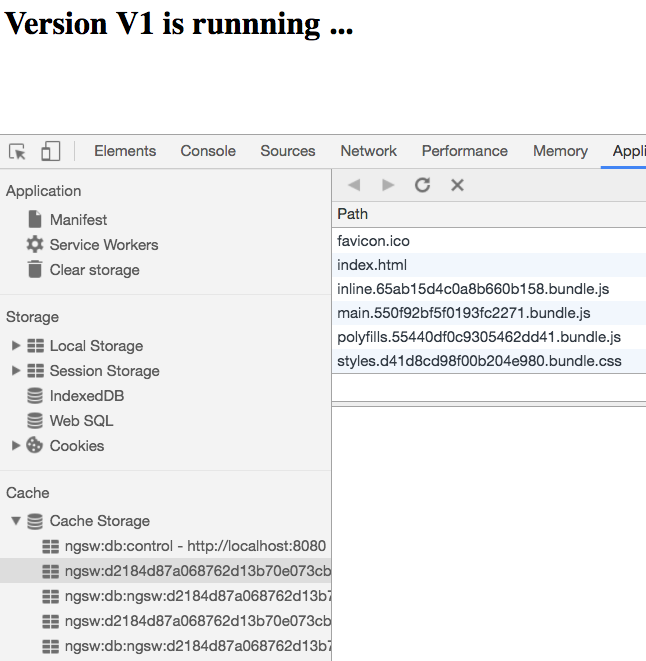
From now on, the Angular Service Worker will serve these files from the cache on every page load. If you hit refresh, you might notice a substantial improvement in startup speed.
Keep in mind that these performance gains will be far more evident on a production server than on
localhost.
Testing Offline Functionality
To conclusively prove the application is fully downloaded, let's perform a definitive test: stop the server by pressing Ctrl+C.
Now, hit refresh without the web server running. You may be surprised to see that the application loads without any issues!
Checking the console, you'll see a message like this:
An unknown error occurred when fetching the script.
ngsw-worker.js Failed to load resource: net::ERR_CONNECTION_REFUSED
The fact that the app still loads proves that all its constituent JS and CSS bundles are being served from the cache, not the network.
The only request that went to the network was for the Service Worker file itself, which is a standard and expected behavior (we'll discuss why shortly).
Step 6 of 7 - Deployment, Updates, and Version Management
This comprehensive caching is excellent, but it raises a valid concern: what happens when you need to deploy a critical bug fix or a new feature?
Imagine we make a small change, like tweaking a global style in the styles.css file. Before we rebuild, let's keep a copy of the current ngsw.json file for comparison.
Now, let's run the production build again and compare the newly generated ngsw.json file:
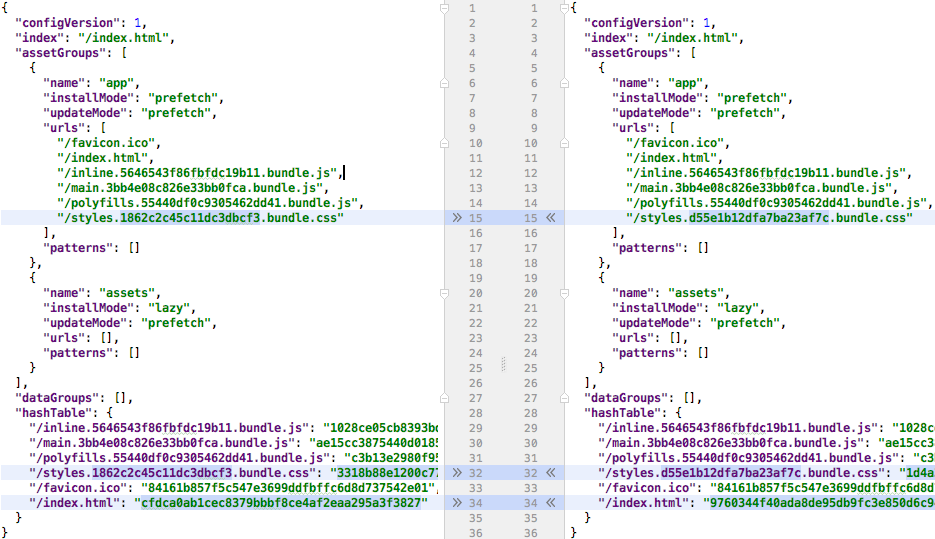
This diff clearly shows that the only significant changes are to the CSS bundle and the index.html file, which now points to the new CSS. The rest of the application files remain unchanged.
How the Angular Service Worker Handles New Versions
On every full application reload, the Angular Service Worker's first action is to check the server for an updated ngsw.json file.
This is done to maintain consistency with the standard Service Worker lifecycle and to prevent users from running stale application code for extended periods. An obsolete version could contain security vulnerabilities or critical bugs, so frequent checks are essential.
In our scenario, the Service Worker compares the cached and new versions of ngsw.json. It identifies the new CSS bundle and downloads and installs it in the background.
The new application version will be displayed the next time the user reloads the page!
Alerting the User that an Update is Ready
For long-running SPAs that users might keep open for hours, we should periodically check for updates and install them in the background. Is that possible?
Yes, you can manually trigger an update check at any time using the checkForUpdate() method on the SwUpdate service.
While you can call checkForUpdate() manually, it's not typically necessary because, for consistency with the Service Worker lifecycle, the Angular Service Worker automatically checks for an updated ngsw.json on every page reload (more details can be found here).
Instead of manual checks, you can subscribe to the available Observable from the SWUpdate service to get notified when a new version is fully downloaded. You can then use a dialog to ask the user if they'd like to activate the new version immediately:
Here’s the sequence of events when you deploy a new version to the server:
- New static files (e.g., updated CSS or JS bundles) are uploaded to the server.
- A new
ngsw.jsonfile is also uploaded, containing the updated manifest with all file names and their new hashes.
When the user reloads the page, they will still see the old version of the app!
This is completely normal. The user's browser still has the old Service Worker installed, which continues to serve the application files directly from Cache Storage, completely bypassing the network.
However, in the background, the old Service Worker checks for the new ngsw.json. Upon finding it, it downloads all the new files listed within. Once everything is in the cache:
Once all new files are fetched and cached, the Angular Service Worker triggers the available event. This is a signal that a fresh version is ready to be activated. The user can then see the following prompt:
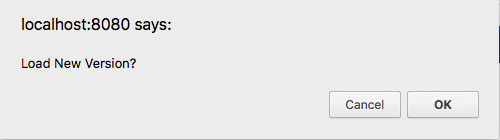
If they click "OK", the page will automatically reload and show the new version. Keep in mind that even without this prompt, the user would see the new version after their next manual page reload anyway.
A Summary of the Version Management Flow
To summarize how the Angular Service Worker handles new releases:
- A new build produces an updated
ngsw.jsonmanifest. - On the user's first reload after deployment, the Service Worker finds the new
ngsw.jsonand silently downloads the updated files. - On the second reload, the user is served the new, updated version of the app.
- This two-reload cycle works consistently across all open tabs, avoiding the complexities of the standard Service Worker lifecycle.
And with that, we have a robustly installable Angular PWA with built-in version management.
The remaining piece to finalize the one-click installation experience is to present the user with a dedicated install prompt.
Step 7 of 7 - One-Click Installation with the App Manifest
The final step is making the application one-click installable. This part is optional, meaning you can leverage the Angular Service Worker for its performance benefits without an App Manifest.
Conversely, an App Manifest only works when a Service Worker is present and controlling the page. By providing a standard manifest.json file, you enable the browser's feature to prompt the user to install the application to their device's Home Screen.
When does the "Install to Home Screen" prompt appear?
This functionality has specific requirements. One prerequisite is that the application must be served over a secure HTTPS connection and, as we've established, have a Service Worker activated.
Moreover, the installation button isn't shown immediately. There are other conditions that need to be fulfilled.
Browsers use an evolving heuristic to decide when to show the install prompt, often factoring in user engagement patterns like the number of visits and their frequency.
Crafting a Sample App Manifest
To bring this feature to life, we must first create a manifest.json file. Place it in the root of your application, in the src folder alongside your main index.html:
This file defines metadata for the installed application, such as the Home screen icon and other user interface parameters.
Linking the Manifest in your index.html
Once the manifest.json file is created, you need to tell the browser about it. Add a <link> tag to the <head> section of your index.html:
Configuring the CLI to include the Manifest
To include our App Manifest in the final production build, we'll need to configure the CLI's asset handling to copy this file into the output folder.
We can do this in the angular.json file by adding it to the assets array:
After this configuration, a manifest.json file will be present in your production build. However, if you reload the app now, you'll most likely find that nothing happens!
How to Trigger the Install Prompt
What we mean by "nothing happens" is simply that the "Install To Home Screen" button will not automatically appear yet because the browser's internal heuristic conditions haven't been satisfied.
However, you can manually trigger this prompt via the Chrome DevTools! Navigate to the Manifest tab and click the Add To Home Screen button:
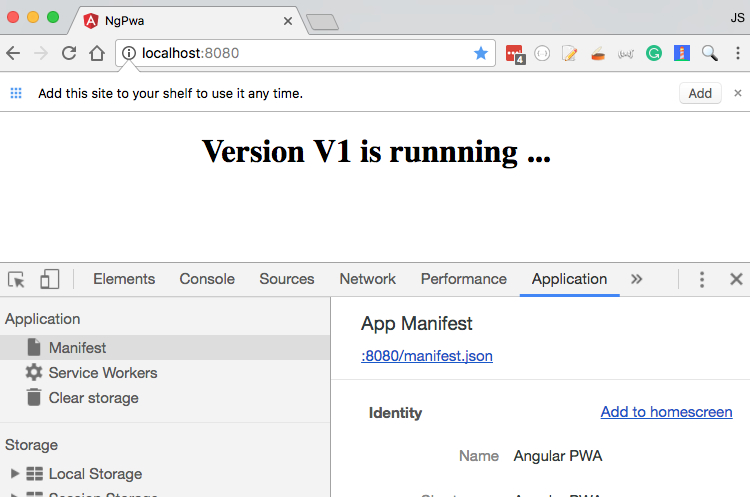
Please note that the user interface for this on a desktop environment like macOS is still quite rudimentary. On a mobile device, the prompt would look more polished:

And with this, our application now boasts a complete, one-click download and installation experience.
Summary and Final Thoughts
Achieving native-like application download and installation is now more manageable than ever with the Angular Service Worker and its seamless integration into the Angular CLI.
The performance benefits are immense for any application, desktop or mobile. These advantages can be introduced gradually without needing to rewrite your entire application in one go.
Any web application can benefit from dramatically faster startup times, and the Angular CLI’s intelligent defaults mean you can often get this working out of the box.
We hope this guide has provided a solid foundation for working with the Angular Service Worker and helps you get started on enhancing your own projects.
To explore this topic even deeper, we recommend checking out the Angular PWA Course, which covers these concepts in extensive detail.
For more insights into other features of Angular PWAs, feel free to browse through the rest of this series:
- Service Workers - Practical Guided Introduction (several examples)
- Angular App Shell - Boosting Application Startup Performance
- Angular Service Worker - Step-By-Step Guide for turning your Application into a PWA
If you have questions or comments, please feel free to leave them in the section below. To stay updated on future articles, consider subscribing to our newsletter:
If you're just starting your journey with Angular, our Angular for Beginners Course is an excellent place to begin:

More Articles from Our Blog
Here are some other popular posts you might find valuable:
- Getting Started With Angular - Development Environment Best Practices With Yarn, the Angular CLI, Setup an IDE
- Why a Single Page Application, What are the Benefits ? What is a SPA ?
- Angular Smart Components vs Presentation Components: What's the Difference, When to Use Each and Why?
- Angular Router - How To Build a Navigation Menu with Bootstrap 4 and Nested Routes
- Angular Router - Extended Guided Tour, Avoid Common Pitfalls
- Angular Components - The Fundamentals
- How to build Angular apps using Observable Data Services - Pitfalls to avoid
- Introduction to Angular Forms - Template Driven vs Model Driven
- Angular ngFor - Learn all Features including trackBy, why is it not only for Arrays ?
- Angular Universal In Practice - How to build SEO Friendly Single Page Apps with Angular
- How does Angular Change Detection Really Work ?