
Overview:
Discover how to bring ESLint into your Angular project to spot defects early, maintain uniform coding conventions, and enhance teamwork. Whether you're working on a compact application or expanding an enterprise solution, ESLint serves as your primary safeguard for orderly and maintainable code.
Key Takeaways:
This guide takes you through the steps of integrating ESLint into an Angular project. ESLint performs static analysis on your code to identify problematic patterns and promote best practices. You'll gain familiarity with:
- Adding ESLint as a dev dependency
- Angular v13+ projects frequently ship with ESLint pre-configured when generated via ng new.
- Setting up lint commands in your package. json
- Tailoring rules to your needs
- Executing ESLint against your codebase from the command line
When you finish, your project won't just be operational—it will also be safeguarded by a uniform standard of coding practices.
Article:

Getting Started:
A Practical Walkthrough for Adding ESLint to Your Angular App
The web development landscape is constantly shifting, and keeping code tidy, uniform, and free of defects is essential. For those working with Angular, this has driven a change in the tools we use. Since TSLint was deprecated starting with Angular v13, ESLint has become the go-to choice for linting TypeScript.
The following steps will show you how to install and configure ESLint in your Angular application. We'll go over the necessary commands, break down the configuration file that gets generated, and demonstrate how to resolve linting issues automatically.
Before diving into the configuration details, it's worth understanding why ESLint is so valuable in any current JavaScript or TypeScript project—particularly in expansive or team-based environments such as Angular or Nx monorepos.
Here are the key advantages:
- Catching Errors Early
ESLint flags problems such as
- Variables that haven't been declared
- Imports that aren't being used
- Type mismatches (handled through @typescript-eslint)
- Improper use of async/await or promises
Addressing bugs before they reach runtime translates to safer code and quicker debugging sessions
- Uniform Code Style
ESLint applies coding standards across your project without manual effort.
- camelCase versus snake_case
- Consistent indentation and whitespace
- Quote style choices (‘ vs “)
- Arrow functions versus traditional function declarations
Pair it with Prettier for streamlined formatting!
- Better Team Dynamics
- Makes the codebase easier to read and anticipate
- Limits subjective arguments during code reviews
- Applies shared standards for every contributor
Hearing "the linter flagged this" is far more productive than debating in pull request comments.
- Enhanced Code Quality and Upkeep
Lint rules encourage:
- More compact functions and components
- Robust error management
- Explicit return annotations (via @typescript-eslint)
- Prevention of anti-patterns such as any, nested callbacks, or tightly coupled modules
Clean code simplifies testing, refactoring, and scaling
- Immediate Feedback While Coding
- ESLint is compatible with VS Code, WebStorm, and other editors
- Highlights issues with red underlines as you type
- Assists less experienced developers in adopting sound practices
Lint warnings function like traffic signals for your code
- Enforcing Architectural Boundaries (such as in Nx Monorepos)
Within Nx or large Angular applications, ESLint can enforce:
- Module boundaries (@nrwl/nx/enforce-module-boundaries)
- Correct import paths
- Layering according to domain
Keeps monorepo architecture from becoming tangled
- Preventing Security and Performance Concerns
Plugins like eslint-plugin-security can identify:
- Uses of eval()
- Risky regex patterns
- Exposed global variables
Linting works alongside secure coding methods
- Streamlined Automation and CI Workflows
- ESLint integrates smoothly into CI/CD pipelines
- Prevents merges of PRs that don't pass linting
- Automatically corrects issues with eslint –fix
Important: Starting with ESLint v9.0.0, eslint.config.js has become the default configuration file.
If you're still working with a .eslintrc.* file, consult the migration guide to transition your configuration to the newer format:
https://eslint.org/docs/latest/use/configure/migration-guide
Maintain quality gates before merging, not afterwards
Incorporating ESLint into Your Angular Project
Thanks to the Angular CLI and the @angular-eslint schematics, initialization is simple. To bring ESLint into your project, execute this command in your terminal:
ng add @angular-eslint/schematicsThis installs the current release of @angular-eslint along with its associated packages.

Transitioning from TSLint (legacy)
Generally, this automated conversion works without a hitch. Yet, if problems arise or you need to handle the migration manually for a particular project in your workspace, the following command is available. It's designed for older setups, so it should function correctly. Essentially, it supports projects up to Angular 13; you'll need to look up your project name in the angular.json file.
# Deprecated: For older Angular versions (<=13) only
ng g @angular-eslint/schematics:convert-tslint-to-eslint project-name
This approach won't work on newer versions (13+); it's now considered obsolete for those releases.
Manual TSLint Removal
If you're already on ESLint, you can ignore this. For those still on TSLint, here's a manual method to eliminate that dependency. If you're on a recent Angular version and need to strip out TSLint after adding ESLint, take these steps:
npx ng add @angular-eslint/schematics
npm uninstall tslint codelyzer
rm tslint.json
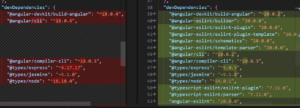
It makes use of tslint-to-eslint-config to automatically convert your current TSLint settings (tslint.json) into the ESLint format, resulting in a .eslintrc.json file at the workspace root.
Next, Modify the lint Target in angular.json
Once converted, confirm that your angular.json is configured to work with ESLint:
- "builder": "@angular-devkit/build-angular:tslint",
+ "builder": "@angular-eslint/builder:lint",
  "options": {
    "lintFilePatterns": ["src/**/*.ts", "src/**/*.html"]
  }
ESLint Extensions for Angular Projects
The @angular-eslint/* packages:
| Plugin | What it does |
| @angular-eslint/eslint-plugin | Angular-specific lint rules for .ts files |
| @angular-eslint/template-parser | A custom parser that allows ESLint to understand Angular’s HTML template syntax. |
| @angular-eslint/eslint-plugin-template | Contains a set of rules specifically for linting Angular templates (.html files and inline templates). |
| @typescript-eslint/* | TypeScript-specific linting rules (e.g., no-unused-vars, typing checks) |
@angular-eslint/eslint-plugin-template is focused on linting Angular templates
Important: you must have @angular-eslint/template-parser installed when using @angular-eslint/eslint-plugin-template. They serve distinct though interconnected purposes.
Consider them a translator and a grammar expert for a particular language variant:
@angular-eslint/template-parser handles the Translation.
@angular-eslint/eslint-plugin-template handles the Grammar Checking.
Additional plugins and packages:
eslint-plugin-import
Eslint-config-prettier When setting up prettier, you'll also need these packages: eslint-plugin-prettier
If you choose this path, a .prettierrc file must also be created in your project.
{
  "singleQuote": true,
  "semi": false,
  "printWidth": 100
}
After completing the setup, the ng lint command—which may not have been active before—will be connected to ESLint, surfacing any warnings or errors according to the rules you've established. It's necessary to have lint configured in the angular.json file as well. These plugins are all dev dependencies.
npm install --save-dev packagenameWhen setting up these plugins, corresponding rules must be added. I've provided a sample eslint.json file for guidance; feel free to expand it with additional rules.
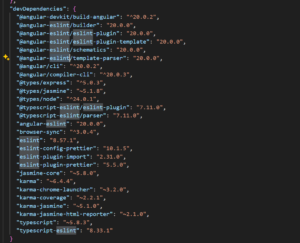
Decoding the .eslintrc.json File
The .eslintrc.json file serves as the core of your linting workflow. Let’s walk through its key sections to see how it enforces code standards across your project.
{
  "root": true,
  "ignorePatterns": [
    "projects/**/*",
    "dist"
  ],
  "overrides": [
    {
      "files": [
        "*.ts"
      ],
      "parserOptions": {
        "project": [
          "tsconfig.json",
          "e2e/tsconfig.json"
        ],
        "createDefaultProgram": true
      },
      "extends": [
        "plugin:@angular-eslint/recommended",
        "plugin:@angular-eslint/template/process-inline-templates",
     "plugin:import/recommended",
        "plugin:import/typescript",
        "plugin:prettier/recommended",
        "eslint-config-prettier"

      ],
      "rules": {
        "@angular-eslint/component-selector": [
          "error",
          {
            "prefix": "app",
            "style": "kebab-case",
            "type": "element"
          }
        ],
        "@angular-eslint/directive-selector": [
          "error",
          {
            "prefix": "app",
            "style": "camelCase",
            "type": "attribute"
          }
        ]
      }
    },
    {
      "files": [
        "*.html"
      ],
      "extends": [
        "plugin:@angular-eslint/template/recommended"
      ],
      "rules": {}
    }
  ]
What Each Setting Does:
"root": true— This tells ESLint that the current directory holds the definitive configuration. It prevents ESLint from searching higher up the directory tree for alternative config files, keeping your setup self-contained."ignorePatterns": [...]— This array lists the files and folders that ESLint should skip entirely. With the given setup, everything underprojectsanddistis excluded from linting, which means your libraries inprojects/won’t be checked unless you explicitly include them elsewhere.
For instance, suppose you want to lint everything in projects/ except for one library called my-ui-kit. You could adjust your ignorePatterns like this:
// .eslintrc.json

"ignorePatterns": [
  "projects/**/*",      // First, ignore everything inside the projects directory
  "!projects/my-ui-kit", // Then, create an exception to re-include this specific library
  "dist/"
]
Prefer .eslintignore when running ESLint outside of the Angular CLI
Add a .eslintignore file at the root level with the following content:
!src/app/**This setup ignores all files except those inside src/app.
Only rely on this method if you're invoking ESLint directly rather than through ng lint.
"overrides": [...]— This flexible mechanism lets you apply distinct rules to different file categories.- TypeScript Files (
*.ts):"parserOptions"— Determines how ESLint interprets your TypeScript source code."project"— Links to yourtsconfig.jsonfiles, which unlocks type-aware linting capabilities."createDefaultProgram"— A compatibility fallback that enables ESLint to handle files not listed in anytsconfig.jsonreferenced by the"project"array.
- TypeScript Files (
Heads-up on performance: although createDefaultProgram: true is convenient and prevents "file not found in project" errors, it carries a heavy price. The parser must spin up a brand-new TypeScript program for each unmatched file, which can severely slow down linting in larger repositories. This option exists mainly for backward compatibility, so use it sparingly.
Pro Tip: Speeding Up Linting in Monorepos
If you're working in a monorepo with multiple libraries inside projects/, the way you set up parserOptions can make or break your linting speed and accuracy.
The Inefficient Single-Config Route
A typical starting configuration might point to one root-level tsconfig.json:
// .eslintrc.json (in the workspace root)
{
  // ...
  "overrides": [
    {
      "files": ["*.ts"],
      "parserOptions": {
        "project": ["tsconfig.json"], // Points to one central tsconfig
        "createDefaultProgram": true // SLOW: Used as a fallback for library files not in the main tsconfig
      },
      // ...
    }
  ]
}
This setup forces ESLint to construct a comprehensive TypeScript program for your entire application. Then, for any library files that fall outside that program, it relies on the sluggish createDefaultProgram fallback. The result? Unnecessary delays and slower feedback loops.
The Recommended Multi-Config Strategy
For both speed and maintainability, the ideal approach is to give every application or library its own dedicated ESLint configuration. When you create a library with ng generate library my-lib, the Angular CLI usually generates a separate .eslintrc.json just for it.
Here’s how the layout works:
- Root
.eslintrc.json: Holds project-wide rules and ignore lists. - Library-specific
.eslintrc.json: Each library points to its owntsconfigfile, so linting stays scoped and precise.
Example: projects/my-data-access/.eslintrc.json
{
  "extends": "../../.eslintrc.json", // Inherits from the root config
  "ignorePatterns": ["!**/*"], // Ensures all files in this lib are linted
  "overrides": [
    {
      "files": ["*.ts"],
      "parserOptions": {
        // RECOMMENDED: Point to the library's specific tsconfig
        "project": ["projects/my-data-access/tsconfig.lib.json"],
        // "createDefaultProgram" is no longer needed here!
      },
      "rules": {
        // You can add rules specific to this library here
      }
    },
    {
      "files": ["*.html"],
      "parserOptions": {
        "project": ["projects/my-data-access/tsconfig.lib.json"]
      }
    }
  ]
}
Why this approach pays off:
- Faster Linting: Linting a single library means ESLint builds a TypeScript program only for that library’s files — dramatically reducing overhead.
- Better Rule Accuracy: Type-aware rules work with the exact compiler options intended for that library, so results are more reliable.
- Scalability: As your monorepo expands, linting performance remains consistent because each unit is checked in isolation.
Investing a little time in setting up focused configuration files means your linting workflow stays fast and responsive regardless of how large your codebase grows.
"extends"— Defines the set of base configurations your setup inherits rules from.plugin:@angular-eslint/recommended: A curated bundle of recommended linting rules tailored to Angular TypeScript code.plugin:@angular-eslint/template/process-inline-templates: Allows ESLint to read and lint inline HTML templates embedded directly within your component files.
"rules"— This is where you fine-tune or replace inherited rules. For example,@angular-eslint/component-selectorand@angular-eslint/directive-selectorenforce consistent naming conventions for your components and directives.
- HTML Files (
*.html):"extends"— Pulls inplugin:@angular-eslint/template/recommended, a set of best-practice guidelines for Angular markup."rules"— Kept empty here, indicating no extra rules are added beyond the recommended defaults for HTML. You’re free to populate it with your own custom rules if needed.
Handy JS/TS Rules to Turn On
"rules": {
  "no-console": "warn",
  "prefer-const": "error",
  "arrow-body-style": ["error", "as-needed"],
  "@typescript-eslint/explicit-function-return-type": "warn"
}
Running ESLint from the Command Line
npx ng lintAuto-Fixing What ESLint Finds
A major benefit of using a linter is its ability to repair many issues on its own. With ESLint, you can trigger this by running a simple command — either call it directly with npx or add a corresponding script to your package.json file to streamline the process.
npx eslint . --fix

{
  "lint": "ng lint",
   "lint:fix": "ng lint --fix"
}
This command instructs ESLint to scan every file in the current directory (.) and automatically apply corrections (--fix) for all fixable rule violations. This feature alone can save you countless hours of manual cleanup and helps keep your code aligned with your standards. It's wise to run this regularly to maintain a tidy codebase.
Note: ESLint comes pre-installed by default in Angular 20 projects.
ESLint Rules in Nx Monorepos
When working with Nx, ESLint is tightly integrated to help enforce constraints across your workspace.
If you're using Nx, you'll need to specify linting rules for each library in your workspace.
npm install --save-dev @nrwl/eslint-plugin-nxBy following these guidelines, you can successfully bring ESLint into your Angular project, improving code quality and ensuring your application stays maintainable over time. Thanks for reading. This guide covers a complete ESLint setup for an Angular application.
In future content, I’ll show you how to combine ESLint with Husky for pre-commit checks.
Happy coding!