
A thoughtfully arranged project setup does more than just ease teamwork — it creates the groundwork for long-term maintainability. Here, I'll outline best practices and tooling that help you build a modern Angular project on a solid base from day one: from code analysis, modular architecture, and visual inspection to commit standards and monorepo strategies.
Code Analysis: Verify Before You Trust
The linter eslint serves as the central mechanism for automated code inspection. A first invocation of ng lint sets it up with a default configuration through the CLI. This configuration already includes checks for standard TypeScript and Angular practices.
For simplicity, I stick with this default configuration instead of adapting it to personal taste. For me, the key point isn't about which conventions are chosen, but rather that some conventions are applied uniformly and reliably. Keeping the defaults helps save time and avoids pointless debates.
One adjustment I do make concerns the eslint rule @typescript-eslint/no-unused-vars, which flags unused variables. While that rule is generally sensible, there are situations where certain parameters aren't used yet but are prepared for the future or are dictated by an interface. For those cases, I use this setting in eslint.config.js at the project root, which permits unused parameters as long as their names start with an underscore:
"@typescript-eslint/no-unused-vars": [
  "error",
  {
    argsIgnorePattern: "^_",
  },
],
This allows the linter to accept the following code, even when the method doesn't currently make use of the countryCode parameter:
applyVAT(netPrice: number, _countryCode: string): number {
  return netPrice * 1.2;
}
Modular Design: Good Boundaries Make Good Neighbors
For the application to remain maintainable as it grows, we need sound modularization. In enterprise settings especially, organizing the code into business domains that know as little about each other as possible works well. That results in loose coupling, which lets each domain evolve independently. Adding layers to these domains introduces additional structure:

The layers shown here are the ones suggested by Nx:
- feature: Concrete components that implement use cases. These are also called Smart Components.
- ui: Reusable components utilized by Smart Components. They are also referred to as Dumb or Presentational Components.
- data: Includes the data model or domain model along with services for data access.
- util: General helper constructs, for instance for authentication or logging.
The four layers described are a solid starting point for most projects. Depending on specific needs and tastes though, it may be sensible to extend them. Some teams, for example, split the data layer into one layer for the domain model and another for data access. Dumb Components can reach into the former but are restricted from the latter.
For larger projects, it may also be useful to further partition the shared area.
The matrix above translates directly into the folder layout of the project. Columns become folders, and rows become subfolders:
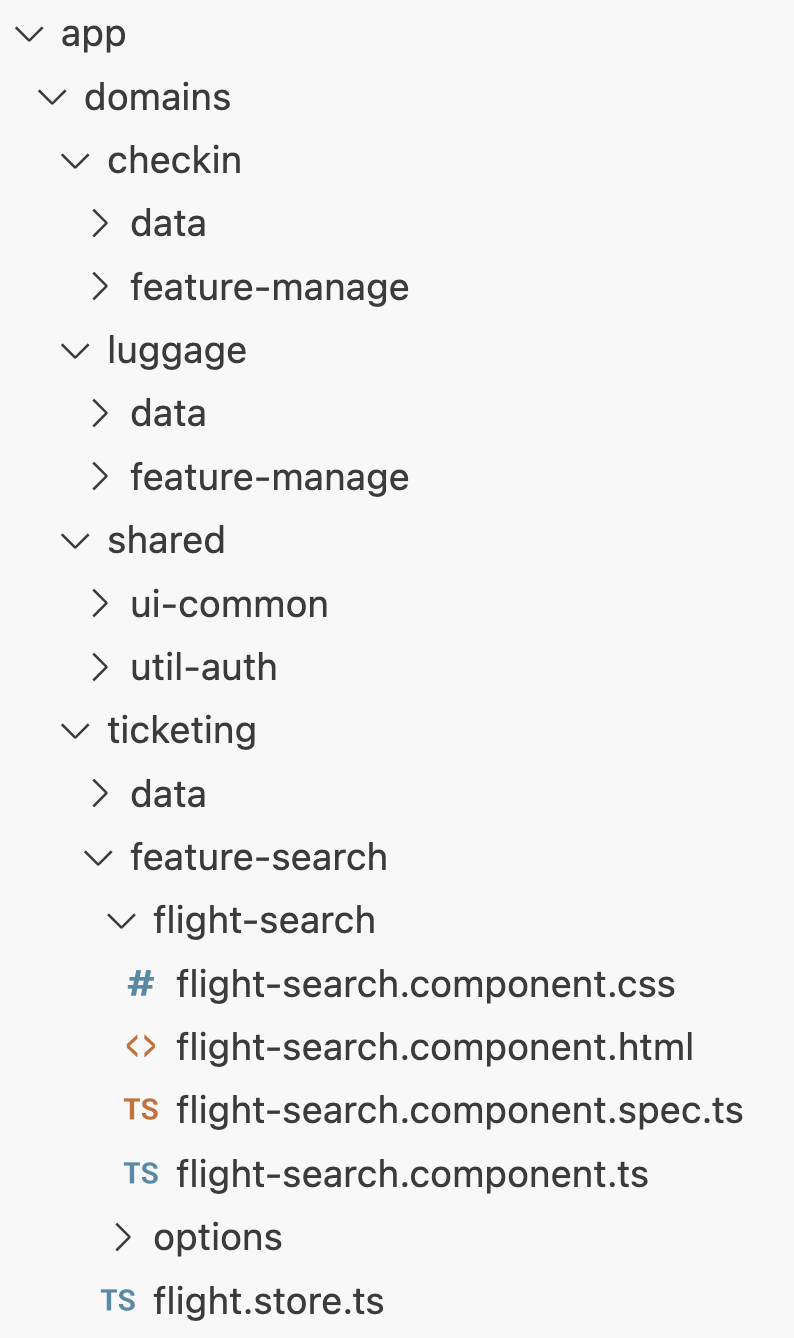
To simplify relative imports between different areas, setting up path mappings for each domain is wise. This happens in the tsconfig.json at the project root:
"baseUrl": ".",
"paths": {
  "@my-project/*": ["src/app/domains/*"]
}
The result is consistent imports that always follow the project/domain/module/path-to-file pattern:
import { CheckinService } from '@my-project/checkin/data/checkin.service';Sheriff: Enforcing Modular Boundaries
The modular structure from the previous section brings several benefits. For one, it settles debates about where certain pieces belong or should be placed — especially important in large projects with many contributors. Also, it guides development by specifying that a layer may only depend on layers beneath it, and that a domain only sees its own parts and those from shared resources.
These kinds of rules can be enforced with linting. The Sheriff project provides a suitable linting rule. Sheriff and its eslint integration are installed like this:
npm install -D @softarc/sheriff-core @softarc/eslint-plugin-sheriffThe file sheriff.config.ts at the project root is generated via npx sheriff init. We then add the access rules to it:
import { sameTag, SheriffConfig } from '@softarc/sheriff-core';

export const config: SheriffConfig = {
  enableBarrelLess: true,
  modules: {
    'src/app/domains/<domain>/feature-<name>': [
      'domain:<domain>',
      'type:feature',
    ],
    'src/app/domains/<domain>/ui-<name>': ['domain:<domain>', 'type:ui'],
    'src/app/domains/<domain>/data': ['domain:<domain>', 'type:data'],
    'src/app/domains/<domain>/util-<name>': ['domain:<domain>', 'type:util'],
  },
  depRules: {
    root: '*',
    'domain:*': [sameTag, 'domain:shared'],
    'type:feature': ['type:ui', 'type:data', 'type:util'],
    'type:ui': ['type:data', 'type:util'],
    'type:data': ['type:util'],
    'type:util': [],
  },
};
The modules section partitions the project into modules, and depRules defines which access between modules is allowed. Angle brackets act as placeholders. For instance, <domain> matches the names of the individual folders under src/app/domains. In the example configuration, each module receives two tags. Ones starting with domain map to the columns of the architecture matrix; those starting with feature correspond to the rows.
After placeholder resolution, the module src/app/domains/booking/feature-manage gets the tags domain:booking and type:feature. The access rules in depRules operate on these tags. The example defines that a domain can reach only itself and shared. Additionally, each layer is restricted to communicating with layers below it. So a module in the feature layer may only depend on modules in the ui, data, and util layers.
Apart from the access permissions described by the depRules node, Sheriff separates every module into a public and a private portion. Other modules can use the public part, provided depRules allow it. The private part, however, remains an implementation detail that is invisible outside. These internal details can thus be modified — even heavily — without affecting consumers of the module.
Originally, each module needed to expose its public API via an index.ts file. Naming conventions for private components are now available. By setting enableBarrelLess to true, as in the example, Sheriff treats everything within the internal subfolder as private. The folder name is configurable, and future versions of Sheriff will even permit globs or regular expressions to identify private files. This way, an application could decide that all files with names starting with a certain letter or located in particular folders or at certain depths are private.
To let eslint delegate to Sheriff, an entry in eslint.config.js at the project root is required:
const eslint = require("@eslint/js");
const tseslint = require("typescript-eslint");
const sheriff = require("@softarc/eslint-plugin-sheriff");

[…]

module.exports = tseslint.config(
  […],
  {
    files: ["**/*.ts"],
    extends: [sheriff.configs.all],
  },
);
If the rules are broken, the linter in your IDE of choice raises an error:

Here, the ticketing domain reaches directly into the checkin domain, and it references the private API of util-auth.
When crafting rules, it can be helpful to see which modules Sheriff creates and how it tags them. The Sheriff CLI gives you this insight. In the project root, you run the command:
npx sheriff list src/main.ts
A Matter of Perspective: Visualize and Analyze Architecture with Detective
The Detective tool renders the architecture monitored by Sheriff as a dependency graph:
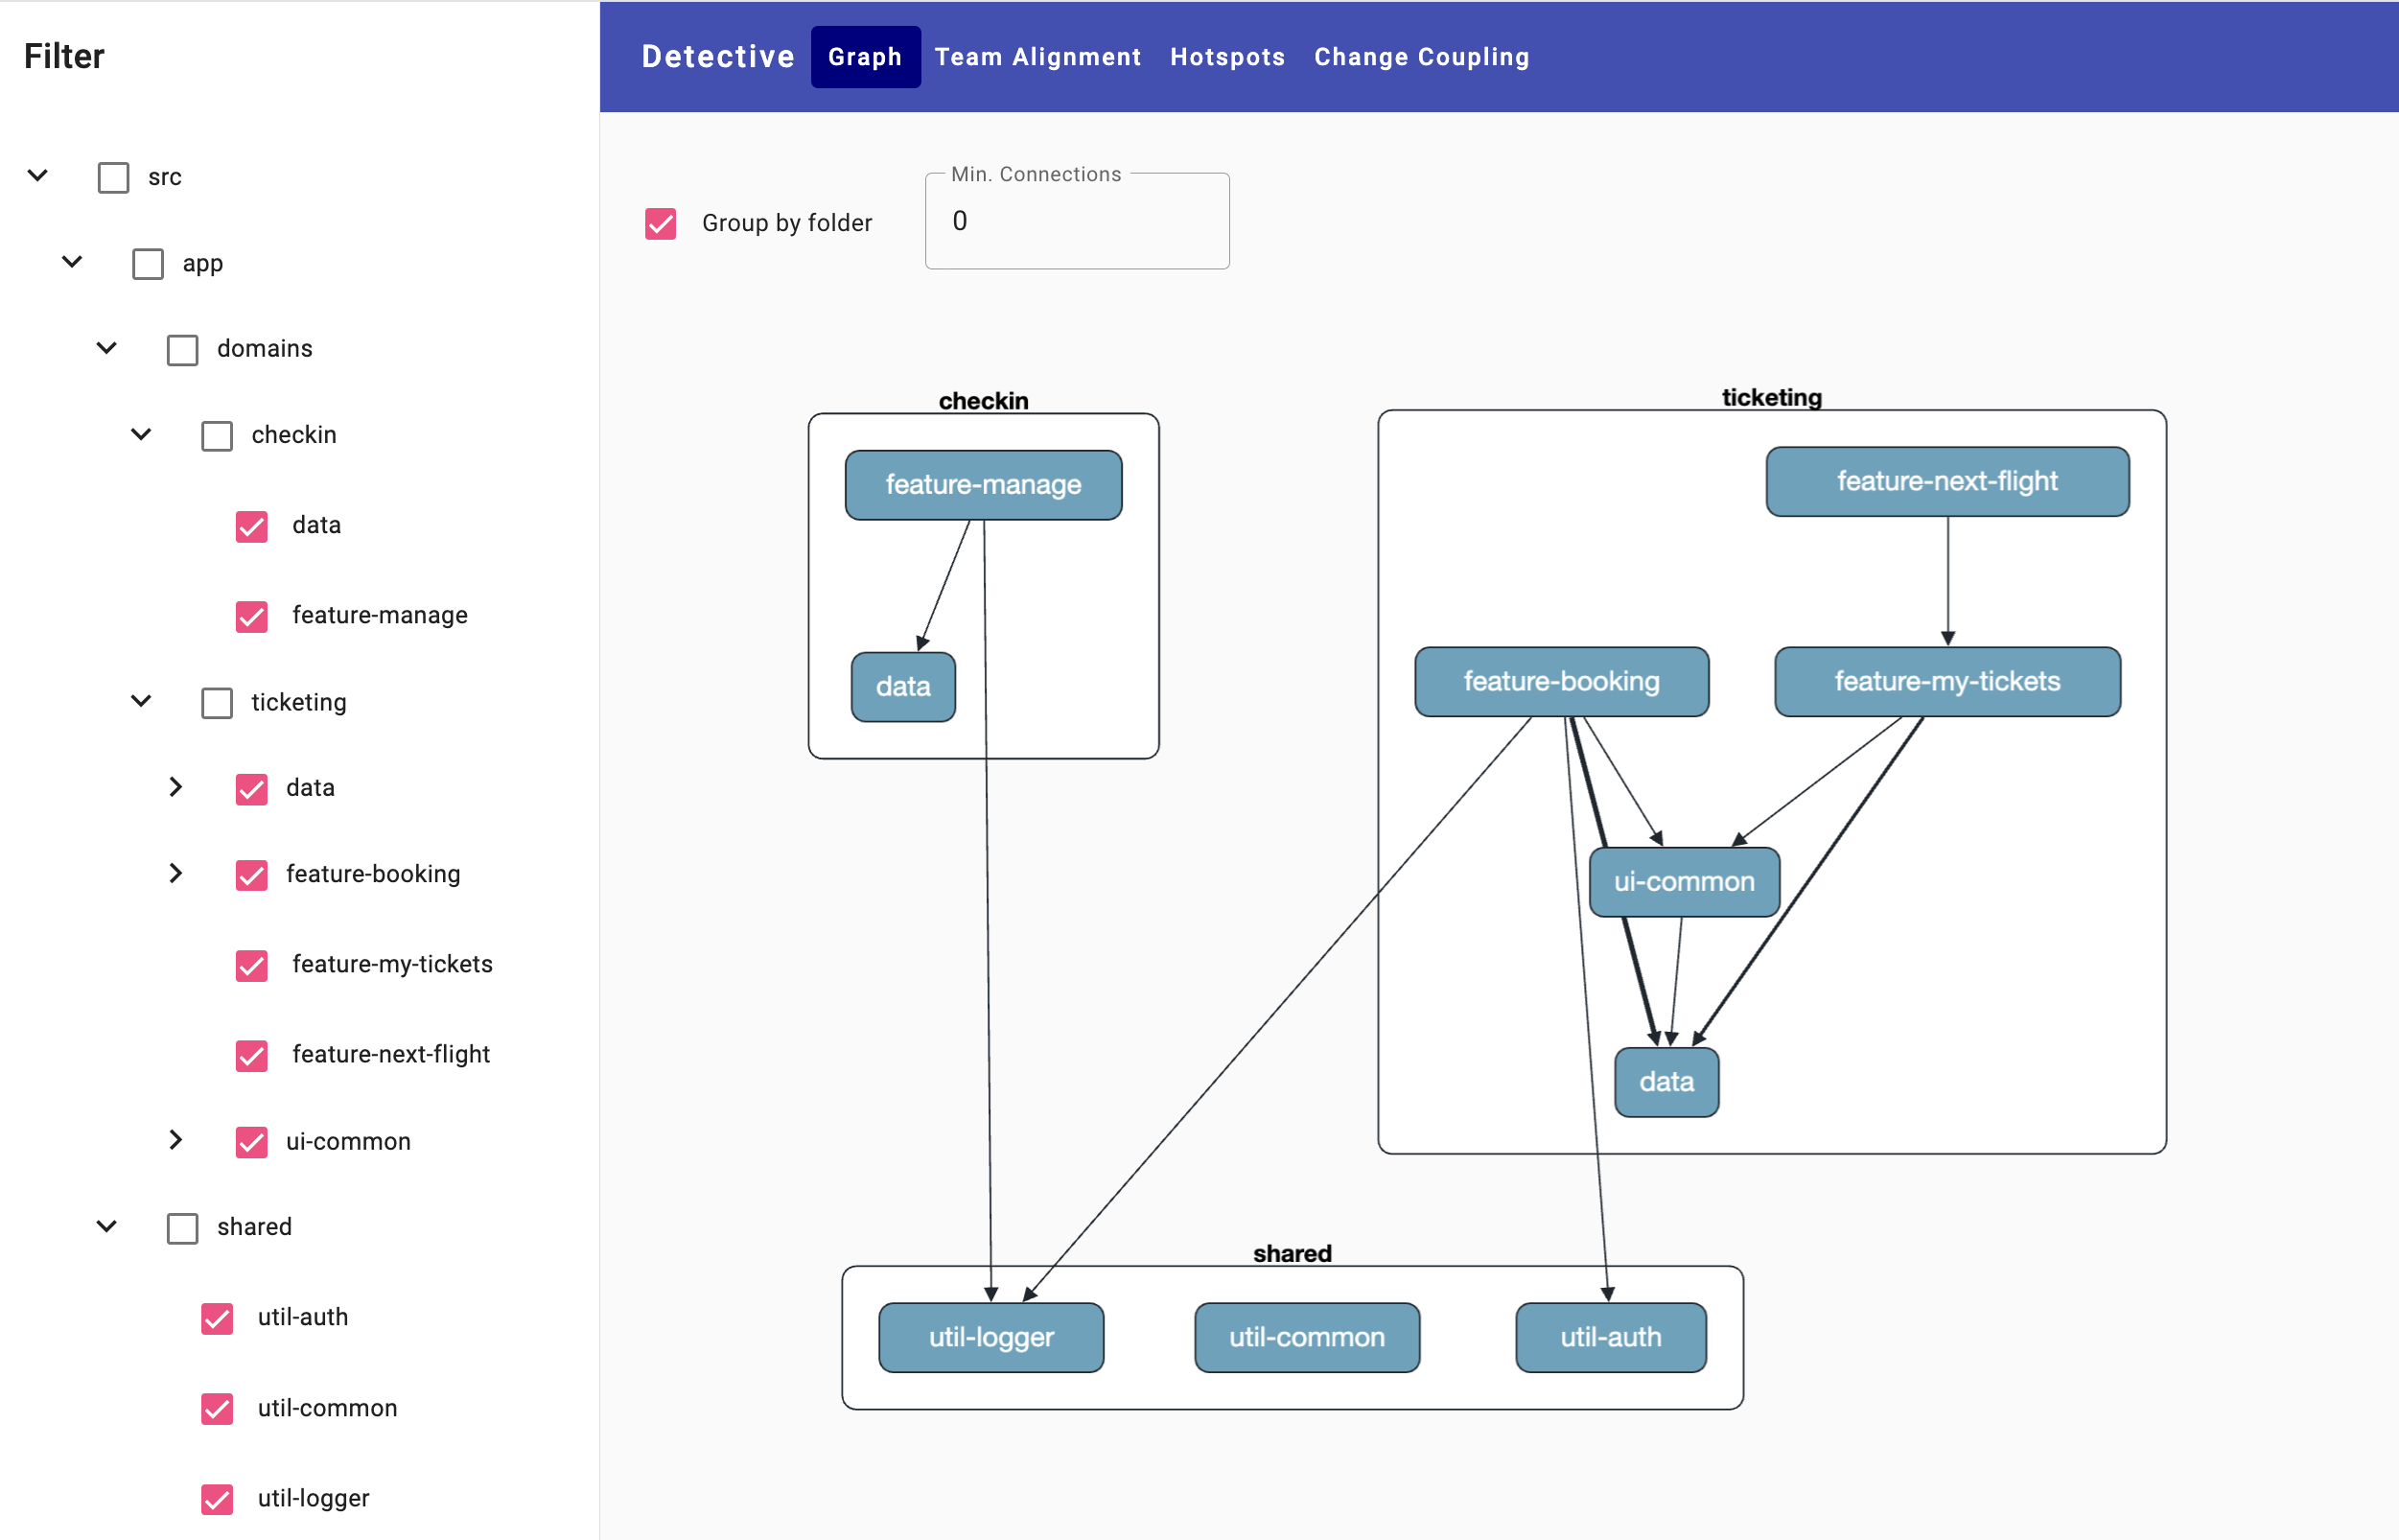
It can be added to current projects with npm and launched with npx:
npm i @softarc/detective -D
npx detective
Besides showing dependencies, it offers forensic analyses that pull in Git history data:
- Change coupling exposes which modules were modified together and how often, giving a signal for hidden dependencies.
- Hot spots are code areas that were changed often and are notably complex. Studies indicate those files tend to be harder to maintain.
- Team alignment looks at how well teams map to individual modules, like domains. Git users are mapped to team names beforehand. Ideally, each team handles one — or a few — domains.
For more details on forensic analysis and Detective, check this article.
Learn More: Angular Architecture Workshop (Remote, Interactive, Advanced)
Turn into a specialist for enterprise-scale, maintainable Angular applications with our Angular Architecture workshop!
English Version | German Version
Prettier: Style That Serves
When multiple developers touch the same application, divergent code styles often emerge. Tools like Prettier, which format source code automatically, bring uniformity. Since consistency matters more than any particular style, I stick with the defaults for convenience.
That said, I appreciate the Prettier plugin prettier-plugin-organize-imports. Automatically sorted imports give you a clearer view of the code and can prevent merge conflicts. Just install it as a dev dependency and Prettier detects it automatically:
npm i -D prettier-plugin-organize-importsPrettier reads the settings in the .editorconfig that the Angular CLI generates. So, for example, it is automatically configured to use single quotes for strings, as is common in Angular work.
To limit formatting to only the files that were modified just before committing — mainly for performance — the pretty-quick package comes in handy:
npm i pretty-quickOnce installed, prettier can be run with:
npx pretty-quickI'll show later how this and other commands can be fired automatically on every commit.
Conventional Commits
Everyone wants to know what changed and what's new, but few enjoy writing a changelog. Also, hand-written changelogs often miss details.
If you maintain meaningful commit messages, they can already serve as a changelog internally. The best part is that you write commit messages anyway, so the extra cost is modest. For outside consumers, you can build a neatly formatted changelog from them later.
Conventional commits have shown themselves to be a helpful standard for structuring those messages. Here's the basic template:
<type>[optional scope]: <description>;

[optional body]

[optional footer(s)]
Only the first line is required. The type names the kind of change (feat for a new feature, fix for a bug fix, docs for documentation, refactor for code restructuring, or chore for routine repo tasks). The optional scope points to the subproject — a domain, for instance — that the change touches.
The optional body adds detail about the change. The pattern "before …, now …" works well for describing modifications. It clarifies which existing behavior changed and how. The footer, also optional, may hold references like Git usernames of reviewers or pairing partners. You can also cite related tickets:
feat(booking): allow to book flights for groups

Before, one could only book a flight for oneself.
Now, one can also book for an entire group of people.

Together with: Max Muster

Closes: #56789
Linting Your Commits
To make sure everyone sticks to conventional commits, linting commit messages is a useful approach. The packages from the commitlint project make that possible. First, install the packages with npm:
npm install -D @commitlint/{cli,config-conventional}Commit linting is then configured via commitlint.config.mjs at the project root, applying the conventional commits rules:
export default {
  extends: ["@commitlint/config-conventional"]
};
A Git hook is set up to check every message passed to git commit. The next section covers how that is done using the npm package Husky.
Husky: Guarding Every Commit
Git hooks let you define custom scripts that run at specific points in the version control workflow, such as right before a commit lands. The npm package Husky simplifies hook management considerably. Once installed, the husky init command handles the initial configuration:
npm install husky -D
npx husky init
From there, you place your scripts inside the .husky directory at the root of your project. The filename determines which Git event triggers the script—for instance, the pre-commit file runs prior to every commit. If that script exits with an error, Git halts the commit. In my setup, this hook invokes the linter (which includes Sheriff) and hands off formatting duties to pretty-quick:
ng lint
npx pretty-quick --staged
The commit-msg hook, meanwhile, validates the commit message itself. Here, I delegate that responsibility to commit linting:
npx --no -- commitlint --edit $1Husky passes the captured commit message to the script as a parameter, which you can access via $1. Any deviation from conventional commits triggers an appropriate warning:

Testing Library for Angular
Out of the box, the Angular CLI ships with everything you need for unit and component testing. Yet writing component tests that genuinely mimic user interactions can be laborious—partly because change detection must be triggered manually within the test itself.
The Angular flavor of Testing Lib addresses exactly that pain point. It wraps Angular's testing infrastructure in a convenient API that keeps low-level details out of sight. Here's a component test written with it: it simulates typing and a button click, then verifies that the component displays the expected output:
import { TestBed } from '@angular/core/testing';
import { render, screen } from '@testing-library/angular';
import userEvent from '@testing-library/user-event';

import { FlightSearchComponent } from './flight-search.component';
import { provideHttpClient } from '@angular/common/http';
import {
  HttpTestingController,
  provideHttpClientTesting,
} from '@angular/common/http/testing';

describe('FlightSearchComponent', () => {
  let ctrl: HttpTestingController;

  it('should search for flights', async () => {
    const user = userEvent.setup();

    await render(FlightSearchComponent, {
      providers: [provideHttpClient(), provideHttpClientTesting()],
    });

    const fromField = await screen.findByPlaceholderText('from');
    const toField = await screen.findByPlaceholderText('to');
    const loadButton = await screen.findByText('Load');

    await user.type(fromField, 'Graz');
    await user.type(toField, 'Hamburg');
    await user.click(loadButton);

    ctrl = TestBed.inject(HttpTestingController);
    const request = ctrl.expectOne(
      'http://demo.angulararchitects.io/api/flight?from=Graz&to=Hamburg',
    );

    const date = new Date().toISOString();
    request.flush([
      { id: 7, from: 'Graz', to: 'Hamburg', date, delayed: false },
    ]);

    const result = await screen.findByText(/Graz/);
    expect(result).not.toBeNull();
  });
});
Because the library sits directly atop Angular's TestBed, you can swap out dependencies in the familiar way. The example above takes advantage of that to mock data access via the HttpClient.
Later, when we look at Nx, we'll also meet Playwright, the well-known E2E framework.
Monorepo Structure: Apps and Libs
When a codebase grows large, one common strategy is to split the system into multiple applications, each dedicated to a specific domain. Teams can then work on one application at a time and rebuild only the part that changed, which trims build times.
Once you take that approach, the next question is whether to keep all those applications in one repository or spread them across several. A single repository—a monorepo—reduces version conflicts, removes the chore of publishing shared libraries, and surfaces breaking changes immediately. Multiple repositories, in contrast, grant each team more independence.
For monorepos, the Angular CLI lets you generate multiple applications and libraries inside one workspace:
ng g app miles
ng g lib util-auth
These subprojects land in the projects folder. The main project, created by default with ng new, sits at the workspace root. For consistency, it's wise to relocate it into projects as well. If you move it manually, be sure to adjust the corresponding entries in angular.json. Alternatively, generate a fresh app with ng g app and migrate your existing source code into it.
To skip the default project altogether, invoke ng new with the flag --create-application false. That yields an empty workspace where you can add apps via ng g app, avoiding the root-level project from the start.
To let apps consume libraries, the Angular CLI registers path mappings in tsconfig.json that point to the compiled library output in the dist folder. That default forces a rebuild of every library after each change, which is awkward. The common workaround is to redirect those mappings to each library's src directory:
"@my-project/util-auth": [
  "projects/util-auth/src/public-api.ts"
]
The public-api.ts file in that listing is the library's entry point, generated by the CLI. It exports everything that constitutes the library's public surface. Nx, which we'll discuss shortly, sets up these mappings by default.
Once the path mapping is in place, apps can import the library by name:
import { UtilAuthService } from '@my-project/util-auth';Optional: Micro Frontends with Native Federation
The separate applications born from splitting a system are often called micro frontends. Typically, though, users expect one integrated product. So those pieces need to be assembled inside a single shell. Native Federation makes that possible.
Native Federation is a technology-agnostic implementation of the Module Federation concept. It allows a shell to pull in components or routes from separately compiled micro frontends. In federation terminology, the shell is the host, and the micro frontends are remotes.
A schematic is available to set up Native Federation. Running
ng g @angular-architects/native-federation:init --project my-remote --type remote --port 4201turns a project into a micro frontend. And with
ng g @angular-architects/native-federation:init --project my-shell --type dynamic-host --port 4200a project becomes a shell. The shell also receives a federation-manifest.json file that lists the URLs of the micro frontends. To load a remote, the shell typically defines a lazy route:
{
  path: 'flights',
  loadComponent: () =>
    loadRemoteModule('mfe1', './Component').then((m) => m.AppComponent),
},
More details on Native Federation are available here.
Incremental Compilation with Nx
When a monorepo contains several applications, you only need to rebuild, test, and lint the ones affected by your latest changes. That saves a great deal of time, but only if you can pinpoint which projects those are. The popular build system Nx excels at exactly that—it computes the impact of your changes and lets you run tasks solely on the affected projects.
Nx also brings a rich set of tools that are easy to configure via Schematics, including Storybook and the widely used E2E framework Playwright.
Although scripts exist to convert an existing project into an Nx workspace, I'd rather create a fresh Nx workspace and migrate the code over. That keeps the new monorepo free of legacy baggage. To get started, run:
npx create-nx-workspace@latestInstalling the Nx CLI as well is a good idea:
npm i -g nxIt behaves much like the Angular CLI, offering the familiar generate, serve, and build commands:
nx g app apps/milesWhen building libraries and applications, you now need to provide the full path. Building an app with
nx build milescauses Nx to store the result in a local cache, located in the .nx folder at the project root. Rebuild the same app without any changes, and Nx simply retrieves the output from that cache. The speedup is substantial:

The cache applies to far more than builds. Unit tests, end-to-end tests, and linting all benefit. Build artifacts are often cached at the level of whole apps, whereas test and lint results are cached per library. That's why it's standard practice in Nx workspaces to break the codebase into many smaller libraries.
To run a task across several projects at once, the Nx CLI offers the run-many command:
nx run-many -t build -p flights,milesUnaffected parts are again pulled from the cache. Everything discussed so far is free and MIT-licensed. The team behind Nx also has commercial offerings, such as Nx Cloud. That service provides a shared cache for your whole team, so every developer and the CI server benefit from all prior executions. Connecting to Nx Cloud is straightforward:
nx connect-to-nx-cloudYou can then try Nx Cloud for free for a limited time. Open source projects generally qualify for free licenses. If you prefer to host it yourself, Nx Cloud also runs locally as a Docker image.
Another Nx Cloud feature is pipeline parallelization. Nx automatically figures out which subtasks can run on separate cloud nodes. You simply specify the maximum node count. To use it, you need a build script, which you can generate with:
nx generate @nx/workspace:ci-workflow --ci=githubBesides GitHub Actions, CircleCI, Azure DevOps, Bitbucket, and Gitlab are currently supported. After the script is generated, check the comments inside it—some capabilities need to be activated explicitly by uncommenting them.
Summary
A disciplined project setup lays the groundwork for maintainable, scalable Angular applications. Clear domain and layer boundaries, automated linting via eslint and Sheriff, and consistent formatting with Prettier create a structure that endures. Tools like Detective offer insight into dependencies and modularization, helping you spot weaknesses. Rounding it all out is a monorepo with incremental builds through Nx, commit message validation, and git hooks wired up with Husky.