
Input Setter versus ngOnChanges
Angular offers two distinct mechanisms for reacting to changes in component inputs: a setter on an @Input property and the ngOnChanges lifecycle hook. Both serve the purpose of detecting when new values arrive, but they operate differently.
So, which approach should you choose? The answer is: it depends on the scenario.
import {
ChangeDetectionStrategy,
Component,
Input,
OnChanges,
SimpleChanges} from '@angular/core';

@Component({
 selector: 'app-product',
 template: ``,
 changeDetection: ChangeDetectionStrategy.OnPush,
})
export class ProductComponent implements OnChanges {
 @Input() set productDetails(details: ProductDetails) {
   // handle product details change
 }

 @Input() owner: ProductOwner;
 @Input() category: ProductCategory;

 ngOnChanges(changes: SimpleChanges): void {
   // handle any input changes
 }

 // ... other stuff
}
When you opt for a setter, Angular invokes it only when the specific input's value actually changes, including the initial assignment. This provides a focused, granular reaction to a single input's updates.
In contrast, ngOnChanges fires whenever any input on the component changes. Even if multiple inputs are updated within the same change-detection cycle, the hook is invoked only once, but its argument provides details about all the changes.
Setters shine when your logic depends on a single input in isolation. If you need to react to a combination of inputs or compare their previous and current states, ngOnChanges is the necessary tool. In that case, it's crucial to inspect the SimpleChanges argument to determine precisely which inputs were affected.
Our recommendation is to favor setters when possible, and if you must use ngOnChanges, always check the SimpleChanges object to see what actually changed rather than assuming all inputs were modified.
Enforcing a Required Input
Have you ever built a component that depends on a specific @Input to function correctly? Here's how you can enforce that the consumer always provides it.
Imagine you have the following component setup:
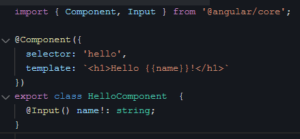
To make the name input mandatory, include it in the component's selector string within square brackets.

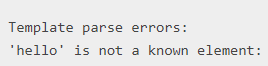
This configuration informs the Angular compiler that the component must be used with a name attribute. If a developer forgets to add it, they'll encounter a compilation error:
Alternatives to ng-deep
You've likely noticed that the ng-deep selector was marked as deprecated. Fortunately, there are other ways to style elements that live inside nested components.
There are two primary options:
- Place the styling rules for nested component elements in your global stylesheet.
- Disable view encapsulation on the parent component by setting
ViewEncapsulation.Nonein its metadata, then style the nested elements directly in that component's style file.
Both methods have their trade-offs. The key to preventing style leakage is to use highly specific selectors that target only the elements you intend to style.
What has your experience been? Have you run into problems with either approach, discovered an alternative solution, or are you still relying on ng-deep?
Content Projection with ng-content
Angular components often need to project HTML from a parent component into a child component's template. The ng-content tag acts as a placeholder within the child template, marking where the projected content should be inserted.
/* Projecting template from parent to child component
   using ng-content with selector */

import { Component } from '@angular/core';

@Component({
 selector: 'app-root',
 template: `<app-child>
   <p class="class" attr>class attr</p>
   <p class="class">class</p>
   <p attr>attr</p>
   <p attr2>attr2</p>
   <p attr3>attr3</p>
 </app-child>`,
})
export class AppComponent {}

@Component({
 selector: 'app-child',
 template: ` <div>
   <h1>Not matching any of selectors:</h1>
   <ng-content></ng-content>

   <h1>By attribute:</h1>
   <ng-content select="[attr]"></ng-content>

   <h1>By class:</h1>
   <ng-content select=".class"></ng-content>

   <h1>By class and attribute:</h1>
   <ng-content select=".class [attr]"></ng-content>
 </div>`,
})
export class ChildComponent {}

// RESULT
/*
 Not matching any of selectors:
 attr2
 attr3

 By attribute:
 class attr
 attr

 By class:
 class

 By class and attribute:
*/
You can define multiple placeholders, each dedicated to a specific piece of content. This is achieved by adding a select attribute to ng-content. The selector works similarly to document.querySelector, allowing you to match elements by tag, attribute, CSS class, or any combination thereof.
If a projected element matches the selectors of multiple placeholders, it gets inserted into the first matching one. Conversely, any content that doesn't match any selector is projected into the ng-content placeholder that has no select attribute.
Useful Local Variables in ngFor
The ngFor directive is a staple for iterating over collections in templates. However, it offers several handy local variables that are easy to overlook:
index: number – the current element's index, starting from 0.count: number – the total number of elements in the collection.first: boolean – true if the current element is the first one.last: boolean – true if the current element is the last one.even: boolean – true if the current index is even.odd: boolean – true if the current index is odd.
These variables can be aliased in various ways, as shown in the example below. When dealing with complex templates, especially nested ngFor loops, it's wise to assign descriptive names to avoid confusion.
<div *ngFor="let item of items;
index as currentIndex;
first as first;
last as last;
even as isEven;
let isOdd = odd;
let count = count;
">
  <app-item
    [item]="item"
    [index]="currentIndex"
    [first]="first"
    [last]="last"
    [count]="count"
    [even]="isEven"
    [odd]="isOdd"
  >
  </app-item>
</div>
One important detail: the even and odd flags reflect the parity of the index, not any property of the element itself. For example, the first element with an index of 0 will have even === true and odd === false.
Have you ever found yourself manually calculating these values, for instance, using index === 0 instead of first?
Optimizing with trackBy
Do you make use of the trackBy function in your ngFor directives?
It's a valuable performance optimization, particularly when the collection you're rendering is subject to frequent changes.
By default, Angular tracks items in a collection by their object reference. Any operation that changes the collection—such as a user action or an API response—will inevitably change these references. Angular then interprets this as a complete change, removing all DOM elements for the collection and recreating them from scratch. As the collection grows, this can have a noticeable negative impact on performance.
This is where trackBy comes in. It gives Angular a way to identify which items were added or removed.
<ul>
 <li *ngFor="let item of items; trackBy: trackByIndexFn">
   {{ item.name }}
 </li>
</ul>
trackByIndexFn = (index: number, item: Item) => index;The function receives the item's index and the item itself as parameters. It should return a unique identifier for that item.
Angular then uses this identifier to track items across collection changes, rather than relying on object references. This allows it to precisely identify which elements are new or removed, and in turn, update only those specific DOM elements instead of rebuilding everything.
Managing RxJS Subscriptions
If you've noticed your application's memory usage climbing after repeatedly creating and destroying components, memory leaks are likely the culprit. A common cause is unsubscribed RxJS subscriptions. The most direct fix is to call the unsubscribe() method on the Subscription returned by subscribe(), but that's not the only strategy. We're curious to hear which methods you prefer (or dislike) for handling unsubscription, and why.
Here are a few common approaches:
Using UntilDestroy:
import { Component, OnInit } from "@angular/core";
import { UntilDestroy, untilDestroyed } from "@ngneat/until-destroy";
import { interval } from 'rxjs';

@UntilDestroy()
@Component({})
export class InboxComponent implements OnInit {
    ngOnInit(): void {
        interval(1000)
            .pipe(untilDestroyed(this))
            .subscribe();
    }
}
Using a Subject:
import { Component, OnInit, OnDestroy } from "@angular/core";
import { Subject, interval, takeUntil } from 'rxjs';

@Component({})
export class InboxComponent implements OnInit, OnDestroy {
    destroy$: Subject<boolean> = new Subject<boolean>();

    ngOnInit(): void {
        interval(1000)
            .pipe(takeUntil(this.destroy$))
            .subscribe();
    }

    ngOnDestroy(): void {
        this.destroy$.next(true);
        this.destroy$.unsubscribe();
    }
}
Using the subscription add method:
import { Component, OnDestroy, OnInit } from "@angular/core";
import { Subscription, interval } from 'rxjs';

@Component()
export class InboxComponent implements OnInit, OnDestroy {
    subscription1: Subscription;
    subscription2: Subscription;

    allSubscriptions = new Subscription();

    ngOnInit(): void {
        this.subscription1 = interval(1000).subscribe();
        this.subscription2 = interval(500).subscribe();

        this.allSubscriptions.add(this.subscription1);
        this.allSubscriptions.add(this.subscription2);
    }

    ngOnDestroy(): void {
        this.allSubscriptions.unsubscribe();
    }
}
Type Safety in Dialogs
Have you ever used the mat-dialog-close directive in a Material dialog's template to pass data back when the dialog closes? While it's a straightforward approach, it can lead to a subtle bug that's easy to avoid.
The issue is that this directive passes data of type any. This means you could inadvertently return something that doesn't match the expected output shape without a compile-time error.
A better approach is to explicitly type the dialog reference in the component's constructor:
dialogRef: MatDialogRef<ExampleDialogComponent, ExampleDialogOutput>
The first generic parameter is mandatory and refers to the component type. The second one, which is key here, specifies the type of data the dialog will return.
You would then use this reference when closing the dialog from a method triggered by a button in the UI:
this.dialogRef.close({ result: 'I love Angular <3' });
Here, type safety is maintained because the close method requires an argument that conforms to ExampleDialogOutput.
Another best practice is to define interfaces for both the data passed into the dialog and the data it returns. These interfaces should be used in both the dialog component itself and wherever the dialog is opened.
When opening the dialog, you can specify all three types explicitly:
this.dialog.open<ExampleDialogComponent, ExampleDialogInput, ExampleDialogOutput>(
ExampleDialogComponent,
{ data: inputObj }
).afterClosed()
By declaring the input data type, you ensure the data object passed in is of the correct type. Likewise, declaring the output type guarantees that the value emitted by the Observable returned from afterClosed() is properly typed.
import { Component, Inject } from '@angular/core';
import { filter } from 'rxjs/operators';
import { MatDialog } from '@angular/material/dialog';
import { MAT_DIALOG_DATA, MatDialogRef } from '@angular/material/dialog';

export interface ExampleDialogInput {
 input: string;
}
export interface ExampleDialogOutput {
 result: string;
}

@Component({
 selector: 'app-root',
 template: `<div>
   <mat-form-field>
     <mat-label>Input data</mat-label>
     <input placeholder="Input data" matInput [(ngModel)]="input" />
   </mat-form-field>
   <button mat-raised-button color="primary" (click)="openDialog()">
     Open dialog
   </button>
   <h2 *ngIf="!!result">{{ result }}</h2>
 </div> `,
})
export class AppComponent {
 input = '';
 result?: string;
 constructor(private dialog: MatDialog) {}

 openDialog(): void {
   this.dialog
     .open<ExampleDialogComponent, ExampleDialogInput, ExampleDialogOutput>(
       ExampleDialogComponent,
       {
         data: { input: this.input },
       }
     )
     .afterClosed()
     .pipe(filter((output) => !!output))
     .subscribe((output) => (this.result = output!.result));
 }
}

@Component({
 selector: 'app-example-dialog',
 template: ` <h2 mat-dialog-title>Input data: {{ data.input }}</h2>
   <div mat-dialog-content>
     <mat-form-field>
       <input matInput [(ngModel)]="result" />
     </mat-form-field>
   </div>
   <div mat-dialog-actions align="end">
     <button mat-flat-button (click)="cancel()">Cancel</button>
     <button mat-flat-button (click)="submit()">Submit</button>
   </div>`,
})
export class ExampleDialogComponent {
 result = '';
 constructor(
   protected dialogRef: MatDialogRef<
     ExampleDialogComponent,
     ExampleDialogOutput
   >,
   @Inject(MAT_DIALOG_DATA) public data: ExampleDialogInput
 ) {}

 submit(): void {
   this.dialogRef.close({ result: this.result });
 }

 cancel(): void {
   this.dialogRef.close();
 }
}
By following these two simple rules:
- Use a typed
dialogRefand theclosemethod to return data, instead of relying on themat-dialog-closedirective. - Define and consistently use interfaces for both input and output data across the dialog component and its opening context.
You can achieve full consistency for all data flowing in and out of your Angular Material dialogs!
Wrapping Up
As you can see, we've accumulated a number of useful Angular tips. And we're far from finished! We'll continue to share tips and updates on a regular basis. To stay in the loop, we recommend following our Facebook and Twitter profiles. You'll find announcements about events, Angular Meetups organized by House of Angular or ngPoland, discount codes for courses and training, and competitions where you can win Angular swag, tickets, and more. We'll also keep you updated on new articles, tips, and news about the Angular and NestJS ecosystems.