Final Outcome
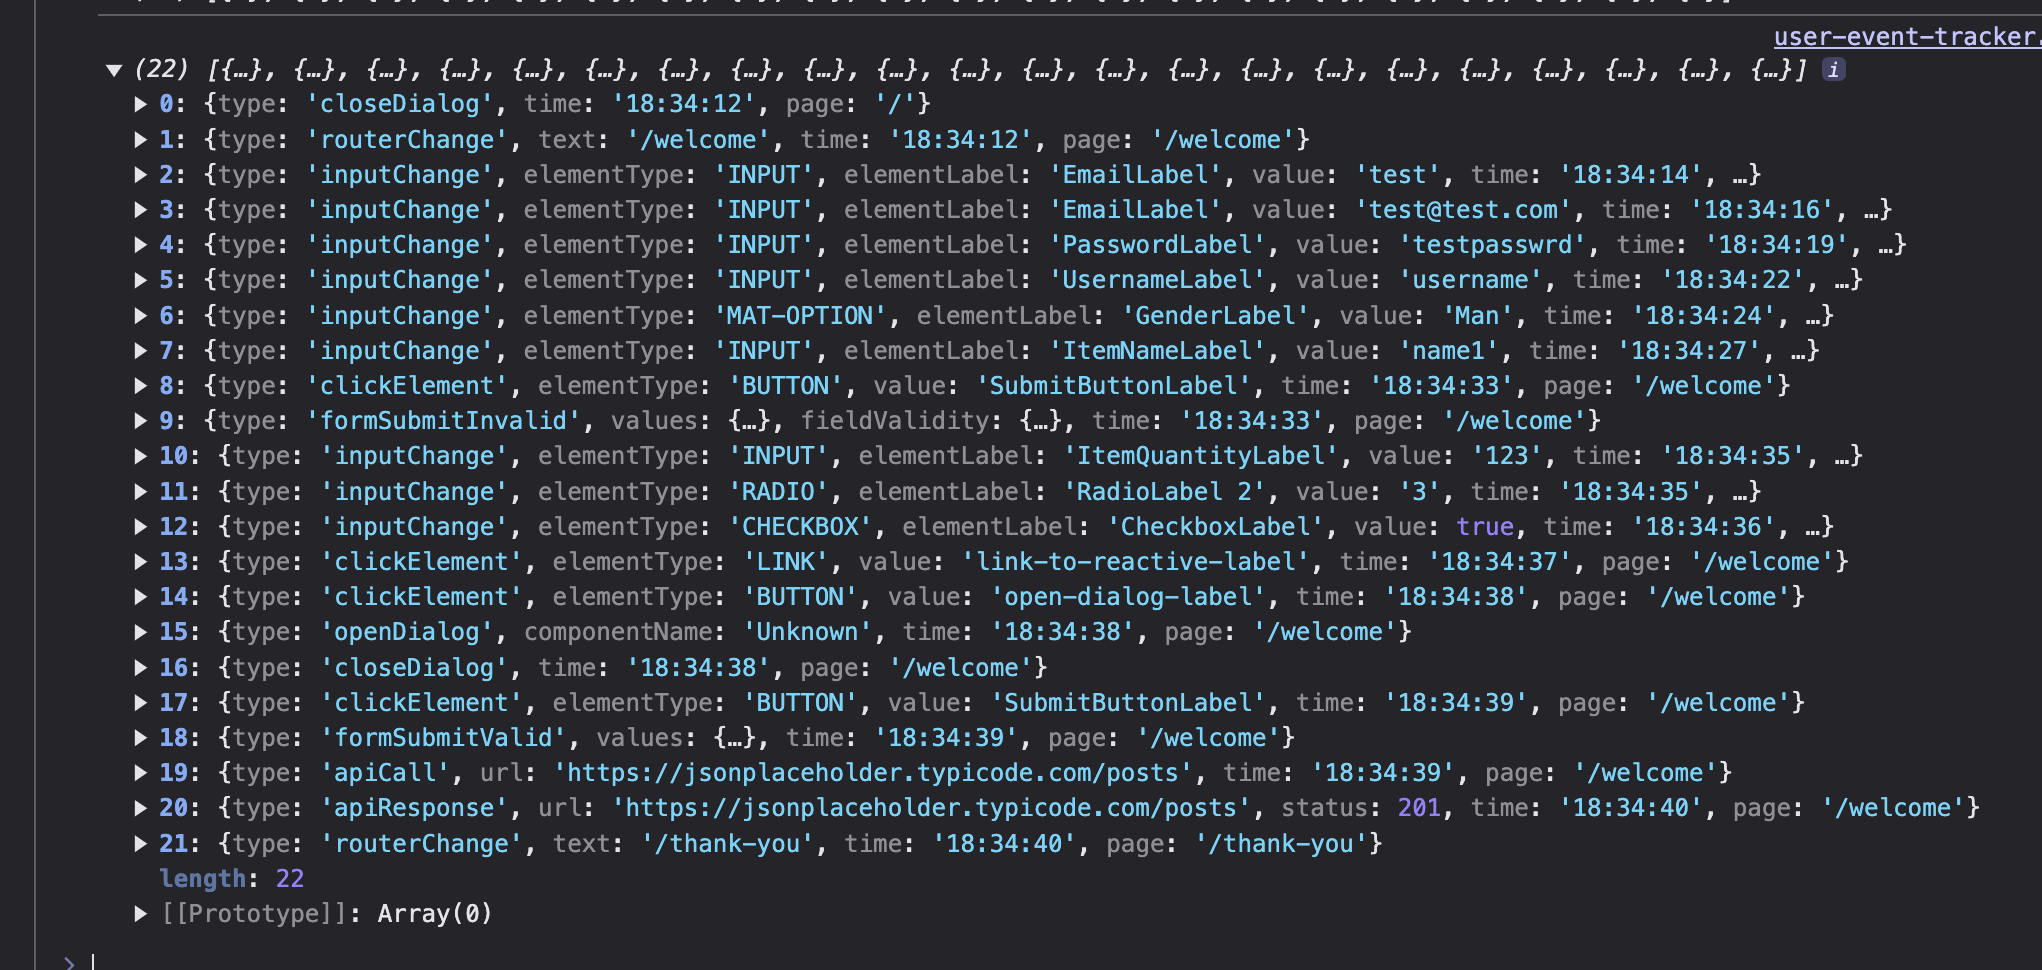
Before we get into the nitty-gritty, let me show you what we ended up with. As users go through the application—updating form controls, opening dialogs, submitting forms, clicking around—all of that activity gets captured and stored.
The Initial Planning Phase
When we first sat down to think through this, the HTTP interception part was straightforward: an Angular interceptor clearly had to be involved. The bigger puzzle was tracking changes to input fields—text inputs, text areas, selects, radio groups, button presses, and so forth. Two ideas ended up on the table:
- Scattered Directives – A single directive for each type of relevant HTML element, like
@Directive({ selector: 'input, textarea' }). - A Single Central Service – Bringing in the
DOCUMENTtoken (document = inject(DOCUMENT)) inside a service, installing a global event listener, and then categorizing the element that received the click or focus event.
Directives are fine when you need to zero in on specific elements, but the big downside for us was that each one had to be manually imported into every standalone component where it was needed. For simplicity, we went with a "one service to manage it all" strategy, though there were a few edge cases where a directive was more practical. Each approach is described below.
Collecting the Events
The foundational piece was a service whose job was to sit on the accumulated logs until the app shut down and it was time to ship them to the backend. The mechanics of this part weren't very involved, and here's the structure we settled on:
@Injectable({
  providedIn: 'root',
})
export class UserEventTrackerService {
  private readonly router = inject(Router);

  /** trigger when an user event happens that we want to log */
  private readonly accumulateLog$ = new Subject<LogEventAction>();

  /** trigger to reset the accumulated logs */
  private readonly resetLogs$ = new Subject<void>();

  /** accumulate every user event that happens */
  private readonly accumulatedLogs = toSignal(
    merge(
      // triggered logs by the app
      this.accumulateLog$.pipe(
        map((action) => ({
          type: 'add' as const,
          action: { ...action, time: new Date(), page: this.router.url },
        })),
      ),
      // reset logs
      this.resetLogs$.pipe(map(() => ({ type: 'reset' as const }))),
    ).pipe(scan((acc, curr) =>
		(curr.type === 'add' ? [...acc, curr.action] : [])
        , [] as UserEvent[])
	  ),
    { initialValue: [] },
  );

  createLog(action: LogEventAction): void {
    this.accumulateLog$.next(action);
  }

  saveLogs(): void {
    const logChunks = createChunks(this.accumulatedLogs(), 120)

    // save all log chunks
    for (const logFormat of logChunks) {
      this.sendToRemoteByFetch(logFormat);
    }

	// trigger reseting all previous logs
    this.resetLogs$.next();
  }

  private sendToRemote(body: unknown): void {
	// todo ....
  }
}
From the UserEventTrackerService, two different entry points are available to the rest of the app. When you need to add a new record, you invoke createLog(). We deliberately avoided letting people access the underlying accumulateLog$ subject directly; wrapping it inside createLog() avoids the risk of outside code doing something unintended like calling accumulateLog$.complete(). The LogEventAction type is what lets us tag and differentiate the various kinds of log entries. This article isn't really about that type, but in case you're curious, its definition looks like:
// the code is reduced for the sake of article
export type LogEventAction =
  | {
      type: 'inputChange';
      // input, select, checkbox
      elementType: string;
      // label of the element
      elementLabel: string;
      // input value
      value: string | boolean | number;
    }
  | {
      type: 'clickElement';
      elementType: string;
      value: string;
    }
  | {
      type: 'routerChange';
      text: string;
    }
  | {
      type: 'apiCall';
      url: string;
    }
   | {
	   type: 'custom';
	   value: unknown;
   }
   // .....

export type UserEvent = {
  // time when the user event happens - HH:mm:ss
  time: string;
  // current page that the user is on
  page: string;
} & LogEventAction;
So in a component, creating a log entry comes down to just:
export class TestComponent {
	private trackingService = inject(UserEventTrackerService);

	createLog(){
		this.trackingService.createLog({ type: 'custom', value: 'AA' })
	}
}
The second callable piece of UserEventTrackerService is saveLogs(). This takes the stored logs, transmits them in smaller batches (details in a moment), and then pushes the resetLogs$ trigger to purge what was stored.
At first glance, resetLogs$ might look surplus to requirements—one would assume the logs just pile up until the application shuts down. But in our scenario, we also needed to forcefully transmit logs at refresh time, wipe the slate, and then resume logging for the new session.
export class App {
  private userEventTrackerService = inject(UserEventTrackerService);

  @HostListener('window:beforeunload')
  onPageRefresh() {
    this.userEventTrackerService.saveLogs();
  }
}
Shipping Logs Back To The Server
One might initially assume that saving data to the server is just about injecting HttpClient, calling post(), and being done. Under the hood, you're making an XMLHttpRequest call, which will transmit the info across the wire. But there's a catch here: an XHR is aborted if the browser is closed, meaning any analytics that haven't reached the server would simply vanish.
There are two, much more reliable paths. The first uses the sendBeacon() Navigator API. This lets you issue a POST request even while the tab/page is being removed. Its drawback: you have no way to set headers, credentials, or cookies on the request.
Option two is a standard fetch() call, which provides the flexibility to specify your own headers and enabling the keepalive property by assigning true to it. Just keep in mind that even though the send happens when the app is closing/reloading, whether that data is actually persisted is up to the server. This essentially means the frontend wipes its accumulated logs once the request is sent, so if the server doesn’t finish the save, those logs are unrecoverable.
  private sendToRemote(body: unknown): void {
    const xsrfToken = this.getCookie('XSRF-TOKEN');

    fetch('api/logs', {
      method: 'POST',
      headers: {
        'Content-Type': 'application/json',
        ...(xsrfToken ? { 'X-XSRF-TOKEN': xsrfToken } : {}),
      },
      credentials: 'include',
      keepalive: true, // keep the connection alive when app closes
      body: JSON.stringify(body),
    });
  }
Page Structure And Markup
Picture our app as a booking flow for an airline. It's a set of forms, split across multiple routes, and users move through these forms in a defined sequence. The last route is the checkout page, but it's possible to abandon the order on any of those earlier steps.
<form [formGroup]="form" (ngSubmit)="onSubmit()">
  <mat-form-field>
	<mat-label>Email</mat-label>
	<input matInput formControlName="email" />
  </mat-form-field>

  <mat-form-field>
	<mat-label>Gender</mat-label>
	<mat-select formControlName="gender">
	  <mat-option value="man">Man</mat-option>
	  <mat-option value="woman">Woman</mat-option>
	</mat-select>
  </mat-form-field>

  <mat-radio-group>
	<mat-radio-button value="1">Option 1</mat-radio-button>
	<mat-radio-button value="2">Option 2</mat-radio-button>
  </mat-radio-group>

  <button mat-stroked-button type="submit">Submit</button>
</form>
Setting up click and focus listeners isn't enough to satisfy all of our needs. On every interaction with any of those page elements, the logger has to grab two things:
- The value – holding whatever is inside that HTML element (that part is straightforward).
- The associated label – of the HTML element (this is the tough part).
Labels present a complication. For some elements, like input or mat-select, the label is displayed beside the element. But consider radio buttons, checkboxes, or a generic button—what exactly constitutes their label?
One natural reflex would be to grab the text content. A button labeled "Submit", for instance, would simply log itself as "Submit". However, then we run into issues with localization. For a website that supports multiple languages, that label is going to look different depending on the locale, making event analysis a lot clumsier. "Submit" in English becomes "Enviar" in Spanish and "Soumettre" in French, and correlating user behavior across languages gets messy quickly.
Labeling The HTML
We floated the idea of using aria-label to name elements, although it wasn't quite the right fit. That method implies manually spelling out aria-label (or some similar selector) for every button, input, select, etc. that needs to be observed.
Using the aria-label does improve accessibility, but providing an inaccurate label can end up being more harm than good for screen reader users. The naming also needs to be presented in the user's language at all times. A phrase we recalled often was: "a website without aria-labels is still better than one full to the brim with incorrect ones." Our real aim was a selector that would stay in English, yet be ignored by assistive tech. For that job, we substituted the data-label attribute.
<form [formGroup]="form" (ngSubmit)="onSubmit()">
  <mat-form-field>
	<mat-label>Email</mat-label>
	<input data-label="Email" matInput formControlName="email" />
  </mat-form-field>

  <mat-form-field>
	<mat-label>Gender</mat-label>
	<mat-select formControlName="gender">
	  <mat-option data-label="Gender" value="man">Man</mat-option>
	  <mat-option data-label="Gender" value="woman">Woman</mat-option>
	</mat-select>
  </mat-form-field>

  <mat-radio-group data-label="RadioLabel 1" formControlName="radioEx1">
	<mat-radio-button value="1">Option 1</mat-radio-button>
	<mat-radio-button value="2">Option 2</mat-radio-button>
  </mat-radio-group>

  <button data-label="SubmitButton" mat-stroked-button type="submit">
     Submit
  </button>
</form>
If it were feasible, my preference would always be to use data-label to attribute names to elements. In situations where that's not possible, sticking with nearest-text labeling and simply accepting the localization caveat is the likely path.
Another practical note about positioning data-label on selectors like mat-select. The moment a mat-select is opened, an overlay gets painted above your content holding the option list. This overlay means the data-label, if attached to the mat-select itself, is no longer accessible for reading, and that just makes retrieval messy. Attaching it to the mat-option ended up being a better arrangement, allowing us to reliably read the select's label.
Installing Global Event Watchers
Easiest approach for watching HTML element interactions was to have one service subscribing to DOM events, and then logging the activity it sees, categorizing that by what kind of element caused it. The final code is prettier than some of our earlier attempts, but the general design remains similar:
@Injectable({
  providedIn: 'root',
})
export class UserEventListenerService {
  private readonly userEventTrackerService = inject(UserEventTrackerService);
  private readonly document = inject(DOCUMENT);
  private readonly ngZone = inject(NgZone);
  private readonly router = inject(Router);
  private readonly dialog = inject(MatDialog);

  start() {
    afterNextRender(() => {
      merge(
        // open dialog log
        this.dialog.afterOpened.pipe(map((dialogRef) => ({ type: 'openDialog' }))),
        // close dialog log
        this.dialog.afterAllClosed.pipe(map(() => ({ type: 'closeDialog' }))),
        // router change log
        this.router.events.pipe(
          filter((e): e is NavigationEnd => e instanceof NavigationEnd),
          map((routerData) => ({ type: 'routerChange', text: routerData['url'] })),
        ),
      ).subscribe((res) => this.userEventTrackerService.createLog(res));

      this.ngZone.runOutsideAngular(() => {
        // listen on click events
        this.document.addEventListener('click', (event) => {
        const target = event.target as HTMLElement;

          if (target.tagName === 'A') {
            this.userEventTrackerService.createLog({
              type: 'clickElement',
              elementType: 'LINK',
              value: target.dataset['label'] ?? 'Unknown',
            });
          }
          // ... other elements

        }, true);

        // listen on input change events
        this.document.addEventListener('change', (event) => {
          const target = event.target as HTMLElement;

          if (target.tagName === 'INPUT') {
            this.userEventTrackerService.createLog({
              type: 'inputChange',
              elementType: 'INPUT',
              elementLabel: target.dataset['label'] ?? 'Unknown',
              value: (target as HTMLInputElement).value,
            });
          }
          // ... other elements

        }, true);
      });
    })
  }
}
Naturally, the actual production version is more extensive, with extra logic classifying element types (based on their tagName) that bumped into the event. Here, we've distilled it for clarity. Some key points worth calling out:
- Observable Merging: Using the
merge()operator to bring together dialog open/close notifications, plus navigation events, into a single data flow. - Listening To Clicks & Value Changes:
addEventListeneris set to receive both user clicks and any value changes, then we conditionally record the HTML element interaction, checking thetagName. Also, we had to put the capture phase totrue, allowing the event to be caught as it rises up the tree. Without that, certain events went unlogged—radio button changes being one such case. - Isolated From Angular's Change Detection: Coming from runOutsideAngular, this wraps the DOM interactions and keeps them out of the change detection cycle, which is intentional for better performance. Running this kind of setup outside the zone is a recommended practice to avoid driving up the number of re-render cycles.
- Protection For Server-Side Rendering: The presence of afterNextRender means the callback itself only gets invoked on the client side, and just as soon as Angular finishes rendering. It’s the standard place to put code that works directly on DOM nodes.
With a global listener in place, we get one single, registered provider responsible for handling the logging for the entire application, to the extent that user activity happens within the DOM.
bootstrapApplication(App, {
  providers: [
	// ... other things ...
    provideAppInitializer(() => {
      inject(UserEventListenerService).start();
    }),
  ],
});
Targeted Use Cases With Directives
There are specific scenarios where handling everything at the global level turned out not to be possible, and that was a limitation I couldn't crack. One example: collecting form-level details when users hit submit. While it's true that we can attach a global listener on the submit event and grab the valid/invalid state there, it stopped short—the structural details of the form, the names of specific controls, and the values of what the user subitted remained inaccessible.
this.document.addEventListener('submit', (event) => {
  const formElement = event.target as HTMLFormElement;

  const isValid = formElement.checkValidity();
  const formStructure = "Dunno"; // please help
}, true);
That's because event.target lands as an HTMLFormElement. What we ideally want is a reference to the actual FormGroup, giving us immediate access to the form's value. Handling cases like that is where a directive shines.
@Directive({
  selector: 'form[formGroup]',
  standalone: true,
  host: {
    '(ngSubmit)': 'onSubmit()',
  },
})
export class FormSubmitDirective {
  private formGroupDirective = inject(FormGroupDirective);
  private userEventTrackerService = inject(UserEventTrackerService);

  onSubmit() {
    const form = this.formGroupDirective.form;
    const isValid = form.valid;
    const values = form.getRawValue();

    if (isValid) {
      this.userEventTrackerService.createLog({
        type: 'formSubmitValid',
        values,
      });
    } else {
      this.userEventTrackerService.createLog({
        type: 'formSubmitInvalid',
        values,
        fieldValidity: getFormValidationState(form),
      });
    }
  }
}
Putting FormSubmitDirective into practice requires mentioning it in each standalone component that has a form. The ngSubmit gets triggered only if a valid <form> tag is present, with at least one interactive element inside it—a keyboard action or a click on a submit button labeled <button type = "submit">Submit</button>. If that structure isn't in place, the form submission will go right past the directive's watch.
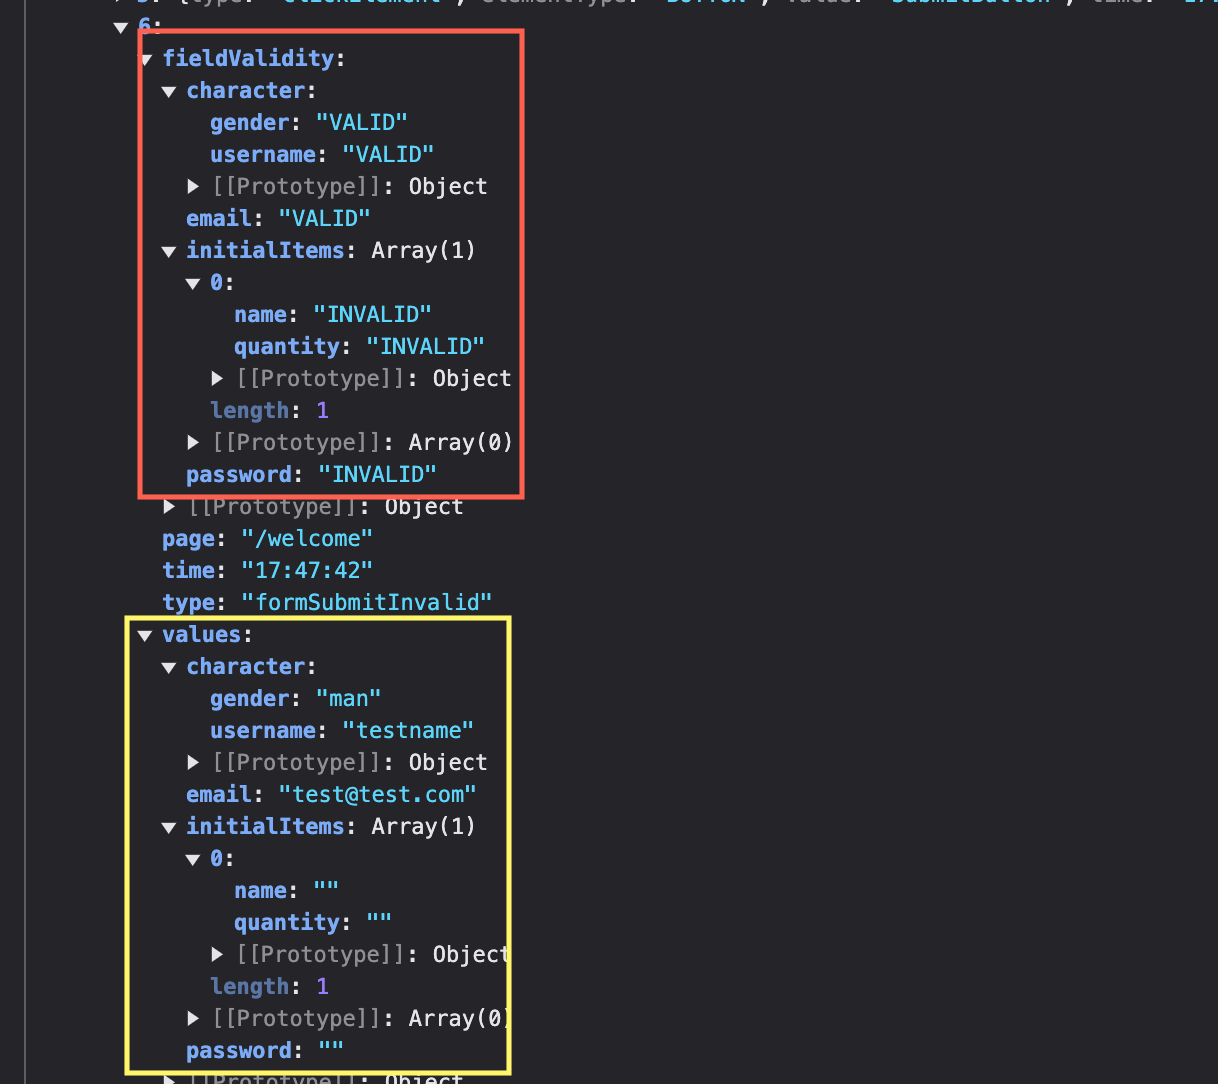
The helper function, named getFormValidationState(), iterates through the form in its entirety. Keys remain intact, but their corresponding values become either a VALID / INVALID string, depending on which fields have passed their validators.
type ValidationState =
  | 'VALID'
  | 'INVALID'
  | { [key: string]: ValidationState }
  | ValidationState[];

const getFormValidationState = (form: AbstractControl): ValidationState => {
  if (form instanceof FormControl) {
    return form.valid ? 'VALID' : 'INVALID';
  }

  if (form instanceof FormGroup) {
    return Object.keys(form.controls).reduce(
      (acc, key) => ({
        ...acc,
        [key]: getFormValidationState(form.controls[key]),
      }),
      {},
    );
  }

  if (form instanceof FormArray) {
    return form.controls.map((control) => getFormValidationState(control));
  }

  // default use case, shouldn't happen
  return 'INVALID';
};
When someone attempts to send a form that's in an invalid state—say, leaving a required field blank or giving it some other validation error—we get a log entry shaped like this:
Directives When Dealing With Input Changes
You might ask why we didn't just default to directives from the get-go for HTML value changes. Something in the style of
@Directive({
  selector: 'input',
  standalone: true,
  host: {
    '(change)': 'onChange($event)',
  },
})
export class EventInputsDirective {
  private userEventTrackerService = inject(UserEventTrackerService);

  onChange(event: FocusEvent) {
    const inputTarget = event.target as HTMLInputElement;
    const labelName = inputTarget.dataset['label'] ?? 'Unknown';

    this.userEventTrackerService.createLog({
      type: 'inputChange',
      elementType: inputTarget.tagName,
      elementLabel: labelName,
      value: inputTarget.value,
    });
  }
}
And that approach is functional. For us, the downside was having to register the directive(s) inside every standalone component that we cared about, when the service version just handled input changes across the board without any extra wiring.
Catch Network By Interceptors
You probably already know your way around interceptors, so here’s a quick refresher on using them to log both outgoing and incoming network activity. The log records the complete URL, status codes, and the duration of each request, making it straightforward to measure how much time passes from the moment a request leaves the client to when the response arrives.
export const userEventLoggingInterceptor = (
  req: HttpRequest<unknown>,
  next: HttpHandlerFn,
): Observable<HttpEvent<unknown>> => {
  const service = inject(UserEventTrackerService);

  return next(req).pipe(tap((event) => {
      // send http event
      if (event.type === HttpEventType.Sent) {
        service.createLog({ type: 'apiCall', url: req.urlWithParams });
      }
      // receive http event
      else if (event.type === HttpEventType.Response) {
        trackingService.createLog({
          type: 'apiResponse',
          url: req.urlWithParams,
          status: event.status,
        });
      }
    }),
  );
};
bootstrapApplication(App, {
  providers: [
    provideHttpClient(withInterceptors([userEventLoggingInterceptor])),
    // ... other ...
   ]
 })
Summary
This article walked through a common front-end dilemma and offered a practical way to handle it. I demonstrated setting up a shared service to track DOM interactions, tagging elements with data-label, building an interceptor for network requests, applying directives for elements that fall outside global coverage, and manually pushing events into a subject for custom logging.
One final point worth raising: collecting user interaction data can fall under GDPR rules, so be sure to get explicit consent from users before you start logging anything.
I hope this guide was useful. The entire tracker is on GitHub, and you’re welcome to use it wherever you like. If you have thoughts or questions, feel free to share them, or find more of my work on dev.to / LinkedIn.