Implementing Automatic Token Injection in Requests with an HTTP Interceptor
Angular introduced the HTTP interceptor mechanism in version 4.3 as part of HTTPClientModule. Its primary role is to intercept and alter HTTP requests and responses. Interceptors serve a wide array of purposes, including authorization workflows that attach tokens to outgoing requests, header adjustments, server response transformations, request retries for failed calls, caching strategies, and other frequent tasks. A comprehensive look at the most common interceptor applications can be found in this overview.
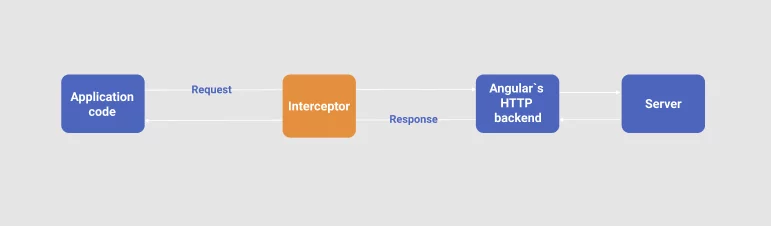
An interceptor operates between your application logic and Angular's HTTP backend, which is responsible for dispatching AJAX calls to the server. The flow is illustrated in the following diagram:
For a deeper dive into how interceptors work internally, refer to the Insider’s guide into interceptors and HttpClient mechanics in Angular.
Authentication stands out as a typical scenario where interceptors prove invaluable. This guide walks through implementing an interceptor specifically for managing tokens in an authentication flow.
Consider a service that handles authentication and persists tokens via local storage:
import { Injectable } from '@angular/core';
@Injectable()
export class AuthService{

 constructor() { }

 getAuthToken():string {
 return localeStarage.getItem('token')
 }
}
In Angular, an interceptor is a TypeScript class that implements the HttpInterceptor interface.
Per the Angular documentation, HttpInterceptor defines a single critical method—intercept—which is used to identify and process an HTTP request.
interface HttpInterceptor {
 intercept(req: HttpRequest<any>, next: HttpHandler): Observable<HttpEvent<any>>
}
req– the outbound request object that needs to be processed.next– represents the next interceptor in the sequence, or the backend itself when no further interceptors remain.Observable– the method yieldsObservable<HttpEvent<any>>, an observable stream of events. This observable can be managed according to your app's specific needs.
Now, let's build an AuthInterceptorService that appends authorization headers:
export class AuthInterceptorService implements HttpInterceptor {
  constructor(private authService: AuthService) {}
 intercept(request: HttpRequest<any>, next: HttpHandler): Observable<HttpEvent<any>> {
    const token = this.authService.getAuthToken();

   if (token) {
     // If we have a token, we set it to the header
     request = request.clone({
        setHeaders: {Authorization: `Authorization token ${token}`}
     });
  }

  return next.handle(request).pipe(
  	catchError((err) => {
   	 if (err instanceof HttpErrorResponse) {
       	 if (err.status === 401) {
       	 // redirect user to the logout page
     	}
 	 }
  	return throwError(err);
	})
   )
  }
}
As demonstrated, the intercept method handles the modification of the HttpRequest object. The token is retrieved from authService. In cases where no token exists, the header is still attached to the request.
It's important to note that HttpRequest is designed to be immutable, preventing direct alterations. This immutability offers certain assurances, which are explained in detail in this article. The clone method on HttpRequest enables changes to specific properties by creating a copy rather than modifying the original.
After adjusting the HttpRequest, we invoke the handle method on HttpHandler, passing the successfully cloned HttpRequest object. Error handling is achieved through the catchError operator from RxJS; more details are available in the reference documentation. Be sure to return an observable—throwError(err)—from the catchError function. Once the error is confirmed, you can incorporate extra logic, such as evaluating the error status and redirecting users to a logout page.
In this example, the handle method forwards the request to the backend server; alternatively, it could trigger the next interceptor in the chain.
The final step involves registering AuthInterceptorService within the AppModule.
import {HTTP_INTERCEPTORS } from '@angular/common/http';
import { AuthInterceptorService} from '...';
import { AuthService} from '...';
@NgModule({
 ...
 imports: [
  HttpClientModule,
  ...
 ],
 providers: [
   AuthService ,
  {
   provide: HTTP_INTERCEPTORS,
   useClass: AuthInterceptorService,
   multi: true
  },
  ...
 ],
 ...
})

export class AppModule { }
When working with multiple interceptors, they should be registered as shown below:
import {HTTP_INTERCEPTORS } from '@angular/common/http';
@NgModule({
 ...
 imports: [
  HttpClientModule,
  ...
 ],
 providers: [
   FruitService,
  {
   provide: HTTP_INTERCEPTORS,
   useClass: FirstInterceptor,
   multi: true
  },
  {
   provide: HTTP_INTERCEPTORS,
   useClass: SecondInterceptor,
   multi: true
  },
  ...
 ],
 ...
})

export class AppModule { }
Keep in mind that interceptors execute in the order they are provided. Setting the optional multi attribute to true signals to Angular that this is a multi-provider—allowing multiple values for a single DI token. Interceptors can also be linked to form a related chain. Guidance on constructing a custom middleware chain is available here.
Wrap-Up
The HttpInterceptor in Angular offers a powerful mechanism for handling requests and responses. Within the intercept method, you can rely on immutable principles to alter request or response objects.
Managing your requests and responses addresses many common challenges, including error handling, authentication, attaching custom headers to outgoing calls, and logging incoming responses.
For those interested in expanding their knowledge on interceptors, the following resources are recommended.
Additional Reading
How to split http interceptors between multiple backends
Insiders guide into interceptors and httpclient mechanics in angular