
How Google Orders Search Results
Google uses a three-stage pipeline to decide which pages appear for a given query:
Discovery
When Google first learns of a URL, it dispatches automated crawlers to fetch that page. During this visit, the search engine renders the page, examines its textual and visual components, and assesses the overall layout. The clearer your site's structure and content are to Google, the more accurately it can pair your pages with relevant searches.
Categorization
Once a page has been fetched, Google moves to understand its subject matter. This phase, known as indexing, involves parsing the page's text, cataloging any embedded images or videos, and building a semantic profile of the page. That profile is stored in Google's index—a massive, distributed database spread across countless machines.
Ranking and Delivery
When a user submits a search, Google scans its index for the most relevant matches. It weighs numerous signals to surface what it considers the highest-quality answers, while also personalizing results based on the user's location, language, and device type.
A query like "bicycle repair shops" will produce vastly different results for someone in Paris versus someone in Hong Kong. Google does not accept payment for better placement; the ranking process is entirely automated.
Setting Up the Demo Project
To see pre-rendering in action, we'll build a fresh Angular application. You have two options: clone the starting point from this repository, or follow along by copying the code below.
The finished version of the project is also available here.
In short, we're creating a minimal app with three routes:
//about/contact
Start by installing the Angular CLI globally, if it's not already on your machine:
npm install -g @angular/cli
Next, generate a new project named ng-boost-seo:
ng new ng-boost-seo
Now create the components you'll need with these commands:
ng generate component components/home
ng generate component components/about
ng generate component components/contact
After that, set up the main navigation to switch between routes.
<!-- app.component.html -->

<nav>
  <ul>
     <li>
        <a routerLink="/">Home</a>
     </li>
     <li>
        <a routerLink="/about">About</a>
     </li>
     <li>
        <a routerLink="/contact">Contact</a>
     </li>
  </ul>
</nav>

<router-outlet></router-outlet>
Now fill in the templates for the home, contact, and about components in that order.
<!-- components/home.components.html -->

<h1>I'm the home component</h1>

<ul>
  <li>Learn how Google ranks your site</li>
  <li>Learn how to pre-render html content with Scully</li>
  <li>Learn how to add Search Engine meta tags</li>
  <li>Learn how to add Open Graph meta tags for social media</li>
  <li>Learn how to deploy your boosted app to Firebase</li>
</ul>
<!-- components/contact.component.html -->

<h1>I'm the contact component</h1>

<p>
  Keep in touch with us
</p>
<!-- components/about.component.html -->

<h1>I'm the about component</h1>

<p>
  Make sure your site ranks high on Google so you get more visits and your business grows.
</p>
Finally, wire up the routes in the app.routing.module.ts file as shown:
// app-routing.module.ts

const routes: Routes = [
  {
     path: '',
     component: HomeComponent,
     pathMatch: 'full',
  },
  {
     path: 'about',
     component: AboutComponent,
  },
  {
     path: 'contact',
     component: ContactComponent,
  },
  {
     path: '**',
     redirectTo: '',
  },
];

@NgModule({
  imports: [ RouterModule.forRoot(routes) ],
  exports: [ RouterModule ],
})

export class AppRoutingModule {
}
Boosting SEO for Angular Apps
With the three core stages of Google's algorithm in mind, let's look at what we can adjust in an Angular app to improve its visibility.
First, launch the starter code and open the browser's View page source feature.
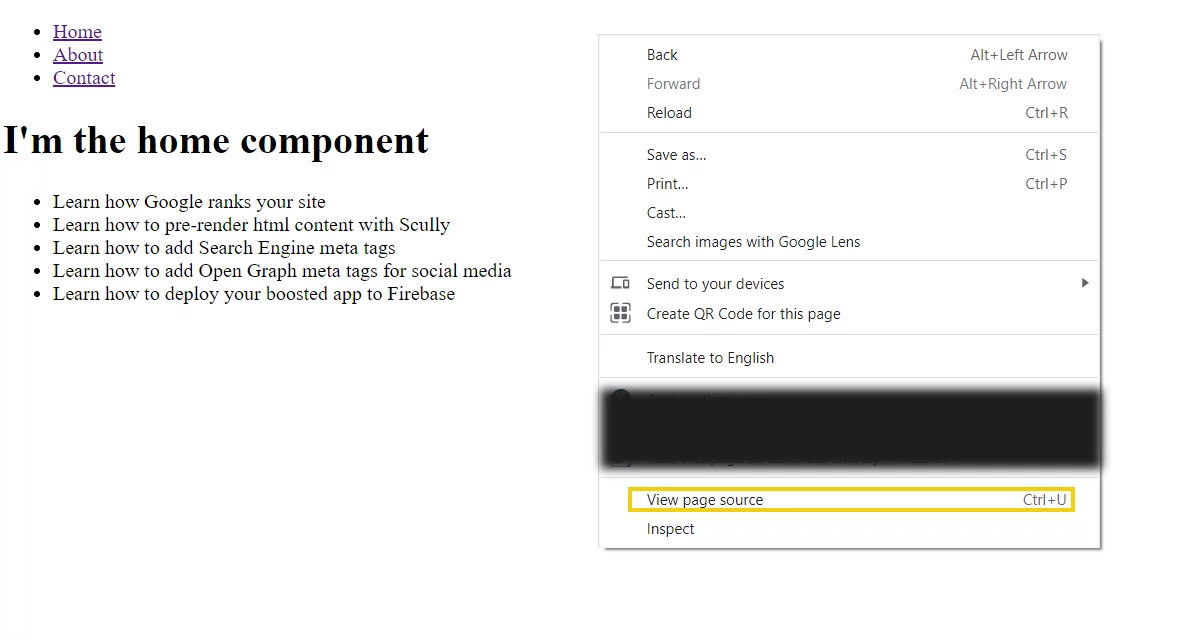
You'll see output similar to this:
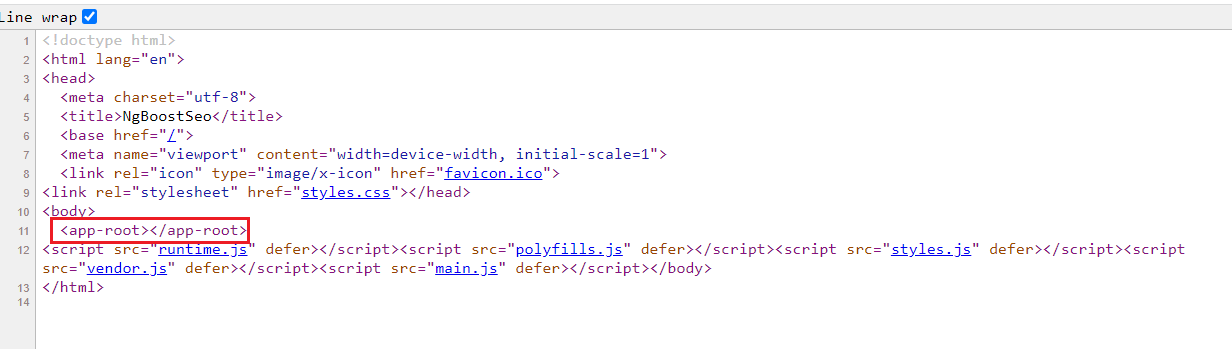
There's barely any content for Google to read, right? The <app-root></app-root> tag is empty, with just a handful of script tags below it.
Angular applications are SPAs (Single Page Applications). The content that ends up inside <app-root></app-root> is generated at runtime—the browser downloads the bundled JavaScript, executes it, and only then produces the HTML.
Depending on Google's crawlers to run our JavaScript before seeing the content is risky. The goal, then, is to pre-render the HTML for each route so that bots can read it immediately without executing a single line of script.
Introducing Scully
We can accomplish this pre-rendering with Scully. This static site generator inspects the compiled Angular app's route tree and produces a static HTML version for every page.
Before making changes, verify that your environment meets these prerequisites:
- Angular v8.x.x or newer
- Node.js 10 or higher
- Chromium: Scully depends on Chromium, so your OS must allow its installation and execution, and you need appropriate permissions.
Make sure all conditions are satisfied when you build locally. Our demo already has an app-routing.module.ts, which Scully requires. If yours is missing, create it with:
ng generate module app-routing --flat --module=app
Time to add Scully. (The code for this stage is in this branch.)
ng add @scullyio/init
When prompted, select the Scully platform server option.

Once installed, several files will be added or modified.
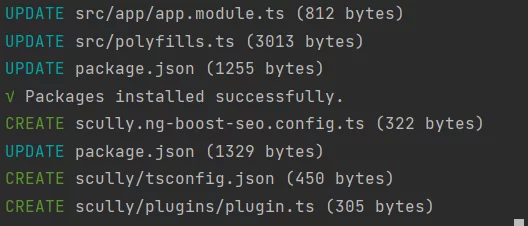
Note: If you had ng serve running during installation, restart it after the process completes.
Scully will generate a config file named scully.<projectName>.config.ts, where projectName matches your Angular project's name. In this example, the file looks like this:
// scully.ng-boost-seo.config.ts

import { ScullyConfig } from '@scullyio/scully';

export const config: ScullyConfig = {
 projectRoot: "./src",
 projectName: "ng-boost-seo",
 outDir: './dist/static',
 routes: {}
};
Even with this default configuration, we're ready to run Scully for the first time.
Note: Routes that contain dynamic parameters won't be pre-rendered until you modify the config to handle them.
Before Scully can do its job, we must first compile the Angular project. Ensure the build output lands in a dedicated folder under /dist. For this project, angular.json specifies:
// angular.json

...
"build": {
 "builder": "@angular-devkit/build-angular:browser",
 "options": {
   "outputPath": "dist/ng-boost-seo",
...
This means the compiled files will appear in a folder called ng-boost-seo within dist.
Let's build the app now:
ng build
With the Angular build complete, Scully can take over. Run:
npm run scully
That's it! Your Angular app is now a pre-rendered static site.
The generated files live in the /dist/static directory. Inside, you'll find a separate index.html for each route—three in our case:
Each of these files holds the fully rendered HTML for its corresponding route.
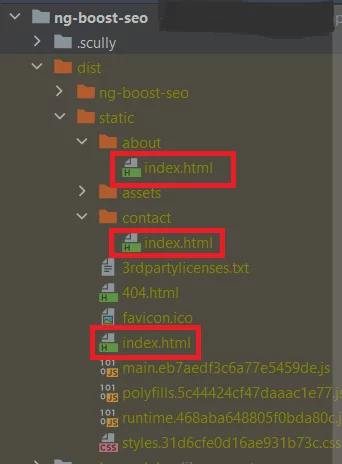
Note: An app with 100 routes will result in 100 index.html files in dist/static.
The folder names under /dist/static mirror your route paths. A route like /news will produce a folder named /news with its own index.html.
These files are complete with inlined HTML and CSS, confirming that Scully ran successfully and our pages are pre-rendered.
To preview the result, Scully ships with its own test server. Start it with:
npm run scully:serve
Here's what you'll see:
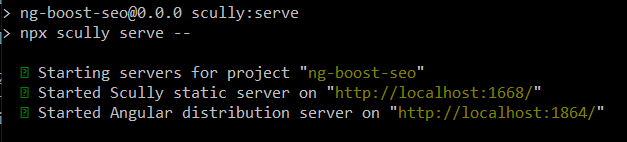
This command spins up two servers. One serves the Scully output (the /static folder), while the other serves the standard ng build output (from /ng-boost-seo). This dual setup lets you compare both versions.
Navigate to http://localhost:1668/, which serves the /static directory. Open view page source again and you'll notice:
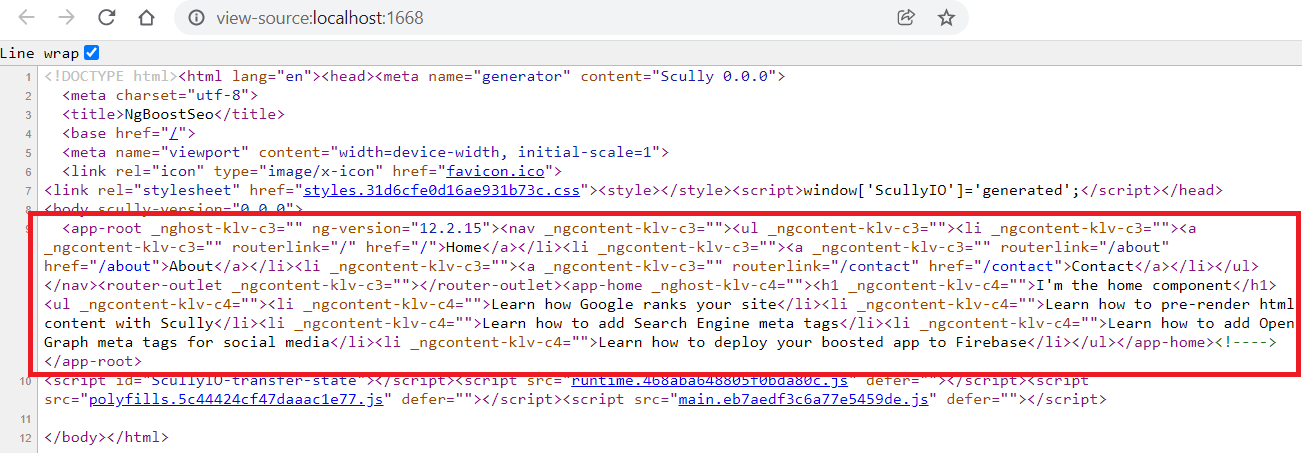
Now there's actual content inside the <app-root></app-root> tag—exactly what we wanted.
What about navigating to /about and checking its source? The page now looks like this:
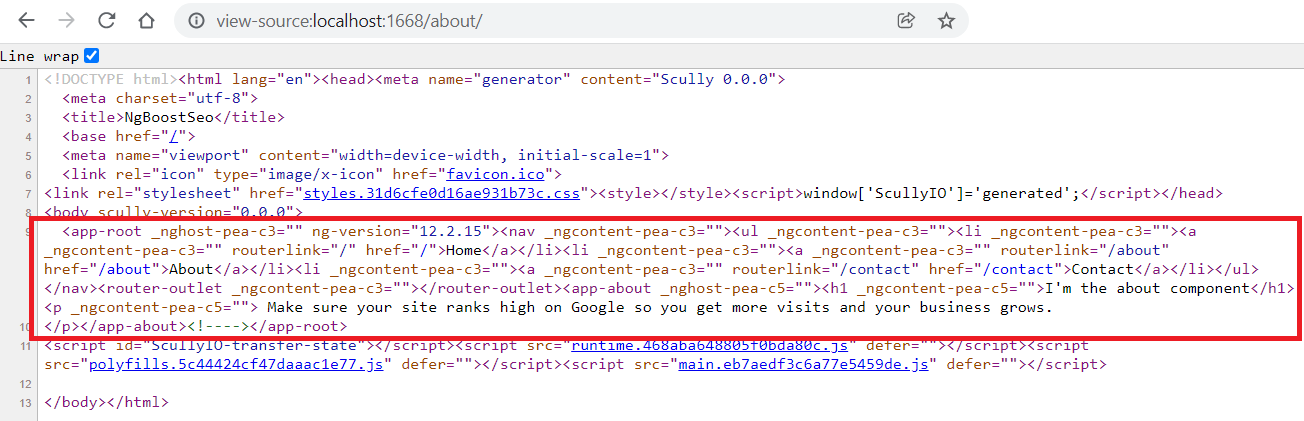
Every route has its own pre-rendered content. This is a major SEO win, since crawlers can now see the actual text without executing JavaScript.
Enhancing the page with HTML tags
HTML tags enable bots to correctly interpret the content of our web page and index it in an appropriate manner.
It's time to modify a few files within our Angular application (the final code for this section can be found here).
Title and description
The title tag holds the greatest significance for SEO. It functions as the identifier for our content. The description meta tag follows, helping users determine whether they want to visit the page.
Let's insert the following code into the index.html file:
<!-- index.html -->

<!doctype html>
<html lang="en">
     ...
     <title>How to Boost Angular Apps SEO</title>
     <meta content="A guide to boost your Angular app SEO and still have all the benefits of SPAs"
           name="description"/>
     ...
</html>
Consider how these tags influence a site's appearance in Google search results. Let's look up inDepthDev on Google:
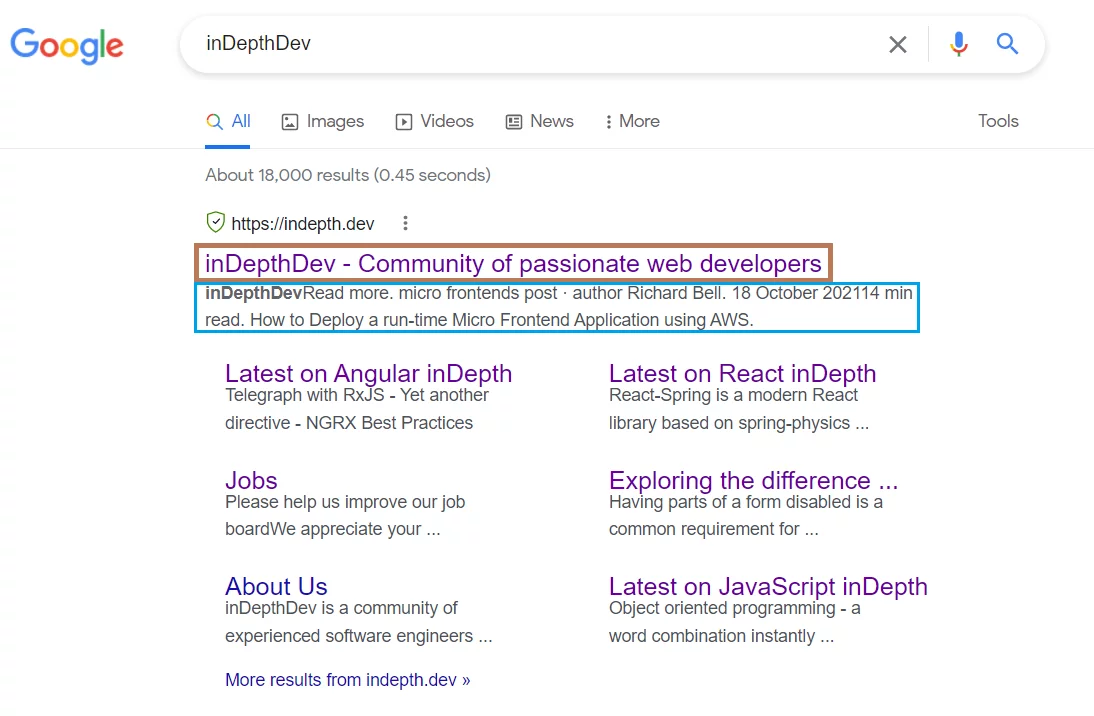
The title appears in brown, while the description is shown in blue. This information proves quite valuable for users, doesn't it?
Employ meaningful headers
We should update the content of the <h1> tag within the home.component.html file.
<!-- components/home.components.html -->

<!-- Change this -->
<h1>I'm the home component</h1>

<!-- To this -->
<h1>How to boost your Angular App SEO</h1>
This modification assists Google in identifying content sections and generating featured rich snippets.
Incorporate Microdata
Microdata represents a collection of tags introduced alongside HTML5. Schema.org offers a set of shared vocabularies that webmasters can utilize to annotate their pages in a manner comprehensible to major search engines like Google, Microsoft, Yandex, and Yahoo.
We'll adjust our index.html file by adding the following meta tags:
<!-- index.html -->

...
     <meta content="How to boost Angular Apps SEO"
           itemprop="name"/>
     <meta content="A guide to boost your Angular app SEO and still have all the benefits of SPAs"
           itemprop="description"/>
     <meta content="IMAGE URL"
           itemprop="image"/>
...
In the snippet above, we've incorporated three <meta /> tags, each containing a content attribute and an itemprop attribute.
itemprop serves as the property we add to furnish search engines with additional details about our website's purpose. Schema.org provides the shared vocabularies that webmasters can leverage. When it comes to itemprop, we primarily work with four properties: name, description, url, and image.
Note: The URL for the image is your choice since it depends on your hosting location. Feel free to leave this URL empty and populate it at a later stage. Refer to this resource for additional information.
Facebook and WhatsApp personalization
We can tailor how our site appears when shared on Facebook and WhatsApp using Open Graph meta tags—snippets of code that govern how URLs are presented when distributed across social media platforms. For Facebook and WhatsApp specifically, the tags in the index.html file should resemble this:
<!-- index.html -->

...
<meta content="en_US"
     property="og:locale"/>
<meta content="WEBSITE WRL"
     property="og:url"/>
<meta content="website"
     property="og:type"/>
<meta content="How to Boost Angular Apps SEO"
     property="og:title"/>
<meta content="A guide to boost your Angular app SEO and still have all the benefits of SPAs"
     property="og:description"/>
<meta content="IMAGE URL"
     property="og:image"/>
<meta content="How to Boost Angular Apps SEO"
     property="og:site_name"/>
...
Within the code snippet above, every page requires four mandatory properties:
og:title– The title of our object as it should appear within the graph.og:type– The type classification of our object.og:image– An image URL that should symbolize our object within the graph.og:url– The URL where our application will be hosted.
Twitter personalization
Next, we'll customize how our site appears when shared on Twitter by adding these tags to the `index.html` file:
<!-- index.html -->

...
<meta content="summary"
     name="twitter:card"/>
<meta content="How to boost Angular Apps SEO"
     name="twitter:title"/>
<meta content="A guide to boost your Angular app SEO and still have all the benefits of SPAs"
     name="twitter:description"/>
<meta content="WEBSITE WRL"
     name="twitter:url"/>
<meta content="IMAGE URL"
     name="twitter:image"/>
...
For comprehensive guidance on utilizing Twitter tags, consult this documentation.
Now we should rebuild our application for deployment using these commands:
ng build npm run scully
At this point, our application is prepared for launch. Initially, we need to create a project on Firebase via this link, then click on Go to console located in the top right corner:
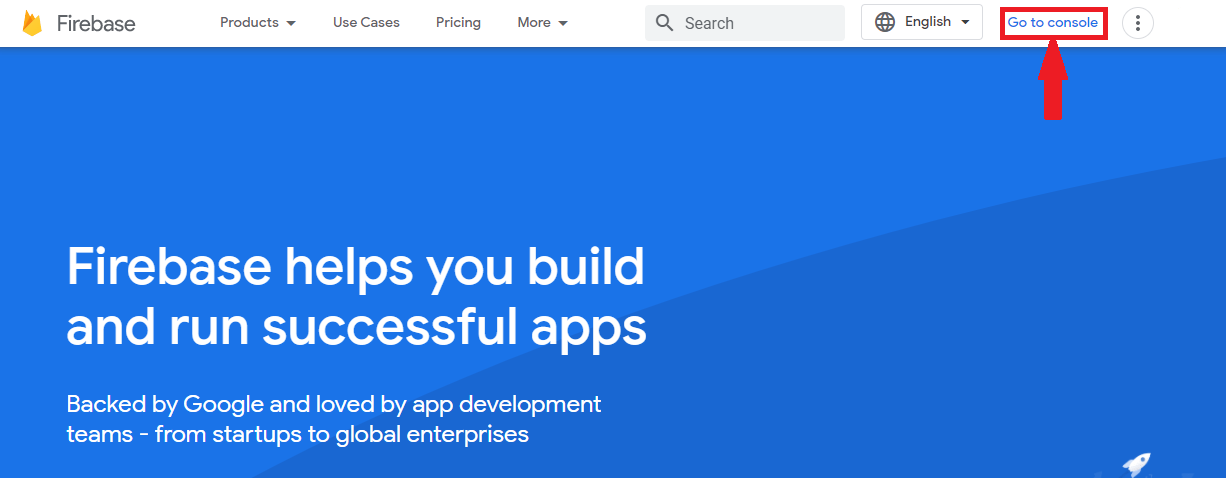
Next, click on add project

From there, simply follow the instructions they provide for creating a project—the process is quite straightforward.
With the project successfully created, let's return to our code editor and open a terminal at the root directory of our application folder.
To host our site using Firebase Hosting, we'll need the Firebase CLI. Execute the following command to install the CLI or update it to the latest version:
npm install -g firebase-tools
We must then authenticate with Google by running:
firebase login
Afterward, run the following command to initialize our project:
firebase init
Then select the hosting option
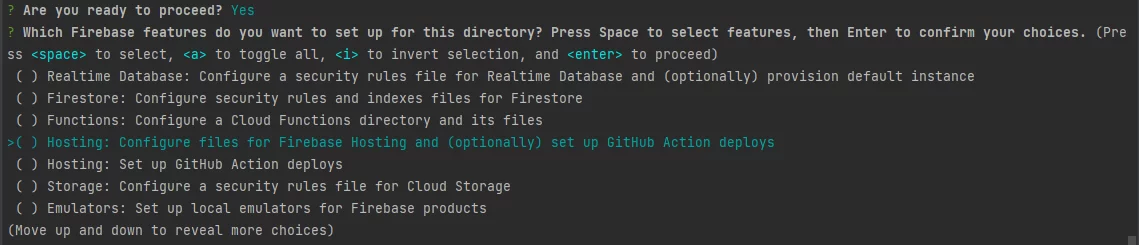
Now let's connect our Angular app to a Firebase project by opting to use an existing project and selecting the Firebase project you created earlier
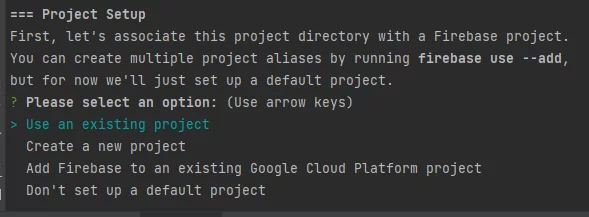
We'll then be prompted to specify the public folder, which contains our deployment files.

Enter dist/static to designate it as the public directory

Following this, we'll be asked how to configure the Firebase server's handling of incoming requests.

Select N for No, since we don't want the server to serve the same index.html for every requested route.
Firebase will then attempt to rewrite the 404.html file situated at the root level of our /dist/static folder.

Let's respond with N for No.
It will also try to rewrite our index.html file located at the root level of our /dist/static folder.

Let's respond with N for No.
Our Firebase project is now fully configured.
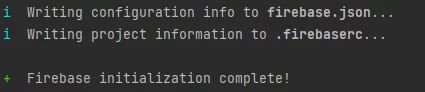
It's time to deploy our project by executing this command:
firebase deploy
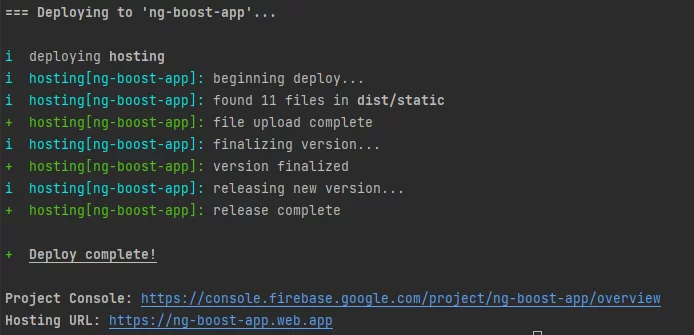
We've accomplished it! The deployed Angular application now delivers the exceptional user experience characteristic of a SPA while also achieving solid SEO performance.
- How Google Search Works (for beginners)
- Schema Markup 2022 - SEO Best Practices
- Understand how structured data works
- Open Graph Meta Tags: Everything You Need to Know
- A Guide to Share for Webmasters (for Facebook & Whatsapp)
SEO has the power to elevate your rankings in search engine results. This can profoundly influence a company's most critical objectives, such as boosting leads and driving sales.
Throughout this article, we explored how to enhance SEO in Angular applications with Scully, how to personalize site sharing on Facebook, WhatsApp, and Twitter, and how to deploy static sites to Firebase.