
Getting Started
They say a single image can convey what words cannot. But on the web, that same image might consume more bandwidth than every word on your page combined. To deliver a smoother browsing experience, we need our applications to be as lean and efficient as possible. Let's explore how NgOptimizedImage helps us achieve that.
Building a Test Environment
I've put together a minimal Angular application that pulls images from the JSONPlaceholder API and presents them in a gallery format. The concept is straightforward: fetch a collection of images and render them on screen, as demonstrated below:

The gallery functions, but its loading time leaves much to be desired — and we all know how quickly users lose patience. Time to address this. The approach: generate a production build, serve it locally, and run Chrome's Lighthouse tool to evaluate the page's performance.
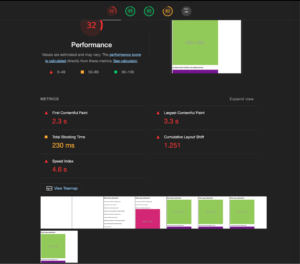
My measurements came back with the following results:
- First Contentful Paint (FCP): 2.3 seconds — the delay between navigation and the first visual content appearing on screen. Best practice suggests this should stay under 1.8 seconds.
- Largest Contentful Paint (LCP): 3.3 seconds — the time required to render the page's main content. A good user experience demands this be below 2.5 seconds.
- Cumulative Layout Shift: 1.251 — this tracks how much the page layout moves around during its lifetime. A score of 0.1 or lower is the target.
- Total Blocking Time: 230ms — the duration the main thread remains occupied, preventing user interaction, measured after FCP. We're aiming for under 200 ms.
Now, let's figure out how to improve things.
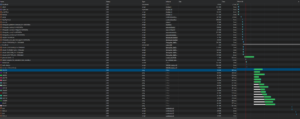
The network resources panel reveals that images are only fetched after all JavaScript, stylesheets, and fonts have been processed. In certain instances, like the one highlighted in the screenshot, the browser pauses for up to 600ms before initiating image downloads. After that, it fetches the remaining assets concurrently, even when many are invisible to the user.
A Viable Approach
Drawing from the Core Web Vitals guidelines and sound engineering judgment, several optimizations come to mind. As outlined earlier, the performance targets we should meet are:
- First Contentful Paint < 1.8seconds
- Largest Contentful Paint < 2.5 seconds
- First Input Delay < 100 ms
- Cumulative Layout Shifts < 0.1
- Chrome Lighthouse score > 85
To hit these numbers, a few actions are necessary:
- Optimize how images are handled — specifically, deciding which ones get downloaded first and requesting them as early as possible.
- Accelerate the application's loading process, ensuring the LCP score dips below 2.5 seconds.
- Reviewing the <img> tag specification, we find several attributes designed for image loading optimization:
- fetchpriority
- loading
- sizes
- srcset
- Introduce lazy loading for images not visible during the initial viewport. For most applications, it makes sense to load images just before they're needed, conserving significant user bandwidth.
In a typical scenario, we might roll up our sleeves and build a custom image component, directive, or wrapper to handle this logic. However, for this specific need, there's a turnkey solution ready to use: the NgOptimizedImage directive.
Understanding NgOptimizedImage
Image optimization is such a frequent requirement that the Angular team baked a solution directly into the framework. The NgOptimizedImage directive has been available since version 13.4.0. To get started, import it from @angular/common and include it in your component's or module's imports array.
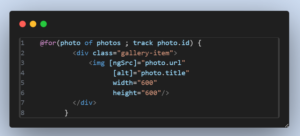
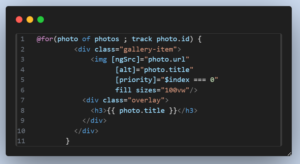
To activate the directive, swap your src attribute for ngSrc. Additionally, you're required to set explicit width and height values — omitting them will result in an error. Assigning fixed dimensions helps eliminate layout shifts attributed to images.
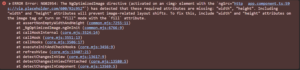
With that adjustment, you'll encounter the following error:

This message indicates that the image in question is your LCP element, yet it hasn't been designated as a priority. Addressing this ensures the image gets preferential treatment during loading, checking off another requirement on our list.

After applying the priority flag, the img tag appears as shown in the screenshot above. But our work isn't finished — there's another warning we need to resolve.

As the warning advises, you'll need to insert a preconnect link for your image server's domain into the document's <head> section. This step also contributes to faster image retrieval. In our case, the placeholder domain is used; you should replace it with your own server's address.

With the preconnect domain in place, our console finally shows a clean slate — no more warnings or errors. Let's inspect the page to see what Angular has transformed for our images.
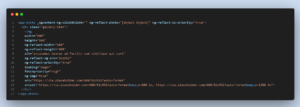
The img tag now carries several new attributes. Its loading behavior is set to "eager" — the available options are "lazy" (the default), "eager", and "auto". There's also a new fetchpriority attribute, marked as "high". Additionally, Angular has generated a srcset for the image, ensuring requests are always made at the appropriate resolution.
Looking at the next image reveals these attributes:

Notice that its loading is configured as "lazy" and fetchpriority as "auto". This deprioritizes the image, minimizing its impact on the application's overall performance.
Below is a side-by-side comparison: one page with NgOptimizedImage, another without. The first screenshot illustrates the browser attempting to fetch and load every image simultaneously, which hampers script execution. The second shows a more efficient strategy — only loading images within the current viewport.
Without ngSrc
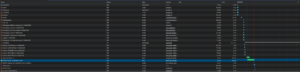
With ngSrc and NgOptimizedImage directive
So far, all we've done is import NgOptimizedImage and act on its recommendations. Now, let's rebuild and rerun our tests to assess the impact.
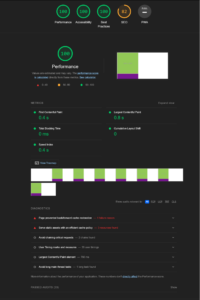
The numbers speak for themselves. Every metric we tracked has seen substantial improvement. What's truly impressive is how little effort was required to achieve this outcome.
But we can push even further. NgOptimizedImage offers additional features to fine-tune performance:
fill— this attribute removes the need to specify width and height, as the image automatically expands to occupy its parent container. The parent must have a position of "relative", "fixed", or "absolute". The image's object-fit property can then be set to "contain" or "cover".ngSrcset— a comma-separated list of density descriptors.sizes— designed for responsive images. The default breakpoints are[16, 32, 48, 64, 96, 128, 256, 384, 640, 750, 828, 1080, 1200, 1920, 2048, 3840]. When ngSrcset is present, a corresponding srcset is created based on the specified sizes; they work in tandem.- Image loaders — these functions accept a URL and transform it. For instance, to avoid providing the full image URL repeatedly, you could modify the URL before passing it to ngSrc, as shown in the example.
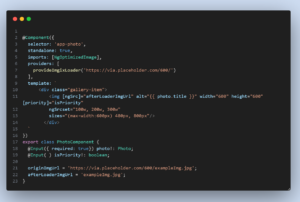
Angular comes with some predefined loaders, but creating your own is always an option.
Of course, this only scratches the surface. For a comprehensive overview of what the directive can do, consult the official NgOptimizedImage documentation.
Final Thoughts
Implementing the NgOptimizedImage directive is refreshingly simple. Through a mere import and following its guidance, I've dramatically enhanced the performance of my demo application. Remarkably, this was accomplished in minutes, not the days or weeks a custom solution might have demanded.
With innovations like this, Angular maintains its edge in developer experience and performance. I'm eager to see what comes next.