
Set Up an Nx Workspace
To get started, we need an Nx Workspace. The command below will handle the initial scaffolding:
$ npx create-nx-workspace trombonix --preset=empty --cli=angular
In this case, trombonix is the workspace name, and the empty preset is used to generate a project with no applications or libraries from the start. Because we plan to build an Angular frontend, we also opt to include Angular CLI support in the workspace setup. After moving into the trombonix directory:
$ cd trombonix
The scaffolded project is initially bare:
trombonix
├── apps
├── dist
├── libs
├── node_modules
├── tools
├── README.md
├── angular.json
├── jest.config.js
├── nx.json
├── package.json
├── tsconfig.json
├── tslint.json
└── yarn.lock
With an empty workspace in place, we can introduce the specific technologies we need. Since the goal is a full-stack solution with an Angular journal app and a NestJS API, we must add the corresponding schematics to the workspace by executing:
$ ng add @nrwl/nest --defaults

$ ng add @nrwl/angular --defaults
The --defaults flag instructs the schematic to adopt standard options, which here means Jest for unit tests and Cypress for E2E tests. We won't dive into those testing frameworks in this piece.
With those steps complete, we’re ready to build our journal application.
Build the NestJS API
If you have experience with Angular, the angular-like style of NestJS will feel familiar and easy to follow. We can generate an API with the following command:
$ ng generate @nrwl/nest:app api --directory
The --directory option is used to place the API in the root of the apps folder. This results in the following directory layout:
apps/api
├── src
│   ├── app
│   │   ├── app.controller.spec.ts
│   │   ├── app.controller.ts
│   │   ├── app.module.ts
│   │   ├── app.service.spec.ts
│   │   └── app.service.ts
│   ├── assets
│   ├── environments
│   │   ├── environment.prod.ts
│   │   └── environment.ts
│   └── main.ts
├── jest.config.js
├── tsconfig.app.json
├── tsconfig.json
├── tsconfig.spec.json
└── tslint.json
We’ll modify app.service.ts to provide basic get, save, and delete operations. To keep things straightforward, we’ll rely on in-memory storage.
import { Injectable } from '@nestjs/common';

export interface JournalEntry {
  title: string;
  body: string;
  timestamp?: Date;
}

@Injectable()
export class AppService {

  entries: JournalEntry[] = [{
     title: 'example title',
     body: 'example journal entry',
    timestamp: new Date()
  }];

  getData(): JournalEntry[] {
    return this.entries;
  }

  create(entry: JournalEntry) {
    const newEntry = {
      title: entry.title,
      body: entry.body,
      timestamp: new Date()
    };

    this.entries = [...this.entries, newEntry];
  }

  delete(id: number) {
    this.entries = this.entries.filter((_, idx) => idx !== id);
  }
}
Next, we need to adjust app.controller.ts to expose GET, POST, and DELETE methods on the entries endpoint.
import { Body, Controller, Delete, Get, Param, ParseIntPipe, Post } from '@nestjs/common';

import { AppService, JournalEntry } from './app.service';

@Controller('entries')
export class AppController {
 constructor(private readonly appService: AppService) {}

 @Get()
 getData() {
   return this.appService.getData();
 }

 @Post()
 create(@Body() body: JournalEntry) {
   return this.appService.create(body);
 }

 @Delete(':id')
 delete(@Param('id', ParseIntPipe) id: number) {
   return this.appService.delete(id);
 }
}
That covers the backend. To launch the API and verify it, use:
$ ng serve api
When you visit http://localhost:3333/api/entries, the sample entry should be visible in the response.
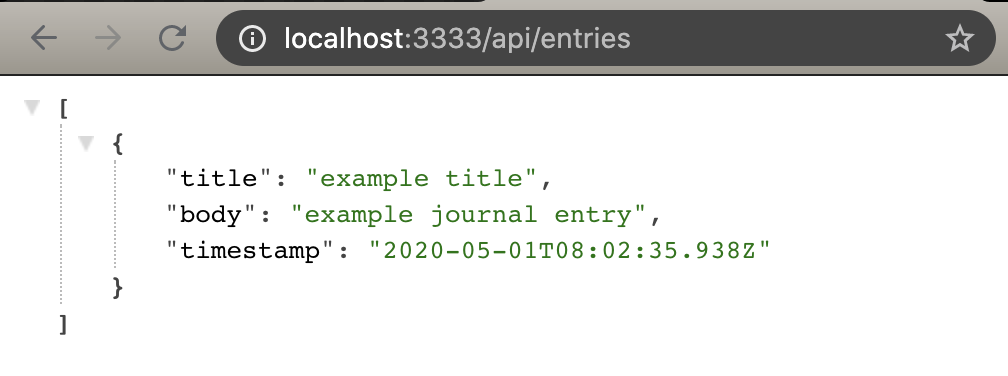
This command leverages the Nrwl schematics for Angular to create an app that follows workspace conventions. Let's generate our journal app:
$ ng generate @nrwl/angular:app journal --routing=false --style=scss --backend-project=api
In this command we pass backend-project=api. This action creates a proxy.conf.json in the app that configures the Angular proxy to forward requests to api to our backend, sidestepping CORS issues.
apps/journal
├── src
│   ├── app
│   │   ├── app.component.html
│   │   ├── app.component.scss
│   │   ├── app.component.spec.ts
│   │   ├── app.component.ts
│   │   └── app.module.ts
│   ├── assets
│   ├── environments
│   │   ├── environment.prod.ts
│   │   └── environment.ts
│   ├── favicon.ico
│   ├── index.html
│   ├── main.ts
│   ├── polyfills.ts
│   ├── styles.scss
│   └── test-setup.ts
├── browserslist
├── jest.config.js
├── proxy.conf.json
├── tsconfig.app.json
├── tsconfig.json
├── tsconfig.spec.json
└── tslint.json
To enhance the look of the UI, we'll include a lightweight CSS framework called Bulma, which I find quite handy. The package install is straightforward:
$ yarn add bulma
Then we add the import to our styles.scss file:
@import 'bulma';

body {
  height: 100vh;
  background-color: #fcfcfc;
}
Since we're interacting with an API, let's create an Angular service to encapsulate our HTTP requests. We can use the Angular CLI to generate it:
$ ng generate @nrwl/angular:service services/data --project=journal
We also need to include HttpClientModule in the root module of the app, located at app.module.ts
import { HttpClientModule } from '@angular/common/http';
import { NgModule } from '@angular/core';
import { BrowserModule } from '@angular/platform-browser';

import { AppComponent } from './app.component';

@NgModule({
  declarations: [AppComponent],
  imports: [BrowserModule, HttpClientModule],
  bootstrap: [AppComponent]
})
export class AppModule {}
Now we can connect the service to our API using the HttpClient:
import { HttpClient } from '@angular/common/http';
import { Injectable } from '@angular/core';
import { Observable } from 'rxjs';

export interface JournalEntry {
  title: string;
  body: string;
  timestamp?: Date;
}

@Injectable({
  providedIn: 'root'
})
export class DataService {
  constructor(private http: HttpClient) {}

 fetch() {
   return this.http.get<JournalEntry[]>('/api/entries');
 }

 save(entry: JournalEntry) {
   return this.http.post('/api/entries', entry);
 }

 delete(id: number) {
   return this.http.delete(`/api/entries/${id}`);
 }
}
Please note that we've redefined the JournalEntry interface here to safely type our response. This duplication is acceptable for now; we'll address it in the upcoming section.
With the service ready, we can build a straightforward component using data.service.ts to read and add journal entries. Let's start with app.component.ts:
import { Component, OnInit } from '@angular/core';

import { DataService, JournalEntry } from './services/data.service';

@Component({
 selector: 'trombonix-root',
 templateUrl: './app.component.html',
 styleUrls: ['./app.component.scss']
})
export class AppComponent implements OnInit {
 entries: JournalEntry[];

 constructor(private dataService: DataService) {}

 ngOnInit(): void {
   this.fetch();
 }

 fetch() {
   this.dataService.fetch().subscribe({
     next: (response: JournalEntry[]) => (this.entries = response)
   });
 }

 onSaveEntry(titleInput: HTMLInputElement, bodyInput: HTMLInputElement) {
   const entry = {
     title: titleInput.value,
     body: bodyInput.value
   };
   this.dataService.save(entry).subscribe({
     next: () => {
       this.fetch();
       titleInput.value = '';
       bodyInput.value = '';
     }
   });
 }

 onDeleteEntry(index: number) {
   this.dataService.delete(index).subscribe({
     next: () => {
       this.fetch();
     }
   });
 }
}
Next, we add UI elements by updating the template in app.component.html:
<h1 class="title">One line Journal</h1>

<input #titleInput class="input is-fullwidth" placeholder="Title" />

<input
 #bodyInput
 class="input is-fullwidth"
 placeholder="Start typing here..."
 (keydown.ENTER)="onSaveEntry(titleInput, bodyInput)"
/>

<button
 class="button is-info"
 type="submit"
 (click)="onSaveEntry(titleInput, bodyInput)"
>
 save
</button>

<div class="card" *ngFor="let entry of entries; index as idx">
 <div class="card-content">
   <h1 class="title">{{ entry.title }}</h1>
   <button class="delete is-small" (click)="onDeleteEntry(idx)"></button>
   <p>"{{ entry.body }}"</p>
   <p class="is-size-7 has-text-grey-lighter">
     {{ entry.timestamp | date: 'short' }}
   </p>
 </div>
</div>
We’ll also add some basic styles in app.component.scss
:host {
 display: block;
 font-family: sans-serif;
 min-width: 300px;
 max-width: 600px;
 padding: 50px;
 margin: auto;
}

input {
 margin-bottom: 8px;
}

.card {
 margin: 16px;
 border-radius: 8px;
}

.delete {
 position: absolute;
 right: 8px;
 top: 8px;
}
The journal app is now functional, and we can test it with:
$ ng serve journal -o
Excellent! It's working. We can now log our daily notes, which the API stores in memory.
Establish a Shared Library
As you may have observed, we had to replicate the JournalEntry interface in both the journal app and the API for proper type safety. Let's create a shared library to extract this common code and eliminate that duplication.
Creating such a library is straightforward with the command below:
$ ng generate @nrwl/workspace:library types
The types library has been generated within the libs directory:
libs
└── types
    ├── src
    │   ├── lib
    │   └── index.ts
    ├── README.md
    ├── jest.config.js
    ├── tsconfig.json
    ├── tsconfig.lib.json
    ├── tsconfig.spec.json
    └── tslint.json
We'll now transfer the interface to types.ts and update our code to use the shared type:
export interface JournalEntry {
  title: string;
  body: string;
  timestamp?: Date;
}
Next, we remove the interface from the API in the app.service.ts file:
import { Injectable } from '@nestjs/common';
import { JournalEntry } from '@trombonix/types'; // <-- this should be added instead

// this should be removed
// export interface JournalEntry {
//   title: string;
//   body: string;
//   timestamp?: Date;
// }

@Injectable()
export class AppService {
...
}
We can now import JournalEntry from @trombonix/types, which points to our shared types library. This convenience comes from the schematic used to scaffold the library, as it sets up a TypeScript path alias.
We must also adjust the imports in app.controller.ts to reference our shared types library. A similar update is needed in data.service.ts and app.component.ts within the Journal app.
Our full-stack Journal app is now complete with a shared library. If we generate a dependency graph, we can visualize how the code is interconnected. We can do this using the CLI once more:
$ yarn dep-graph
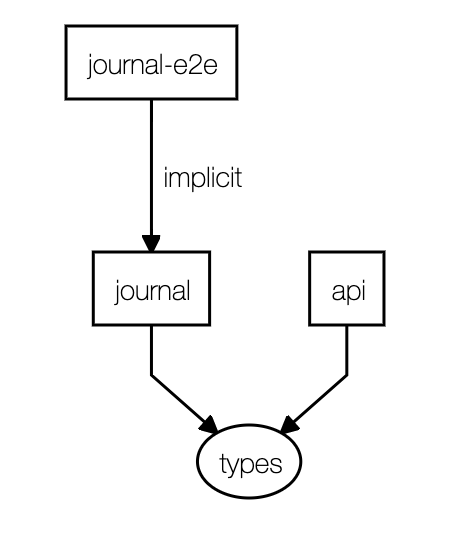
As illustrated above, we now have a shared types library that holds the types used by both the frontend and backend. This establishes a contract between the two during development, allowing us to fully leverage TypeScript's capabilities.
Final Thoughts
We've explored how to use NxDevTools to set up a full-stack application. We also saw how to create a shared library to reduce code duplication and improve maintainability.
Keep in mind that not every piece of code is ideal for sharing between frontend and backend. Response interfaces are a great fit as they define a clear contract. However, classes with complex business logic can lead to tight coupling and should be used judiciously.
Another benefit of a monorepo is the ability to build a feature end-to-end without coordinating multiple pull requests across different repositories.
An Nx workspace offers a wealth of tooling that makes monorepo development practical and efficient. We've only touched on a fraction of its capabilities here, but hopefully, this sparks your interest in exploring further.
The complete code for this article is available on GitHub: https://github.com/Carniatto/journal-nx-angular-nest