Understanding Angular Lifecycle Hooks and Change Detection
Every component instance in Angular follows a defined lifecycle. It begins when Angular instantiates the component class and renders its view along with any child views. From there, change detection takes over, with Angular monitoring data-bound properties for modifications and updating both the view and the component instance accordingly. The lifecycle concludes when Angular destroys the component instance and removes its rendered template from the DOM.
Directives experience a comparable lifecycle, with Angular creating, updating, and destroying their instances during execution.
Angular applications can leverage lifecycle hook methods to respond to significant moments in a component or directive's lifecycle. These hooks enable you to initialize new instances, trigger change detection when necessary, react to updates during change detection, and perform cleanup before instance deletion.
The framework invokes these hook methods in this sequence:
- ngOnChanges: Fires when an input/output binding value changes.
- ngOnInit: Executes after the first
ngOnChanges. - ngDoCheck: Runs custom change detection logic.
- ngAfterContentInit: Triggers after component content is initialized.
- ngAfterContentChecked: Runs after every check of component content.
- ngAfterViewInit: Fires after a component's views are initialized.
- ngAfterViewChecked: Executes after every check of a component's views.ngOnDestroy: Called just before the component/directive is destroyed.

Setting Up the Project
For practical demonstration, we'll create a fresh project using the Angular CLI:
ng new life-cycle-hooks
Next, execute these commands to generate the required components:
ng g c components/parent
ng g c components/child
Now, add the following starter code.
<!-- app.component.html -->

<app-parent></app-parent>
<!-- components/parent/parent.component.html -->

<button (click)="updateUser()">Update</button>

<br/>
<br/>

<app-child [userName]="userName"></app-child>
// components/parent/parent.component.ts

export class ParentComponent {
  userName = 'Maria';

  updateUser() {
     this.userName = 'Chris';
  }
}
// components/child/child.component.ts

export class ChildComponent {
  @Input() userName = '';

}
<!-- components/child/child.component.html -->

Here is the user name: {{ userName }}
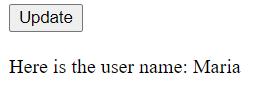
With this code in place, the interface appears as shown:
The ngOnChanges Hook
This method executes once when the component is created and subsequently whenever changes are detected in any of the component's input properties. It receives a SimpleChanges object as its parameter. This object provides information about which input properties changed—when there are multiple—along with their current and previous values.
Keep in mind that if your component has no inputs, or you don't supply any inputs when using it, the framework will skip calling ngOnChanges().
This hook proves valuable in many scenarios. It's particularly useful when you need to execute specific logic within the component based on the input properties received.
To illustrate, let's add the following to our code:
// components/child/child.component.ts

export class ChildComponent implements OnChanges {
  @Input() userName = '';

  ngOnChanges(changes:SimpleChanges) {
    console.log('ngOnChanges triggered', changes);
 }
}
Examine the console—you'll see the console.log() fires when the application first launches.
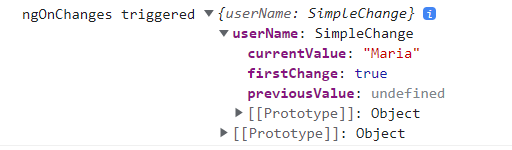
Observe that the changes object contains three keys: currentValue, previousValue, and firstChange, each functioning as their names suggest.
We might decide to modify the userName value only when it's not the initial change, or when the current value equals Chris. Numerous possibilities exist—let's implement the latter scenario.
// components/child/child.component.ts

export class ChildComponent implements OnChanges{

  @Input() userName = '';

  ngOnChanges(changes:SimpleChanges) {
     console.log('ngOnChanges triggered', changes);

     if (!changes['userName'].isFirstChange()){
        if (changes['userName'].currentValue === "Chris") {
           this.userName = 'Hello ' + this.userName
        } else {
           this.userName = changes['userName'].previousValue
        }
     }
  }
}
Here, we update the userName value when it's not the first change (this condition ensures we don't override the initial input) and when the current value is precisely Chris.
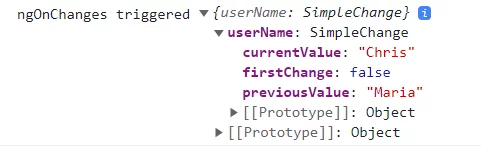
Now, when you click the Update button, you'll notice the console.log() function fires once more. This occurs because the @Input() value transitions from Maria to Chris. Further clicks on the Update button produce no new console output, since the @Input() remains unchanged.

Additionally, inspecting the console output reveals that the received object appears like this:
The ngOnInit Hook
This method executes only once during the component lifecycle, following the initial ngOnChanges call. Interestingly, ngOnInit() runs even when ngOnChanges() doesn't—which happens when there are no template-bound inputs.
Among all lifecycle hooks, this is perhaps the most frequently used. It's the ideal place to send server requests for content loading, create a FormGroup for form handling within the component, establish subscriptions, and perform various other tasks. Essentially, it's where you handle initializations shortly after the component is constructed.
However, one might wonder: why use ngOnInit when the same work (setting up a FormGroup or fetching server data) could be done in the component's constructor()? Let's clarify.
Here are some essential distinctions:
The constructor()
- As the class's default method, it executes when the class is instantiated, ensuring proper field initialization for the class and its subclasses.
- Angular's Dependency Injector (DI) analyzes constructor parameters. When creating a new instance via
new MyClass(), it locates providers matching the parameter types, resolves them, and passes them to the constructor asnew MyClass(someArg). - It should only initialize class members rather than perform actual work. This is because the
constructorruns beforengOnInit; at that point, only the component class exists—dependencies are injected, but initialization logic hasn't executed yet.
The ngOnInit()
- This lifecycle hook signals that Angular has completed creating the component.
- It's designated for all initialization and declaration tasks, since the component is fully initialized at this stage.
For demonstration, let's incorporate the following:
// components/parent/parent.component.ts

export class ParentComponent implements OnInit {
 ...

  ngOnInit() {
     console.log('ngOnInit from the parent component');
  }

  ...
}
// components/child/child.component.ts

export class ChildComponent implements OnInit, OnChanges {
  ...

  ngOnInit() {
     console.log('ngOnInit from the child component');
  }

  ...
}
The console should display this output:
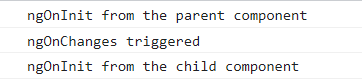
Unsurprisingly, the parent component initializes first (ngOnInit from the parent triggers before the child's), followed by its child component. Clicking the Update button won't trigger ngOnInit, as it fires only once as previously explained.
The ngDoCheck Hook
Think of this hook as an "extension" of ngOnChanges. It allows you to detect changes that Angular cannot or will not identify. The hook runs on every change detection pass, immediately following ngOnChanges and ngOnInit.
This hook carries performance costs since it executes frequently—after every change detection cycle, regardless of where changes occur. Consequently, you should use it judiciously to avoid degrading the user experience.
To demonstrate, let's add the following:
// components/child/child.component.ts

export class ChildComponent implements OnInit, OnChanges, DoCheck {
  @Input() userName = '';

  constructor() {
  }

  ...

  ngDoCheck() {
     console.log('ngDoCheck triggered');
  }

...
}
After launching the application, we see:
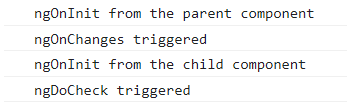
Clicking the Update button triggers both ngOnChanges and ngDoCheck:
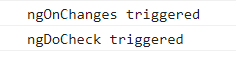
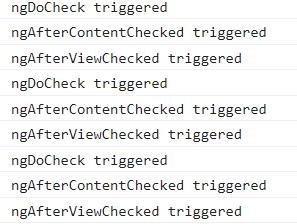
With continued clicks on Update, only ngDoCheck fires with each click, as it detects a change.
How does ngDoCheck detect a change when the @Input() property remains unchanged?
Angular tracks object references. When we mutate an object without changing its reference, Angular fails to detect the modification and skips change detection for that component. Consequently, the updated property value won't render in the DOM. Fortunately, ngDoCheck steps in—we can use this hook to identify object mutations and inform Angular accordingly.
The ngAfterContentInit Hook
This method runs once during the component lifecycle, after the first ngDoCheck. At this point, we gain initial access to the ElementRef of the ContentChild—Angular has already projected the external content into the component's view.
Let's add the following code:
<!-- components/parent/parent.component.html -->


<app-child [userName]="userName">
  <div #contentWrapper>foo</div> <!-- <== Add this -->
</app-child>
// components/child/child.component.ts

export class ChildComponent implements OnInit, OnChanges, DoCheck, AfterContentInit {
  ...

  @ViewChild('wrapper') wrapper!: ElementRef;
  @ContentChild('contentWrapper') content!: ElementRef;

 ...

  ngAfterContentInit() {
     console.log('ngAfterContentInit - wrapper', this.wrapper);
     console.log('ngAfterContentInit - 'contentWrapper', this.content);
  }

...
}
<!-- components/child/child.component.html -->


<div #wrapper>
  <ng-content></ng-content>
</div>

In this snippet, we project content from the Parent component into the Child component. For more on content projection, refer to this documentation.
At this stage, only the projected content is accessible (contentWrapper holds the projected content's value). The component's template isn't initialized yet (wrapper is undefined). Template initialization completes and becomes accessible in the ngAfterViewInit hook.

The ngAfterContentChecked Hook
This method fires once after ngAfterContentInit and subsequently after every ngDoCheck call. Angular invokes it after checking the content projected into the component during the current digest loop.
To demonstrate, add the following:
// components/child/child.component.ts

export class ChildComponent implements OnInit, OnChanges, DoCheck, AfterContentInit, AfterContentChecked {


  ngAfterContentChecked(): void {
     console.log('ngAfterContentChecked triggered');
  }
}

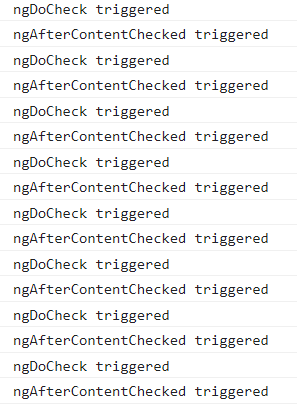
Each click on the Update button triggers ngAfterContentChecked along with ngDoCheck.
The ngAfterViewInit Hook
This method executes once during the component lifecycle, after ngAfterContentChecked. Here, we gain first-time access to the ElementRef of the ViewChildren—Angular has already assembled the component's views and their child views.
This hook proves essential when loading content dependent on the view's components; for instance, configuring a video player or building a chart from a canvas element.
Add the following code:
// components/child/child.component.ts

export class ChildComponent implements OnInit, OnChanges, DoCheck, AfterContentInit, AfterContentChecked, AfterViewInit {

...

  ngAfterViewInit(): void {
     console.log('ngAfterViewInit - wrapper', this.wrapper);
  }

...
}
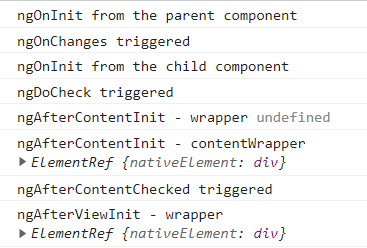
At this juncture, the component's template is fully created and accessible.
The ngAfterViewChecked Hook
This method fires once after ngAfterViewInit and then after every subsequent ngAfterContentChecked. Angular calls it after checking the component's views and child views in the current digest loop.
For demonstration, add the following:
// components/child/child.component.ts

export class ChildComponent implements OnInit, OnChanges, DoCheck, AfterContentInit, AfterContentChecked, AfterViewInit,
     AfterViewChecked {

  @Input() userName = '';
  @ViewChild('wrapper') wrapper!: ElementRef;
  @ContentChild('contentWrapper') content!: ElementRef;

  constructor() {
  }

...

  ngAfterViewChecked(): void {
     console.log('ngAfterViewChecked triggered');
  }

...
}

Multiple clicks on the Update button trigger ngAfterViewChecked each time, along with ngDoCheck and ngAfterContentChecked.
The ngOnDestroy Hook
Finally, this method runs once during the component lifecycle, right before Angular destroys it. This is where you notify the rest of your application about the component's impending destruction, should any actions need to follow.
Additionally, this is where all cleanup logic belongs. For example, you might remove local storage data and, importantly, unsubscribe from observables, detach event handlers, and stop timers to prevent memory leaks.
Be aware that ngOnDestroy doesn't fire when the user refreshes the page or closes the browser. Should you need cleanup logic for those events, the HostListener decorator can help:
@HostListener(‘window:beforeunload’)
ngOnDestroy() {
  // Insert Logic Here!
}
To demonstrate, let's add:
// components/parent/parent.component.ts

export class ParentComponent implements OnInit {
  ...

  isChildDestroyed = false;

 ...

  destroy() {
     this.isChildDestroyed = true;
  }

...
}
<!-- components/parent/parent.component.html -->


<button (click)="destroy()">Destroy Child</button>


<app-child *ngIf="!isChildDestroyed"
          [userName]="userName">
  <div #contentWrapper>foo</div>
</app-child>

<div *ngIf="isChildDestroyed">Child component is destroyed! :(</div>

...
// components/child/child.component.ts

export class ChildComponent implements OnInit, OnChanges, DoCheck, AfterContentInit, AfterContentChecked, AfterViewInit,
     AfterViewChecked, OnDestroy {

 ...

  ngOnDestroy(): void {
     console.log('Child component is destroyed! :(');
  }

...
}
Here's our updated interface:

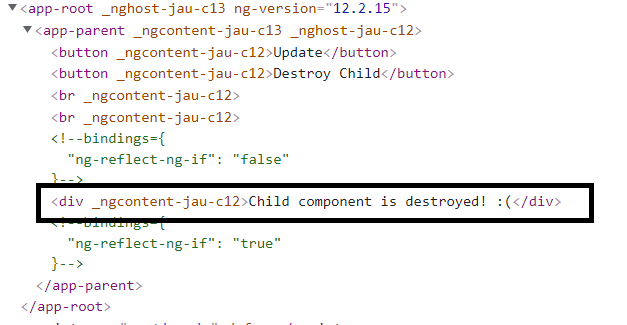
Clicking the Destroy Child button triggers the ngOnDestroy function and removes the component from the DOM.
The following shows the DOM before clicking Destroy Child:
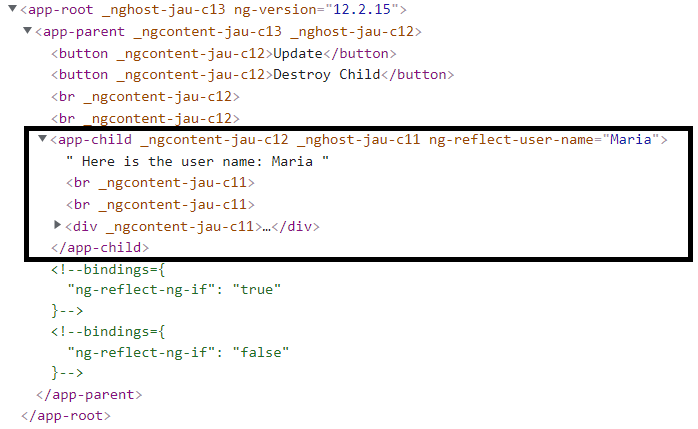
And this shows the DOM after clicking Destroy Child:
The Complete Picture
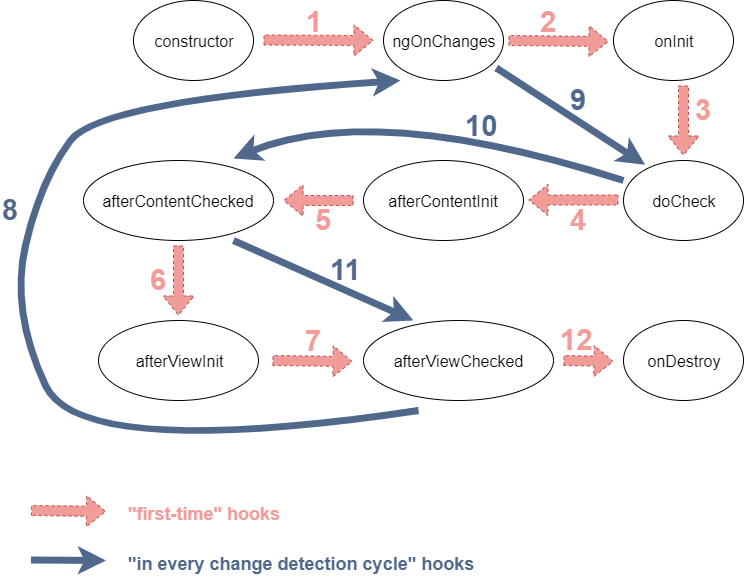
In essence, we can organize the lifecycle hooks into two phases: "first-time hooks" and "hooks during every change detection cycle."
Phase 1—"first-time hooks"—includes:
- onChanges
- onInit
- doCheck
- afterContentInit
- afterContentChecked
- afterViewInit
- afterViewChecked
Phase 2—"hooks in every change detection cycle"—includes:
- onChanges
- doCheck
- afterContentChecked
- afterViewChecked
The diagram below illustrates precisely how the Angular component/directive lifecycle operates:
Additional Resources
- Lifecycle Hooks from Angular docs
- Difference between Constructor and ngOnInit
- Article: If you think
ngDoCheckmeans your component is being checked - Everything you need to know about the
ExpressionChangedAfterItHasBeenCheckedErrorerror
Wrapping Up
We've explored Angular's Lifecycle Hooks, their purposes, and their invocation timing. These hooks prove invaluable when building Angular applications. Understanding their mechanics and capabilities allows you to leverage them effectively whenever the need arises.