
What Makes Complex Reactive Forms Messy?
Reactive Forms in Angular shine because they move validation logic out of the template and into the component. That gives developers a single, controlled place to manage validation. But once the form grows beyond a handful of fields, the component code can quickly become tangled and harder to reason about.
Where the Pain Points Lie
- Following the official Angular guidance for cross-control validation means attaching a custom validator at the
FormGrouplevel. With a large form, that validator fires on every single control change, which can drag down performance. See the snapshot below.
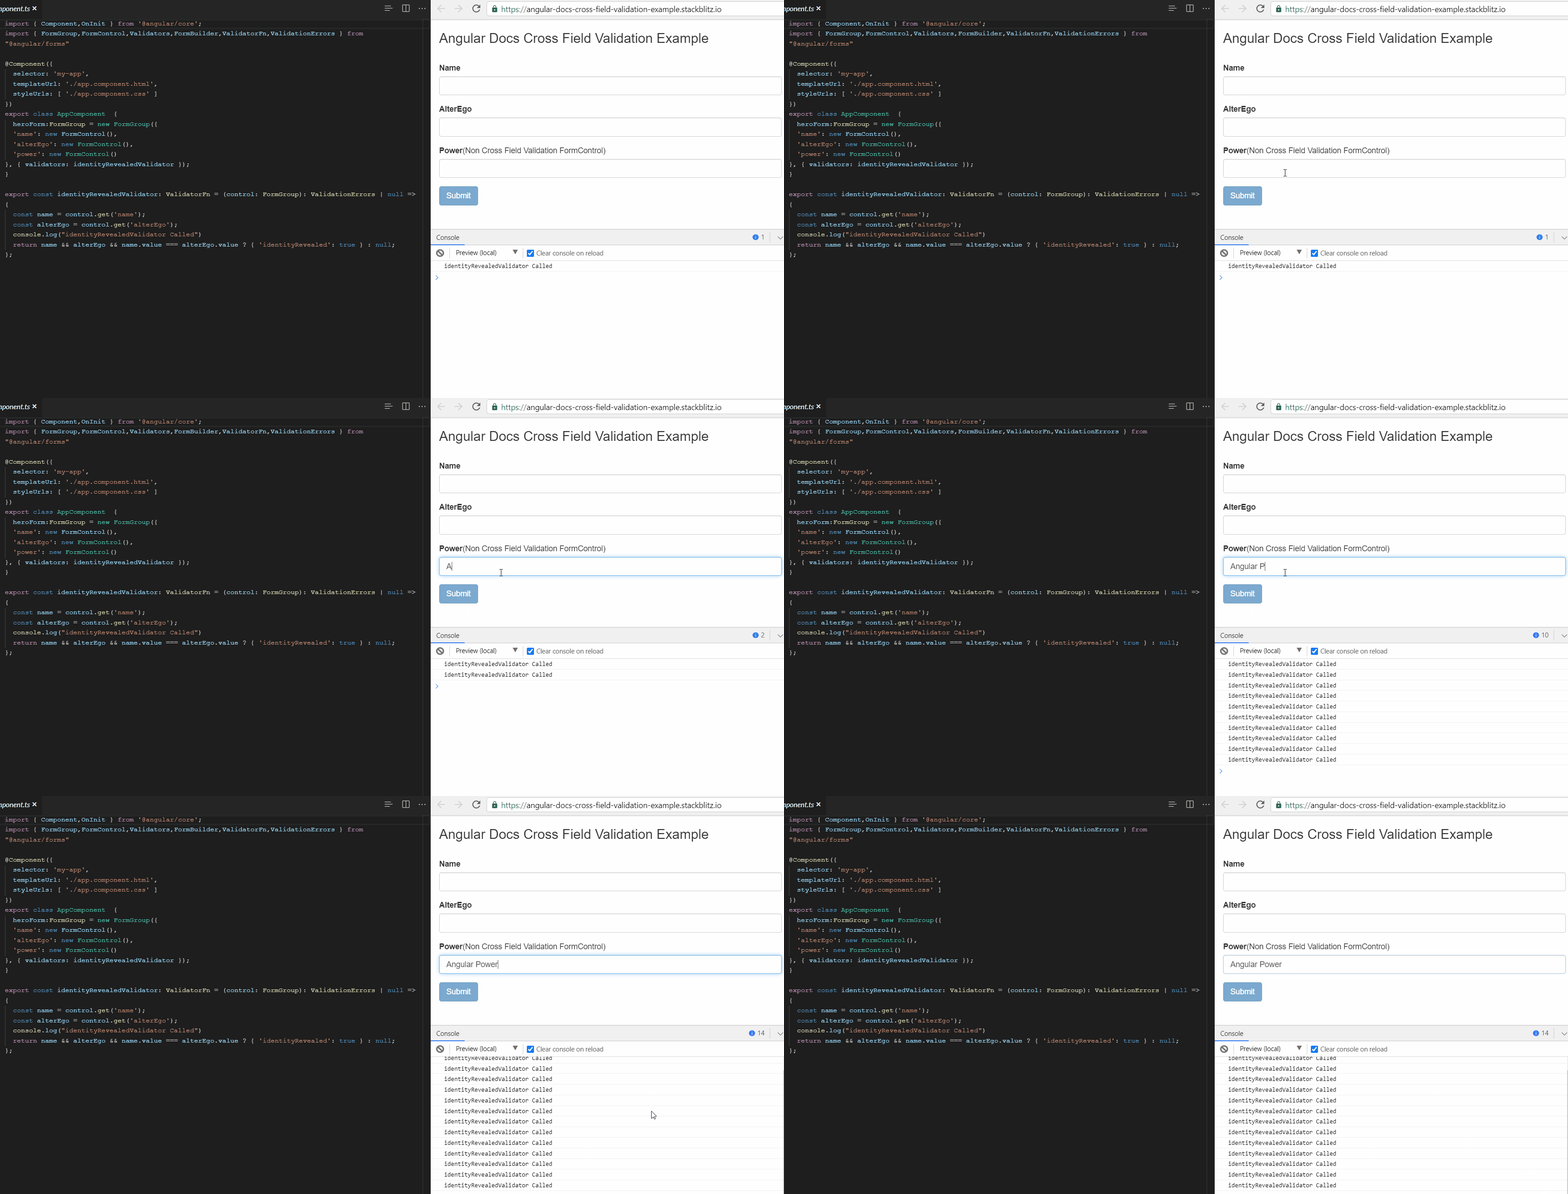
This is the output produced by the code example in the Angular guide for cross-field validation.
- The core Reactive Forms APIs are powerful, but keeping the code tidy gets tricky when conditional validation enters the picture. Imagine making a field required only when another control holds a specific value. The conventional approach is to subscribe to the
valueChangesstream of the controlling field and then callsetValidatorson the dependent control. That method is fragile; it is easy to accidentally wipe out existing validators when you assign the new conditional one.
Let’s look at a cleaner path for cross-field, conditional, and on-demand validation using RxWebValidators.
To get started, install the @rxweb/reactive-form-validators package in your project:
npm i @rxweb/reactive-form-validators
Once installed, import and register the RxReactiveFormsModule in your application's root module.
import {  RxReactiveFormsModule } from "@rxweb/reactive-form-validators"

@NgModule({
  imports:      [ RxReactiveFormsModule,...],
  declarations: [...],
})
export class AppModule { }
Now, let’s walk through specific use cases to compare the standard pattern with the RxWebValidators approach.
Handling Cross-Field Validation
The Scenario: You need to compare two FormControl values and flag one as invalid when they do not match.
The Conventional Way
const userForm = new FormGroup({
    'firstName': new FormControl(),
    'password': new FormControl(),
    'comparePassword': new FormControl()
},
{ validators: (control: FormGroup): ValidationErrors | null => {
const password = control.get('password');
const comparePassword = control.get('comparePassword');
return password && comparePassword && password.value !== comparePassword.value ? { 'compare': true } : null; }
});
Looking at that code, the custom validator sits on the FormGroup, which means it gets evaluated even when unrelated fields like firstName change. Here are a couple of workarounds people often try:
- As suggested by Deborah K in this example, you can wrap just the two password fields in their own nested
FormGroup. The downside is that you then have to reshape the form value before sending it to the server, which adds overhead and can be a headache to keep consistent. - Another tactic is to put the same validator directly on each
FormControl. This way, the validator only runs when one of those specific controls changes. It works, but if you have several pairs of cross-validated fields, the code becomes hard to manage.
Now, let’s see how RxWebValidators handles the same task.
let userForm =new FormGroup({
    password:new FormControl(),
    confirmPassword:new FormControl('', RxwebValidators.compare({fieldName:'password' })),
});
Here, the compare validator is directly attached to the 'comparePassword' FormControl. The validation logic runs automatically whenever either 'password' or 'comparePassword' changes. The result is much more straightforward to read.
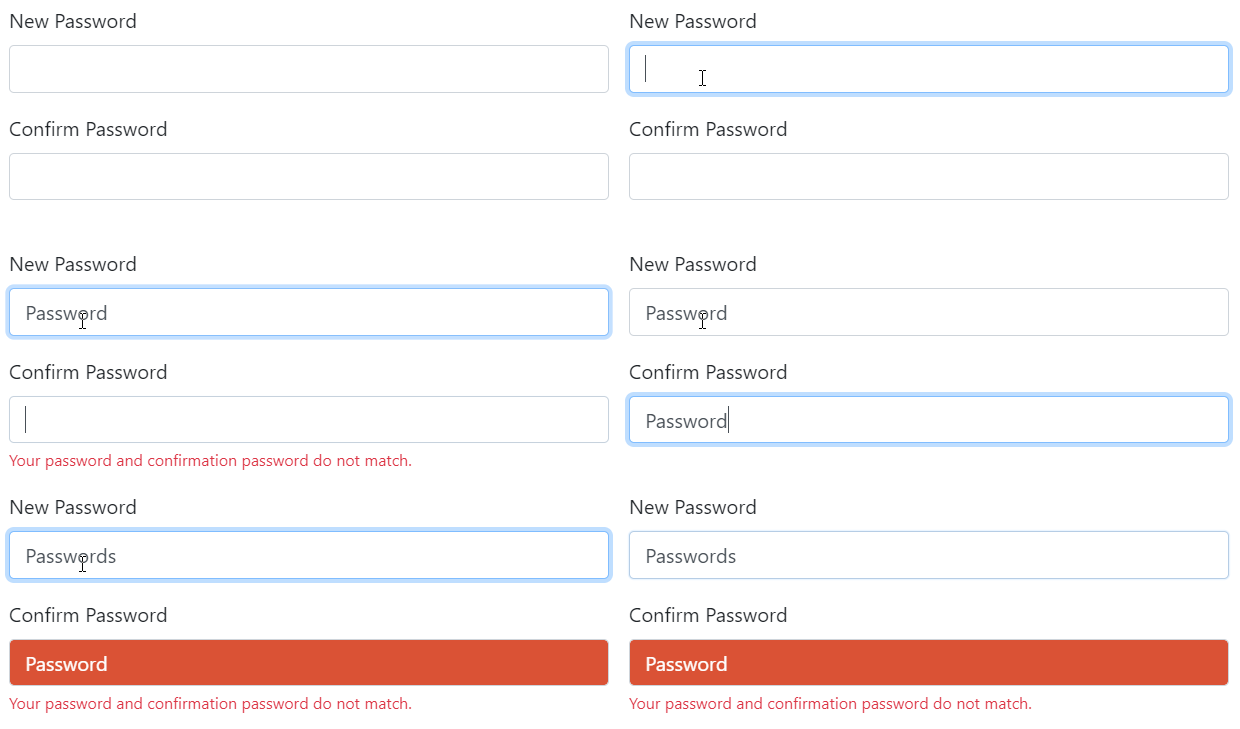
This is the output of the cross-field validation using the RxWebValidators method.
Dealing with Conditional Validation
The Scenario: The 'phone' field is only required when the 'notification' checkbox is checked.
The Conventional Way
 setNotification(ticked: boolean): void {
    const phoneControl = this.userForm.get('phone');
    if (ticked) {
      phoneControl.setValidators(Validators.required);
    } else {
      phoneControl.clearValidators();
    }
    phoneControl.updateValueAndValidity();
 }
As forms become more complex and rules pile up, the standard code above tends to introduce a few issues:
- It gets tough to keep track of all the validation rules assigned to a single
FormControl. - There's a real risk of inconsistent behavior if you forget to re-apply all the original validators when you swap in a new set at runtime.
- You end up with a lot of
if/elsestatements to handle various conditional scenarios, which is a classic code smell.
Now, examine the following solution that tackles all those points directly.
 let userForm = new FormGroup({
     notification:new FormControl(),
     phone:new FormControl('', RxwebValidators.required({conditionalExpression:x => x.notification === true }))
});
Thanks to the conditionalExpression property, the 'phone' FormControl is only validated as required when the notification control's value is set to 'true'. The intent is clear, and the code stays easy to maintain.
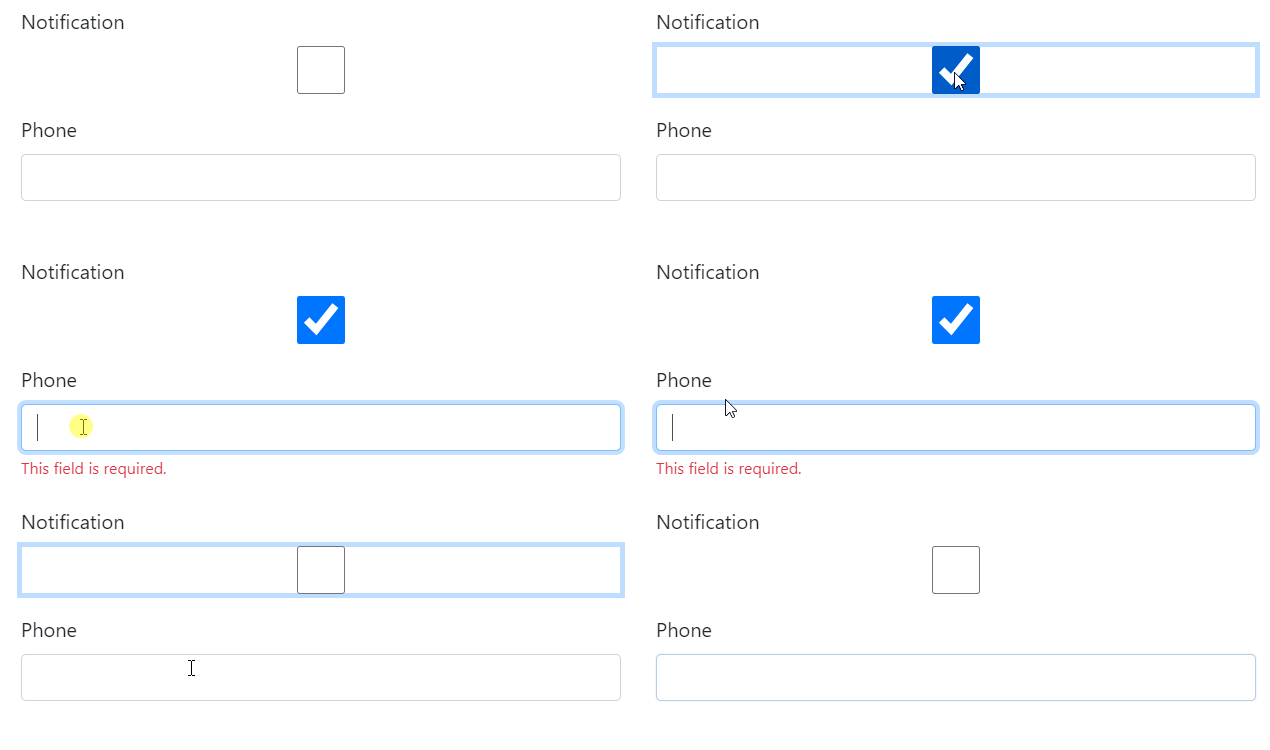
This is the output of the conditional validation using the RxWebValidators approach.
Validating On-Demand Based on Other Values
The Scenario: We have three inputs: Premium product charges, Purchase price, and Resale price. The rule states that the Resale price must be at least 30% higher than the sum of the Purchase price and the Premium product charges.
The Conventional Way
  ngOnInit() {
        this.userInfoFormGroup = new FormGroup({
          premiumCharge:new FormControl(),
          purchasePrice:new FormControl(),
          resalePrice: new FormControl()
        });

        this.userInfoFormGroup.controls.premiumCharge.valueChanges.subscribe(t=>{
          this.setMinValidator(this.userInfoFormGroup.value)
        })

        this.userInfoFormGroup.controls.purchasePrice.valueChanges.subscribe(t=>{
            this.setMinValidator(this.userInfoFormGroup.value)
        })
    }
    setMinValidator(formValue:any){
      const minimumPrice = ((parseInt(formValue.purchasePrice) + parseInt(formValue.premiumCharge)) * 30 / 100);
      this.userInfoFormGroup.controls.resalePrice.clearValidators();
      this.userInfoFormGroup.controls.resalePrice.setValidators(Validators.min(minimumPrice));
      this.userInfoFormGroup.controls.resalePrice.updateValueAndValidity({onlySelf:true});

    }
Handling this logic in the standard way means writing a significant amount of imperative code in the component, which limits its extensibility.
Let’s refactor this using RxWebValidators to make it much more elegant.
this.userInfoFormGroup = new FormGroup({
          premiumCharge:new FormControl(),
            purchasePrice:new FormControl(),
           resalePrice: new FormControl('', RxwebValidators.minNumber({
            dynamicConfig: (x, y) => {
                const minimumPrice = ((x.purchasePrice + x.premiumCharge) * 30 / 100);
                  return { value: minimumPrice };
              }
             }))

        });
This strategy leaves plenty of room for the codebase to grow. Instead of manually subscribing to the valueChanges of each relevant field, the library handles the cross-control dependency tracking automatically.
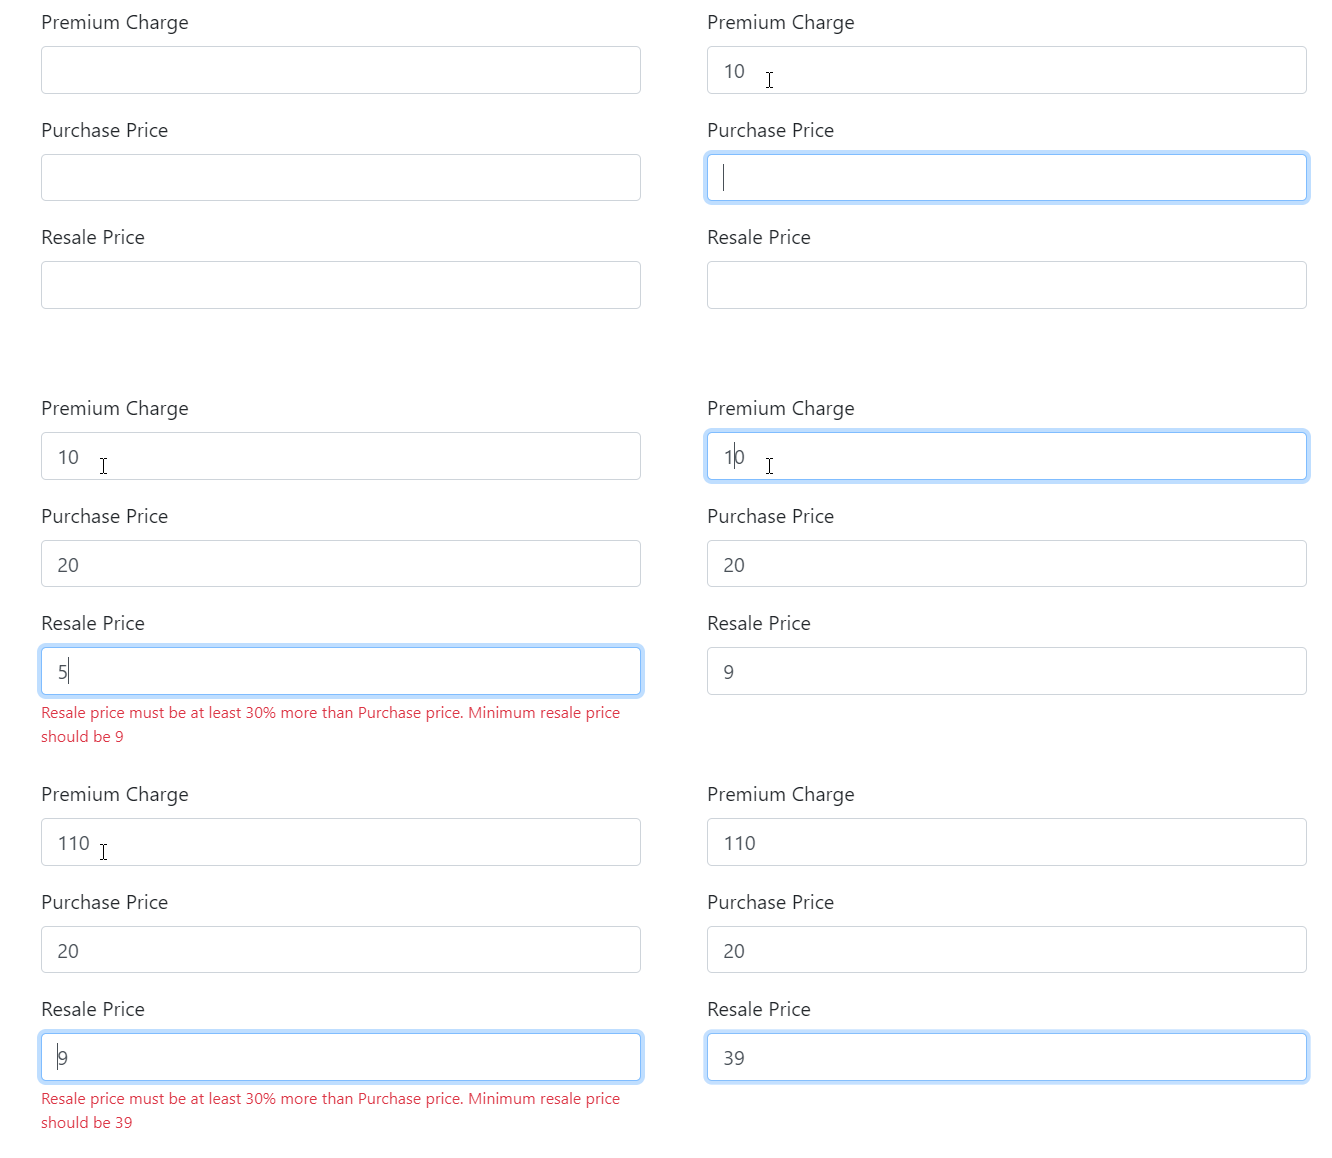
This is the output of the on-demand validation using the RxWebValidators approach.
Wrapping Up
We have seen how RxWebValidators simplifies cross-control validation without needing to tap into the ValueChanges stream or call SetValidators manually. It offers a more graceful way to manage sophisticated reactive form validation, keeping the codebase organized and easy to extend.
We hope this walkthrough was helpful. Feel free to leave a comment if you have any questions or thoughts.