
Exporting posts from WordPress
My first move toward a JAMstack blog was to find a generator that supported markdown and Angular in one place. Tools like Gatsby caught my attention, but none of them let me build the blog with Angular and tap into the framework's feature set. So I mapped out a plan: dump posts to XML, translate XML into markdown, handle images properly, bring in Angular's capabilities, and finally deploy the whole thing.
The starting point is to get all your posts out of WordPress. The platform ships with an export feature that generates a single XML file for the entire site. That option lives in the WP Admin menu here:
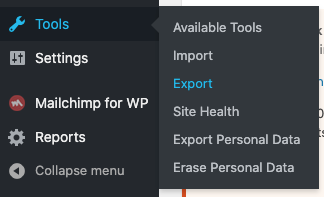
If you're unfamiliar with the screen, the official guide is at Tools Export Screen.
Once you've downloaded the XML dump, you're still holding XML, but markdown is where the magic happens.
Converting XML into markdown
The wordpress-export-to-markdown utility handles the conversion while preserving the blog's organization:
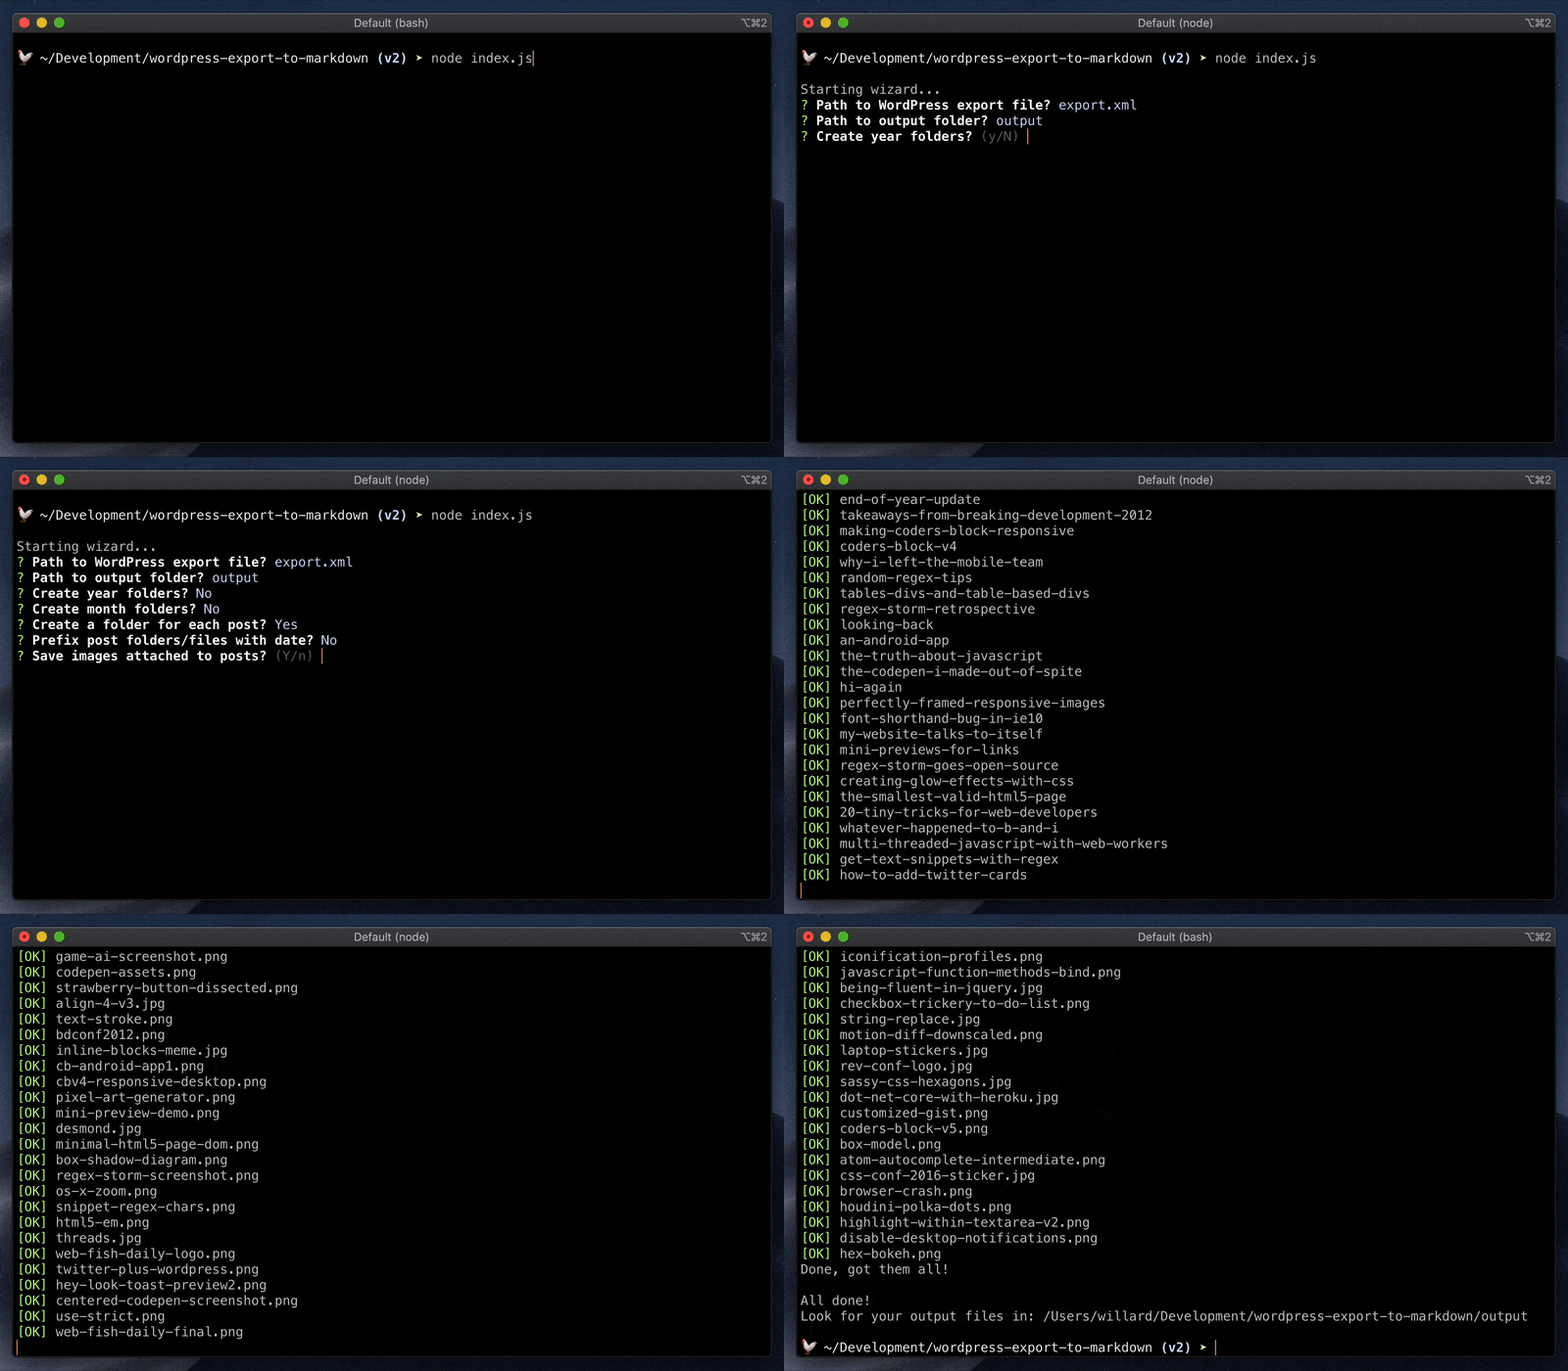
Pay close attention when the tool asks you about URL structures — keeping them consistent will save you from broken links later on.
Once the conversion is done, you'll have markdown files alongside their images. But does Scully actually know what to do with those images?
Images and Scully
I have some bad news: Scully doesn't process images when it converts markdown, and it also fails to copy them over to the compiled output directory.
However, there's a silver lining — Scully has a plugin mechanism. If you need a primer on how plugins work, check out this piece by Sam Vloeberghs — it's excellent.
A Scully plugin to copy images
Our goal is to get Scully to carry over images from the source markdown files into the compiled HTML. The solution is a small plugin (image.scully.plugin.ts):
export function imageFilePlugin(raw: string, route: HandledRoute) {
  return new Promise((resolve) => {
    fs.copyFile(route.templateFile, './dist/static/images/' + route.data.sourceFile, (err) => resolve(''));
  });
}
The problem is that neither ./dist/static nor ./dist/static/images exist yet, so you must create them before any file copying can happen:
if (!fs.existsSync('./dist/static')) {
  fs.mkdirSync('./dist/static');
}
if (!fs.existsSync('./dist/static/images')) {
  fs.mkdirSync('./dist/static/images');
}
Next, register the plugin for every image type you want to handle (feel free to extend the list):
registerPlugin('fileHandler', 'png', imageFilePlugin);
registerPlugin('fileHandler', 'jpg', imageFilePlugin);
registerPlugin('fileHandler', 'gif', imageFilePlugin);
This is what the final, cleaned-up version of the plugin looks like (image.scully.plugin.ts):
import { registerPlugin, HandledRoute } from '@scullyio/scully';
import * as fs from 'fs';

if (!fs.existsSync('./dist/static')) {
  fs.mkdirSync('./dist/static');
}
if (!fs.existsSync('./dist/static/images')) {
  fs.mkdirSync('./dist/static/images');
}

export function imageFilePlugin(raw: string, route: HandledRoute) {
  return new Promise((resolve) => {
    const src = route.templateFile;
    const dest = './dist/static/images/' + route.data.sourceFile;
    fs.copyFile(src, dest, (err) => {
        if (err) {
          console.log(err);
        }
        console.log(`${route.templateFile} was copied to ${dest}`);
        resolve('');
      }
    );
  });
}

registerPlugin('fileHandler', 'png', imageFilePlugin);
registerPlugin('fileHandler', 'jpg', imageFilePlugin);
registerPlugin('fileHandler', 'gif', imageFilePlugin);
Then wire it up in the Scully config (scully.blog.config.ts) so it actually runs:
import './src/image.scully.plugin';

export const config = {
  ...
Using the preRenderer router option
Once I had my image plugin, Sander Elias (the person behind Scully) pointed out a simpler path — the preRenderer router option:
export const config: ScullyConfig = {
  ...
  routes: {
    '/blog/:slug': {
      preRenderer: async (handledRoute: HandledRoute) => {
        ...
        return false;
      },
      ...
    },
  }
};
By returning false you're telling Scully to skip that path entirely. So you can wrap things in a condition:
const fileExtention = path.extname(handledRoute.data.sourceFile);
if (['.jpg', '.png', '.gif'].includes(fileExtention)) {
  return false;
}
return true;
You can also fold your image-copying logic into the branch where an image is detected:
const src = path.resolve('./' + handledRoute.route + fileExtention);
const dest = path.resolve('./dist/static/images/' + handledRoute.data.sourceFile);
fs.copyFile(src, dest);
Important: Scully skips images by design (it just doesn't reproduce them), so to change that behavior and make sure image paths show up in handledRoutes, you must register a tiny 'dummy' plugin for the file types you care about — it does nothing but signal that those extensions are being handled:
registerPlugin('fileHandler', 'png', async () => '');
registerPlugin('fileHandler', 'jpg', async () => '');
registerPlugin('fileHandler', 'gif', async () => '');
Pulling tags from XML
Tags are another piece you'll want to keep. Unfortunately, wordpress-export-to-markdown ignores them out of the box. I've opened a PR to add that, but in the meantime, you can grab my fork if tags are essential.
Dealing with double encoding
There's a quirk in the WordPress XML export that only shows up if you use non-Latin characters — say, writing in a language that relies on them. When that happens, text gets encoded twice. For my own export, I tweaked this line to keep non-Latin titles working as they should.
Tables and special characters
The converter has another blind spot: it doesn't recognize HTML tables. So if you relied on them in your WordPress posts, be prepared to rewrite each one by hand in markdown.
Also watch out for characters like [, ], \, -, _, or $ — they get escaped with backslashes automatically, turning into \[, \], \\, \-, \_, \$. Inside code blocks, that's almost certainly not what you want.
Angular services: titles, articles, tags, and search
Once your content is sitting in .md files, you can start adding blog features that used to feel like WordPress exclusives — think page titles, tags, or search — and run them entirely on the client side.
TitleService
Angular ships with its own title service. You just inject it:
  constructor(
    ...
    private titleService: Title) {
and assign the article title when the page loads:
this.scully.getCurrent().subscribe(article => {
  this.titleService.setTitle(article.title);
  this.article = article;
});
Article Service
A solid foundation for content manipulation is a dedicated Articles Service. The natural starting point is Scully's scully.available$ stream:
getArticles(): Observable<Article[]> {
  return this.scully.available$;
}
But there's a catch: Scully will emit an entry for every file it finds, and that includes images, not just markdown. I wrote up an issue for this, and it should get fixed at some point. For now, filter the stream so only *.md files come through:
this.scully.available$.pipe(
      map((articles: Article[]) => articles.filter((article: Article) =>
        article.sourceFile?.split('.').pop() === 'md')));
Each post carries a date, so it's natural to sort them in DESC order — newest entries first:
map((articles: Article[]) => {
  return articles.sort((articleA, articleB) => {
    return +new Date(articleB.date) - +new Date(articleA.date);
  });
})
A limit is also a practical addition:
map(articles => articles.slice(0, limit))
Here's the finished service:
  getArticles(limit = 10): Observable<Article[]> {
    return this.scully.available$
      .pipe(
        tap(articles => console.log(articles)),
        map((articles: Article[]) => articles.filter((article: Article) =>
          article.sourceFile?.split('.').pop() === 'md')),
        map((articles: Article[]) => {
          return articles.sort((articleA, articleB) => {
            return +new Date(articleB.date) - +new Date(articleA.date);
          });
        }),
        map(articles => articles.slice(0, limit))
      );
  }
With this service in place, rendering a preview list of posts becomes trivial:
<app-article-preview [article]="article" *ngFor="let article of articles$|async"></app-article-preview>
Tags Service
Building on ArticleService, you can gather every tag along with a count, which makes it easy to render a tag cloud later:
getTags(): Observable<Tag[]> {
  return this.articleService.getAllArticles().pipe(map(articles => {
    const tags = [];
    articles.forEach(article => {
      article.tags.split(',').forEach(articleTag => {
        const tag = tags.find(t => t.title === articleTag);
        if (!tag) tags.push({ title: articleTag, count: 0 });
        tag.count++;
      });
    });
    return tags;
  }));
}
Search
A blog without search (or at least tag-based filtering) feels incomplete. Since ArticleService already exists, filtering is just a matter of matching tags:
articles.filter((article) => {
  if (!tag) {
    return true;
  }
  return article.tags.includes(tag);
});
or running against a search query:
articles.filter((article) => {
  if (!searchTerm) {
    return true;
  }
  return article.title.includes(searchTerm) || article.tags.includes(searchTerm);
});
Put it all together and this is what you get:
getFilteredArticles(tag: string, searchTerm: string, limit: number = 10): Observable<Article[]> {
  return this.getAllArticles().pipe(
    map( (articles: Article[]) => {
      return articles.filter((article) => {
        if (!tag) {
          return true;
        }
        else if (!article.tags) {
          return false;
        }
        return article.tags.includes(tag);
      });
    }),
    map(articles => articles.filter(article => {
      if (!searchTerm) {
        return true;
      }

      return article.title.includes(searchTerm) || article.tags.includes(searchTerm);
    })),
    map(articles => articles.slice(0, limit))
  );
}
Isn't it great when search lives on the frontend and returns results in under a second?
Code Highlighting
One more thing — if you haven't seen it yet, you can get syntax highlighting for code blocks (i.e.
). Just turn on the option in Scully config (scully.blog.config.ts):
setPluginConfig('md', { enableSyntaxHighlighting: true });
It's off by default, so you have to explicitly enable it.
Deployment
Any static host will do. Your choices include GitHub Pages, FireBase, or Vercel. For me, Netlify is the go-to. You'll need a build command:
ng build --prod && npm run scully
and point the publish directory to ./dist/static.
Incremental builds
If your blog has grown past 100 posts, rebuilding everything for a single edit gets tedious. That's where the routeFilter option comes in — it lets you limit rendering to one section, usually a folder for a year or year+month if you're coming from WordPress:
ng build --prod && npm run scully -- --routeFilter "*2020/11*"
With that flag, Scully will regenerate only the markdown files located in the 2020/11 directory.
You can push this even further by leveraging git to detect which files changed in the most recent commit:
git show --name-only --oneline HEAD | tail -n +2 | grep 'blog/'
The final command ends up looking like this:
npm run scully -- --routeFilter "$(git show --name-only --oneline HEAD | tail -n +2 | grep 'blog/' | xargs | sed -e 's/ /, /g')" --scanRoutes
For extra convenience, put it in your package.json scripts.
Final thoughts
The Scully team has built something genuinely impressive. Granted, you may need to apply a few custom tweaks for your particular situation, but Scully more than holds its own as a Gatsby equivalent for Angular. I ran the experiment on my WordPress blog, and the results made me comfortable recommending it — and encouraging you to join the Scully community.
Useful links
- The complete blog code is available here.
- The live site is https://blog.stepansuvorov.com/ — feel free to explore.
- Scully Documentation
- "Custom plugins for Scully" by Sam Vloeberghs
…and of course, don't hesitate to reach out to me with any questions or suggestions.