 ## Morse Code Fundamentals
Telegraph relies on Morse code, which is essentially a binary signal pattern. The signal is split into discrete segments, each representing either a "beep" (1) or silence (0). The rules are straightforward:
- Two symbols exist: dash and dot
- A dash consists of three consecutive 1s
- A dot is a single 1
- Symbols are divided by a single 0
- Letters are separated by three consecutive 0s
- Words use seven consecutive 0s (the four 0s for space plus the three 0s ending a character)
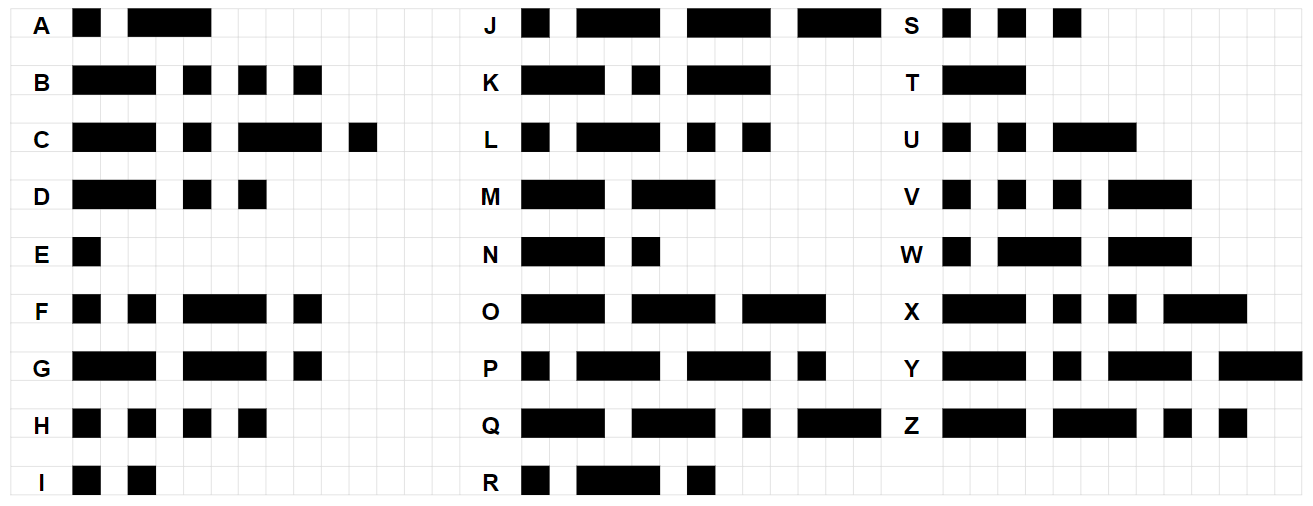
Each letter corresponds to a specific pattern, as shown in the table. The black squares denote 1s and white squares denote 0s.
Consider the letter "H"—it translates to four dots. Since each dot is a single 1 and these must be separated by 0s, we get: **1010101**. Following this logic, "HELLO WORLD" would be encoded as:
**1010101**000**1**000**101110101**000**101110101**000**11101110111**0000000 = **HELLO**[end of word]
**101110111**000**11101110111**000**1011101**000**101110101**000**1110101**0000000 = **WORLD**[end of word]
This reflects the standard US Morse code table, though alternative versions exist. For an Angular implementation, the code table is an ideal candidate for an `[InjectionToken](https://angular.io/api/core/InjectionToken)`. Using the second parameter with a factory function allows us to set a default implementation, which projects can later override with their own Morse code tables:
## Morse Code Fundamentals
Telegraph relies on Morse code, which is essentially a binary signal pattern. The signal is split into discrete segments, each representing either a "beep" (1) or silence (0). The rules are straightforward:
- Two symbols exist: dash and dot
- A dash consists of three consecutive 1s
- A dot is a single 1
- Symbols are divided by a single 0
- Letters are separated by three consecutive 0s
- Words use seven consecutive 0s (the four 0s for space plus the three 0s ending a character)
Each letter corresponds to a specific pattern, as shown in the table. The black squares denote 1s and white squares denote 0s.
Consider the letter "H"—it translates to four dots. Since each dot is a single 1 and these must be separated by 0s, we get: **1010101**. Following this logic, "HELLO WORLD" would be encoded as:
**1010101**000**1**000**101110101**000**101110101**000**11101110111**0000000 = **HELLO**[end of word]
**101110111**000**11101110111**000**1011101**000**101110101**000**1110101**0000000 = **WORLD**[end of word]
This reflects the standard US Morse code table, though alternative versions exist. For an Angular implementation, the code table is an ideal candidate for an `[InjectionToken](https://angular.io/api/core/InjectionToken)`. Using the second parameter with a factory function allows us to set a default implementation, which projects can later override with their own Morse code tables:
export const MAP = new InjectionToken<Map<string, readonly (0 | 1)[]>>(
  'Morse code dictionary',
  {
    factory: () => new Map([
      [' ', [0, 0, 0, 0]],
      ['a', [1, 0, 1, 1, 1]],
      // ...
    ])
  }
)
@Injectable({
  providedIn: 'root'
})
export class MorseService extends Subject<readonly (0 | 1)[]> {
  constructor(
    @Inject(MAP) private readonly chars: Map<string, readonly (0 | 1)[]>
  ) {
    super();
  }

  send(char: string) {
    this.next(this.chars.get(char));
  }
}
export const MORSE = new InjectionToken<Observable<0 | 1>(
  'A sequence of Morse code',
  {
    factory: () => {
      const chars = inject(MAP);
      const duration = inject(UNIT);
      const service$ = inject(MorseService);
      const keydown$ = fromEvent(inject(DOCUMENT), 'keydown').pipe(
        map(({ key }: KeyboardEvent) => chars.get(key)),
        filter(Boolean)
      );

      return merge(service$, keydown$).pipe(
        concatMap(sequence =>
          from(sequence).pipe(
            endWith(...SPACE),
            delayEach(duration)
          )
        ),
        share(),
      );
    }
  }
);
export function delayEach<T>(duration: number): MonoTypeOperatorFunction<T> {
  return concatMap(x => of(x).pipe(delay(duration)));
}
@Directive({
  selector: '[char]'
})
export class CharDirective {
  @Input() char = '';
}
@Component({
  selector: '[char]',
  templateUrl: 'char.template.html',
  styleUrls: ['char.style.less'],
  providers: [CharService]
})
export class CharComponent {
  constructor(
    @Inject(CharService) readonly service: Observable<number | string>,
    @Inject(CharDirective) readonly directive: CharDirective,
    @Inject(MorseService) private readonly emitter: MorseService
  ) {}

  @HostListener('click')
  onClick() {
    this.emitter.send(this.directive.char);
  }
}
@Injectable()
export class CharService extends Observable<number | string> {
  private readonly inner$ = this.morse$.pipe(
    // ...
  )

  constructor(
    @Inject(MORSE) private readonly morse$: Observable<0 | 1>,
    @Inject(MAP) private readonly chars: Map<string, readonly (0 | 1)[]>,
    @Inject(CharDirective) private readonly directive: CharDirective
  ) {
    super(subscriber => this.inner$.subscribe(subscriber));
  }
}
private get sequence(): readonly (0 | 1)[] {
  return [...this.chars.get(this.directive.char), ...SPACE];
}
private isValid(value: number, index: number): boolean {
  return this.sequence[index] === value;
}
private getValue(index: number): number | string {
  return this.sequence.length === index + 1
    ? this.char
    : (index + 2) / this.sequence.length;
}
private readonly inner$ = this.morse$.pipe(
  takeWhile(this.isValid.bind(this)),
  map((_, index) => this.getValue(index)),
  startWith(0),
  endWith(0),
  takeWhile(isNumber, true),
)
repeatWhen(() => threeZeroes$),
export function consecutive<T>(
  value: T,
  amount: number
): OperatorFunction<T, unknown> {
  return pipe(
    startWith(...new Array(amount).fill(value)),
    scan((result, item) => (item === value ? ++result : 0), 0),
    filter(v => v >= amount),
  );
}
private readonly inner$ = this.morse$.pipe(
  consecutive(0, SPACE.length),
  concatMapTo(this.morse$.pipe(
    takeWhile(this.isValid.bind(this)),
    map((_, index) => this.getValue(index)),
    startWith(0),
    endWith(0),
  )),
  takeWhile(isNumber, true),
  repeat(),
)
Live Demonstration
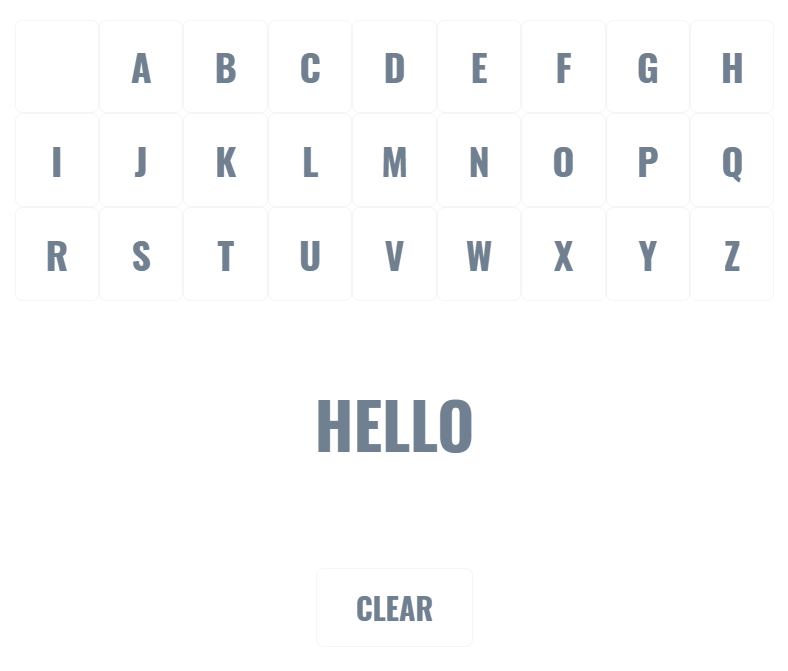
All the pieces are in place, so let's build a working example. The app will capture keyboard input and render a virtual keyboard on screen. Each key will show the decoding progress as the message is being received, and the full text will be displayed below.
A Morse code telegraph wouldn't feel right without the characteristic beeping. Generating simple tones is straightforward using the Web Audio API, specifically with OscillatorNode. My wrapper library, @ng-web-apis/audio, makes this even easier to integrate.
This library is part of the Web APIs for Angular open-source project. Our mission is to provide high-quality, lightweight wrappers for native browser APIs so they can be used naturally within Angular applications. Take a look at the full collection of wrappers we've published.
Using these wrappers, we can construct an audio graph directly from declarative Angular directives:
<ng-container waOscillatorNode autoplay frequency="523">
  <ng-container
    waGainNode
    gain="0"
    [gain]="morse$ | async | waAudioParam : 0.02"
  >
    <ng-container waAudioDestinationNode></ng-container>
  </ng-container>
</ng-container>
This configuration produces a tone for one second and then silence, all managed by adjusting the volume. Next, we need to define the layout for both the virtual keyboard and the decoded output. Adding a «Clear» button to reset everything also seems practical:
<section>
  <button *ngFor="let char of chars" type="button" [char]="char">
    {{char}}
  </button>
</section>
<output>{{ output$ | async }}</output>
<footer>
  <button type="reset" (click)="reset$.next()">Clear</button>
</footer>
The question is: where does the output$ stream come from? The answer lies in querying services directly from the template. It's worth noting that Angular queries are capable of retrieving services and other instances from node injectors.
@ViewChildren(CharService)
readonly services: QueryList<Observable<string | number[]>>
Just remember, these queried instances won't be accessible until the
ngAfterViewInitlifecycle hook fires!
We can assemble the output$ stream using this approach:
readonly reset$ = new Subject<void>();

readonly output$ = this.reset$.pipe(
  switchMap(() => merge(...this.services.toArray()).pipe(
    filter(x => !isNumber(x)),
    scan((result, char) => result + char, ''),
    startWith(''),
  )),
  startWith(''),
);

ngAfterViewInit() {
  this.reset$.next();
}
To visualize the decoding progress, we'll add a simple span element inside the CharComponent. Its height and color can be driven by two separate streams:
readonly progress$ = this.service.pipe(
  filter(isNumber),
  map(value => value * 100),
);

readonly pending$ = this.service.pipe(
  filter(Boolean),
  map(isNumber),
);
One final technique worth highlighting is leveraging the same token used for the UNIT duration to control CSS transitions. With the Ivy renderer in place, Angular supports binding directly to CSS variables. So, we can define a --duration variable in our styles and wire it up in the main component:
@Component({
  // ...
  host: {
    '[style.--tui-duration]': 'unit + "ms"',
  },
})
export class AppComponent implements AfterViewInit {
  constructor(
    // ...
    @Inject(UNIT) readonly unit: number,
  ) {}

  // ...
}
That wraps up the implementation. Feel free to explore the final working demo!