
Angular 15 shipped a feature that deserves far more attention than it gets — the Directive Composition API. It introduces a new property on the @Directive and @Component decorators: hostDirectives. This property lets you list any standalone directives that should be automatically applied to your component or directive. In effect, you can now bundle together decomposed logic in any combination you find useful. The possibilities here are substantial, and I think both the community and the Angular core team have yet to fully appreciate it — at the time of writing, you will find only a single usage of it across the entire components repository. That scarcity probably explains the rough edges we will cover later. But before diving into those caveats, let's explore just how powerful this feature is. Here's what we'll look at:
- An overview of the feature
- Why it matters (case study: Taiga UI)
- Concrete usage examples
- Limitations and how to work around them
Let's get started.
What are host directives?
Host directives are specified as an array of directive classes, or as objects containing the directive class along with the inputs and outputs you want to surface on the host element. One useful way to think about this feature is as providers, but more capable. In the past, we could already extract logic into services and register them in providers. Let's highlight the key differences:
- Providers are lazy — they remain uninstantiated until something injects them. That can be desirable, but not always. Host directives, by contrast, behave like auto-initialized providers.
- Providers have no access to the host except through
ElementRef. Host directives are regular directives, so they can definehostbindings and listen to host events declaratively. That is a significant advantage. - Providers are configured solely through dependency injection. Host directives, however, can expose inputs, which makes them much more convenient when your decomposed logic needs external configuration.
With those points in mind, it's clear that host directives unlock far more flexibility. On top of that, they can also be used directly in templates on their own. I'm a strong advocate for decomposing logic into small, focused pieces, and this API gives me the tools to do that in a way that meaningfully improves the quality of a codebase. That may not be obvious at first glance, but after looking at the examples below, I'm confident you'll see the value.
My focus is on building reusable, flexible, low-level UI components. The Directive Composition API is a big win for me in that space. That might not be true for developers who mostly work on business-logic-heavy components.
Taiga UI's experience
As I mentioned, even though Angular 15 introduced this feature, it hasn't gotten the traction it deserves. None of the major libraries — Material, ng-zorro, PrimeNG, or Bootstrap — use it. I've spent more than five years building reusable UI primitives, so I was genuinely excited when the Directive Composition API finally landed. With this article, I hope to generate more enthusiasm within the Angular ecosystem by showing what you can accomplish with it in a clean and ergonomic way.
The best source of examples I know is the library my team built called Taiga UI. Recently we completed a substantial refactor for our next major version, moving to Angular 16 and finally enabling this feature. And we took full advantage of it! If you inspect the source code, you'll find around 50 usages of hostDirectives. So what did we learn during that refactor? Let's explore.
Components are a scarce resource
One element can have any number of directives, but only one component. Before the Directive Composition API, if you needed to combine multiple directives on a single element, you had to create a component for it. Imagine you want a dropdown with styling and open/close behavior applied to a button. Those behaviors come from directives, but you'd end up writing a component like this:
<my-custom-dropdown [content]="content">
  <button>Toggle dropdown</button>
</my-custom-dropdown>
And inside its template, something like:
<div myVisualDirective myOpenCloseLogic [myDropdown]="content">
  <ng-content />
</div>
What are the downsides of that approach?
- You burn the single component slot just for composition — the template you add is unnecessary and only complicates the DOM in order to attach directives.
- Configuration becomes painful — you have to pass every option, such as dropdown content, through the component to the underlying directives.
- Those embedded directives are part of the view, so they cannot be injected via DI later if you need access to them.
Starting with Angular 15, a simple directive can handle all of that composition on its own, resolving every issue above:
@Directive({
  standalone: true,
  selector: '[customDropdown]',
  hostDirectives: [
    VisualDirective,
    OpenCloseLogic,
    {
      directive: Dropdown,
      inputs: ['myDropdown: customDropdown'],
    },
  ],
})
export class CustomDropdown {}
And notice we can alias inputs to make the public API as straightforward as possible:
<button [customDropdown]="template">Toggle dropdown</button>
Bonus: handling directive styles
Sometimes wrapping a component is about more than just attaching directives. For instance, one of the most upvoted Angular feature requests is the ability for directives to include styles. Right now, only components can bundle styles. So if you need anything like a preprocessor, or even just keyframes or a simple :hover rule that won't work with inline [style] bindings, you're forced to use a component.
Global styles are an option, but they're not composable, not tree-shakable, and difficult to package and consume within libraries.
We've worked around that with a simple trick involving unencapsulated styles and dynamically created components:
@Component({
  standalone: true,
  template: '',
  styles: '[myDir]:hover { color: red }',
  encapsulation: ViewEncapsulation.None,
})
class MyDirStyles {}

@Directive({
  standalone: true,
  selector: '[myDir]',
})
export class MyDir {
  protected readonly nothing = withStyles(MyDirStyles);
}
What exactly does withStyles do? It's a utility that instantiates a component, which in turn causes its styles to be injected into the head. We need a DI token to keep track of components that have already been instantiated:
const MAP = new InjectionToken('', {
  factory: () => {
    const map = new Map();

    inject(DestroyRef).onDestroy(() =>
      map.forEach((component) => component.destroy())
    );

    return map;
  }
});
Plus a small helper to inject that token and add our component to it whenever the directive is created:
export function withStyles(component: Type<unknown>) {
  const map = inject(MAP);
  const environmentInjector = inject(EnvironmentInjector);

  if (!map.has(component)) {
    map.set(component, createComponent(component, {environmentInjector}));
  }
}
With this in place, our directives can now combine logic via hostDirectives and handle styling using withStyles. Now that we've addressed that, let's review some concrete Directive Composition API use cases.
Practical Applications
Most of my examples come straight from our component library. While numerous directives qualify as host directives in our codebase, I'll concentrate on these five:
- Appearance
- Icons
- Dropdown
- ControlValueAccessor
- Maskito
Appearance
Every component in our collection relies on the same core directive to manage its interactive visual state. The Taiga UI theme is essentially a collection of CSS variable declarations paired with those appearance definitions. You can see an example of the "Accent" source code.
The implementation uses mixins for the :hover and :active states, ensuring hover effects never trigger on touch devices and these stateful styles are reserved for interactive elements like buttons and links. As a result, non-interactive badges won't change color when someone hovers over them. The appearance directive also gives you manual control over these states — useful for scenarios like keeping a button visually pressed while its dropdown stays open. This directive applies across buttons, chips, badges, and numerous other components in our UI kit. It allows us to reuse both style rules and behavioral logic, introduce new or custom appearances with minimal effort, and deploy them everywhere. For instance, a checked checkbox adopts the "Primary" appearance, while an unchecked one uses "Whiteblock" — the same appearances used by buttons or potentially even textfields:
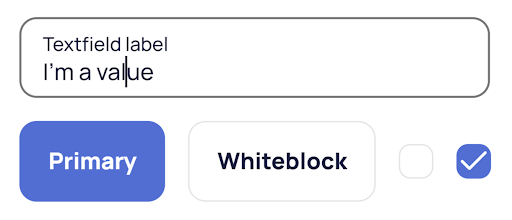
Adding this directive with a single line grants this capability to any component, eliminating the need for an extra wrapper element.
Icons
This one carries a bit more nuance. In Taiga UI 4 we adopted CSS masks to style SVG icons via CSS. It's a clever technique because it doesn't even need an extra DOM element — the icon can live inside a ::before/::after pseudo-element.
Take a look at this Stackblitz for more fascinating CSS mask applications!
Since no DOM element is required, a directive fits perfectly. The same pseudo-element approach translates to buttons, links, tabs, badges, and beyond. The logic responsible for resolving an icon from its name sits inside a directive, which exposes iconStart/iconEnd inputs. Our job then is to prepare our components with the appropriate gaps and margins so that icons, when added, align correctly.
Dropdown
Moving away from purely visual concerns, let's examine our dropdowns. I've previously delved into decomposition by breaking down dropdowns and hints in Taiga UI. I strongly suggest reading my earlier piece. Host directives give us a chance to build on the concepts discussed there.
At their core, our dropdowns address these questions through directives:
- What content should appear?
- When should it appear?
- Where should it appear?
The Directive Composition API provides a clean way to merge these directives. For instance, [(tuiDropdownOpen)] toggles a dropdown by receiving an explicit true/false value. It's a two-way binding because it incorporates the ActiveZone directive (more details here), which closes the dropdown when clicking or keyboard-navigating away and communicates this via an output.
This directive is itself composed of other host directives. Yet, we can attach it to textfields, exposing both input and output to transform basic inputs into select/combo-box/date-picker variants. Multi-layered host directives can be incredibly powerful!
ControlValueAccessor
Host directives also shine when working with ControlValueAccessor. More broadly, they help untangle cyclic dependencies. Consider an accessor that covers most requirements but needs an extra check, like whether the control has been touched. Adding that would mean injecting NgControl, but that creates a cyclic dependency since it already injects your class as the ControlValueAccessor.
The solution: isolate that specific logic into a small directive and attach it as a host directive to your accessor. This defers its instantiation until both classes are available. This approach nicely resolves a singular problem, but the same strategy works for splitting unwieldy classes into separate, self-contained code fragments — especially since you can surface inputs.
In Taiga UI, for example, we have both vertical and horizontal Tabs as distinct components. Yet, the logic for tracking the currently active tab is shared as a host directive. Within the Carousel, the logic for rotating slides has been extracted outside the main component — something providers couldn't achieve because we need per-slide control over the duration. The InputFiles component similarly offloaded independent logic — specifically file type and size validation — into a host directive. This is particularly beneficial because such a directive can implement NG_VALIDATORS to enhance the developer experience when working within forms.
Maskito
Maskito is our framework-agnostic library for input masking. For a solid introduction, check out my overview — it might be quite useful for your projects! In Angular, it's available as a directive, easily applied to standard inputs. However, there are times you'll want to combine a specific mask directly into a component.
A prime example is credit card input. We have a mask for the card number that formats it in groups of four digits, an expiration date mask that refuses invalid months like the 13th, and a CVC mask limited to three digits. While we could simply expose these mask configurations for manual application, a complete InputCard component offers additional conveniences. It can automatically detect the payment system, keep the digit groups intact within the actual form control, or set the appropriate autocomplete attribute.
This is precisely where host directives prove their worth. We can bundle Maskito within our components and configure the mask under the hood, making it ready for use with a single import. The same logic applies to various other inputs requiring masks, such as phone numbers, dates, times, or numerical values.
There are countless other examples, but I'd worry about overwhelming you. For deeper exploration, you can browse the Taiga UI source code. That Maskito scenario required us to configure a host directive from its host context. And that naturally leads us into the discussion of this article's challenges.
Limitations and Workarounds
Having worked extensively with the Directive Composition API, I've identified 3 main pain points. None are deal-breakers, which is reassuring!
Lack of built-in control
We encountered this with our last example — it's tricky to manage the inputs/props of host directives from within the host component. I'm aware the Angular team has this on their radar, and hopefully, they'll address it eventually. In the meantime, we can handle it ourselves using signals and a helper.
Signal inputs can't be changed programmatically, though models can! Until Angular enables manual setting of signal input values, I'm hesitant to use them fully. It's unfortunate, given their transformers.
Our first step is to inject the directive we want to manage, then declare the property we'll use and provide its value. We might need control in two ways: imperative updates (acting like a setter) or declarative updates (acting like a getter). Signals fit perfectly — writable signals function as setter, while computed signals serve as getters:
private readonly setter = binding(MyDir, 'prop1', initialValue);
private readonly getter = binding(MyDir, 'prop2', computed(() => this.signal));
That's the core of our helper's public API. We can now use setter.set(value) to change prop1, and manage prop2 through other signals feeding into the computed. I've shared this on X before, complete with a Stackblitz for fully typed source code — feel free to check it out:
#AngularTip for the day! Want to be able to declaratively control inputs/public properties of `hostDirectives` from your components? With signals it is possible with a simple wrapper, check it out:https://t.co/rHBbX3Il84 pic.twitter.com/xAc2r92uIB
— Alex Inkin (@Waterplea) June 3, 2024
Manual input exposure
I'd prefer host directives to automatically expose all inputs, with concealing them being optional, rather than the reverse. The Angular team disagrees, worried that updating a third-party library might inadvertently expose unexpected inputs on your components. I fail to see the benefit of that caution. What I value is conciseness. The issue is that you can't simply store an object containing the directive and its inputs as a constant because that wouldn't be statically analyzable.
What we can do, however, is create wrapper directives — a pattern we've embraced in Taiga UI. Say you have a directive A with three inputs. Rather than repeatedly writing out an object with an array of those inputs, we can define a small wrapper directive:
@Directive({
  standalone: true,
  hostDirectives: [{
    directive: A,
    inputs: ['input1', 'input2', 'input3'],
  }],
})
export class WithA {}
With this, we can expose all those inputs using a single class, choosing WithA over A in the hostDirectives whenever needed. If you were diligent about reading the docs when this feature launched, you might recall a performance warning against using too many host directives. That warning has since disappeared, as benchmarks reveal the memory/performance cost is negligible. You can verify this yourself by stress-testing the Directive Composition API with this Stackblitz.
Double matching
The most significant hurdle is that host directives throw an error if the same directive ends up matched twice on a single element. Honestly, I think the Angular team should tackle this head-on. My firm belief is they should instantiate the directive on its first encounter and ignore any subsequent matches, similar to how Angular handles providers. There are concerns about execution order though — it's ambiguous which directive would be created first if we followed that approach, and directives might conflict when trying to bind the same property on the host.
Standard directives are instantiated in the order their matching attributes appear on the element, offering some level of control. But I'd argue that if your directives depend on initialization order, that's already a significant anti-pattern and shouldn't hinder the Directive Composition API. This is likely the issue that has tripped me up most, especially because it can surface unexpectedly through multiple layers of host directives. I'm hopeful the Angular team will find a solution.
The simplest way to encounter this problem is by exposing a directive and then importing it again. Consider a highlight directive with a color input:
@Directive({
  standalone: true,
  selector: '[appHighlight]',
})
export class HighlightDir {
  // ...
}
Suppose you expose appHighlight as an input when attaching it to a component, but also want to use it elsewhere in the same template, leading to another import. Now, you have that directive matched twice on the same element — once via the exposed host directive input and once via the attribute of that input acting as a plain directive.
My advice: always alias your exposed inputs to prevent accidental double matches.
Alternatively, remember you can omit the selector entirely if the directive is intended solely for use as a host directive.
Closing Thoughts
This walkthrough should have shed light on the Directive Composition API and the flexibility it hands to Angular developers. Naturally, the approach has its constraints — but most hurdles can be navigated with a bit of care. The fresh composition patterns it introduces are genuinely appealing, and exploring them is likely to pay off for many in the community.
Here’s a condensed look at what this feature brings:
- With
hostDirectives, you can wire standalone directives into other directives or components without manual effort - It enables declarative assembly of self-contained logic units, nested to any depth
- Think of it as comparable to providers, but with extra perks such as inputs and host bindings
- There are some downsides, though these can be eased with utility functions and solid practices
- Dive into the examples and their code in this piece to see the possibilities firsthand
Thanks to this API, substantial, intricate tasks can be split into manageable chunks that fuse together cleanly. The Angular core team is likely to refine the feature as adoption grows and feedback on ergonomics and edge cases comes in.