This guide walks through the setup of a practical Ngrx development environment, with a focus on the Ngrx DevTools. It also covers broader best practices for building Ngrx applications.
Putting these practices in place will noticeably improve your Ngrx workflow if you aren't already using them.
These tips are valuable for any Ngrx project, as they ensure you get the full benefit from both the DevTools and the store architecture itself.
Table of Contents
Here's what we'll cover:
- What are the Ngrx DevTools?
- The main features of the Ngrx DevTools
- What are the benefits of the Ngrx DevTools?
- Installing the Ngrx DevTools with Ngrx Schematics
- What is the Ngrx Router Store module, why do we need it?
- Installing the Ngrx Router Store module (ngrx-router)
- Using a custom router serializer in order to avoid freezing the DevTools
- Preventing several types of bugs with Ngrx Store Freeze
- Action conventions and best practices, to help to make the most out of the DevTools and of the store architecture in general
- Conclusions
Let's dive straight into the Ngrx DevTools.
What are the Ngrx DevTools?
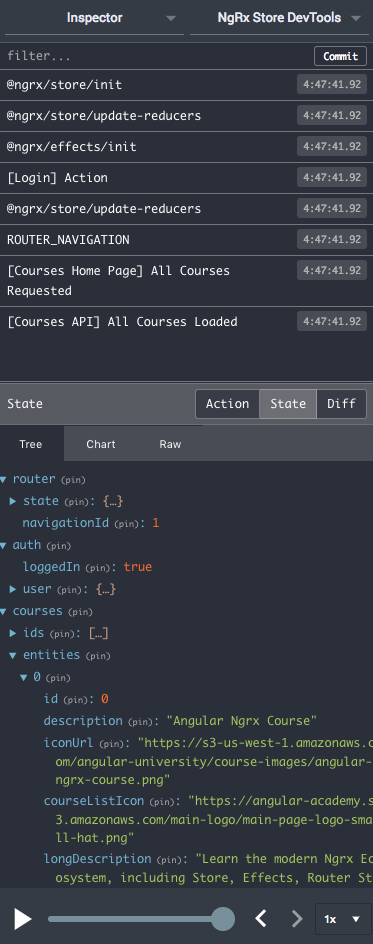
The Ngrx DevTools is a browser extension for Chrome and Firefox that provides an interface for inspecting and interacting with an Ngrx application.
Here's a screenshot showing the DevTools in use:
The main features of the Ngrx DevTools
Looking inside the DevTools, you'll find:
-
An Action Log, which offers deep insight into the application's behavior and identifies which parts of the app are triggering specific Actions.
-
A State inspector for effortlessly examining the current in-memory store state.
-
A time-travelling debugger (the Play button and timeline at the bottom), which allows you to replay any Action from any point in the debugging session or even replay the entire session while navigating across various screens.
What are the benefits of the Ngrx DevTools?
Some key advantages of using the Ngrx DevTools include:
-
You get a visual representation of the store's content at any given time, which proves invaluable when debugging.
-
A new team member can use the DevTools to quickly build a solid mental model of the application’s functioning without needing extensive walkthroughs.
-
By capturing client state in production, you can import it into the DevTools locally to reproduce and fix bugs efficiently.
The main advantage is the constant, immediate visual feedback on the application's activity, which simplifies comprehension significantly.
Installing the Ngrx DevTools with Ngrx Schematics
Ideally, the DevTools should be configured at the project's inception. You can set up the Store and enable DevTools in one step using this Angular CLI command:
ng generate store AppState --root --module app.module.ts
Before this command works, you'll need to enable Ngrx Schematics by adding this to your Angular CLI configuration:
ng config cli.defaultCollection @ngrx/schematics
Once these commands are run, you'll find that DevTools are enabled in the root application module, but only when the Angular CLI is running in development mode.
That's all it takes to get DevTools support! Next, you'll need to install the browser extension by following these instructions.
Once the extension is installed, you can find the Ngrx DevTools under the "Redux" tab in your browser's developer tools (accessible via Ctrl+Shift+I in Chrome).
After opening the DevTools, remember to reload the application to begin your debugging session.
Setting up the Router integration (ngrx-router) from the beginning
Having the browser extension running is only the first step. As you start using the DevTools, you'll quickly encounter scenarios where the time-traveling feature is essential.
However, the time-traveling debugger by default lacks the ability to move through different application screens, preventing you from replaying the entire user interface session from the start.
To enable full time-traveling debugging, you must integrate the DevTools with the Angular Router. This integration ensures that stepping through the Action timeline also navigates to previous screens.
The Ngrx Router Store module does exactly that, so let's enable it in the root application module.
Installing the Ngrx Router Store module
To enable this integration, you'll first need to declare the following in your root module's imports:
This setup instructs the Router Store module to save its state in the store under a property called router (as defined by the stateKey).
Setting up the Router Store reducer
To populate the store with this router state, you'll need a new reducer to handle all state under the router property. You can add this to your root reducer map as follows:
That completes the Router Store module setup! Let's see how it works in practice.
The Ngrx Router Store in Action
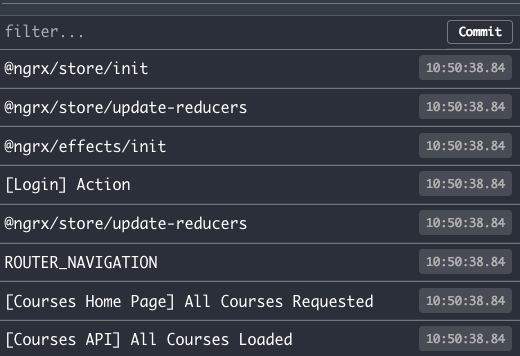
When you restart the DevTools, you'll see router navigations logged as actions in the Action Log:
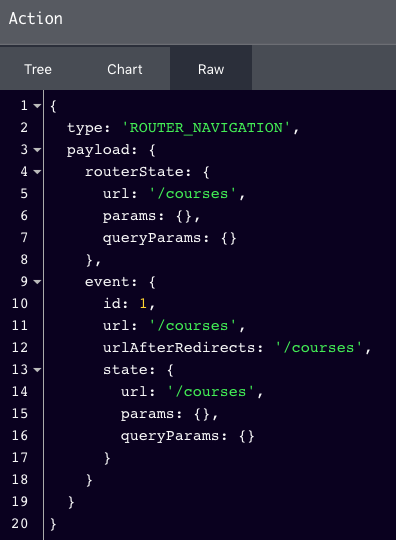
Inspecting the ROUTER_NAVIGATION action within the DevTools reveals all the information needed to perform a router transition:
Additionally, when examining the store state, you'll notice a new router property containing its state:
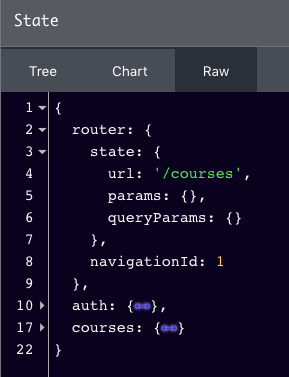
As shown, the Router Store captures the router state after each navigation event and stores it within the store under the router property.
This enables you to replay all user actions from the start of the debugging session, including navigations.
How important is the Ngrx Router Store module, is it optional?
While this module might seem optional at first glance, it becomes essential if you want to use the DevTools in many real-world scenarios that involve routing.
It's worth noting that while this module could be used to trigger navigations by dispatching store actions (see the documentation), that's not its primary purpose.
The Router Store module is not meant to replace the Angular Router's navigation API.
Its real goal is to make the DevTools and time-traveling debugging effective in a wider range of scenarios involving routing. Having the router state in the store can also be useful in other contexts.
Using a custom router serializer in order to avoid freezing the DevTools
If you're using an Ngrx version earlier than this release, you may have encountered the DevTools crashing or becoming unresponsive.
This issue stemmed from problems with serializing the Angular Router state, which contains cycles in its object graph by default.
Therefore, to resolve this and get fully working DevTools, you may need to install a custom router state serializer that produces a cycle-free format.
Newer releases have addressed this problem. However, if you're still experiencing it, installing a custom serializer is a quick fix.
These instructions guide you through the process.
Note: for earlier Ngrx releases that had this DevTools unresponsiveness issue, using a custom router state serializer was usually not optional in practice
With this resolved, you should now have fully functional DevTools with complete time-traveling capabilities.
Prevent several types of bugs by using Ngrx Store Freeze
Next, let's examine another valuable development tool in the Ngrx ecosystem: Ngrx Store Freeze.
Store reducers must follow strict rules, and deviating from them leads to bugs that are notoriously difficult to track down.
A core rule is that reducers must be pure functions: they take the current state and an action and return the new state.
They must not mutate either the existing state or the action. Instead, they must produce a new state object without altering their inputs.
Violating this rule can introduce tricky issues, particularly if you rely on OnPush change detection across your component tree.
It also breaks the time-traveling debugger.
Mutating the store state at the component level
Another common source of frustrating bugs is when a component accidentally obtains a direct reference to the store state and mutates it.
Such direct mutation circumvents the store pattern, bypassing the need to dispatch an action to change state.
This kind of state mutation, whether in components or reducers, also disables the DevTools time-travel feature.
Given the potential for significant bugs and architectural violations, you should address this risk from the start.
Ngrx Store Freeze offers a simple yet powerful solution to this whole class of problems.
How does Ngrx Store Freeze work?
Ngrx Store Freeze is easy to install and thoroughly addresses state mutability concerns.
It works by automatically deep-freezing the entire store state and any dispatched actions. This involves making every object property read-only.
Nested properties are also frozen recursively, making the whole state object effectively immutable.
As a result, it becomes impossible for reducers or components to mutate the state or actions.
Installing Ngrx Store Freeze
Ngrx Store Freeze is implemented as a meta-reducer, which is just a normal reducer function that wraps and runs on top of other reducers.
Meta-reducers can be chained together, with each one operating on the output of the previous.
The Store Freeze meta-reducer runs after the standard reducers for an action have executed, freezing the state before it's sent back to the component tree.
Install it like this:
Keep in mind that Store Freeze only activates in development mode. This means there's no potential performance overhead from deep-freezing state during production builds.
Notice that this performance hit is only noticeable for a very large amount of store state
Ngrx Store Freeze in Action
Let's see it in action. Here's an example of a reducer that incorrectly mutates the original state:
The login action's reducer is directly mutating the authentication feature state, which is a mistake.
Without Store Freeze, this might not cause an immediate visible issue, aside from breaking the time-traveling debugger.
However, if you're using OnPush, you'd likely quickly encounter view synchronization problems, where the UI and store data fall out of sync.
Catching mutability issues from the start
To prevent these issues, simply enable Ngrx Store Freeze. You'll then see an error like this in the console:
store-devtools.es5.js:423 TypeError: Cannot assign to read-only property 'loggedIn' of object '[object Object]'
    at authReducer (auth.reducer.ts:22)
    at store.es5.js:172
    ...
This error is generated by the JavaScript runtime whenever you attempt to write to a read-only property of a frozen object.
The error message can seem daunting, but the stack trace is quite helpful: it even points to the specific line in the reducer causing the problem.
Fixing the reducer to return a new state object instead of mutating the existing one resolves the issue:
Preventing store state mutation at the component level
Store Freeze also guards against components that try to mutate the store state directly, which would break the architecture and the time-travel functionality.
If your Ngrx app doesn't use Store Freeze, it's certainly worth trying to catch and prevent potential bugs.
It's best to use it from the project's beginning to avoid these pitfalls entirely. Ensuring immutability also makes adopting OnPush change detection easier, which can improve UI performance significantly.
Action Conventions, make the most out of the DevTools and the Store architecture
To get the most from the DevTools and the store, it's important to name actions and design their type strings using consistent and useful conventions.
Looking at our Action Log, we can already tell a story about the application just from the entries:
Without reading any source code, we can deduce that:
- the user logged in
- the user then navigated to the Home Page
- a list of courses was requested there
- the list was eventually loaded from the backend via an API request
This log is easy to read because the action types follow this format:
Action conventions
The action types adhere to this naming pattern:
[Source] Event
Here’s how it breaks down:
-
The Source is the part of the application that triggered the Action, like the screen that dispatched it.
-
The Event is the application event linked to the Action.
For a deeper dive into store architecture best practices and the Source/Event convention, check out this insightful talk by Mike Ryan titled "Good Action Hygiene with Ngrx":
Important takeaways from the Source /Event Action convention
This convention has significant implications for how you design actions.
First, actions should be specific to a particular screen or effect, not generic. For example, "Course Home Page" as a Source clearly identifies a specific component.
This also means you should avoid reusing actions across different screens to keep the action log readable.
Instead, if multiple actions share the same reducer logic, you can use the switch statement's fall-through behavior to handle them together.
Action Design: Events instead of Commands
Actions should be designed as Events rather than Commands. The distinction is subtle but crucial for long-term maintainability.
An Event describes something that has already happened recently and is well understood within the dispatching component's or effect's scope.
This last point is vital because it prevents the component from being aware of other parts of the application. The component simply reports the event, and the store (including Effects) determines the appropriate response, whether that's calling a backend, running reducers, or both.
Why not make an action a Command?
If actions were Commands, the component would indirectly dictate what the store or other components should do in response, violating the architecture's principles.
A key goal of the store pattern is to prevent components from directly modifying application state; only the store can do that. Components subscribe to state without altering it, project it to the view, and report events back.
Keeping components isolated and unaware of each other is essential. Command-like actions such as IncrementTopMenuCounter, which might be dispatched from anywhere, would undermine this isolation.
Conclusions
To get the most out of the Ngrx store, you should have the DevTools fully operational from day one.
For complete time-traveling capabilities, the Router Store integration is essential. Depending on your Ngrx version, a custom Router state serializer might also be crucial.
Setting this up at the start ensures you have solid DevTools for the entire project, making that initial investment worthwhile.
To prevent common mutation bugs and simplify a potential switch to OnPush, it's also crucial to maintain store immutability.
The simplest way to achieve this, without requiring a library like ImmutableJs, is to use Ngrx Store Freeze in development mode. It helps ensure your reducers are correct and prevents components from accidentally mutating state.
Finally—and arguably most importantly—learning about Action design best practices is key to unlocking the full value of the Store architecture and DevTools.
More on Ngrx
For more general Ngrx knowledge, this collection of ng-conf talks is an excellent resource. We hope this post helps you get started with the Ngrx DevTools effectively.
If you want a deeper understanding of NgRx, we suggest the NgRx with NgRx Data - The Complete Guide course, which covers the entire ecosystem.
Please leave any questions or comments below, and we'll get back to you.
To stay updated on new posts about Ngrx and other Angular topics, consider subscribing to our newsletter:
If you're just starting with Angular, the Angular for Beginners Course might be a good starting point:
