
“It is not enough for code to work” – Robert C. Martin
Angular directives represent a robust mechanism supplied by the framework, allowing developers to extend elements with custom functionality. In this piece, we will construct a bespoke Angular directive aimed at implementing self-saving (autosave) capabilities for dropdown components.
Understanding self-saving dropdowns
Imagine a straightforward scenario within an application where a dropdown is utilized to select a person's age bracket. A conventional approach would involve a form containing the dropdown and a submission button. However, what if this dropdown exists independently, outside of any form structure? What if it's a lone selectable element on the page, devoid of a save action? In certain situations, requiring users to click a button to persist changes can introduce unnecessary friction.
A self-saving dropdown addresses this by automatically syncing its state with the backend database upon any change event. This pattern is frequently observed in React applications employing a data-fetching strategy, where the component independently manages its data retrieval.
Now, how do we inform the user that a modification has triggered a save operation? How can we alert them to errors that might occur? Clearly, a refined solution is necessary to offer visual cues for ongoing, successful, and failed operations. This is precisely where implementing self-saving behavior becomes valuable.
Getting started
Before diving into the code, let's take a look at how the final implementation behaves.
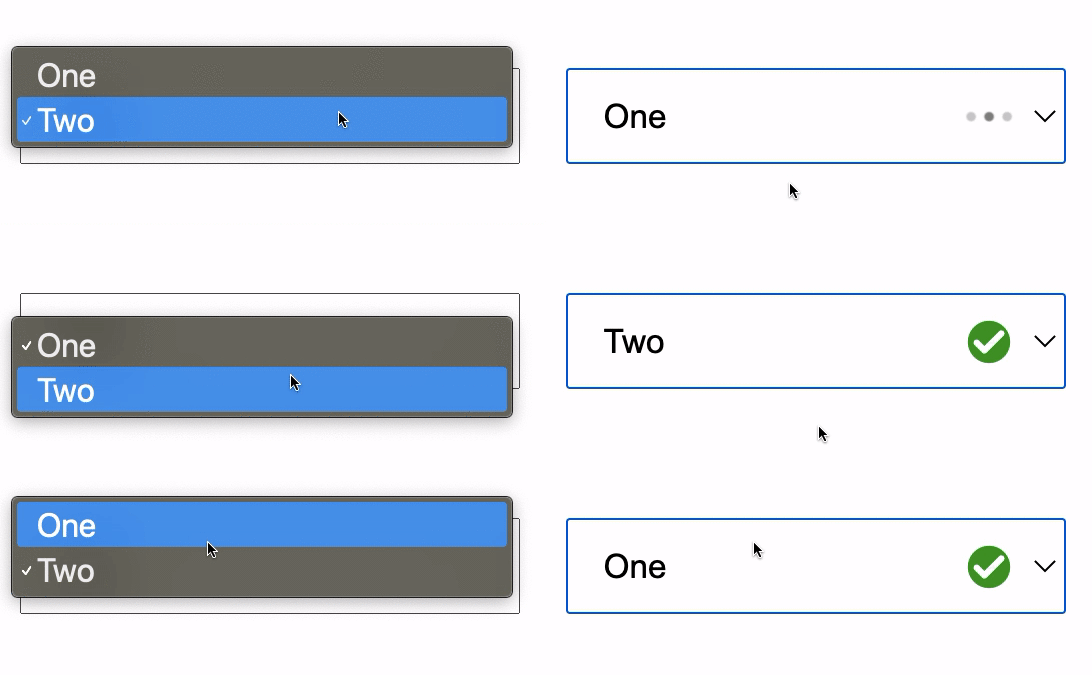
Self saving drop-downs
Impressive, right? Let's lay out our strategy
- The directive should accept an input representing the HTTP request to the backend.
- We need a listener to react when the host element emits the 'change' event.
- Display a loader prior to subscription initiation.
- Upon success, remove the loader and show a green checkmark.
- Automatically hide the checkmark after a one-second delay.
- In case of failure, display an error indicator adjacent to the select field.
Referencing the diagram,
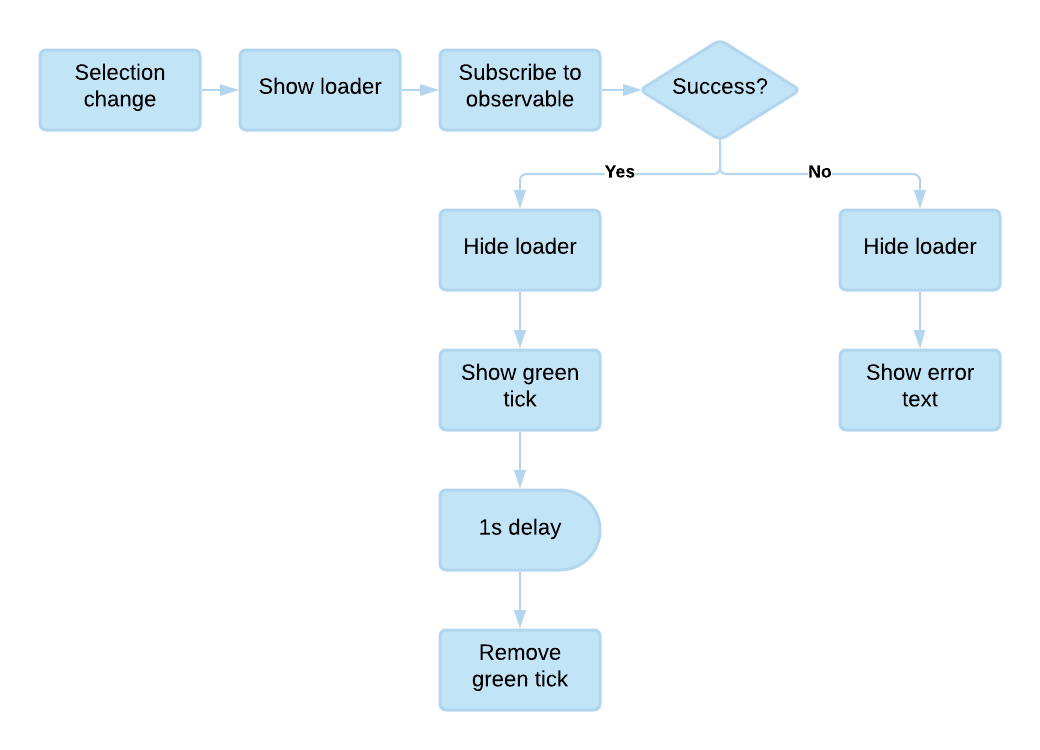
Self saving dropdown, the plan
We'll begin by generating an Angular directive with the Angular CLI.
ng generate directive self-save
This directive will feature a single input, namely
@Input('observableFn')
 observableFn!: () => Observable<any>;
ObservableFn will hold the reference to the HTTP request necessary for saving the data. This information will be supplied from the parent component where the directive is applied.
Next, we'll import ElementRef, Renderer2, and Document.
constructor(
	private elRef: ElementRef,
	private renderer: Renderer2,
	@Inject(DOCUMENT) private document: Document
) {}
These dependencies will be utilized as follows:
ElementRef– To access the host elementRenderer2– For attaching error message elements when neededDocument– For referencing the DOM document
To detect dropdown value changes, we'll subscribe to the change event on the host element.
 @HostListener('change')
 onChange() {
  // Do all craziness
 }
Now, let's implement the self-saving logic,
if (this.observableFn instanceof Function) {
     const element: HTMLElement = this.elRef.nativeElement;

     this.addLoader(element);
     const changeObservable: Observable<unknown> = this.observableFn();
     changeObservable.subscribe(
       _ => {
         this.handleSuccessCase(element);
       },
       _ => {
         this.handleErrorCase(element);
       }
     );
   }
We utilize elementRef to retrieve the native host element (the select). This allows us to manipulate it as needed. Subsequently, we subscribe to the observable passed as input by invoking the provided function. Two helper methods receive the select element; let's examine their implementations.
handleSuccessCase(element: HTMLElement) {
   this.removeBackground(element);
   this.addSuccess(element);
   setTimeout(() => {
     this.removeBackground(element);
   }, 1000);
 }

 handleErrorCase(element) {
   this.removeBackground(element);
   const child = this.document.createElement('img');
   child.src = ERROR_ICON;
   const parent = this.renderer.parentNode(this.elRef.nativeElement);
   this.renderer.appendChild(parent, child);
   setTimeout(() => {
     this.renderer.removeChild(parent, child);
   }, 1000);
 }
The code adheres to our initial flowchart. When the dropdown value changes, it:
- Applies a loader to the element, indicating an ongoing save.
- Fetches the HTTP observable and subscribes to it.
Following a successful operation:
- The loader background is removed.
- A success checkmark icon is added.
- The checkmark is removed after one second.
Conversely, on failure:
- A temporary div is created to contain the error text.
- The
innerTextis set to the error message from the server. - The renderer appends this child to the parent node, positioning the error message below the dropdown.
Let's proceed to implement the helper methods referenced earlier.
Adding a loader to the dropdown,
 addLoader(element: HTMLElement) {
   this.addBackground(
     element,
     LOADER_ICON,
     20
   );
 }
The same approach applies for adding the success indicator,
 addSuccess(element: HTMLElement) {
   this.addBackground(
     element,
     SUCCESS_ICON,
     20
   );
 }
Implementing the addBackground() method,
addBackground(
   element: HTMLElement,
   backgroundImg: string,
   backgroundSize: number
 ) {
   element.style.background = `#fff url("${backgroundImg}") no-repeat right 20px center`;
   element.style.backgroundSize = `${backgroundSize}px`;
 }
Setting the element's background to none removes it.
removeSuccess(element: HTMLElement)  {
  this.removeBackground(element);
}
removeBackground(element: HTMLElement) {
   element.style.background = ‘none’;
 }
Applying this directive to any select element is straightforward,
<select selfSave [observableFn]="post()">
 <option value="One">One</option>
 <option value="Two">Two</option>
</select>
We'll also create a post() method that returns a function yielding the HTTP save observable.
// Done for demo purposes only. Use a service to talk to APIs
 post(): Function {
   return () => {
     return this.http.post(“https://jsonplaceholder.typicode.com/posts”, {});
   };
 }
You can experiment with this implementation on StackBlitz here.
Final thoughts
Directives are incredibly useful for managing repetitive patterns across multiple elements in an application. They enable the creation of reusable components that enhance code maintainability and streamline the developer's workflow by promoting cleaner architecture!