How to Use Angular Signal Forms
Angular Signals deliver predictable and reactive component state, yet the traditional form APIs have always relied on a separate model for values, validation, and submission. Signal Forms bridge this gap by representing form state through Signals, which means user input, validation, and UI feedback all share the same reactive foundation.
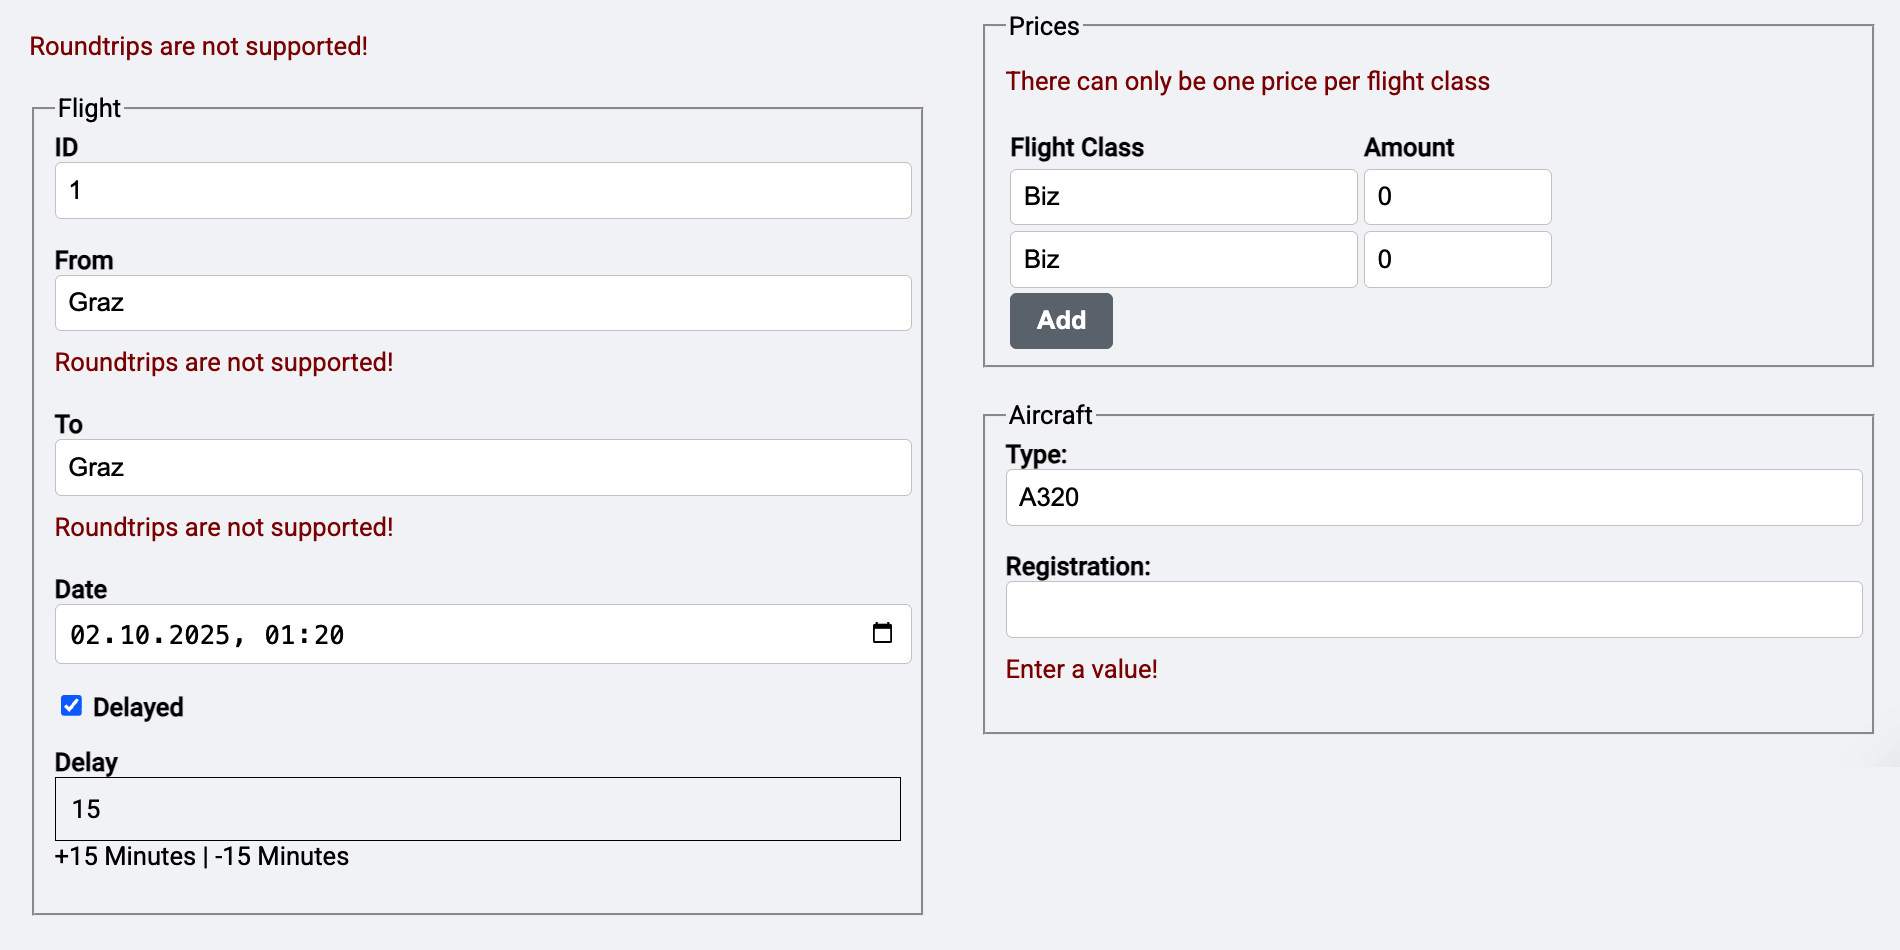
In this part of the series, we'll work with the FlightEdit example to explore how Signal Forms operate in real-world scenarios. We’ll cover the core APIs, the FieldTree type, schema configuration, submission handling, and several validation strategies—ranging from custom validators to conditional and asynchronous checks—in a style that is easy to follow for Angular developers.
We will use the following FlightEdit component as our running example throughout the article.
Building a Signal Form
Angular Signal Forms are exposed through @angular/forms/signals. Instead of maintaining a separate form model, you pass a writable Signal to the form(...) function. In return, you receive a FieldTree offering reactive access to values, validation state, metadata, and submission status.
To get started, we will create a basic form for the flight itself. We'll expand this example later to include nested forms for the airplane and its pricing details.
Setting Up a Signal Form Component
The component receives the flight data from a service called FlightDetailStore, which is similar to the store covered in the previous posts. We won’t go into that service here to keep the example focused. But if you are following along and want to try these concepts step by step, you can find a simplified version in the file simple-flight-detail-store.ts. Additionally, the FlightClient provides extra methods used by that store.
Since the store owns the data's integrity, it provides read-only Signals. To interact with the data via the form, we need a writable working copy. This is where a linked Signal comes into play, enabling two-way binding between the form inputs and the flight object.
// src/app/domains/ticketing/feature-booking/flight-edit/flight-edit.ts

[...]

import { linkedSignal } from '@angular/core';
import { form, minLength, required } from '@angular/forms/signals';
[...]

@Component([...])
export class FlightEdit {
  private readonly store = inject(FlightDetailStore);

  protected readonly flight = linkedSignal(() =>
    normalizeFlight(this.store.flightValue()),
  );

  // Set up the Signal Form with validation rules
  protected readonly flightForm = form(this.flight, (path) => {
    required(path.from);
    required(path.to);
    required(path.date);

    minLength(path.from, 3);
  });

  [...]
}
Before the form is created, the normalizeFlight helper transforms the flight date into the format used by an <input type="datetime-local">. This results in an ISO string without a timezone designator, such as 2030-12-24T17:30:00.000.
function normalizeFlight(flight: Flight): Flight {
  const localDate = flight.date.substring(0, 16);
  return {
    ...flight,
    date: localDate,
  };
}
The form function, imported from Angular's Signal Forms package, takes the linked Signal that contains the flight you want to edit.
The second argument supplied to form is a schema that defines validation rules. Angular offers simple validators out of the box, including required, minLength, maxLength, min, max, and pattern. The last one checks input against a regular expression.
The path property, typed as SchemaPathTree, is used to target the specific properties that should be validated—for instance, from or to.
Consequently, the form function returns a FieldTree, which allows you to connect the individual flight properties to the form controls in the template. This central structure is what we’ll examine in the next segment.
Understanding the FieldTree Type
A FieldTree is essentially a nested Signal structure. Every property in the flight object is reflected by a Signal—such as value, dirty, or invalid—that stores the form's state. Because these are true Signals, they can be bound directly in your templates.
To illustrate, suppose the flight object passed to form looks like this:
{
  id: 1,
  from: 'Graz',
  to: 'Hamburg',
  date: '2030-12-24T17:30',
  delayed: false,
  delay: 0,
  aircraft: {
    type: 'T0815',
    registration: 'R4711'
  },
  prices: [
    { flightClass: 'economy', amount: 299 },
    { flightClass: 'business', amount: 599 },
  ]
}
With such an input, the FieldTree exposes Signals for each of these top-level properties:
const date = this.flightForm.date().value();
const isDateDirty = this.flightForm.date().dirty();
const isDateInvalid = this.flightForm.date().invalid();
const dateErrors = this.flightForm.date().errors();
Each property, like date, is a Signal itself, and its value, dirty, invalid, and errors are also Signals. A dirty value of true means the user has interacted with the field. An invalid value of true indicates a validation failure.
The errors Signal holds an array of all detected validation problems. For instance, if the schema requires from but the field is empty, an error object will appear in this array. To make it easier to inspect these errors during development, you can use the JsonPipe to print them in the template.
Since the FieldTree is deeply nested, you can also reach properties at deeper levels, like the airplane's type or the price list:
const aircraftType = this.flightForm.aircraft.type().value();
const isAircraftTypeDirty = this.flightForm.aircraft.type().dirty();
[...]

const firstPriceAmount = this.flightForm.prices[0].amount().value();
const isFirstPriceAmountDirty = this.flightForm.prices[0].amount().dirty();
[...]
In our example, this means you can bind form controls not only to the flight's basic attributes but also to the related airplane and pricing information. In the following steps, we'll start binding these fields to the template.
Binding a Signal Form to the Template
To work with Signal Forms in the template, you must import the FormField directive. To display validation errors initially, the JsonPipe is also useful:
// src/app/domains/ticketing/feature-booking/flight-edit/flight-edit.ts

[...]

import { JsonPipe } from '@angular/common';

import {
  form,
  FormField,
  minLength,
  required,
} from '@angular/forms/signals';

@Component({
  selector: 'app-flight-edit',
  imports: [
    [...]

    // Import FormField directive
    FormField,

    // Add JsonPipe
    JsonPipe,
  ],
  templateUrl: './flight-edit.html',
  changeDetection: ChangeDetectionStrategy.OnPush,
})
export class FlightEdit {
  [...]
}
The FormField directive is then placed on form elements like input, select, or textarea to connect them to specific fields in the FieldTree
<!-- .../ticketing/feature-booking/flight-edit/flight-edit.html -->

<fieldset>
  <legend>Flight</legend>

  <div class="form-group">
    <label for="flight-id">ID</label>
    <input
      class="form-control"
      [formField]="flightForm.id"
      type="number"
      id="flight-id"
    />
  </div>

  <div class="form-group">
    <label for="flight-from">From</label>
    <input
      class="form-control"
      [formField]="flightForm.from"
      id="flight-from"
    />
    @if (flightForm.from().invalid()) {
      <div>{{ flightForm.from().errors() | json }}</div>
    }
  </div>
  […]
</fieldset>
When working with numeric values, always use an <input type="number" ...>. Signal Forms respect the semantics defined by HTML for type safety, so this distinction matters.
As mentioned, the errors property holds an array of all validation errors for that field. For this introductory example, we’ll output it to see how it looks when the minLength validator is violated. Below, you can see the output in the browser when this occurs.
 {width=50% }
An important detail is that minLength does not trigger when the field is left empty. This is a common convention that makes fields optional unless you explicitly require them. If an empty value is invalid for your use case, the required validator should be used.
Modern Angular
If you want to dive deeper into Signal Forms and modern Angular architecture, check out the eBook Modern Angular. It explores Signals, application architecture, testing, AI tools, and actionable patterns for enterprise-level development.
Understanding Signal Form Schemas
The schema supplied to the form helper does more than just define validation logic. It can also influence other aspects of form behavior, such as whether updates are debounced or whether certain fields are read-only under specific conditions. This section covers these capabilities in greater depth.
Reusing Schemas Across Angular Signal Forms
Up to this point, schemas have been declared inline within the form function call. For complex forms, though, this pattern becomes difficult to manage quickly. By extracting the schema into a constant stored in its own file, you can keep individual components more readable. Because schemas contain broadly applicable rules, the data directory is a natural place to keep them.
// src/app/domains/ticketing/data/flight-schema.ts

import { required, minLength, schema } from '@angular/forms/signals';

import { Flight } from './flight';

export const flightSchema = schema<Flight>((path) => {
  required(path.from);
  required(path.to);
  required(path.date);

  minLength(path.from, 3);
});
The form function can then reference this constant directly:
// src/app/domains/ticketing/feature-booking/flight-edit/flight-edit.ts

import { flightSchema } from '../../data/flight-schema';
[...]

protected readonly flightForm = form(this.flight, flightSchema);
[...]
Schemas may also depend on one another. This proves handy when a form needs to layer its own specialized validation on top of a more general schema:
import {
  apply,
  minLength,
  required,
  schema,
} from '@angular/forms/signals';

import { flightSchema } from '../../data/flight-schema';

export const flightFormSchema = schema<Flight>((path) => {
  apply(path, flightSchema);
  required(path.id);
});
Here, flightFormSchema relies on apply to inherit every rule defined in flightSchema. Additionally, it enforces that the flight's ID is present.
Conditional validation is another scenario where schemas need to reference each other, and we will examine that next.
Controlling Field Behavior with Angular Signal Forms
Validation is not the only responsibility of schemas — they also govern additional behavior. For instance, a schema can dictate when the formField directive ought to disable a particular field:
// src/app/domains/ticketing/data/flight-schema.ts

import { disabled } from '@angular/forms/signals';

[...]
protected readonly filterForm = form(this.filter, (schema) => {
  [...]
  disabled(path.delay, (ctx) => !ctx.valueOf(path.delayed));
}
[...]
Rather than returning a simple boolean, you can instead provide a rationale for why a field is disabled:
// src/app/domains/ticketing/data/flight-schema.ts
protected readonly filterForm = form(this.filter, (schema) => {
  [...]
  disabled(path.delay, (ctx) =>
    ctx.valueOf(path.delayed) ? false : 'not delayed',
  );
}
Every reason that currently applies to a disabled field is exposed through the field's disabledReasons Signal:
@for (reason of flightForm.delay().disabledReasons(); track $index) {
  <p>Disabled because {{ reason.message }}</p>
}
The hidden and readonly functions work similarly to conceal fields or make them read-only. However, these two functions always produce booleans and do not accept reasons.
Signal Forms will automatically prevent writes to bound fields, such as input elements, when they are marked as read-only. Hiding fields, however, is left to the application layer. Typically, hiding a field also means hiding its label and possibly other adjacent UI elements. Therefore, hidden serves only as a hint that your template can act upon:
@if (!flightForm.delay().hidden()) {
  <div class="form-group">
    <label for="flight-delay">Delay (min)</label>
    <input
      class="form-control"
      [formField]="flightForm.delay"
      type="number"
      id="flight-delay"
    />
  </div>
}
Debouncing Input in Angular Signal Forms
In reactive interfaces, especially those with search filters, debouncing is crucial: rather than dispatching an HTTP request with each keystroke, we wait until the user has briefly paused. The flight search form in our example demonstrates this exact scenario.
As mentioned previously, the schema defines the debouncing behavior for a form. To achieve this, we introduced the debounce function within the FlightSearch component:
// .../feature-booking/flight-search/flight-search.ts

[...]

import { debounce, form, minLength, required } from '@angular/forms/signals';

[...]

protected readonly filterForm = form(this.filter, (path) => {
  debounce(path, 300);

  required(path.from);
  minLength(path.from, 3);
});
Sometimes you may want to delay processing until the user has left the input field entirely. In that situation, pass blur instead of a time value:
protected readonly filterForm = form(this.filter, (path) => {
  debounce(path, 'blur');
});
Generally, invoking debounce with a millisecond value is all you need. But if you want to determine the delay programmatically, you can supply a custom debouncer function instead:
protected readonly filterForm = form(this.filter, (path) => {
  debounce(path, (ctx, _abortSignal) => {
    return new Promise((resolve) => {
      setTimeout(resolve, 300);
    });
  });

  required(path.from);
  minLength(path.from, 3);
});
The returned Promise then governs when debouncing ends. Once it resolves, Angular proceeds with handling the changes.
Validating Angular Signal Forms with Zod and Standard Schema
In many projects there is already some artifact — such as a Zod schema — that describes what valid objects look like. These may have originated for server-side use, or they might have been generated from a JSON Schema or an Open API document. Fortunately, Signal Forms lets you validate against those schemas directly.
Assume Zod is already installed in your project (via npm i zod) and that you have the following Zod schema for flights:
// src/app/domains/ticketing/data/flight-zod-schema.ts

import { z } from 'zod';

export const FlightZodSchema = z.object({
  id: z.number().int(),
  from: z.string().min(3).max(20),
  to: z.string().min(3).max(20),
  date: z.string(),
  delayed: z.boolean(),
})
Your Signal Form schema can then use validateStandardSchema to point to the Zod schema for validation purposes:
// src/app/domains/ticketing/data/flight-schema.ts

import { validateStandardSchema, schema } from '@angular/forms/signals';
import { FlightZodSchema } from './flight-zod-schema';

[...]

export const flightSchema = schema<Flight>((path) => {
  validateStandardSchema(path, FlightZodSchema);
  // ... other validation rules
});
This integration is not limited to Zod; it works with any schema library that adheres to the Standard Schema specification, including Valibot.
When paired with the submit function described earlier, this gives you a fast and straightforward approach to implementing client-side validation.
Submitting Signal Forms
The most significant advancement in Signals Forms relates to submission: you can now define the submission logic right when you call the form function. Once the resulting FieldTree is attached to the form tag, a regular submit button is all you need. Below, we explore these new capabilities.
The Mechanics of Submission in Angular Signal Forms
To define your submission behavior, you use the new submission node within the options object that you may pass to the form helper:
// .../ticketing/feature-booking/flight-edit/flight-edit.ts

@Component({
  selector: 'app-flight-edit',
  imports: [
    [...]
    FormRoot,
  ],
  [...]
})
export class FlightEdit {

  [...]

  protected readonly flightForm = form(this.flight, flightSchema, {
    submission: {
      action: async (form) => this.save(form),
      ignoreValidators: 'none',
      onInvalid: (form) => this.reportValidationError(form),
    },
  });

  [...]
}
The action property holds the function that runs when a submission attempt occurs. By default, this function is skipped when any validator is failing or pending. A pending validator refers to an asynchronous validator that has not yet produced its result. You can alter this through the ignoreValidators property, which accepts these values:
none: Validators are always respected, so submission is blocked when any validator is failing or pending. This is the default option.pending: Failing validators still block submission, but those that are merely pending do not.all: Submit proceeds regardless of whether validators are failing or pending.
The onInvalid callback fires when a submission gets blocked due to failing validators.
The function registered under action may also return validation errors that arise from the backend:
protected async save(form: FieldTree<Flight>) {
  try {
    await this.store.saveFlight(form().value());
    return null;
  } catch (error) {
    return {
      kind: 'processing_error',
      error: extractError(error),
    };
  }
}
These returned errors are injected into the object graph that represents the Signal Form. As a result, the form's errors property will surface the relevant message:
<p>
  {{ flightForm().errorSummary() | json }}
</p>
This coordination — between validation errors received locally and those produced during submission — is a welcome addition to Signal Forms. Earlier form implementations made this kind of behavior quite cumbersome to achieve.
In our example, the onInvalid handler calls reportValidationError, which presents a snack bar and moves focus to the first input that contains a validation error:
private reportValidationError(form: FieldTree<Flight>): void {
  this.snackBar.open('Please correct the validation errors', 'OK');
  this.focusInvalid(form);
}

private focusInvalid(form: FieldTree<Flight>) {
  const errors = form().errorSummary();
  if (errors.length > 0) {
    errors[0].fieldTree().focusBoundControl();
  }
}
Submitting Angular Signal Forms from the Template
To enable submission, you merely need to link the form element to your Signal Form. The newly available formRoot directive accomplishes this:
<!-- .../ticketing/feature-booking/flight-edit/flight-edit.html -->

<h1>Flight Edit</h1>

<form [formRoot]="flightForm">

  [...]

  <div>
    <button>Save</button>
  </div>
</form>
This directive handles multiple responsibilities in one stroke:
- It disables the default submission behavior, since we do not want to post the form's contents back to the server as in traditional server-rendered applications.
- It deactivates the browser's built-in form validation, because Angular takes over that duty and we want to avoid duplicate validation messages.
- It wires the defined submission
actionto the form.
Because formRoot attaches the configured action directly to the form's submit event, a standard button of type submit is sufficient. Since submit happens to be the default button type, you do not even need to write type="submit" explicitly, as the earlier example shows. Pressing Enter inside a field also triggers the action.
Adding Extra Submit Actions in Angular Signal Forms
When your form needs additional submission paths, such as sending changes for approval, you can add more buttons of type="button" and attach your own click handlers. In these situations, the submit function provided by Signal Forms is useful — it ensures the submission logic only executes if the form passes validation:
protected async requestApproval(): Promise<void> {
  await submit(this.flightForm, {
    action: async (form) => {
      await this.store.requestApproval(form().value());
    },
    ignoreValidators: 'none',
    onInvalid: (form) => this.reportValidationError(form),
  });
}
Validation Inside Signal Forms: A Detailed Look
Beyond the standard set of validators like required or minLength, you can build custom validation logic tailored to your business requirements. This allows cross-field comparisons and sophisticated rule checks.
Crafting Custom Validators
Custom validators are built using the validate function, which takes the target path and a lambda that contains the validation logic:
// src/app/domains/ticketing/data/flight-schema.ts

import { validate } from '@angular/forms/signals';

[...]
export const flightSchema = schema<Flight>((path) => {
  required(path.from);
  required(path.to);
  required(path.date);
  minLength(path.from, 3);

  const allowed = ['Graz', 'Hamburg', 'Zürich'];
  validate(path.from, (ctx) => {
    const value = ctx.value();
    if (allowed.includes(value)) {
      return null;
    }

    return {
      kind: 'city',
      value,
      allowed,
    };
  });
});
The above snippet introduces a rule that screens the from field against a predefined list of hubs. If the check fails, the function returns a ValidationError. Within this error object, the kind property pinpoints the specific validation issue using a string identifier. Any additional details you wish to communicate can be attached to the error object.
Should there be multiple issues, the validator can hand back an array of ValidationError instances. In a happy path scenario, where nothing is amiss, you simply return null—indicating no faults found.
Refactoring Validators as Reusable Modules
For the sake of cleaner code, it's wise to move these validators into their own named functions that can be shared across forms. At a minimum, your function must have a parameter for the field property, typed using SchemaPathTree<T>:
// src/app/domains/ticketing/data/flight-validators.ts

import { SchemaPathTree, validate } from '@angular/forms/signals';

export function validateCity(path: SchemaPathTree<string>, allowed: string[]) {
  validate(path, (ctx) => {
    const value = ctx.value();
    if (allowed.includes(value)) {
      return null;
    }

    return {
      kind: 'city',
      value,
      allowed,
    };
  });
}
Here, the validator takes a path parameter (pointing to the string field to be validated) and an allowed parameter (holding the list of permissible values). You can now integrate this function directly into your schema definition:
// src/app/domains/ticketing/data/flight-schema.ts

import { validateCity } from './flight-validators';

[...]

export const flightSchema = schema<Flight>((path) => {
  [...]
  validateCity(path.from, ['Graz', 'Hamburg', 'Zürich']);
});
Presenting Validation Feedback to Users
While returning an errors object is effective for logic, it doesn't help end-users. Angular's validators can also grow human-readable error messages that you define:
required(path.from, { message: 'Please enter a value!' });This message is embedded within the message property of the ValidationError. For user-facing display, your app can simply iterate over the errors array and show every message it finds.
In our example setup, the ValidationErrorsPane component is designed for this specific role. In cases where contact-specific messages are absent, it uses the toMessage helper function to generate a generic one:
// src/app/domains/shared/ui-forms/validation-errors/validation-errors-pane.ts

import { Component, computed, input } from '@angular/core';
import { MinValidationError, ValidationError } from '@angular/forms/signals';

@Component({
  selector: 'app-validation-errors-pane',
  imports: [],
  templateUrl: './validation-errors-pane.html',
})
export class ValidationErrorsPane {
  readonly errors = input.required<ValidationError.WithField[]>();
  readonly showFieldNames = input(false);

  protected readonly errorMessages = computed(() =>
    toErrorMessages(this.errors(), this.showFieldNames()),
  );
}

function toErrorMessages(
  errors: ValidationError.WithField[],
  showFieldNames: boolean,
): string[] {
  return errors.map((error) => {
    const prefix = showFieldNames ? toFieldName(error) + ': ' : '';

    const message = error.message ?? toMessage(error);
    return prefix + message;
  });
}

function toFieldName(error: ValidationError.WithField) {
  return error.fieldTree().name().split('.').at(-1);
}

function toMessage(error: ValidationError): string {
  switch (error.kind) {
    case 'required':
      return 'Enter a value!';
    case 'roundtrip':
    case 'roundtrip_tree':
      return 'Roundtrips are not supported!';
    case 'min':
      return `Minimum amount: ${(error as MinValidationError).min}`;
    default:
      return error.kind ?? 'Validation Error';
  }
}
After collecting, the template renders these messages for the user to see:
<!-- .../shared/ui-forms/validation-errors/validation-errors-pane.html -->

@if (errorMessages().length > 0) {
  <div class="validation-errors">
    @for (message of errorMessages(); track message) {
      <div>{{ message }}</div>
    }
  </div>
}
Actually using the ValidationErrorsPane means importing it into the component that owns the form:
// src/app/domains/ticketing/feature-booking/flight-edit/flight-edit.ts

[...]

import { ValidationErrorsPane }
  from '../../shared/ui-forms/validation-errors/validation-errors-pane';
[...]

@Component({
  selector: 'app-flight-edit',
  imports: [[...], ValidationErrorsPane],
  [...]
})
export class FlightEdit {
  [...]
}
With that in place, you pass each field's errors array to the component within your template:
<!-- src/app/domains/ticketing/feature-booking/flight-edit/flight-edit.html -->
<div class="form-group">
  <label for="flight-from">From</label>
  <input [formField]="flightForm.from" id="flight-from" />
  <app-validation-errors-pane [errors]="flightForm.from().errors()" />
</div>
Employing Conditional Validation
Not every rule applies in every environment. In the demo app, the delay field is mandatory only when the delayed flag is set to true. This scenario—where one field dictates the rules for others—is quite common.
Managing this is the applyWhenValue helper. It requires a path and a SchemaValuePredicate (often a lambda), plus the schema to implement if the predicate resolves to true:
// src/app/domains/ticketing/data/flight-schema.ts

import { applyWhenValue, required, min, schema } from '@angular/forms/signals';

[...]

export const flightSchema = schema<Flight>((path) => {
  // ...
  applyWhenValue(path, (flight) => flight.delayed, delayedFlight);
});

export const delayedFlight = schema<Flight>((path) => {
  required(path.delay);
  min(path.delay, 15);
});
This schema packs all the conditional validation constraints. Alternatively, applyWhen offers a different angle: its predicate receives the entire value context, letting you inspect more than just the current field:
applyWhen(path, (ctx) => ctx.valueOf(path.delayed), delayedFlight);Besides valueOf, you can use the stateOf passed by the context. This function pulls the full field state for any given path, handy when you need to check for something like the dirty flag before validating.
There's also a smaller, built-in variation: the required validator itself hosts a when property, enabling easy conditional checks without building a full schema block:
required(path.delay, {
  when: (ctx) => ctx.valueOf(path.delayed),
});
Validating Across Multiple Fields
Some validations are inherently comparative, looking at two or more fields at once. A simple parent-level validator can do the job. For instance, enforcing that from and to differ can be handled as a validator on the flight object that holds both fields:
// src/app/domains/ticketing/data/flight-validators.ts

import { SchemaPathTree, validate } from '@angular/forms/signals';
import { Flight } from './flight';

export function validateRoundTrip(path: SchemaPathTree<Flight>) {
  validate(path, (ctx) => {
    const from = ctx.fieldTree.from().value();
    const to = ctx.fieldTree.to().value();

    // Alternative:
    // const from = ctx.valueOf(path.from);
    // const to = ctx.valueOf(path.to);

    if (from === to) {
      return {
        kind: 'roundtrip',
        from,
        to,
      };
    }
    return null;
  });
}
As is standard, this validator makes its way into the parent schema:
// src/app/domains/ticketing/data/flight-schema.ts

[...]
import { validateRoundTrip } from './flight-validators';

export const flightSchema = schema<Flight>((path) => {
  // ...
  validateRoundTrip(path);
});
Output from this validator sits at the specific object level within the FieldTree—here, the root flight object itself. Your template must therefore tap into the errors of flightForm directly to display this:
<!-- src/app/domains/ticketing/feature-booking/flight-edit/flight-edit.html -->

<app-validation-errors-pane [errors]="flightForm().errors()" />
<form>[…]</form>
Exactly how that message appears at the top of the interface, as you can see. Checking out the errors array on a parent level won't automatically reveal child-level issues. To get a comprehensive view, your app should look at the errorSummary on a parent or canvas the errors array at each hierarchy level:
<app-validation-errors-pane
  [errors]="flightForm().errorSummary()"
  [showFieldNames]="true"
  />
<form>[…]</form>
A neat addition here involves tagging each error with the field name to identify the source within a consolidated list.
Reaching Sibling Fields for Context
A different route to the round-trip check — depending on your taste — gives the message to the from field, while still seeing into its sibling using the context's valueOf function:
export function validateRoundTrip2(path: SchemaPathTree<Flight>) {
  // Now, we are validating the 'from' field only
  validate(path.from, (ctx) => {
    const from = ctx.value();
    const to = ctx.valueOf(path.to);

    if (from === to) {
      return {
        kind: 'roundtrip',
        from,
        to,
      };
    }
    return null;
  });
}
Now the error message surfaces in the from field's own errors array, tying it neatly to that specific control:
<app-validation-errors-pane [errors]="flightForm.from().errors()" />Understanding the Role of Tree Validators
Tree validators are multi-field specialists designed to scatter messages anywhere across your entire field hierarchy. You achieve this by pointing the path property of a ValidationError towards the desired field:
// src/app/domains/ticketing/data/flight-validators.ts

import { SchemaPathTree, validateTree } from '@angular/forms/signals';
import { Flight } from './flight';

export function validateRoundTripTree(path: SchemaPathTree<Flight>) {
  validateTree(path, (ctx) => {
    const from = ctx.fieldTree.from().value();
    const to = ctx.fieldTree.to().value();

    if (from === to) {
      return {
        kind: 'roundtrip_tree',
        field: ctx.fieldTree.from,
        from,
        to,
      };
    }
    return null;
  });
}
Once registered in the schema, the provided message lands at the exact field level you designated:
// src/app/domains/ticketing/data/flight-schema.ts

[...]
import { validateRoundTripTree } from './flight-validators';

export const flightSchema = schema<Flight>((path) => {
  // ...
  validateRoundTripTree(path);
});
Since a validator can send back multiple message objects as an array, a tree validator can simultaneously handle several fields. It's a strong option for very integrated rulesets. Still, obvious rules can stick to basic validators reaching into neighbor fields.
Handling Validation That's Not Instant
Certain situations demand server-side evaluation, forcing us to await a response. To meet these needs, Signal Forms offers validateAsync, building on four core mappings:
- The
paramshook — transforms form state into request parameters - The
factoryhook — initializes a resource using these parameters - The
onSuccesshook — processes outcome data into aValidationError(or list of them) - The
onErrorhook — handles a resource error by outputting aValidationError(or list of them)
Take this example, utilising an rxResource to call your rxValidateAirport function in a simulated network round-trip:
// src/app/domains/ticketing/data/flight-validators.ts

import { rxResource } from '@angular/core/rxjs-interop';
import { SchemaPathTree, validateAsync } from '@angular/forms/signals';
import { delay, map, Observable, of } from 'rxjs';

export function validateCityAsync(path: SchemaPathTree<string>) {
  validateAsync(path, {
    params: (ctx) => ({
      value: ctx.value(),
    }),
    factory: (params) => {
      return rxResource({
        params,
        stream: (p) => {
          return rxValidateAirport(p.params.value);
        },
      });
    },
    onSuccess: (result: boolean, _ctx) => {
      if (!result) {
        return {
          kind: 'airport_not_found_http',
        };
      }
      return null;
    },
    onError: (error, _ctx) => {
      console.error('api error validating city', error);
      return {
        kind: 'api-failed',
      };
    },
  });
}

// Simulates a server-side validation
function rxValidateAirport(airport: string): Observable<boolean> {
  const allowed = ['Graz', 'Hamburg', 'Zürich'];
  return of(null).pipe(
    delay(2000),
    map(() => allowed.includes(airport)),
  );
}
Just like any other, step into the schema and register this validator as well:
// src/app/domains/ticketing/data/flight-schema.ts

import { validateCityAsync } from './flight-validators';

[...]

export const flightSchema = schema<Flight>((path) => {
  [...]
  validateCityAsync(path.from);
});
To keep network traffic lean, your asynchronous validator is stopped in its tracks until all synchronous validators have passed. Also, while the task is mid-flight, the `pending` flag on the involved field signals activity:
<!-- .../ticketing/feature-booking/flight-edit/flight-form/flight-form.html -->

@if (flightForm.from().pending()) {
  <div>Waiting for Async Validation Result...</div>
}
A Simpler Way to Validate Against HTTP
Thinking about it, most async validators' purpose is a quick server call. That's why validateHttp simplifies the usual setup by directly dealing with HttpResource:
// src/app/domains/ticketing/data/flight-validators.ts

import { SchemaPathTree, validateHttp, metadata } from '@angular/forms/signals';
import { Flight } from './flight';

export function validateCityHttp(path: SchemaPathTree<string>) {
  validateHttp(path, {
    request: (ctx) => ({
      url: 'https://demo.angulararchitects.io/api/flight',
      params: {
        from: ctx.value(),
      },
    }),
    onSuccess: (result: Flight[], _ctx) => {
      if (result.length === 0) {
        return {
          kind: 'airport_not_found_http',
        };
      }
      return null;
    },
    onError: (error, _ctx) => {
      console.error('api error validating city', error);
      return {
        kind: 'api-failed',
      };
    },
  });
}
The pattern is familiar—onSuccess turns the return into ValidationError instances; onError wraps any error in that same format. Anchor it to the schema, missing that part is a common slip-up:
// src/app/domains/ticketing/data/flight-schema.ts

import { validateCityHttp } from './flight-validators';

[...]

export const flightSchema = schema<Flight>((path) => {
  [...]
  validateCityHttp(path.from);
});
Getting Deeper with Signal Forms: Nesting & Grouping
Real-world data is hardly a single-layer structure. Signal Forms effortlessly manage nested objects and collections, making it possible to break substantial forms into logical units. Let's explore using form groups for object nodes and form arrays for repeating groups alike.
Navigating Nested Object Groups
While earlier we used a simple flat flight object, further complexity is expected. Envision adding detailed validation for the aircraft materialized as its own structure:
// src/app/domains/ticketing/data/aircraft-schema.ts

import { required, schema } from '@angular/forms/signals';
import { Aircraft } from './aircraft';

export const aircraftSchema = schema<Aircraft>((path) => {
  required(path.registration);
  required(path.type);
});
Integrate an aircraft schema into the larger flight schema, treating it as a nested tree branch:
// src/app/domains/ticketing/data/flight-schema.ts

import { apply } from '@angular/forms/signals';
import { aircraftSchema } from './aircraft-schema';

[...]

export const flightSchema = schema<Flight>((path) => {
  [...]
  apply(path.aircraft, aircraftSchema);
});
You can traverse flightForm.aircraft.registration to weed through the hierarchy. To keep templates tidy and avoid drawn-out path expressions, create local named references like @let for easy access:
<!-- src/app/domains/ticketing/feature-booking/flight-edit/flight-edit.html -->

@let aircraftForm = aircraft();

<fieldset>
  <legend>Aircraft</legend>

  <div class="form-group">
    <label for="type">Type:</label>
    <input id="type" class="form-control" [formField]="aircraftForm.type" />
    <app-validation-errors-pane [errors]="aircraftForm.type().errors()" />
  </div>
  <div class="form-group">
    <label for="registration">Registration:</label>
    <input
      id="registration"
      class="form-control"
      [formField]="aircraftForm.registration"
    />
    <app-validation-errors-pane
      [errors]="aircraftForm.registration().errors()"
    />
  </div>
</fieldset>
Orchestrating with Form Arrays
Repeated collection fields, such as prices, follow the pattern laid out above. Start by defining a schema for the array and its element model:
// src/app/domains/ticketing/data/price-schema.ts

import { min, required, schema } from '@angular/forms/signals';
import { Price } from './price';

export const initialPrice: Price = {
  flightClass: '',
  amount: 0,
};

export const priceSchema = schema<Price>((path) => {
  required(path.flightClass);
  required(path.amount);
  min(path.amount, 0);
});
But the overall flight schema now must echo its validation into every last #price. To achieve that, swap out the singular apply for applyEach:
// src/app/domains/ticketing/data/flight-schema.ts

import { applyEach, schema } from '@angular/forms/signals';
import { priceSchema } from './price-schema';

export const flightSchema = schema<Flight>((path) => {
  // ...
  applyEach(path.prices, priceSchema);
});
Loop over the prices range in the template, ensuring each item has its corresponding input elements bound correctly:
<!-- src/app/domains/ticketing/feature-booking/flight-edit/flight-edit.html -->

@let pricesForm = prices();

<fieldset>
  <legend>Prices</legend>
  <app-validation-errors-pane [errors]="pricesForm().errors()" />
  <table class="datagrid">
    <tr>
      <th>Flight Class</th>
      <th>Amount</th>
      <th></th>
    </tr>
    @for (price of pricesForm(); track $index) {
      <tr>
        <td>
          <input [formField]="price.flightClass" class="medium" />
        </td>
        <td>
          <input [formField]="price.amount" type="number" class="small" />
        </td>
        <td class="error-col">
          <app-validation-errors-pane
            [errors]="price().errorSummary()"
            [showFieldNames]="true"
          />
        </td>
      </tr>
    }
  </table>
  <button (click)="addPrice()" type="button" class="btn btn-default ml3">
    Add
  </button>
</fieldset>
An additive Add button extends the collection, seamlessly signaling Signal Forms to synthesize and display the related field set:
// src/app/domains/ticketing/feature-booking/flight-edit/flight-edit.html

[...]

addPrice(): void {
  const prices = this.prices();
  prices().value.update((prices) => [...prices, { ...initialPrice }]);
}
Validating Each Node of a Form Array
Rules function on every node in the object graph—collections get the same treatment. Below, a validator traverses prices to highlight any duplicate entries:
// src/app/domains/ticketing/data/flight-validators.ts

import { SchemaPath, validate } from '@angular/forms/signals';
import { Price } from './price';

export function validateDuplicatePrices(path: SchemaPath<Price[]>) {
  validate(path, (ctx) => {
    const prices = ctx.value();
    const flightClasses = new Set<string>();

    for (const price of prices) {
      if (flightClasses.has(price.flightClass)) {
        return {
          kind: 'duplicateFlightClass',
          message: 'There can only be one price per flight class',
          flightClass: price.flightClass,
        };
      }
      flightClasses.add(price.flightClass);
    }

    return null;
  });
}
Hook this validator into its rightful place in the schema as you would with any other:
// src/app/domains/ticketing/data/flight-schema.ts

import { validateDuplicatePrices } from './flight-validators';

[...]

export const flightSchema = schema<Flight>((path) => {
  [...]
  validateDuplicatePrices(path.prices);
});
Splitting Up Big Chunks into Subforms
A single, all-encompassing component risks becoming a tangled knot. Modularization is your friend. Split the main FlightEdit so it orchestrates three child parts: a flight subform, a prices subform, and an aircraft subform:
// src/app/domains/ticketing/feature-booking/flight-edit/flight-edit.ts
[...]

import { AircraftForm } from './aircraft-form/aircraft-form';
import { FlightForm } from './flight-form/flight-form';
import { PricesForm } from './prices-form/prices-form';

@Component({
  selector: 'app-flight-edit',
  imports: [
    AircraftForm,
    PricesForm,
    FlightForm,
    ValidationErrorsPane,
    RouterLink,
  ],
  templateUrl: './flight-edit.html',
  changeDetection: ChangeDetectionStrategy.OnPush,
})
export class FlightEdit {
  [...]
}
Data flows seamlessly; parent hands off controller slices to the focused children:
<!-- src/app/domains/ticketing/feature-booking/flight-edit/flight-edit.html -->

@if (flight().id !== 0) {
  <app-validation-errors-pane [errors]="flightForm().errors()" />
  <form class="flight-form" novalidate>
    <app-flight [flight]="flightForm"></app-flight>
    <app-prices [prices]="flightForm.prices"></app-prices>
    <app-aircraft [aircraft]="flightForm.aircraft"></app-aircraft>

    <div class="mt-40">
      <button>Save</button>
    </div>
  </form>
}
For these child pieces, Angular uses the general type FieldTree<T>. Your subform expects the relevant section via an @Input:
// .../ticketing/feature-booking/flight-edit/aircraft-form/aircraft-form.ts

import { Component, input } from '@angular/core';
import { FieldTree, FormField } from '@angular/forms/signals';

import { ValidationErrorsPane }
  from '../../../../shared/ui-forms/validation-errors/validation-errors-pane';
import { Aircraft } from '../../../data/aircraft';

@Component({
  selector: 'app-aircraft',
  imports: [FormField, ValidationErrorsPane],
  templateUrl: './aircraft-form.html',
})
export class AircraftForm {
  aircraft = input.required<FieldTree<Aircraft>>();
}
If your subform pulls in an array (like a list of prices), it does so in the same way:
// .../ticketing/feature-booking/flight-edit/prices-form/prices-form.ts

import { Component, input } from '@angular/core';
import { FieldTree, FormField } from '@angular/forms/signals';

import { ValidationErrorsPane }
  from '../../../../shared/ui-forms/validation-errors/validation-errors-pane';
import { Price } from '../../../data/price';
import { initialPrice } from '../../../data/price-schema';

@Component({
  selector: 'app-prices',
  imports: [FormField, ValidationErrorsPane],
  templateUrl: './prices-form.html',
})
export class PricesForm {
  readonly prices = input.required<FieldTree<Price[]>>();

  addPrice(): void {
    const prices = this.prices();
    prices().value.update((prices) => [...prices, { ...initialPrice }]);
  }
}
Understanding Signal Form Metadata
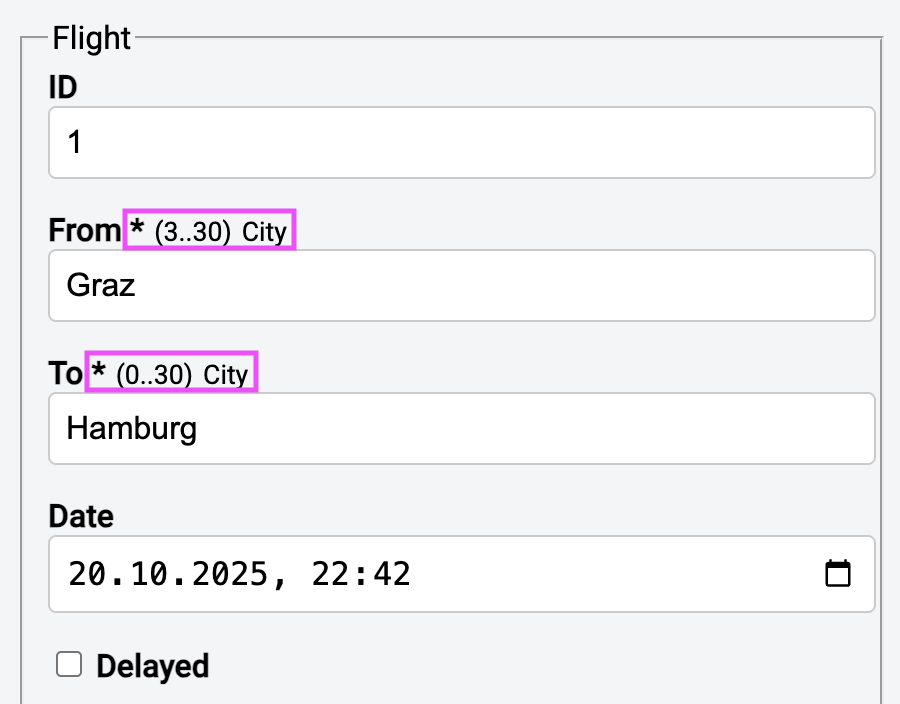
Signal Forms offer a proactive approach to validation by exposing metadata that informs users about expected input types before they submit invalid data:
 {width=50% }
Accessing Metadata in Angular Signal Forms
Validators typically attach metadata to the fields they validate. You retrieve this information using the metadata method with a specific key, such as REQUIRED or MIN_LENGTH. We encapsulate this logic in a reusable FieldMetaDataPane component that accepts a field through an input:
// src/app/domains/shared/ui-forms/field-meta-data-pane/field-meta-data-pane.ts

import { Component, computed, input } from '@angular/core';
import {
  FieldTree,
  REQUIRED,
  MIN_LENGTH,
  MAX_LENGTH,
} from '@angular/forms/signals';

@Component({
  selector: 'app-field-meta-data-pane',
  imports: [],
  templateUrl: './field-meta-data-pane.html',
})
export class FieldMetaDataPane {
  readonly field = input.required<FieldTree<unknown>>();

  protected readonly fieldState = computed(() => this.field()());

  protected readonly isRequired = computed(
    () => this.fieldState().metadata(REQUIRED)?.() ?? false,
  );
  protected readonly minLength = computed(
    () => this.fieldState().metadata(MIN_LENGTH)?.() ?? 0,
  );
  protected readonly maxLength = computed(
    () => this.fieldState().metadata(MAX_LENGTH)?.() ?? 30,
  );
  protected readonly length = computed(
    () => `(${this.minLength()}..${this.maxLength()})`,
  );
}
The component's template looks like this:
<!-- .../shared/ui-forms/field-meta-data-pane/field-meta-data-pane.html -->

@if (isRequired()) {
  <span class="info">*</span>
}
<span class="info info-small">{{ length() }}</span>
Presenting Metadata in the UI
To showcase metadata in our interface, we integrate the FieldMetaDataPane into the FlightForm component:
// .../ticketing/feature-booking/flight-edit/flight-form/flight-form.ts

[...]

import { FieldMetaDataPane }
  from '../../../shared/ui-forms/field-meta-data-pane/field-meta-data-pane';

[...]

@Component({
  selector: 'app-flight-form',
  imports: [[...], FieldMetaDataPane],
  [...]
})
export class FlightForm {
  [...]
}
Inside the template, we position the metadata panel adjacent to each corresponding field:
<!-- .../ticketing/feature-booking/flight-edit/flight-form/flight-form.html -->

<div class="form-group">
  <label for="flight-from">
    From
    <app-field-meta-data-pane [field]="flightForm.from" />
  </label>
  <input class="form-control" [formField]="flightForm.from" id="flight-from" />
  [...]
</div>
Creating Custom Metadata for Signal Forms
For personalized metadata keys, use the createMetadataKey function:
// src/app/domains/shared/util-common/properties.ts

import { createMetadataKey } from '@angular/forms/signals';

//
//  Property
//
export const CITY = createMetadataKey<boolean>();
Here is where things get interesting: suppose two validators assign different values to the identical property. The first might set CITY to true, while the second sets it to false. By default, the most recent assignment takes precedence.
However, you can override this behavior with a reducer. The MetadataReducer.or(), for instance, merges values using a logical OR operation (value1 || value2):
import { createMetadataKey, MetadataReducer } from '@angular/forms/signals';

//
//  AggregateProperty
//
export const CITY = createMetadataKey(MetadataReducer.or());
Consequently, if one validator assigns CITY as true and another as false, the final result becomes true.
Beyond MetadataReducer.or, you have access to additional reducers like MetadataReducer.and, MetadataReducer.min, MetadataReducer.max, and MetadataReducer.list. The last one aggregates all values into an array.
For unique requirements, custom reducers are possible by implementing the MetadataReducer<T> interface. As an illustration, here is a bespoke reducer that also merges boolean values with a logical OR:
const myOr: MetadataReducer<boolean, boolean> = {
  reduce(acc, item) {
    return acc || item;
  },
  getInitial() {
    return false;
  }
};

export const CITY = createMetadataKey(myOr);
To set a value for a metadata key, you employ the metadata function. While you can invoke it directly in the schema, it is more common to do so within a custom validator where you are already declaring user expectations:
// src/app/domains/ticketing/data/flight-validators.ts

[...]

export function validateCityHttp(path: SchemaPathTree<string>) {
  metadata(path, CITY, () => true);

  validateHttp(path, { ... });
}
Retrieving Custom Metadata in Angular Signal Forms
Custom metadata is accessed in the same manner—by supplying the metadata key to the field's metadata method:
// src/app/domains/shared/ui-forms/field-meta-data-pane/field-meta-data-pane.ts

[...]

import { CITY } from '../../util-common/properties';

@Component({
  selector: 'app-field-meta-data-pane',
  imports: [],
  templateUrl: './field-meta-data-pane.html',
})
export class FieldMetaDataPane {
  readonly field = input.required<FieldTree<unknown>>();

  protected readonly fieldState = computed(() => this.field()());

  [...]

  protected readonly city = computed(() => this.fieldState().metadata(CITY));
}
To render our CITY metadata, we must also update the FieldMetaDataPane's template:
<!-- .../shared/ui-forms/field-meta-data-pane/field-meta-data-pane.html -->

[...]

@if (city()) {
  <span class="info info-small">City</span>
}
Reasons Signal Forms Reject Undefined Values
One surprising aspect of Signal Forms is their refusal to work with undefined values. This choice stems from the semantic meaning of undefined: it signifies that a field does not exist. When initialized with an undefined value, the form function cannot determine that the field should be present.
Consider a hypothetical scenario where the delay attribute of our flights is optional:
export interface FlightDomainModel {
  id: number;
  from: string;
  to: string;
  date: string;
  delayed: boolean;

  // Optional delay
  delay?: number
}
Let's imagine the backend only anticipates a delay value when delayed is true. In every other case, the field is excluded and therefore undefined. When constructing a form for this model in a component without a delay, Angular lacks the necessary metadata for the delay field. From Angular's standpoint, this field simply does not exist.
Yet from the form's viewpoint, the field is always present, even though it may occasionally have no value. This discrepancy reveals a mismatch between the domain perspective and the form perspective. Consequently, the Angular team advises distinguishing these viewpoints by creating two separate types:
export interface FlightFormModel {
  id: number;
  from: string;
  to: string;
  date: string;
  delayed: boolean;
  delay: number
}
Signal Forms would accept null as an alternative to undefined since it conveys the concept of an 'empty value'. However, an even better approach is using a sensible default. In our case, we can set the default delay to 0. To connect the domain model and the form model, we employ mapping functions when constructing the Signal Form:
export function toFlightFormModel(model: FlightDomainModel): FlightFormModel {
  return {
    ...model,
    delay: model.delay ?? 0,
  };
}
For the reverse transformation, assuming the backend rejects a delay of 0 when delayed is false, we need a corresponding function:
export function toFlightDomainModel(model: FlightFormModel): FlightDomainModel {
  return {
    ...model,
    delay: model.delayed ? model.delay : undefined,
  };
}
Additionally, in our component, a linked signal can automate the conversion from the domain model to the form model within the reactive data flow:
protected readonly flightDomainModel = signal<FlightDomainModel>({
  id: 0,
  from: '',
  to: '',
  date: '',
  delayed: false,
});

protected readonly flightFormModel = linkedSignal(
  () => toFlightFormModel(this.flightDomainModel())
);

protected readonly flightForm = form(this.flightFormModel);
When persisting the form, we must convert back to the domain model:
protected save(): void {
  const formModel = this.flightForm().value();
  const domainModel = toFlightDomainModel(formModel);
  [...]
}
If the form model requires immediate conversion back after each keystroke, a delegated signal as outlined in @sec:state-services is appropriate.
This same principle extends to conditionally appearing fields. From the form's perspective, these fields are ever-present, even when hidden in the UI. Therefore, the proper modeling approach is to include them consistently in the form model and handle conversions when mapping to and from the domain model.
Developing Custom Controls for Signal Forms
Up to this point, we've relied exclusively on the FormField directive paired with standard HTML elements. Now we'll explore how to adapt this directive for custom widgets. For instance, imagine a DelayStepper component that adjusts flight delays in 15-minute intervals. Ideally, it should integrate with FormField for binding, just like any other field:
<!-- .../ticketing/feature-booking/flight-edit/flight-form/flight-form.html -->

<div class="form-group form-check">
  <label for="delay">Delay</label>
  <app-delay-stepper id="delay" [formField]="flightForm.delay" />
  <app-validation-errors-pane [errors]="flightForm.delay().errors()" />
</div>
Historically, custom widgets required a Control Value Accessor provider. This process was notoriously complex and rarely appeared on anyone's list of favorite Angular features.
Signal Forms dramatically simplify integration: the widget simply implements the FormValueControl<T> interface, which demands a ModelSignal called value. Additionally, it offers optional properties like disabled or errors for the widget to utilize as needed:
// src/app/domains/shared/ui-common/delay-stepper/delay-stepper.ts

import { Component, effect, input, model } from '@angular/core';
import { FormValueControl, ValidationError } from '@angular/forms/signals';

@Component({
  selector: 'app-delay-stepper',
  imports: [],
  templateUrl: './delay-stepper.html',
})
export class DelayStepper implements FormValueControl<number> {
  readonly value = model(0);

  readonly disabled = input(false);
  readonly errors = input<readonly ValidationError.WithOptionalField[]>([]);

  constructor() {
    effect(() => {
      console.log('DelayStepper, errors', this.errors());
    });
  }

  protected inc(): void {
    this.value.update((v) => v + 15);
  }

  protected dec(): void {
    this.value.update((v) => Math.max(v - 15, 0));
  }
}
The DelayStepper component leverages the disabled property to signal when a field is inactive due to schema rules. It receives validation errors from Signal Forms through the errors input, and an effect logs these to the console for demonstration. Both disabled and value are then used within the template:
<!-- src/app/domains/shared/ui-common/delay-stepper/delay-stepper.html -->

@if (disabled()) {
  <div class="delay">No Delay!</div>
} @else {
  <div class="delay">{{ value() }}</div>
  <div>
    <button type="button" (click)="inc()">+15 Minutes</button> |
    <button type="button" (click)="dec()">-15 Minutes</button>
  </div>
}
Note on Custom Checkboxes
FormValueControl also supports checkboxes via an optional checked property. However, Signal Forms provide a dedicated FormCheckboxControl interface for this purpose, which includes a mandatory checked property and an optional value.
Angular Signal Forms FAQ
What exactly are Angular Signal Forms?
Angular Signal Forms represent a forms API within @angular/forms/signals that utilizes Signals to manage form values, validation, metadata, and submission state. This approach aligns forms with Angular's signal-based reactivity model rather than introducing a separate abstraction.
How do Signal Forms compare to Angular Reactive Forms?
Reactive Forms are built around classes such as FormGroup, FormControl, and FormArray. Signal Forms, in contrast, expose a FieldTree whose state is accessed via Signals. This architecture makes derived UI state, validation feedback, and component composition more intuitive within signal-first Angular applications.
Are async validation and nested forms supported?
Absolutely. Signal Forms accommodate asynchronous validators, cross-field validation, nested objects, form arrays, and subforms. This versatility makes them suitable for everything from basic inputs to complex enterprise forms with intricate validation logic.
Why should form models steer clear of undefined values?
Signal Forms interpret undefined as a missing field rather than an empty value. For optional data, it's wiser to define a concrete form value like null or a domain-specific default, then map it back to the domain model during saving.
Wrapping Up
Signal Forms deliver a signal-based framework for constructing and validating forms in Angular. Form state, values, and validation outcomes are represented as signals, creating a fully reactive and composable system. This approach aligns user interaction with application state using a unified set of reactive primitives.
Validation is handled declaratively through schemas that are composable, reusable, and conditionally applicable. The system supports built-in, custom, multi-field, and asynchronous validators, plus integration with external schema standards like Zod. Errors, pending indicators, and validation metadata are all embedded in the reactive form state, ready for direct UI consumption.
Complex forms are structured using nested objects, arrays, and subforms, enabling large-scale forms to be broken down into focused components. A clean separation between domain models and form models helps prevent issues with optional or undefined values. Custom form controls interface through a straightforward signal-based API, elevating advanced UI widgets to first-class participants in the form ecosystem.