Understanding Angular Signals
Signals represent a reactive primitive built on the Observer Design Pattern. In this pattern, a publisher holds a value along with a collection of subscribers who wish to be notified whenever that value changes.
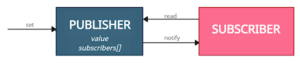
Essentially, a signal wraps a value and exposes a way to respond to modifications of that value. This concept will feel familiar to Angular developers who have worked with RxJS, particularly BehaviorSubject, which similarly starts with an initial value.
The primary motivation behind introducing signals was to enhance the change detection system. Given that alternatives existed—such as patching Zone.js, adopting a "setState"-style API, or relying on RxJS—the question arises: why signals?
Several factors drove the decision to implement signals:
- Angular can monitor exactly which signals are accessed within a view, enabling it to determine precisely which components require re-rendering when state changes.
- Signals provide synchronous access to a value that is always available for reading.
- Reading a signal value never produces side effects.
- There are no glitches that could lead to inconsistent state readings.
- Dependency tracking is automatic and dynamic, eliminating the need for explicit subscriptions and the overhead of managing them to prevent memory leaks.
- Signals can be used independently of components, integrating well with Angular's Dependency Injection system.
- The API encourages writing code in a declarative style.
Working with the Angular Signals API
With an understanding of the rationale and underlying mechanics, we can now examine the API surface available for using signals.
In Angular, a signal is represented by an interface that includes:
- A
getterfunction, invoked to retrieve the current value, and - A
SIGNALsymbol that allows the framework to identify the object as a signal.
Whenever a signal's value is read, that action is recorded. This tracking forms the basis for constructing a dependency graph between interconnected signals.
interface Signal<T> {
  (): T;
  [SIGNAL]: unkown;
}
Typically, signals are intended to be read-only; we fetch the current value and observe its changes. However, Angular provides a separate interface that includes built-in methods for modifying the value:
interface WritableSignal<T> extends Signal<T> {
  set(value: T): void;
  update(updateFn: (value: T) => T): void;
  mutate(mutatorFn: (value: T) => void): void;
  asReadonly(): Signal<T>;
}
The set method replaces the currently stored value with a new one. Drawing a parallel to BehaviorSubject, this operates similarly to invoking its next method.
The update method calculates a new value based on the existing one and stores it. Meanwhile, mutate alters the current value directly without replacing the reference. This is particularly handy when working with arrays or objects where we want to modify the content in place (e.g., appending to an array with Array.prototype.push).
Calling asReadonly produces a new signal that holds the same value but prevents any further modification. In the context of RxJS, this parallels using the asObservable method on a Subject.
To instantiate a WritableSignal, the following function is used:
function signal<T>(
  initialValue: T,
  options?: { equal?: (a: T, b: T) => boolean }
): WritableSignal<T>
The equal parameter lets you define what constitutes equality between two values, which is especially useful for determining when updates to objects should trigger notifications. When not supplied, the default comparison using === is applied, with the caveat that objects and arrays are never considered equal. This default behavior enables storing these reference types while still listening for their replacement.
Here is a practical demonstration of the various WritableSignal methods:
interface User {
  id: string;
  name: string;
  age: number;
}

@Injectable()
export class UserService {
  private _users = signal<User[]>([]);
  users = this._users.asReadonly();

  addUser(newUser: User): void {
   // mutating current value
   this._users.mutate(users => users.push(newUser));
  }

  removeUser(id: string): void {
   // setting a new value created from the current
   this._users.update(users => users.filter(user => user.id !== id));
  }

  getUser(id: string): User | null {
   return this._users().find(user => user.id === id) ?? null;
  }

  resetUsers(): void {
   // setting a new value, replacing the existing
   this._users.set([]);
  }
}
One of the most frequently used RxJS operators is map, which creates a derived value based on a source. In the world of signals, the computed function serves this purpose:
function computed<T>(
  computation: () => T,
  options?: {equal?: (a: T, b: T) => boolean}
): Signal<T>;
The signal resulting from computed has a dependency on any signals whose values are read inside the computation function. Therefore, its value updates only when at least one of those dependencies experiences a change. It's important to note that the computation function is expected to be pure and free of side effects—only read operations are permitted within it.
Determining whether the newly computed value differs from the previous one follows the same logic as the signal function. We can also supply a custom equal function to override the default comparison, which can enhance performance by reducing unnecessary computations.
const user = signal<User>({ id: ‘70a65491c1d6’, name: ‘John’, age: 35 });
const isAdult = computed(() => user().age >= 18)); //Signal<boolean>
const color = computed(() => isAdult() ? ‘green’ : ‘red’); //Signal<’green’ | ‘red’>

// isAdult is recalculated because its dependency has changed</span>

// color does not need to be recalculated, because the value of isAdult has not changed </span>

user.set({ id: ‘c37de3232c4d’, name: ‘Andy’, age: 22 });</span>
A key characteristic of signals created via computed is their dynamic dependency tracking. They keep track of signals that were read during the most recent evaluation, not necessarily all signals that might be accessed in other contexts.
const greeting = computed(() => showName() ? `Hello, ${name()}!` : 'Hello!');Consider a scenario where greeting is a computed signal. It will always depend on showName, but it will only track name when showName is true. If showName is false, changes to name will have no effect on the value of greeting.
Certain situations call for triggering a side effect—code that alters state outside its immediate scope, such as making an HTTP request or syncing between independent data models. While RxJS uses the tap operator for such cases, signals rely on the effect function:
function effect(
  effectFn: (onCleanup: (fn: () => void) => void) => void,
  options?: CreateEffectOptions
): EffectRef;
An effectFn registered this way observes signal values and executes whenever any of them change. It can also accept an optional cleanup function, which runs before the next execution of effectFn, providing a hook to cancel actions initiated by the prior invocation.
effect((onCleanup) => {
   const countValue = this.count();
   let secsFromChange = 0;
   const logInterval = setInterval(() => {
    console.log(
     `${countValue} had its value unchanged for ${++secsFromChange} seconds`
    );
   }, 1000);
   onCleanup(() => {
    console.log('Clearing and re-scheduling effect');
    clearInterval(logInterval);
   });
});
The exact timing of when an effect runs is not strictly specified and depends on the strategy Angular adopts. However, several principles provide reliability:
- An effect is guaranteed to run at least once.
- The effect runs after at least one of the signals it reads has changed.
- Effects are executed as few times as needed. If several dependencies change simultaneously, the effect will run only once, combining those changes.
Since effects listen to signals they depend on, they remain active and ready to respond. By default, they are automatically cleaned up when the containing component or directive is destroyed. If the manualCleanup option is enabled, the effect persists beyond destruction, and you can stop it explicitly using the EffectRef instance it returns.
const effectRef = effect(() => {...}, { manualCleanup: true });
…
effectRef.destroy();
Modifying a signal's value from within an effect is discouraged because it can lead to unpredictable results and is treated as an error by default. You can enable this capability by setting the allowSignalWrites flag in the options parameter.
Building Components with Signals
Note: The signal-based component APIs discussed here are based on the Signal RFC and may not yet be publicly available. The final implementation and behavior are still subject to change.
It is worth mentioning that the features described in this section apply equally to directives and components. For clarity, we will refer only to components throughout.
To unlock signal features and the new change detection strategy in your components, you need to set the signals property within the @Component decorator to true:
@Component({
  signals: true,
  …
})
Leaving this option as false (or unset) retains the traditional Zone.js-based change detection approach. Notice that you can mix both types of components within a single application; they are not mutually exclusive.
To display the value contained in a signal within your template, you simply invoke the getter function provided by the signal function:
@Component({
  signals: true,
  selector: ‘counter’,
  template: `
  <p>Counter: {{ count() }}</p>
  <button (click)=”increment()”>+1</button>
  <button (click)=”decrement()”>-1</button>`
})
export class CounterComponent {
  count = signal(0);
  increment(): void {
   this.count.update(value => value + 1);
  }
  decrement(): void {
   this.count.update(value => value - 1);
  }
}
Previously, we were cautioned against calling functions directly inside templates because the return value would be recalculated on every change detection pass, potentially degrading performance. With signals, this concern is circumvented: the view only re-renders when it detects a change in the signal's value.
The traditional @Input decorator is superseded here by an input function. This function returns a read-only Signal that holds the latest bound value. It accepts a default value and an options object as arguments. Keep in mind that effects initialized in the component that rely on an input value will not run until that value is actually provided by the parent.
@Component({
  signals: true,
  selector: ‘user-card’,
  template: `
  <div class=”user-card” [NgClass]=”{ user-card–disabled: disabled() }”>
   <p>Name: {{ name() }}</p>
   <p>Role: {{ role() }}</p>
  </div>`
export class UserCardComponent {
  name = input<string>(); // Signal<string | undefined>
  role = input(‘customer’); //Signal<string>
  disabled = input<boolean>(false, { alias: ‘deactivated’ }); //Signal<boolean>
}
A model acts as a special type of input, returning a WritableSignal. This implies that the component can modify its value, and those changes are propagated back to the parent, effectively creating a two-way binding when the parent passes a signal reference.
@Component({
  signals: true,
  selector: ‘counter’
  template: `
  <p>Counter: {{ count() }}</p
  <button (click)=”increment()”>+1</button>`
})
export class CounterComponent {
  count = model(0); //WritableSignal<number>

  increment(): void {
   this.count.update(value => value + 1);
  }
}

@Component({
  signals: true,
  selector: ‘widget’
  template: `
  <counter [(count)]=”value” />`
)}
export class WidgetComponent {
  value = signal(10);
}
With the input mechanism redefined, it's natural to ask about outputs. Signal architecture doesn't alter how outputs work; instead, the API is updated for consistency. The @Output decorator is replaced by an output function that returns an EventEmitter:
@Component({
  signals: true,
  selector: ‘user-card’,
  template: `
  <p>{{ user().name }}</p>
  <button (click)=”edit()”>Edit</button>
  <button (click)=”remove()”>Remove</button>`
})
export class UserCardComponent {
  user = input<User>();
  edit = output<User>(); //EventEmitter<User>
  remove = output<string>({ alias: ‘delete’ }) //EventEmitter<string>

  edit(): void {
   this.edit.emit(this.user());
  }

  remove(): void {
   this.remove.emit(this.user().id);
  }
}
Furthermore, the decorators for performing view and content queries—@ViewChild, @ViewChildren, @ContentChild, and @ContentChildren—are transformed into corresponding functions that return Signals:
@Component({
  signals: true,
  selector: ‘form-field’,
  template: `
  <field-icon [icon]=”someIcon” />
  <field-icon [icon]=someAnotherIcon” />
  <input #inputRef />`
})
export class FormFieldComponent {
  icons = viewChildren(FieldIconComponent); //Signal<FieldIconComponent[]>
  input = viewChild<ElementRef>(‘inputRef’); //Signal<ElementRef>

  eventHandler(): void {
   this.input().nativeElement.focus();
  }
}
The new change detection mechanism brings about a shift in how lifecycle hooks are defined. They are no longer methods on the component class required by an interface. Instead, lifecycle functionality is exposed as functions that receive callbacks to be executed at specific points. These functions are typically activated by calling them within the component's constructor or another method, registering the desired callback.
Three new hooks have been added to handle operations after view rendering:
function afterNextRender(fn: () => void): void;This first hook runs after the next change detection cycle completes. It is ideal for operations that need to read from or write to the DOM manually.
function afterRender(fn: () => void): { destroy(): void }
The second hook is invoked after every DOM update performed during the rendering process.
function afterRenderEffect(fn: () => void): { destroy(): void };
The third is a distinctive kind of effect. When its dependent signals change, it triggers in coordination with afterRender.
From the legacy set of hooks, only two retain their original nature and purpose:
ngOnInitis succeeded byafterInit.- Similarly,
ngOnDestroyis replaced bybeforeDestroy.
The execution timing for these new hooks matches their predecessors. afterInit runs after the component is instantiated and all inputs have been set, while beforeDestroy runs just prior to the component's destruction.
The remaining hooks don't translate to the new system because signals can fulfill their roles more effectively:
ngOnChangeswas used to respond to input alterations. Now that inputs are signals themselves, you can leveragecomputedto create a derived signal or place the logic within aneffect.ngDoCheckreacted to every change detection cycle; this behavior can now be moved to aneffect.ngAfterViewInitwas for post-render actions;afterNextRendernow fills this void.ngAfterContentInit,ngAfterViewChecked, andngAfterContentCheckedwere primarily for inspecting query results. Since queries are now signal-based and reactive by default, you can use those signals directly.
How Change Detection Is Being Reworked
First, a quick recap of how Change Detection has operated up to this point.
Angular relies on Zone.js to keep tabs on browser events, such as DOM interactions, outgoing HTTP requests, or timer callbacks. The library monkey-patches objects like window and document, as well as prototypes such as HtmlButtonElement and Promise, adding runtime callbacks to anything that might alter application state.
When one of these events fires, the framework has no idea what exactly changed, or even if anything changed at all. It pulls in fresh data and reconciles the view against the existing state, walking the entire component tree even though only a sliver of the app typically needs updating.
The OnPush strategy can trim the number of components that get checked. With this approach, only components that satisfy certain criteria—like handling a DOM event, receiving a new input, or being explicitly flagged for checking—and their child trees are examined. Essentially, it tells the framework *when* to check, but not *where* the change occurred.
This setup has its perks, particularly for smaller projects:
- State can be stored directly in plain JavaScript data structures.
- State can live anywhere in the application.
- Updating state requires no extra API—just assign a new value.
However, it also carries notable drawbacks that become more pronounced as systems grow:
- Initializing Zone.js consumes time and resources, with the cost scaling up as the application expands.
- Developers must swap
async/awaitforPromise, since the keywords cannot be monkey-patched. - The standard browser API is altered, which can introduce bugs that are hard to trace.
- Breaking the usual unidirectional data flow can trigger the well-known ExpressionChangedAfterItHasBeenCheckedError.
- Third-party libraries that tap into the browser API can cause an avalanche of superfluous Change Detection cycles.
- It frequently becomes the root cause of performance bottlenecks.
Signals change the game by offering far more precision and control over Change Detection. This translates into better performance and a smoother developer experience. Signal-based components bypass the global Change Detection mechanism entirely. Instead, they refresh on demand, guided by a simple but powerful rule:
A component is re-rendered only when a signal whose value appears in its template notifies Angular of a change.
The beauty of this approach lies in its granularity. Each view—the fundamental building block of a template, made up of static HTML elements, directives, or components—is checked independently. These views can also render portions of the UI conditionally or in loops.
Consider the following template, which is composed of a single view:
<div>
  <label>Who: <input name="who"></label>
  <label>What: <input name="what"></label>
</div>
On the other hand, using structural directives such as <code>ngFor, ngSwitchCase, or ngIf creates more independent views in the template: <div> <label>Who: <input name="who"></label> <ng-container *ngIf="showWhy"> <label>Why: <input name="why"></label> </ng-container> </div>
Updating the UI at the view level hits the sweet spot for efficiency. Views are small—they don't contain many bindings—so the cost of refreshing one is minimal. Fragmenting things further would just eat up extra memory and time tracking more dependencies. On the flip side, larger structures naturally split into multiple views, each of which can be updated on its own schedule.
There's another optimization: inputs are now signals. The input's value is updated *before* the Change Detection cycle kicks in, rather than during it. Moreover, if an input isn't actually read in the template, detecting a change in it is skipped entirely. And changing a bound value won't force the parent view to refresh either.
Working with RxJS
RxJS Observables have become ubiquitous in Angular and its surrounding ecosystem. Signals are poised to take over some of the roles Observables previously filled. But because these two constructs are built on different philosophies, they complement each other exceptionally well.
Signals are synchronous, which makes them ideal for managing state and representing values that evolve over time. Observables, in contrast, are asynchronous by nature and represent streams of data. RxJS also gives developers a vast toolkit for handling complex, async workflows.
To turn an Observable into a signal, there's the toSignal function:
export function toSignal<T, U extends T|null|undefined>(
   source: Observable<T>, options: { initialValue: U, requireSync?: false }): Signal<T|U>;
export function toSignal<T>(
   source: Observable<T>, options: { requireSync: true }): Signal<T>;
This function subscribes to the Observable passed in and updates the signal's value each time a new value arrives. The subscription is established immediately to avoid lazy invocation of the Observable's creation logic. Once the containing context—say, a component—is destroyed, the subscription is automatically cleaned up.
In cases where the Observable hasn't emitted yet, the signal defaults to holding undefined. If that's not suitable, you can pass an initialValue in the option object to pre-populate the signal.
Some Observables are synchronous emitters, like BehaviorSubject. For those, the requireSync option removes the need to handle an initial value. But if this flag is set and the Observable turns out to be asynchronous, toSignal will throw an error.
Observables can send three kinds of notifications to subscribers: next, error, and complete. Since a signal only cares about emitted values, errors are not handled by toSignal. If an error slips through, reading the signal will throw. To handle this, you'll need to catch errors explicitly with a try/catch block or the catchError operator.
The reverse conversion is handled by the toObservable function:
const count: Observable<number> = toObservable(counterObs);Upon subscription, this function sets up an effect that pushes successive signal values to subscribers. Emission of these values is asynchronous. This means that if you change a signal's value multiple times in a synchronous sequence, only the final value will be emitted, like so:
const myObservable = toObservable(mySignal);
myObservable.subscribe(console.log);

mySignal.set(1);
mySignal.set(2);
mySignal.set(3):
//Output: 3
Wrapping Up
Angular signals usher in a host of changes and even more possibilities. They unlock new levels of optimization, pave the way for future enhancements that elevate the developer experience, work hand-in-hand with RxJS, redefine state management, and set the stage for the component model of tomorrow. I hope this piece gave you a solid grounding in the topic and a springboard for your own explorations. I'd love to hear your thoughts on this new feature.