
Understanding the mechanics of SSR
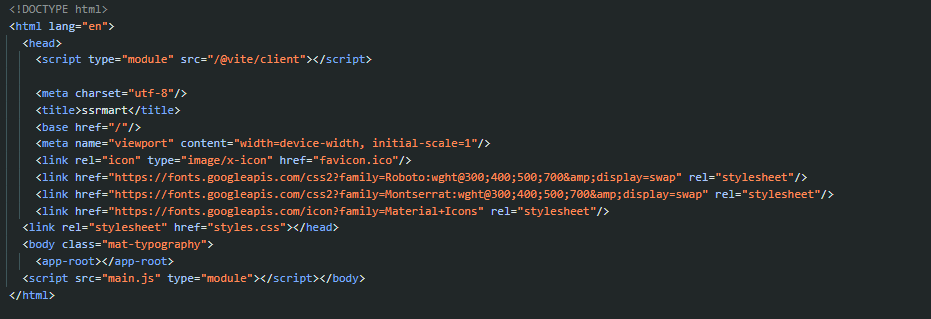
Before diving into Angular specifics, it’s useful to clarify what happens when a typical client-side rendered app loads in a browser:
- The browser fetches an HTML document that is mostly empty — just the familiar
app-rootplaceholder — together with stylesheets, assets, and JavaScript bundles. - After downloading, the scripts are parsed and run. Angular’s instructions tell the browser how to build the DOM from your components.
- Since much of the visible content depends on remote data, the browser issues API calls and updates the interface when responses arrive.
- Only after all data is loaded and the DOM is fully assembled does the application become interactive and usable.
Here’s a look at the raw response the browser receives from the server for a client-rendered demo app:
Now, the server-rendered flow looks quite different:
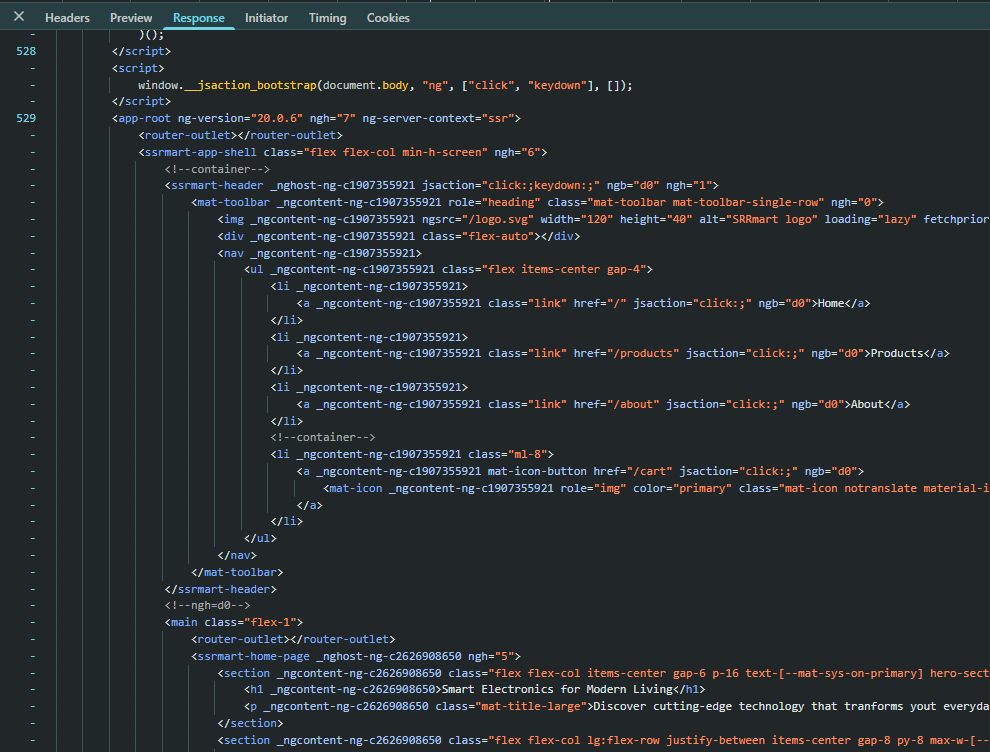
- The browser fetches the same kind of resources, but the HTML itself already contains the fully rendered content.
- Next, the browser downloads and executes the JavaScript bundles.
- Angular attaches to the existing DOM and makes the page interactive. This step is called hydration.
With SSR, the server renders the HTML in advance, so the initial response already carries all the visible content:
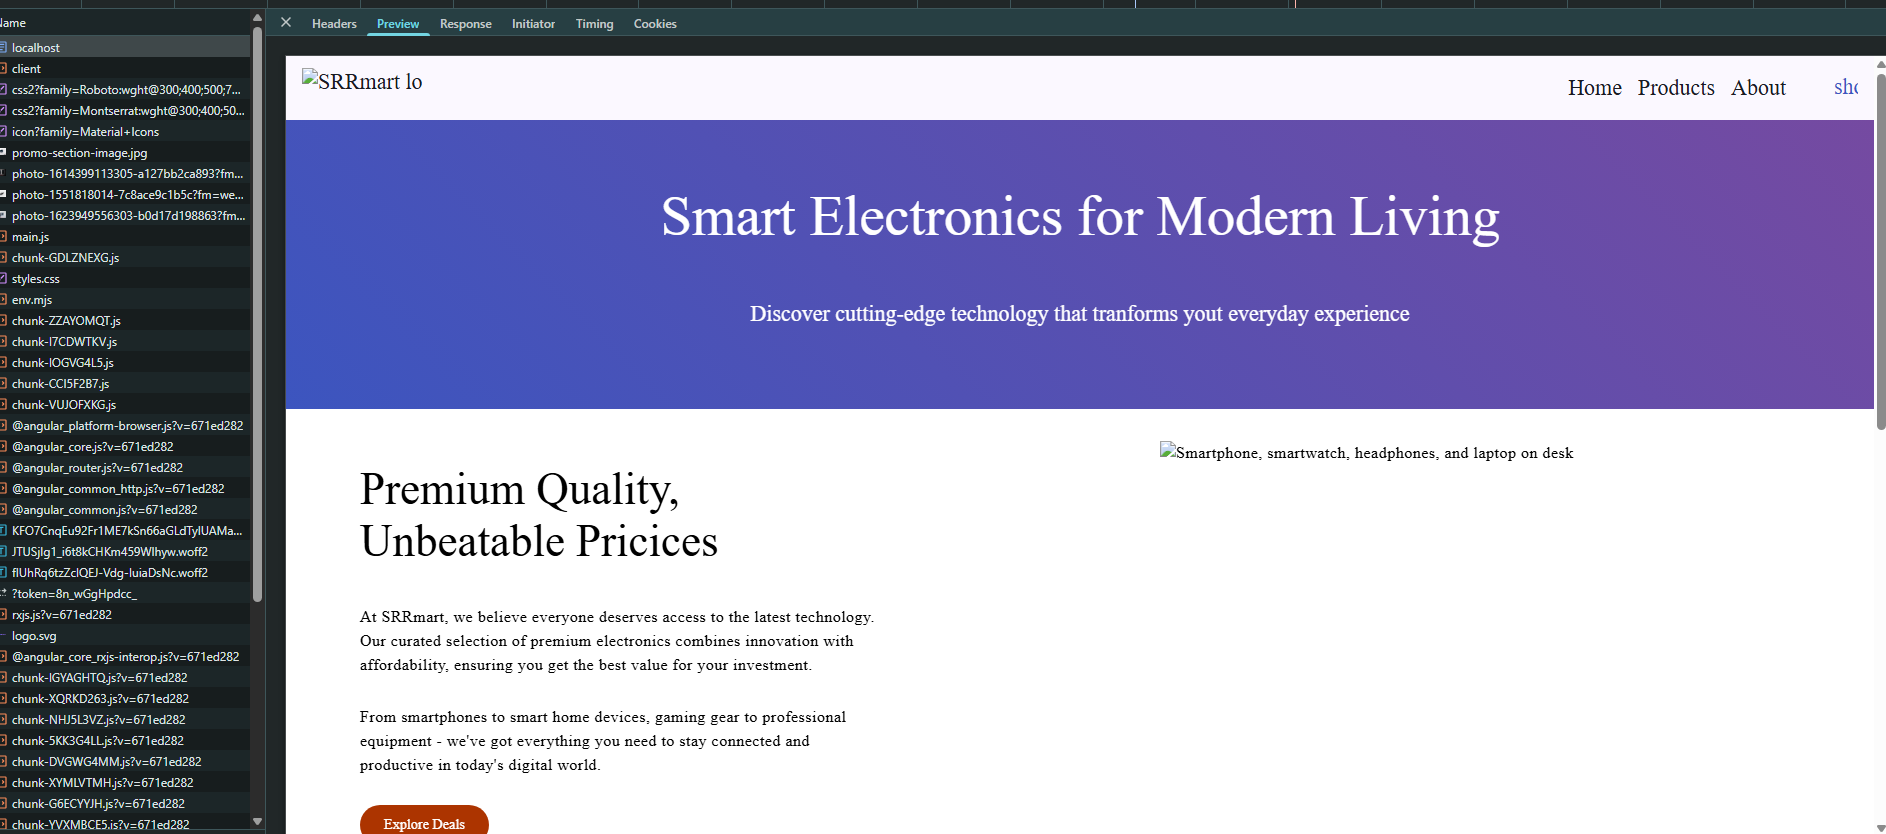
And here’s how that same page appears in the Preview tab:
Getting started with Angular SSR
Starting with Angular CLI version 17, the ng new command will ask whether you want to include Server-Side Rendering (SSR) and Static Site Generation (SSG) in a new project. You can also skip the prompt by passing the --ssr flag directly.
For an existing application, enabling SSR is just one command away: ng add @angular/ssr.
Once SSR is turned on, the CLI adds several new files. Here’s what each of them does:
server.ts– the server entry point that initializes your app on the server side, including the Express configuration for handling requests and rendering pages.app.config.server.ts– holds server-specific providers and settings required for SSR to work.app.routes.server.ts– lets you control how individual routes are rendered.main.server.ts– the server-side counterpart tomain.ts, used to bootstrap the app for SSR.
Your angular.json (or project.json for Nx workspaces) also gains additional configuration blocks for server builds.
That’s all it takes — your application is now SSR-enabled and ready to leverage the benefits. And there are quite a few to explore.

The Value of Server-Side Rendering in Angular

With Angular SSR enabled, the server delivers pre-rendered HTML to the client, either generated ahead of time or produced on demand with each request. Even so, the JavaScript payload accompanying that HTML still carries the full Angular runtime, which assumes control of the page once loaded and manages every subsequent user interaction in the browser. After hydration completes, the experience is indistinguishable from a conventional Angular application.
Given the added setup and operational overhead, you might question whether this extra layer is justified. There are, however, several compelling motivations for adopting SSR.
Speed and Responsiveness
Among the heaviest tasks a browser undertakes is the parsing and execution of JavaScript. In a purely client-side rendered scenario, the browser begins with an essentially empty HTML document — leaving the user staring at a white screen — and then builds every piece of the interface from the ground up. The Performance panel in Chrome DevTools makes this sequence plainly visible.
On top of the computational expense, you also have to account for the latency involved in pulling script files from the server, which is highly sensitive to network conditions. On mobile hardware, where processing power is limited and connections are often slower, these effects are magnified, frequently resulting in further degradation.
The window between initiating a page load and the moment the application becomes both visible and interactive is critical. The wider that window, the more likely visitors will abandon the page. Google research indicates that moving load time from one second to three seconds raises the probability of a bounce by 32%, which in commercial terms can mean losing a substantial share of potential customers.
To measure your own application’s performance, Lighthouse is the go-to tool. It is an automated auditing system that subjects a page to a battery of checks and produces a detailed scorecard with category ratings alongside practical suggestions.
When assessing performance, Lighthouse examines several crucial indicators, among them:
- First Contentful Paint (FCP) – when the first text or image becomes visible (ideal: <1.8s)
- Largest Contentful Paint (LCP) – when the largest above-the-fold element finishes loading (ideal: <2.5s)
- Total Blocking Time (TBT) – how long the main thread remains occupied during load (ideal: <0.15s)
- Cumulative Layout Shift (CLS) – a measure of visual instability caused by unexpected element movement (ideal: <0.1)
- Speed Index (SI) – how rapidly the visible content reaches its final state (ideal: <1.3s)
Here is a Lighthouse report for a sample application operating as a CSR-only site:

And this is the same application once SSR is enabled. The improvement is plain to see, even for a very basic app. As the application grows in complexity, the gap between the two approaches widens further.

Here is how SSR elevates your Lighthouse metrics:
- Faster First Contentful Paint (FCP):
Because the server ships complete HTML, there is no waiting for scripts to arrive, be parsed, and run before anything appears. Content is visible right away. - Strengthened Largest Contentful Paint (LCP):
The most prominent elements are already present in the pre-rendered markup, so they surface considerably sooner than with client-only rendering. - Lower Total Blocking Time (TBT):
Hydration demands far less work than a full client-side bootstrap. The initial HTML parses without halting the main thread, and any JavaScript execution happens in smaller, deferred bursts. Users gain access to the interface sooner. - Enhanced Cumulative Layout Shift (CLS):
The delivered HTML contains the full structure with images and content blocks already sized correctly. This avoids the displacement that typically follows asynchronous component insertion or late-arriving media. - Quicker Speed Index (SI):
Visual content shows up immediately and improves steadily, instead of appearing in large, delayed waves. The result is faster perceived completeness and a more fluid user experience.
Optimizing for Search Engines
SEO refers to the collection of techniques aimed at improving a website’s discoverability and rank on search engine results pages. Given that search engines are a principal gateway to online information, a poor ranking means passing up the majority of users who might otherwise engage with your content, products, or services.
Search engine crawlers have difficulty with JavaScript-heavy applications that build content dynamically after the initial HTML payload arrives. Your app could be perfectly optimized for human visitors, yet still be rendered inefficiently for a bot that sees little more than a root element and several script tags. Even though Google has evolved to handle JavaScript-driven content to some degree, its processing is sluggish, and other search engines face greater limitations. Serving substantial, content-rich HTML in the initial response is therefore essential.
Core Web Vitals feed directly into Google’s ranking algorithm. Better scores on FCP, LCP, and CLS translate into improved search placement, and since Google uses mobile-first indexing, pages with fast load times and a stable layout on handheld devices are especially favored, which amplifies the advantage of SSR even further.
Speed and efficiency during indexing matter too. By removing the need for crawlers to execute scripts to view content, SSR accelerates the discoverability of your pages. That leads to quicker indexing cycles, better scores for content freshness, and more favorable visibility for content that changes frequently.
With SSR, search engines receive the entire anatomy of your site — internal linking, navigation paths, breadcrumbs — all intact, enabling them to better comprehend the site’s structure and the relationships between its sections.
Metadata and Social Media Presence
Metadata supplies crucial context about a page — like title, summary, image, or keywords — before the page is fully loaded. Client-side-rendered apps typically carry generic information that does not correspond to the dynamic content that will be injected later, whereas an SSR application can issue accurate metadata based on the actual page content from the very first response.
Browsers rely on metadata to refine the browsing experience. The title shows up in tabs, bookmarks, and history lists, while the description shapes how the page is presented in search engine results.
Social platforms are equally dependent on metadata. When a link is shared, their crawlers fetch the URL, parse the returned HTML, and look for particular metadata tags in the <head> section to construct link previews. Crucially, these crawlers seldom execute JavaScript, so the metadata must already exist in the initial server response. Accurate and appealing previews drive higher engagement because users are more inclined to click on links that clearly convey what lies beyond them.
Open Graph tags — introduced by Facebook but now standardized across LinkedIn, WhatsApp, Slack, and others — leverage properties such as og:title, og:description, og:image, and og:url to dictate how a link appears in social feeds.
Twitter Cards function similarly but use Twitter-specific tags and formats for that platform. With options like summary cards, large image cards, and app cards, they give publishers control over how their content is represented on Twitter.
These tags are no longer confined to social media; messaging apps, email clients, and countless other services that generate link previews now use them too, making them indispensable for content marketing and consistent brand representation across the social web.

A canonical URL is a meta tag that signals to search engines which version of a page should be treated as the authoritative one where several URLs contain identical or closely matching content. It resolves duplication problems that can drag down search rankings — such as when one page is accessible via multiple addresses. By concentrating SEO value onto a single preferred URL, canonical tags preserve ranking authority, prevent keyword competition among your own pages, and make sure the intended version gets indexed and displayed.
To put all this into practice, I built a compact SEO service that handles metadata updates.
@Injectable({ providedIn: 'root' })
export class SeoService {
  private readonly _titleService = inject(Title);
  private readonly _metaService = inject(Meta);
  private readonly _document = inject(DOCUMENT);

  setSeoData(seoData: SeoData): void {
    const title = seoData.title ? `${seoData.title} | SSRmart` : 'SSRmart';

    this._titleService.setTitle(title);

    this._updateMetaTag('og:title', title);
    this._updateMetaTag('og:description', seoData.description);
    this._updateMetaTag('og:image', this._getImageParamsUrl(seoData.imageUrl));
    this._updateMetaTag('og:url', seoData.url);
    this._updateMetaTag('og:type', seoData.type);

    this._updateMetaTag('twitter:card', 'summary_large_image');
    this._updateMetaTag('twitter:title', title);
    this._updateMetaTag('twitter:description', seoData.description);
    this._updateMetaTag(
      'twitter:image',
      this._getImageParamsUrl(seoData.imageUrl)
    );

    this._updateMetaTag(
      'robots',
      seoData.noIndex ? 'noindex,nofollow' : 'index,follow'
    );

    this._updateCanonicalUrl(seoData.url);
  }

  private _updateMetaTag(name: string, content?: string): void {
    if (!content) {
      this._metaService.removeTag(`property="${name}"`);
      return;
    }

    if (this._metaService.getTag(`property="${name}"`)) {
      this._metaService.updateTag({ property: name, content });
    } else {
      this._metaService.addTag({ property: name, content });
    }
  }

  private _updateCanonicalUrl(url?: string): void {
    const existingCanonicalUrl = this._document.querySelector(
      'link[rel="canonical"]'
    );

    if (existingCanonicalUrl) existingCanonicalUrl.remove();

    if (url) {
      const canonicalLink = this._document.createElement('link');
      canonicalLink.rel = 'canonical';
      canonicalLink.href = url;
      this._document.head.appendChild(canonicalLink);
    }
  }

  private _getImageParamsUrl(imageUrl?: string): string | undefined {
    if (!imageUrl) return undefined;

    /*
      Open Graph image requirements:
      - size: 1200x630
      - format: jpg or png
    */

    const url = new URL(imageUrl);
    url.search = '';
    url.searchParams.set('w', '1200');
    url.searchParams.set('fm', 'jpg');
    url.searchParams.set('fit', 'crop');

    return url.toString();
  }
}
The service receives its input as SeoData, which you can populate using route resolvers. This might be a straightforward mapping of fetched properties — for instance, on a product detail page — or you can go more granular and supply a rich set of properties, such as for a product search results page:
const getTitle = (
  category: string,
  searchTerm: string,
  isBestSeller: boolean
): string => {
  if (categoryTypeGuard(category)) {
    return searchTerm
      ? `Search Results for "${searchTerm}" in ${capitalize(category)}`
      : `${capitalize(category)} Products`;
  }

  if (searchTerm) return `Search Results for "${searchTerm}"`;

  if (isBestSeller) return 'Best Selling Products';

  return 'Products';
};

const getDescription = (
  category: string,
  searchTerm: string,
  isBestSeller: boolean
): string => {
  if (searchTerm) return `Find the best products matching "${searchTerm}".`;

  if (categoryTypeGuard(category))
    return `Discover amazing ${category} products at great prices.`;

  if (isBestSeller) return 'Shop our most popular and best-selling products.';

  return 'Browse our wide selection of products.';
};

export const productSearchSeoResolver: ResolveFn<SeoData> = (route) => {
  const category = route.params['category'];
  const searchTerm = route.queryParams['term'];
  const isBestSeller = route.queryParams['bestsellers'];

  const baseUrl = inject(ConfigService).get('baseUrl');
  const url = category
    ? `${baseUrl}/products/${category}`
    : `${baseUrl}/products`;

  const imageUrl =
    'https://images.unsplash.com/photo-1498049794561-7780e7231661';

  return {
    title: getTitle(category, searchTerm, Boolean(isBestSeller)),
    description: getDescription(category, searchTerm, Boolean(isBestSeller)),
    keywords: ['products', 'shop', 'online store', category, searchTerm].filter(
      Boolean
    ),
    type: 'website',
    url,
    imageUrl,
  };
};
To see how your metadata-driven previews perform, you have access to a variety of tools, for example the Facebook Sharing Debugger. It shows you the exact preview that will accompany a link, enumerates the metadata it recognized, and points out any missing pieces. Here is the result for one of the product pages:

Structured Data Using JSON-LD
This represents yet another way to embed semantic information in a web page, assisting search engines in interpreting and classifying content more accurately, often yielding richer search results. The approach uses a dedicated script block in the page head, so it adds no clutter to the visible markup. Conforming to Schema.org specifications, JSON-LD (JavaScript Object Notation for Linked Data) can characterize a wide array of content types through standardized attributes such as @type, name, description, image, rating, and price (this e-commerce app uses all of them). JSON-LD has established itself as the preferred technique for structured data because it is flexible, straightforward to maintain, and comes with Google’s explicit endorsement.
Here is a utility function that builds structured data for a product from its configuration, retrieved via a resolver:
export const generateProductStructuredData = (
  product: Product,
  baseUrl: string
): StructuredData => {
  return {
    '@context': 'https://schema.org/',
    '@type': 'Product',
    '@id': `${baseUrl}/products/${product.id}`,
    name: product.name,
    description: product.shortDescription,
    image: product.imageUrl,
    sku: product.id,
    category: product.category,
    keywords: product.keywords.join(', '),
    aggregateRating: {
      '@type': 'AggregateRating',
      ratingValue: product.rating,
      ratingCount: product.ratingCount,
      bestRating: '5',
      worstRating: '1',
    },
    offers: {
      '@type': 'Offer',
      url: `${baseUrl}/products/${product.id}`,
      priceCurrency: 'USD',
      price: product.price,
      itemCondition: 'https://schema.org/NewCondition',
      availability: 'https://schema.org/InStock',
      seller: {
        '@type': 'Organization',
        name: 'SSRMart',
        url: baseUrl,
      },
    },
    brand: {
      '@type': 'Brand',
      name: 'SSRMart',
    },
    additionalProperty: [
      {
        '@type': 'PropertyValue',
        name: 'Best Seller',
        value: product.isBestSeller,
      },
    ],
  };
};
The generated object is handed off to the StructuredDataService, which inserts a script element into the document head:
@Injectable({ providedIn: 'root' })
export class StructuredDataService {
  private readonly _document = inject(DOCUMENT);

  addStructuredData(data: StructuredData, id: StructuredDataId): void {
    const script = this._document.createElement('script');
    script.type = 'application/ld+json';
    script.textContent = JSON.stringify(data);
    script.id = this._transformId(id);

    this.removeStructuredData(id);

    this._document.head.appendChild(script);
  }

  removeStructuredData(id: string): void {
    const script = this._document.getElementById(this._transformId(id));
    if (script) {
      script.remove();
    }
  }

  private _transformId(id: string): string {
    return `${id}-structured-data`;
  }
}
For verification, I turn to the Rich Results Test. Google needs structured data to grasp what a page is about and to showcase it with added visual elements in search results. If you aim to qualify for these premium appearances, pay attention to this guide.

Indexing Your Pages
Page indexing is the sequence of steps by which search engines locate, parse, and file web pages in their databases, making them eligible to surface in results when users run relevant queries.
Sitemap
A sitemap acts as a content map for search engines, helping them find, crawl, and index your site more effectively. Typically delivered as an XML document, it records metadata such as:
- location – the canonical URL of each page
- last modification date
- change frequency – whether content updates daily, weekly, monthly, etc.
- priority – how significant each page is relative to others on the site
export const sitemapRoute = (router: Router): void => {
  router.get('/sitemap.xml', async (req, res) => {
    const { baseUrl } = getServerConfig();
    const sitemapItems = await getSitemapItems(baseUrl);

    const xml = `<?xml version="1.0" encoding="UTF-8"?>
    <urlset xmlns="http://www.sitemaps.org/schemas/sitemap/0.9">
    ${sitemapItems
      .map(
        (item) => `
      <url>
        <loc>${item.loc}</loc>
        <lastmod>${item.lastmod}</lastmod>
        <changefreq>${item.changefreq}</changefreq>
        <priority>${item.priority}</priority>
      </url>`
      )
      .join('')}
    </urlset>`;

    res.set('Content-Type', 'application/xml');
    res.set('Cache-Control', 'public, max-age=86400, s-maxage=86400');
    res.send(xml);
  });
};
It expedites the indexing process, meaning newly published or recently revised content gets noticed and processed more swiftly.
For the most beneficial SEO impact, sitemaps should list only canonical URLs and pages you intend to have indexed, leaving out duplicate material or pages blocked by robots.txt.
Robots.txt
Robots.txt is a plain-text file located in the site’s root that instructs search crawlers which areas of your application they may or may not access. It works through straightforward directives such as:
- User-agent – which crawler the rule applies to
- Disallow – preventing access to specific pages or folders
- Allow – granting access to particular content
It serves to manage crawl budget, stopping search engines from wasting it on inconsequential pages, duplicated content, or staging setups, and it offers content control by restricting access to sensitive parts of the site.

Meta robots
You have the ability to explicitly tell search engines not to list a certain page in their indexes, even when they can crawl and read it, by inserting a noindex robot meta tag. Search engines may still follow outbound links found on noindex pages to discover other content, but the page itself stays out of search results. This practice elevates overall site quality by keeping low-value pages from competing with your significant content for visibility.
Rendering modes
The app.routes.server.ts file holds the configuration for server routes, with its primary responsibility being the definition of render modes for each route in the application. Angular provides three distinct rendering modes:
- Server (SSR) – for every incoming request, the server renders a complete page and returns fully populated HTML to the browser
- Prerender (SSG) – routes are rendered ahead of time during the build process, producing static HTML files for direct serving
- Client (CSR) – pages are rendered in the browser, which is Angular's standard behavior
export const serverRoutes: ServerRoute[] = [
  {
    path: '',
    renderMode: RenderMode.Server,
  },
  {
    path: 'products',
    renderMode: RenderMode.Server,
  },
  {
    path: 'privacy-policy',
    renderMode: RenderMode.Prerender,
  },
  ...,
  {
    path: '**',
    renderMode: RenderMode.Server,
  },
];
Every rendering mode brings its own set of trade-offs, and the right choice depends on the specific requirements of your application. Let’s take a closer look at each one.
Server-side rendering
With Server-Side Rendering (SSR), as discussed earlier, the server delivers a complete HTML document straight to the browser. There's no waiting for JavaScript to download and execute before content becomes visible. The user receives a page that's ready to display immediately, complete with all necessary data. This approach accelerates the perceived loading experience and offers significant SEO advantages, since search engine crawlers can parse and index the fully rendered HTML without having to execute any JavaScript.
When opting for SSR, your code must avoid relying on browser-specific APIs. Direct access to globals such as window, document, navigator, or location, along with certain properties of HTMLElement, will trigger runtime errors. The safer path is to leverage Angular's SSR-friendly abstractions. For instance, injecting the DOCUMENT token inside a service such as SeoService rather than touching document directly keeps your code functional both on the server and in the browser.
@Injectable({ providedIn: 'root' })
export class SeoService {
  private readonly _titleService = inject(Title);
  private readonly _metaService = inject(Meta);
  private readonly _document = inject(DOCUMENT);

  …
}
There's also a consideration when selecting third-party libraries. You need to verify they're SSR-compatible and don't secretly depend on browser features. In the demo app, the "About" page renders a map showing shop locations using LeafletJS — a prime example of a library that heavily manipulates the DOM.

For any browser-only APIs you need, make sure their execution is limited to the client side. Wrapping such code within the afterNextRender or afterEveryRender lifecycle hooks works well, since those run exclusively in the browser and are skipped entirely on the server.
export class AboutPageComponent {
private readonly _seoService = inject(SeoService);
constructor() {
this._seoService.setSeoData(getAboutPageSeo());
afterNextRender(async () => {
await this._initializeMap();
});
}
private async _initializeMap(): Promise<void> {
const lat = 52.225996;
const lng = 20.949808;
const zoom = 16;
try {
const L = await import('leaflet');
const map = L.map('map').setView([lat, lng], zoom);
L.marker([lat, lng]).addTo(map);
L.tileLayer('https://{s}.tile.openstreetmap.org/{z}/{x}/{y}.png', {
attribution:
'© <a href="https://www.openstreetmap.org/copyright">OpenStreetMap</a> contributors',
}).addTo(map);
} catch (error) {
console.error('Failed to initialize map:', error);
}
}
}Outside of components or directives where lifecycle hooks aren't accessible, you can inject the PLATFORM_ID token instead. Combined with the isPlatformBrowser utility, you can isolate code so it executes only in the browser — or use isPlatformServer when you need code that runs strictly server-side.
export const initializeMap = async (containerId: string): Promise<void> => {
  const platformId = inject(PLATFORM_ID);

  if (!isPlatformBrowser(platformId)) return;

  const lat = 52.225996;
  const lng = 20.949808;
  const zoom = 16;

  try {
    const L = await import('leaflet');
    const map = L.map(containerId).setView([lat, lng], zoom);
    L.marker([lat, lng]).addTo(map);
  } catch (error) {
    console.error('Failed to initialize map:', error);
  }
};
For the home page and product search, I went with this rendering mode. Both pages display product search outcomes that shift frequently, so server-side rendering made practical sense. It gives me all the SEO benefits necessary for maintaining strong search rankings, while ensuring customers constantly see current content. This approach works in favor of both user experience and business goals.
Prerendering (SSG)
Prerendering generates the HTML document during the build phase. This results in faster page delivery, as the server can respond with a static file immediately without performing any additional processing.
Caching is another significant benefit. Static files are ideal candidates for caching by Content Delivery Networks (CDNs), browsers, and other intermediary layers, which means subsequent visits load even quicker. In fact, a fully static site can be hosted entirely via a CDN or a basic static file server, eliminating the need for a dedicated server runtime for your application.
To see what this produces, build your application and inspect the dist folder:

Like SSR, prerendering supports SEO strongly, since search engines receive fully rendered HTML. The same constraints apply as well — you should steer clear of directly using browser-specific APIs.
An additional limitation is that every piece of data needed for rendering must be available at build time. Pages that rely on user-specific information or any request-dependent content can't be prerendered. This makes prerendering most suitable for pages that look the same for every visitor.
Because the rendering happens at build time, production builds can take noticeably longer. Generating many HTML documents doesn't just stretch the build duration; it also enlarges your deployment package, which may slow down deployments and demand more storage or bandwidth.
Customizing prerendering
To prerender documents for routes with parameters, define an asynchronous getPrerenderParams function. This function returns an array of objects, where each object maps route parameter names to their corresponding values.
Within this function, Angular's inject utility lets you access dependencies and carry out whatever operations are needed to identify which routes should be prerendered. A typical pattern involves making API calls to retrieve data that informs the array of parameter values.
{
    path: 'products/:id',
    renderMode: RenderMode.Prerender,
    getPrerenderParams: async () => {
      const productService = inject(ProductService);
      const products = await firstValueFrom(productService.searchProducts(), {
        defaultValue: [],
      });

      return products.map((product) => ({ id: product.id }));
    },
 },
The fallback property allows you to define how requests for routes that weren't prerendered should be handled. The choices are:
- Server – falls back to server-side rendering (this is the default)
- Client – falls back to client-side rendering
- None – the request remains unhandled
Client-side rendering
This mode brings us back to Angular's default behavior. It offers the simplest development experience, as you can write code under the assumption it always runs in a browser and freely use a broad selection of client-side libraries.
The downside is giving up all the advantages that SSR provides, which hurts both performance and SEO.
On the upside, the server only needs to serve the static JavaScript assets without any additional work. This can be a benefit when server costs matter, particularly for pages where SSR doesn't offer much value — an admin panel being a good example.
Hydration
Angular's documentation describes hydration as follows:
Hydration is the process that restores the server-side rendered application on the client. This includes things like reusing the server rendered DOM structures, persisting the application state, transferring application data that was retrieved already by the server, and other processes.
The term "hydration" captures the concept well. Consider the resurrection plant: dried out under the desert sun, it looks like a static HTML page delivered from the server — complete in structure and appearance, yet completely inert.
Water brings it back to life. Similarly, hydration in Angular makes a page interactive. The static yet fully formed HTML becomes a live, responsive application, all while preserving the work already performed during server-side rendering.
Reusing existing DOM elements at runtime and avoiding unnecessary destruction and recreation of nodes improves performance by reducing First Input Delay (FID) and Largest Contentful Paint (LCP).
It also helps prevent UI flickering and layout shifts, improving the Cumulative Layout Shift (CLS) score. Better scores across these metrics benefit user experience and SEO alike.
To confirm hydration is enabled and functioning, open Developer Tools. The console should show a confirmation message with hydration statistics, for example:
Angular hydrated 5 component(s) and 65 node(s), 0 component(s) were skipped. 5 defer block(s) were configured to use incremental hydration.
The Angular DevTools browser extension is another way to verify. Look for droplet icons in the components tree, or turn on the hydration overlay to see exactly which parts of the page were hydrated.

Replaying events
When the server renders a page, it becomes visible to the user the moment the browser loads the HTML. At that point, the page may look fully functional, but the application isn't yet interactive. Hydration must finish before Angular can attach its behavior to the DOM.
This creates a potential issue: what happens when a user clicks a button, types into a field, or otherwise interacts with the page before hydration completes? Without a remedy, those early interactions would simply be lost. Event Replay exists to solve this.
The Event Replay feature preserves user interactions during the non-interactive window. It operates in three steps:
- Capture – native browser events (clicks, key presses, scrolls, and so on) that occur before hydration finishes are intercepted
- Store – these captured events are held in memory temporarily while Angular continues hydrating the app
- Replay – once hydration completes and the application is fully interactive, Angular replays the buffered events as if they occurred in real time

You enable this feature by using the withEventReplay() function:
bootstrapApplication(App, {
  providers: [
    provideClientHydration(withEventReplay())
  ]
});
Note that when incremental hydration is in use, event replay is turned on automatically.
Hydrating on demand
Incremental hydration is a more sophisticated strategy where portions of the application remain dormant until they are specifically activated. Instead of hydrating the entire page in one go, this method allows you to control exactly when and which parts get hydrated, which can reduce the initial payload and provide a better performance profile while maintaining a smooth user experience.
This pattern is built on the familiar @defer block syntax. You create a hydration boundary using a @defer block and attach a hydrate trigger to it. When the server renders the page, it includes the contents of the @defer block where the placeholder would normally appear. On the client, however, the associated dependencies are not loaded right away, and the content remains in a dehydrated state until the hydration trigger is activated.
Keep in mind that this hydration process is specific to the initial render on the server. For subsequent navigation within the app using standard client-side routing, the usual @defer behavior takes over.
After the hydration process finishes, any browser events that were captured before hydration began and match component listeners are replayed using Angular’s Event Replay feature.
It's also important to note that without an explicit trigger, a deferable view defaults to the idle trigger. If you opt for a different client-side trigger, you should also provide a @placeholder block.
@Component({
  selector: 'ssrmart-app-shell',
  template: `
    @defer (hydrate on hover) {
    	<ssrmart-header />
    }

    <main class="flex-1">
      <router-outlet />
    </main>

    @defer (hydrate on interaction; on immediate) {
    	<ssrmart-footer />
    } @placeholder {
    	<footer class="footer-placeholder"></footer>
    }
  `,
  changeDetection: ChangeDetectionStrategy.OnPush,
  imports: [HeaderComponent, FooterComponent, RouterOutlet],
  host: {
    class: 'flex flex-col min-h-screen',
  },
})
export default class AppShellComponent {}
For the demonstration, I configured the hydration trigger to hover (in a real-world scenario, I'd likely use interaction as I did for the footer). In the example, hovering over the header causes Angular to hydrate it, fetching the separate chunks for the HeaderComponent, MatToolbar, and MatIcon on demand, while the footer remains in a dehydrated state.

The @defer block is flexible enough to accept multiple hydration triggers, which are separated by semicolons. If any one of the listed triggers fires, hydration begins. At that moment, Angular loads the necessary dependencies for the deferable view and hydrates its content. The following triggers are available:
on idle– triggers when the browser is idle, as determined byrequestIdleCallbackon viewport– triggers when the content scrolls into view, detected with the Intersection Observer APIon interaction– triggers when the user clicks or presses a key on the elementon hover– triggers when the user hovers over the content with the mouse or focuses it using the keyboardon immediate– triggers as soon as the rest of the non-deferred content has been renderedon timer– triggers after a specific time delaywhen condition– triggers when a specified condition becomes truthy
There is also the special never trigger. This tells Angular to keep the block permanently dehydrated, rendering it as static content. This is ideal for sections that are purely decorative or have no interactive elements. Furthermore, never stops hydration for all child components within that block, so any nested hydration triggers are also ignored.
Because Angular components are hierarchical, there is a specific order to hydration. For a component to be hydrated, its parent components must also be hydrated. If a trigger fires for a block nested deep within a dehydrated tree, Angular will start hydrating from the highest-level dehydrated parent component and work its way down to the triggered block.
To illustrate this process, let's put the router-outlet in the shell component inside a @defer block that uses the interaction trigger. Then, for the product cards in the Bestsellers section on the home page, we add a separate @defer block with the hover trigger. The outcome is shown below:

Limitations and prerequisites
Hydration works by taking the HTML generated on the server and reusing it directly in the browser, rather than creating it anew. For this to function correctly, the DOM structure produced by the server must be an exact match for what the browser's DOM looks like.
Steer clear of direct DOM manipulation
The hydration process assumes that Angular is the only entity interacting with the DOM. If you directly change the DOM by adding, removing, or moving nodes, or by querying for specific elements, Angular won't have any record of these actions.
Because Angular is unaware of these outside modifications, it is unable to reconcile the differences between the server-rendered DOM and the browser's DOM when it attempts to hydrate.
Avoid logic that depends on the environment
The server environment is fundamentally different from the browser environment. Browser-specific properties and APIs like window or localStorage, along with device information, user preferences, or other client-side state, are either not available on the server or produce different results.
If your component's rendering depends on these environment-specific values, you will end up with a server-rendered DOM that is different from what the client expects during hydration.
The recommended approach is to keep the structure of the DOM consistent and use CSS or post-hydration logic to handle any environment-specific differences.
Use valid, well-formed HTML
Browsers often try to correct invalid HTML. If your templates contain incorrect markup, the browser might silently "fix" issues by closing unclosed tags, restructuring nested elements, or dropping invalid nodes. While this auto-correction is sometimes helpful, it's problematic for hydration. The corrected DOM in the browser will not match the DOM that was sent from the server, which will cause hydration to fail.
It's essential to write valid, well-formed HTML in your templates. You can also use validation tools or Angular's strict template checks to catch these issues early in development.
Consistent whitespace handling
Hydration is thorough and doesn't just compare elements. It also compares whitespace and comment nodes that were created during server-side rendering. If the server preserves whitespace but the browser treats it differently, Angular will see a mismatch.
To avoid this issue, Angular suggests keeping the preserveWhitespaces option at its default value of false. This helps guarantee that the output is consistent on both the server and the client.
A note on Custom or Noop Zone.js
Hydration depends on an event from Zone.js that signals when the application has reached a stable state. This stable state is used to know when to begin serializing the page on the server, or to clean up any leftover DOM nodes on the client after hydration. If you are using a custom or a "noop" Zone.js, it can alter the timing of this stable event. This specific configuration is not currently fully supported.
How to skip hydration
Given the potential issues listed above, there may be components that are not compatible with hydration. The ideal solution is to refactor these components to be hydration-friendly. If that proves too difficult or time-intensive, there is a last-ditch workaround: the ngSkipHydration attribute.
<hydration-incompatible-component ngSkipHydration />
or
@Component({
  …,
  host: { ngSkipHydration: ‘true’ }
})
export class HydrationIncompatibleComponent {}
This attribute can be placed on a component's host node to signal to Angular that you want to skip hydration for that component and all of its child components. In this case, Angular will destroy that part of the DOM and re-render it from scratch on the client.
Working with requests and responses
Requests and responses are the crucial link between server-specific data and the rest of your Angular application, forming the basis for context-aware server-side rendering. Angular gives us dedicated dependency injection tokens to work with this data.
It is important to note that the following injection tokens will be null in these situations:
- during the application's build process
- when rendering the app on the client-side
- when generating static pages with static site generation (SSG)
- during route extraction in development mode
Accessing the request
The REQUEST token provides access to the current Request object from the Web API. This object has a wealth of information about the incoming request, which can be helpful in several ways:
- Profiling the client – understanding device type, language, and localization preferences
- Establishing security context – checking if the connection is encrypted, the referrer domain, or authentication headers
- Improving performance and SEO – making decisions on dynamic rendering strategies or adjusting caching
export const getCookie = (name: string): string => {
  const document = inject(DOCUMENT);
  const request = inject(REQUEST);
  const platformId = inject(PLATFORM_ID);

  const cookies = isPlatformServer(platformId)
    ? request?.headers.get('cookie') ?? ''
    : document.cookie;

  return cookies.match('(^|;)\\s*' + name + '\\s*=\\s*([^;]+)')?.pop() ?? '';
};
Understanding the request context
While the REQUEST token provides the raw HTTP information, the REQUEST_CONTEXT token offers more processed, application-specific intelligence. This token is a useful repository for an enhanced understanding of the request. It combines raw request data with business logic, user profiles, and application state. This context object can be passed as the second argument to the handle function in your server.ts file.
app.use('/**', (req, res, next) => {
  const enableCustomerChat =
    !isBotUserAgent(req.headers['user-agent']) &&
    isFeatureFlagEnabled('customer_chat');

  angularApp
    .handle(req, {
      enableCustomerChat,
    })
    .then((response) =>
      response ? writeResponseToNodeResponse(response, res) : next()
    )
    .catch(next);
});
Modifying the response
With the RESPONSE_INIT token, you have the ability to modify the response initialization options. This allows you to set headers and the status code on the response at runtime. This is the ideal token to use when the status code or headers need to be figured out dynamically.
export default class ProductNotFoundPageComponent {
  private readonly _responseInit = inject(RESPONSE_INIT);

  constructor() {
    if (!this._responseInit) return;

    this._responseInit.status = 404;
    this._responseInit.headers = { 'Cache-Control': 'no-cache' };
  }
}
However, if you already know what status code or headers you want to send, you can define them directly in your server route definitions.
{
    path: 'products/not-found',
    renderMode: RenderMode.Server,
    headers: { 'Cache-Control': 'no-cache' },
    status: 404,
},
Caching HTTP requests
During server-side rendering, Angular caches the HTTP requests it makes. These same cached responses can then be reused when the app is initializing on the client. The responses are serialized and included in the server's initial response payload, so Angular can use them from the cache until the application becomes stable.
Below is an example of a cached search request for bestseller products that appears on the home page:

By default, the cache is only used for GET and HEAD requests that do not contain Authorization or Proxy-Authorization headers. This behavior is configurable through the withHttpTransferCacheOptions feature function, which is a part of provideClientHydration. With this function, you can:
- Enable caching for POST requests – this is very useful for search requests that have many parameters
- Enable caching for requests with authorization headers – allowing for secure data to be served from the cache
- Create a custom filter function – to have precise control over which requests should be cached (my own implementation relies on an
HttpContextToken) - Specify which response headers to include in the JSON containing the serialized response
provideClientHydration(
      withHttpTransferCacheOptions({
        includePostRequests: true,
        includeRequestsWithAuthHeaders: true,
        filter: (request) => !request.context.get(SKIP_HYDRATION_CACHE),
        includeHeaders: ['Content-Type'],
      })
    ),
This caching feature can be turned off by using:
provideClientHydration(
      withNoHttpTransferCache()
    ),
Transfer State
To move these cached responses from the server application to the client application, Angular uses Transfer State. This is essentially a key-value store that gets passed between the two environments.
Transfer State is available as an injection token, so you can use it to easily share data in specific use cases. The values stored within are serialized and deserialized using JSON.stringify and JSON.parse. This means that only primitives and plain objects will be serialized and deserialized without losing information.
const specialHeaderStateKey = makeStateKey<string>('special-header');

const trasnferSpecialHeader = (): void => {
  const transferState = inject(TransferState);
  const request = inject(REQUEST);
  const platformId = inject(PLATFORM_ID);

  if (isPlatformServer(platformId)) {
    transferState.set(
      specialHeaderStateKey,
      request?.headers.get('x-special-header') ?? null
    );
  }
};

const readSpecialHeader = (removeFromTransferState = false): string | null => {
  const transferState = inject(TransferState);
  const value = transferState.get(specialHeaderStateKey, null);

  if (removeFromTransferState) {
    transferState.remove(specialHeaderStateKey);
  }

  return value;
};

Analog.js
Earlier, I touched on Analog.js – a standout option within the Angular ecosystem. This full-stack meta-framework offers a contemporary developer experience, packed with capabilities such as:
-
- File-based routing – manual route setup becomes unnecessary. Just drop files into the src/app/pages directory, and Analog derives routes from that structure automatically.
- API routes – serverless functions can live directly inside your Angular project. Put files in the src/server/routes folder, and Analog turns them into API endpoints. Frontend and backend code sit together, which streamlines both development and deployment.
- Hybrid rendering – server-side rendering is enabled by default, but Analog gives you per-route control over whether each page uses SSR, SSG, or CSR.
- Vite-powered build system – rapid dev server startup, hot module replacement (HMR), and optimized production builds are all part of the package.
Analog.js fits especially well with content-rich sites, marketing pages, e-commerce platforms, and any project where SEO and initial render speed are top priorities. It also creates a leaner path for full-stack work.
You won’t lose anything from the existing Angular toolkit either – the framework stays fully aligned with the broader Angular ecosystem, so your current libraries, components, and tooling continue to work while you tap into Analog’s extras.
For a deeper dive, see our article on Analog.js.
Conclusions
Angular SSR has evolved significantly, moving from a complicated, experimental edge case into something you can put into practice without tearing your hair out. The payoffs are tangible: quicker first paint, stronger SEO visibility, and users who aren’t left watching loading indicators spin.
The essential takeaway is that SSR isn’t the right answer for every Angular app. A dashboard tucked behind authentication likely doesn’t need it. But when SEO is a factor, content is aimed at the public, or speed has a direct impact on your bottom line, SSR can shift the needle meaningfully. The smartest route is often hybrid – enable SSR where it delivers value and fall back to CSR elsewhere.
Going forward, SSR’s trajectory looks promising, with improvements in edge computing, more refined caching approaches, and a continued push from the Angular team on developer experience. If you’ve been hesitating, this is a solid moment to dive in.