
As of Mar. 23rd, 2025, this guide has been refreshed for Hybrid Rendering & the new Incremental Hydration (with a demo now included) in Angular v19.2.
Covered here are an initial SSR primer, a step-by-step setup walkthrough, and various optimization tips for Angular v19 (launched Nov 19th, 2024), all aimed at boosting initial load performance and improving the user experience of Angular-built web applications today.
If v19 isn't in your project yet, why wait? Personally, I believe the Hybrid Rendering and Incremental Hydration capabilities in v19 are production-ready, despite still being in Developer Preview at this time:
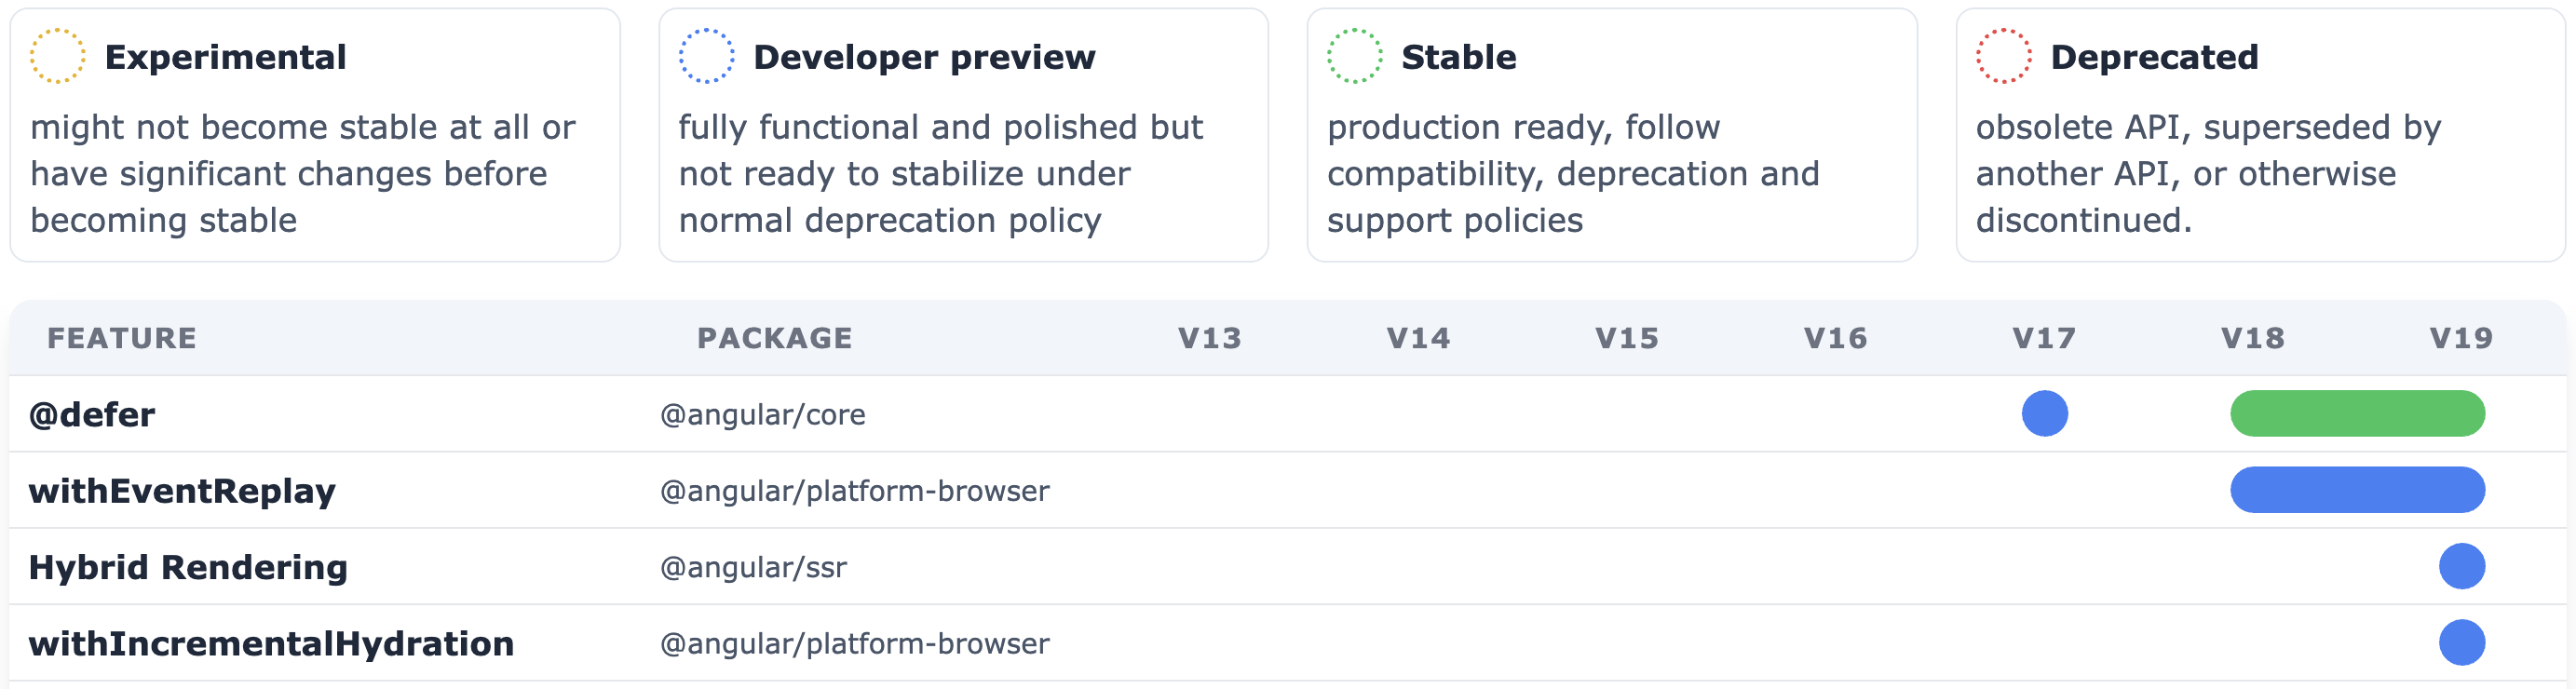
Explore every Angular feature in this Angular feature roadmap created by Gerome Grignon. Also, if you plan to integrate Material or CDK with SSR, you must have at least v18.
Lately—though it has been ongoing for a while now—the Angular team has invested significant effort and done outstanding work to boost initial load times. SSR is a key contributor to that objective for our framework of choice. Check out my July 2023 article to understand why initial load performance matters so much for your Angular applications.
Essentials
We will kick off with the fundamentals. If you are already comfortable with SSR, you can jump ahead to the next section on building.
Server-Side Rendering (SSR)
SSR is a web development approach where the (node in our case) server produces the HTML output of a web page (using JavaScript in our scenario), leading to quicker initial page loads. That translates into a more seamless user experience, notably for individuals on slower connections (like traveling by train in 🇩🇪 or 🇦🇹, which has been frequent for me lately 😏) or using low-cost devices. It also boosts SEO and makes content more crawlable for Social Media platforms and other bots, including the well-known ChatGPT.
Fresh Angular CLI projects will automatically ask about SSR (starting from Angular v17):
ng new your-fancy-app-nameIf you're working with an established application, all it takes is a single ng add command (available from Angular v17 onward).
ng add @angular/ssrHeads-up: After enabling SSR in your project, you might need to manually patch things up, such as importing CommonJsDependencies.
For the full setup details, refer to the angular.dev guide. That said, my suggestion is to move to the new Application Builder, as it includes SSR and SSG out of the box—details are in the build section below. Before going further, let's define SSG.
Static Site Generation (SSG)
Static Site Generation (SSG), which the Angular framework calls Prerendering, builds HTML pages at build time and delivers them as static files when a URL is hit. Unlike rendering dynamically per request, SSG pre-generates the HTML once and sends that same pre-built output to every visitor. This speeds up load times dramatically and boosts the user experience. But, because the HTML is saved on the server, it doesn’t work well when you have frequently changing content.
Key point: SSG doesn’t require a node.js or express server; you can host your app using nginx or Apache too.
Full-application Hydration (preview in v16, stable since v17)
Hydration is when Angular takes the SSR/SSG-generated static HTML and brings it to life on the client. Once the initial HTML is loaded in the browser, Angular’s JavaScript runs, "hydrating" that markup by wiring up event listeners and making it fully responsive. This merges the quick first paint of SSR/SSG with the fluid interactivity of an SPA, which further enriches the overall user experience.

Prior to Angular's Hydration, the statically prerendered DOM was wiped out and swapped for the client-rendered dynamic version, which could trigger layout shifts or a visible browser flicker—hurting your scores on tools like Lighthouse or WebPageTest. In my view, Angular SSR wasn't truly viable for production until Non-Destructive Hydration came along. That shifted in 2023, when the feature went stable with Angular v17.
One thing to keep in mind: with Incremental Hydration arriving in v19 (details below), the original Hydration approach is now labeled Full-application Hydration. And the best part—turning on Hydration in Angular is a breeze 💧
export const appConfig: ApplicationConfig = {
  providers: [
    provideClientHydration(), // use v16 full-app hydration
  ],
};
For those who remain on NgModules—whatever the reason—the equivalent setup looks like this:
@NgModule({
  providers: [provideClientHydration()],
})
export class AppModule {}
Deferrable Views (preview in v17, stable since v18) with @defer
Deferrable Views, known as @defer blocks, serve as Angular's built-in mechanism for declaratively postponing the loading of app components. This approach offers an alternative to route-based lazy loading, which relies on loadComponent() for Standalone Components or loadChildren() for route definition arrays and, previously, NgModules.
With the @defer block, you control the timing of a component's load and render, leveraging triggers such as on idle, on viewport, on hover, and on interaction. This strategy significantly enhances initial load performance by holding off non-essential components—like those situated below the fold—until necessary. Additionally, it works well for lazy-loading resource-intensive libraries, such as chart or complex table utilities. For a deeper dive, check my blog post.
Note: Although Deferrable Views function entirely without SSR, combining them with SSR can enforce client-side rendering (CSR) for specific components. This proves valuable for personalized content, such as user-specific lists or pricing. The server initially renders the placeholder for the @defer block, and the browser later loads the actual content once a trigger fires.
Deferrable Views Demo
Explore a working example in the deferrable views branch of this GitHub repository 😏
Event Replay (in preview since v18, but battle-proven by Google)
This example comes from the official Angular blog. Picture an app featuring a click button structured as:
<button type="button" (click)="onClick()">Click</button>Before Event Replay was available, the handler (click)="onClick()" did not fire until Hydration wrapped up on the client. Now, when it is turned on, JSAction already listens at the root of your application. This library intercepts events that rise to the top through native bubbling and then repeats them on those elements after Hydration finishes.

When this feature is enabled, Angular applications will no longer disregard user events prior to the completion of Hydration, letting visitors engage with the page during its loading phase. Developers don't have to take any extra steps beyond turning this option on.
Once more, activating Event Replay in your project couldn't be easier 🤩
export const appConfig: ApplicationConfig = {
  providers: [
    provideClientHydration(
      withEventReplay(), // use hydration with v18 event replay
    ),
  ],
};Note: As of now, this capability remains in Developer Preview, so proceed with care. Still, in my estimation, it's already robust enough for real-world deployment.
Hybrid Rendering (in preview since v19)
Angular v19 is set to roll out Hybrid Rendering, responding to modern web requirements as outlined in this RFC within the Angular GitHup repo. This mechanism lets you supply extra route-specific metadata to the server. Options such as rendering modes and custom response headers grant you more precise command over SSR.
At this point, we have the ability to choose the page rendering mode on a per-route basis:
- SSR: The page is rendered on the server upon each request (optimal for content that needs frequent updates)
- SSG: The page is rendered at build time and delivered as a static file (ideal for UX
& performance) - CSR: The page is rendered inside the browser (best for personalized content)
To achieve this, we need to introduce a serverConfig within app.config.server.ts, structured as follows:
/* src/app/app.config.server.ts */
// imports [...]

const serverAppConfig: ApplicationConfig = {
  providers: [provideServerRendering(), provideServerRoutesConfig(serverRoutes)],
};

export const serverConfig = mergeApplicationConfig(appConfig, serverAppConfig);
This is what we'll reference from main.server.ts, replacing the client-side appConfig:
/* src/main.server.ts */
// imports [...]

const bootstrap = () => bootstrapApplication(AppComponent, serverConfig);

export default bootstrap;
After that, we can set the renderMode for every individual serverRoute:
/* src/app/app.routes.server.ts */
// imports [...]

export const serverRoutes: ServerRoute[] = [
  { path: "ssr", renderMode: RenderMode.Server },
  { path: "ssg", renderMode: RenderMode.Prerender },
  { path: "csr", renderMode: RenderMode.Client },
];Note: For the routes to work completely, they must also be defined in app.routes.ts.
Furthermore, the server configuration can include advanced capabilities such as server-side 301 redirects or 404 not found error handling.
/* src/app/app.routes.server.ts */
// imports [...]

export const serverRoutes: ServerRoute[] = [
  // [...],
  { path: "redirect", renderMode: RenderMode.Server, status: 301 },
  {
    path: "error",
    renderMode: RenderMode.Server,
    status: 404,
    headers: {
      "Cache-Control": "no-cache",
    },
  },
  { path: "**", renderMode: RenderMode.Server },
];
Want to try it yourself? Check out this v19-ssr demo by the awesome Matthieu Riegler.
Note: This feature is still in Developer Preview as of now, so use it with care—the API might shift.
Incremental Hydration (in preview since v19)
Partial Hydration, which has been renamed to Incremental Hydration, was introduced at ng-conf and Google I/O 2024. It's a method for hydrating an app piece by piece after server-side rendering, which speeds up initial load times and boosts runtime performance by reducing upfront JavaScript. It's built on the beloved @defer API, which we've all grown fond of since Angular v17. With this approach, Angular can deliver server-rendered HTML and hydrate deferred blocks on the client only when they're triggered to do so.

The Angular team (a big thank-you goes out to Jessica Janiuk! Incidentally, check out her talk on Incremental Hydration in Angular v19 on YouTube) wrapped up the RFC in the Angular GitHub repository, and the team is now actively building a prototype. An experimental release is slated for v19, aimed squarely at performance-sensitive applications 🥳
For a quick test, just add withIncrementalHydration() in your app.config.ts:
import { provideClientHydration, withIncrementalHydration } from "@angular/platform-browser";

export const appConfig: ApplicationConfig = {
  providers: [
    // [...]
    provideClientHydration(withIncrementalHydration()),
  ],
};
Keep in mind: when you opt into withIncrementalHydration(), Event Replay turns on by default, so that provider can be dropped.
Then, you define a Hydration Trigger using one of these options:
hydrate oncombined with a trigger (identical to the triggers for@defer; this list of built-in triggers is a handy reference)hydrate whenpaired with a boolean symbol, Signal, or function that acts as the triggerhydrate never, in which case the component is server-rendered but stays unhydrated forever (ideal for static content)
hydrate on
@defer (on viewport; prefetch on idle; hydrate on hover) {
  <app-deferred-hydration />
}
Before a component reaches the viewport, its static, server-side rendered HTML is already in place. Meanwhile, the associated JavaScript bundle gets prefetched during idle periods—much like the Router's PreloadingStrategy—and only when the user hovers does the JS (including event handlers and all interactivity) get hydrated into the browser. This differs sharply from the standard whole-app hydration, which hydrates every component simultaneously.
hydrate when
@defer (hydrate when isUserLoggedIn) {
  <app-deferred-hydration />
}
By default, the component is rendered on the idle trigger of @defer, meaning it appears once the app has fully bootstrapped. However, hydration does not start until isUserLoggedIn evaluates to true.
hydrate never
@defer (on viewport; hydrate never) {
  <app-deferred-hydration />
}
The component is rendered within the viewport, yet it is never hydrated—consequently, no event handlers are attached to it.
Incremental Hydration Demo
Be sure to experiment with this delightful capability, starting with my Incremental Hydration Demo hosted on GitHub 😏
Give back some love
Given that this capability remains in an experimental state, contribute to its enhancement by sharing your insights through the RFC found in the Angular GitHup repo.
Build
Starting with Angular v17, we are presented with two distinct approaches for constructing our Angular app.
Angular's new Application Builder (all-in-one)
As previously noted, it is advisable to migrate to the new Application Builder, which leverages esbuild and Vite. When compared to Webpack, esbuild provides quicker build times along with more precise and granular bundling. The resulting smaller bundle size enhances initial load performance, whether SSR is enabled or not. Additionally, Vite offers a high-speed development server that supports exceptionally rapid Hot Module Replacement (HMR).

What's more, SSR and Prerendering (SSG) both come turned on by default, as seen in this snapshot taken from the Angular Docs which lists the Angular Builders (notice the absence of @angular-devkit/build-angular:server in that table):

A single ng b command is all you need: it kicks off both the browser and server builds simultaneously. The Angular CLI then inspects your Router configuration(s) and prerenders every route that doesn't take parameters, leaving nothing for you to configure manually. For routes that do require parameters, you can list them in a text file if that's what you need. To get started with the migration itself, take a look at my guide on automated App Builder migration.
If you've stuck with Webpack (for whatever reason)
When Webpack remains your choice for building the app, the browser builder has to be set up in your angular.json — or in project.json, provided you're on Nx. Don't worry: running ng add @angular/ssr handles this configuration step for you automatically.
{
  "server": {
    "builder": "@angular-devkit/build-angular:server",
    "options": {
      "outputPath": "dist/your-fancy-app-name/server",
      "main": "server.ts",
      "tsConfig": "tsconfig.server.json"
    }
  }
}
The server.ts file mentioned above is located in the project's root directory and serves as the entry point for your server-side application. When using this dedicated server builder, you'll also find a corresponding tsconfig.server.json configuration file. In contrast, the previously recommended Application Builder consolidates both tsconfig files into one, offering a more streamlined setup.
Next, let's take a brief look at the build scripts involved.
A key point to remember: If you haven't yet adopted pnpm, you're really missing out on its benefits. That said, you can just as easily use npm run ... or yarn ... commands in place of pnpm ....
pnpm dev:ssr
ng run your-fancy-app-name:serve-ssr
In the same way that ng s provides hot reloading while you're coding, this command also relies on SSR behind the scenes. The trade-off is that it operates at a slightly reduced pace compared to ng s, so its main use case is limited to a fast sanity check of SSR behavior on localhost rather than daily development work.
pnpm build:ssr
ng build && ng run your-fancy-app-name:server
In production mode, this command compiles both the browser app and the server script, placing the output in the dist folder. It’s the go-to when preparing a build for deployment or conducting performance checks. For the latter, tools like serve can be used to host the app on your localhost.
Deploy
When it comes to deployment, you have two pathways. Although both are viable, the second is the one I suggest.
Using on-demand rendering mode via node server
Launches the node server that delivers the application with SSR enabled.
pnpm serve:ssr
node dist/your-fancy-app-name/server/main.js
You can find a complete Docker example in this post.
Important: A specific Node.js version is mandatory for Angular; check the version compatibility list for more info.
Opting for SSG with build-time SSR (suggested)
This approach avoids any node environment on the server and significantly outperforms the alternative.
pnpm prerender
ng run your-fancy-app-name:prerender
This command generates the prerendered routes for your application. The resulting static HTML files are bundled with the browser build rather than the server one. This means you can take the browser build and deploy it to any hosting service you prefer, such as nginx. Essentially, this process mirrors a standard build without SSR, except that you'll have a few additional directories (and index.html files) included.
Heads-up: When using the new Application Builder—which is the recommended approach—you can skip all the manual build and prerender steps. They're automatically handled by ng b. In short, you won't need to do any extra work to enable SSR and SSG during the build process—pretty convenient, right? 😎
Debug
When debugging, start by checking for mistakes in your angular.json (or project.json) configuration or any faults in your server.ts. Should those check out fine, there's no standard troubleshooting method for SSR and SSG issues. If you run into any problems, don't hesitate to reach out via this email.
The most frequent pitfall and how to steer clear
Objects that are specific to browsers, like document, window, or localStorage, are NOT present in the server application. Because these aren't available in a Node.js environment, any attempt to use them will trigger errors. You can sidestep these issues by relying on the document injector or by explicitly confining that code to run in the browser only:
import { Component, inject, PLATFORM_ID } from "@angular/core";
import { DOCUMENT, isPlatformBrowser, isPlatformServer } from "@angular/common";

export class AppComponent {
  private readonly platform = inject(PLATFORM_ID);
  private readonly document = inject(DOCUMENT);

  constructor() {
    if (isPlatformBrowser(this.platform)) {
      console.warn("browser");
      // Safe to use document, window, localStorage, etc. :-)
      console.log(document);
    }

    if (isPlatformServer(this.platform)) {
      console.warn("server");
      // Not smart to use document here, however, we can inject it ;-)
      console.log(this.document);
    }
  }
}
Browser-Exclusive Render Hooks
Two render hooks, afterNextRender and afterRender, offer a different approach from injecting isPlatformBrowser. These hooks are restricted to the injection context — which essentially means they are available in a component’s constructor or field initializers.
With afterNextRender, you supply a callback that executes once following the next change detection cycle, bearing some resemblance to lifecycle init hooks. This hook suits one-time setup tasks, like incorporating third-party libraries or accessing browser-specific functionality.
export class MyBrowserComponent {
  constructor() {
    afterNextRender(() => {
      console.log("hello my friend!");
    });
  }
}
When the injection context isn't available, you'll need to pass the injector explicitly.
export class MyBrowserComponent {
  private readonly injector = inject(Injector);

  onClick(): void {
    afterNextRender(
      () => {
        console.log("you've just clicked!");
      },
      { injector: this.injector },
    );
  }
}
The afterRender hook, by contrast, runs after every subsequent change detection cycle. Treat it with the same level of care you’d apply to ngDoCheck or ng[Content|View]Checked, given that Change Detection fires frequently in any Angular application — at least until you adopt a zoneless approach, a topic we’ll save for a separate article 😎
export class MyBrowserComponent {
  constructor() {
    afterRender(() => {
      console.log("cd just finished work!");
    });
  }
}
For those interested in a more thorough exploration of these hooks, Netanel Basal’s blog post is a great resource to check out.
Angular Hydration in DevTools
Matthieu Riegler, an outstanding Angular collaborator, has just integrated hydration debugging into Angular's DevTools! These tools run on all Chromium-based browsers, as well as Firefox—though why anyone would still opt for that outdated browser is beyond me? 😏

Watch for the 💧 marker that flags hydrated components. Although this capability was introduced with the Angular v18 release, it is compatible with earlier versions as well.
Further SSR Debugging Suggestions
Below are a few more personal recommendations for debugging SSR setups:
- DevTools: Beyond the refreshed Angular DevTools panel, check your rendered markup through the Elements tab and monitor API traffic in the Network tab. Also, don't forget to throttle the connection there while testing performance.
- Console: I tend to route everything into my Console. A logger library isn’t something I need—simple
console.log()calls (and perhaps a couple of other levels) do the job. These logs appear in the terminal where you launchedng b,pnpm dev:ssr, orpnpm serve:ssr. And obviously, there's no reason to discuss sending browser console output to production, right? - Node.js: Launch your SSR server with the --inspect flag for extra details:
node --inspect dist/server/main.js - Fetching: Confirm that all required data is present at render time. Leverage Angular's TransferState to move data between server and client.
- Routing: Verify that every route is properly defined and consistent across the
browserandserverbundles. - Environments: Double-check that environmental variables are configured appropriately for both the
browserandserverbuilds. - 3rd-party Libs: As usual, exercise caution with your dependencies. Certain packages may be flawed or incompatible with SSR scenarios. Handle such cases with conditional imports or platform detection—or, ideally, drop those libraries altogether.
That covers everything I've gathered so far. If you have more tips to contribute, feel completely free to reach out to me!
Advanced
Turning Off Hydration for Specific Components
Due to issues like direct DOM manipulation, certain components might fail when hydration is active. A simple fix is to apply the ngSkipHydration attribute on the component's selector to exclude that entire component from the hydration process.
<app-example ngSkipHydration />Another option is to bind to ngSkipHydration at the host level.
@Component({
  host: { ngSkipHydration: "true" },
})
class DryComponent {}
Treat this as a fallback of last resort, and apply it with caution. Any component that relies on skipping hydration should be thought of as a defect that requires attention.
Prefer the Fetch API over XHR
The Fetch API is a modern, promise-based method for handling HTTP requests, delivering a syntax that is both clearer and more concise than the long-standing XMLHttpRequest. It also excels in error handling and comes with advanced capabilities like response streaming and customizable request options. The Angular team also endorses its adoption in SSR environments, as referenced here.
To activate this, just insert withFetch() within your provideHttpClient() call:
export const appConfig: ApplicationConfig = {
  providers: [provideHttpClient(withFetch())],
};
For those who continue to work with NgModules (whatever the rationale), the equivalent code looks like this:
@NgModule({
  providers: [provideHttpClient(withFetch())],
})
export class AppModule {}
Configure SSR API Request Cache
When executing on the server, the Angular HttpClient stores every outgoing network request. Those responses are serialized and sent to the client embedded in the server-rendered HTML. On the browser side, HttpClient looks for cached data before issuing a fresh HTTP call during the initial page load, and if a match is found, it uses the cached entry instead. Once the app reaches a stable state in the browser, HttpClient no longer relies on that cache.
In its default configuration, HttpClient caches all HEAD and GET calls that lack Authorization or Proxy-Authorization headers. To modify these defaults, you can pass withHttpTransferCacheOptions while setting up hydration:
export const appConfig: ApplicationConfig = {
  providers: [
    provideClientHydration(
      withEventReplay(),
      withHttpTransferCacheOptions({
        filter: (req: HttpRequest<unknown>) => true, // to filter
        includeHeaders: [], // to include headers
        includePostRequests: true, // to include POST
        includeRequestsWithAuthHeaders: false, // to include with auth
      }),
    ),
  ],
};
Use Hydration support in Material 18 and CDK 18 💧
From Angular Material 18 onward, every component and primitive ships with full SSR and Hydration support. Check out this blog post for details. To update an existing Angular Material project, follow the official guide on moving from Material 2 to Material 3.
Combine SSR for static & CSR for user content 🤯
The Angular v17 Deferrable Views mechanism, cited earlier, lets you quickly merge SSR/SSG with CSR 🎉
It works simply: every @defer component has its @placeholder rendered server-side, while the actual content loads and paints in the browser only after an on or when trigger fires. See how Deferrable Views are used and triggered.
Below are a few basic use cases for mixing SSR with CSR:
- Fixed pages: Pick SSR (SSG)
- Static sections with real-time updates: Defer the live segments while keeping the rest SSR
- User-specific pricing on a product list: Defer those price widgets while SSR covers the remainder
- User-dependent list rows: Defer the whole list component and keep other parts SSR
In short, anywhere CSR is essential (for user-specific content), wrap it with a @defer. Serve spinners or similar fallbacks inside @placeholder (or @loading) to signal on-going fetching. Ensure sufficient space is set aside for deferred regions so layout stays stable—never make the user endure layout jumps!
SEO and Social Media Crawling 🔍
To rank well with Google and/or social media scrapers, include every required meta tag via SSR. You'll find a thorough list, plus tools and recommendations, right here.
export class SeoComponent {
  private readonly title = inject(Title);
  private readonly meta = inject(Meta);

  constructor() {
    // set SEO metadata
    this.title.setTitle("My fancy page/route title. Ideal length 60-70 chars");
    this.meta.addTag({ name: "description", content: "My fancy meta description. Ideal length 120-150 characters." });
  }
}
Leverage SSR & SSG with AnalogJS 🚀
AnalogJS serves as the framework for Angular, drawing inspiration from Next.js (React), Nuxt (VueJS), SolidStart (Solid). It delivers SSR capabilities during both development and production builds. For deeper insights, check out the version 1.0 announcement from Brandon Roberts or keep an eye out for my soon-to-be-published article 😏
SSR & SSG in Angular with I18n
Because Angular I18n operates exclusively at build time, its capabilities are quite constrained. Consequently, we advise turning to Transloco (alternatively NGX-Translate). Executing ng add @jsverse/transloco prompts you about SSR integration. Yet, there's also the option to adjust the SSR configuration manually, as outlined in the Transloco Documentation:
@Injectable({ providedIn: "root" })
export class TranslocoHttpLoader implements TranslocoLoader {
  private readonly http = inject(HttpClient);

  getTranslation(lang: string) {
    return this.http.get<Translation>(`${environment.baseUrl}/assets/i18n/${lang}.json`);
  }
}
export const environment = {
production: false,
baseUrl: "http://localhost:4200", // <== provide base URL for each env
};Everything gets server-side rendered in the default language first, then switches to the user's language (if different) on the client. While this approach works in most cases, the visible text swap is definitely far from ideal. We also have to make sure no layout shifts happen during the switch! If you have suggestions for improving this, feel free to reach out!
SSR and Hydration with Native Federation
With version 18.2.3, the Angular Architects' native federation package finally brings SSR support to the shell app. This enables combining Module Federation with SSR and SSG in your Angular project. Native Federation exposes an API identical to webpack Module Federation, yet relies on browser-native Import Maps, which is why it functions seamlessly with esbuild – Angular's new Application Builder as well.
For further details on this technique and how to begin, check out this article by the module federation guru Manfred Steyer.
Caution with PWA
Exercise caution when mixing Angular SSR with the Angular PWA service worker, as the behavior diverges from standard SSR. While the initial request is rendered server-side, any following requests are intercepted by the service worker and get rendered on the client instead.
This is frequently the desired outcome. However, to force a fresh request, the freshness option is available as your Angular PWA navigationRequestStrategy. This setting makes the app attempt a network call first and then fall back to the cached index.html when offline. For details, see the Angular Docs and this answer on Stack Overflow.
Outlook
The upcoming milestone is streamed SSR targeting zoneless applications. To see what's on the horizon for future Angular releases, take a look at the roadmap:
Performance Workshop
Our workshop lineup covers a wide range of Angular topics for those wanting to go in-depth — offered in English and German.
- Performance Workshop 🚀
- Best Practices Workshop 📈 (with performance related subjects included)
- Accessibility Workshop ♿
Conclusion
To wrap up, adopting Server-Side Rendering (SSR) in Angular — together with Static Site Generation (SSG), hydration, and event replay — provides a considerable quick boost to how fast your Angular applications first load. By introducing Incremental Hydration, Angular has moved closer to becoming the preferred framework for creating high-performance web experiences — a reputation it hasn't historically held.
This brings a better user experience, especially on slower connections or lighter hardware, and it boosts SEO and crawlability for your web app as well. With the tips and best practices from this guide, improving your apps' load performance takes minimal effort. On top of that, the new Application Builder makes building and deploying your projects much more straightforward.
If you have any further questions, don't hesitate to reach out to me, or consider enrolling in our Performance Workshop 🚀 or the Best Practices Workshop 📈 to dive deeper into optimizing Angular applications.
Alexander Thalhammer authored this blog post. You can also find me on GitHub, X, or LinkedIn.
References
- Why is Initial Load Performance so Important? by Alexander Thalhammer
- Angular v16 – official blog post by Minko Gechev
- Angular Update Guide to V17 incl. migrations by Alexander Thalhammer
- Angular v17’s Deferrable Views by Alexander Thalhammer
- Angular v18 – official blog post by Minko Gechev
- Angular’s after(Next)Render hooks by Netanel Basal
- Angular Event Replay blog post by Jatin Ramanathan & Tom Wilkinson
- Angular Incremental Hydration on YouTube by Jessica Janiuk
- Angular SSR Docker example by Alexander Thalhammer