Why the Harness Deserves Your Attention
Since late May 2026, I've been publishing a series on which LLM works best for Angular development, followed by a look at the apps and harnesses you might pair with it. In that second piece, I blurred the lines between app and harness, treating them almost interchangeably. This post sets the record straight.
The focus here is squarely on the harness—what it genuinely is and how to build one for your Angular projects that lets an agent operate smoothly and turn out generated or refactored code that I'd feel comfortable merging into a long-lived, actively maintained codebase.
In Short: Quality Lives in the Harness
If you're skimming, here's the gist: the harness is the software wrapped around the model—it equips the LLM with tools and drives the agentic loop, and it's the layer where your influence matters most. Get there in five moves: start from a clean baseline, enforce formatting and linting on every commit, write your own Angular style guide (the most impactful single file in this entire setup), create an AGENTS.md operating contract, and keep thin config files that point every agent at the same rules. After that, make sure the agent gets rapid feedback, from ng lint through to Playwright. Everything covered here is available in the companion ng-agentic repository.
Defining the Harness
A quick clarification for Angular folks: I'm not talking about the Angular CDK ComponentHarness used in component testing. Here, a harness means the software that surrounds the model.
Think of the harness as the container for the model. What often gets overlooked is this: by itself, even a top-tier LLM behaves like advanced autocomplete—the kind GitHub Copilot has offered for years. Its only real capability is generating text in response to our prompts. So how does it manage to modify our code?
The harness is the answer. It grants the model tool calling capabilities, turning that autocomplete into something that can act: list the working directory, scan the codebase for inject(, open a source file, make an edit, run ng build. Rather than just replying with text, the model outputs a structured tool request, the harness executes it, and the outcome feeds back into the conversation. (Simon Willison offers a clear, practical explanation of how coding agents function if you'd like more detail.) Simply put, the harness is the layer that empowers the model to read our projects and then alter them.
That feedback loop is the core trick. A coding agent is essentially an LLM running in a cycle: it suggests an action, the harness executes the tool and returns the output, the model examines that output and picks the next step—open another file, patch the error it introduced, run the test suite again. This cycle is what most people now mean by AI agents: the harness oversees context, tools, prompts, and control flow, while the model supplies the reasoning. Condensed into a memorable equation from LangChain's Vivek Trivedy in The Anatomy of an Agent Harness: Agent = Model + Harness.
That leap from autocomplete might seem huge—but it happened incrementally. First, we copy-pasted code into ChatGPT and manually moved the answers back, basically acting as the loop ourselves. Then chats moved into our IDEs, next to the code. Tool calling arrived, and the wrapper gained the ability to do rather than just talk. Now, the harness runs the full loop for us. Models did improve over time, of course—but each of these steps was a harness improvement.
My own view? The harness is where everyday quality is determined, not the model. Two developers with the exact same Opus or GPT model can see wildly different outcomes, purely because one harness has the right tools, strong project context, and practical guardrails—and the other doesn't. That's the reason this post is here: the harness is the piece you own, so configuring it well for Angular isn't optional. In my judgment, it's the most valuable work you can do.
Model, Harness, or App—Keeping Them Straight
We've covered what the harness does, but it's easy to mix it up with the model underneath and the app around it. Let's make it concrete with the setup I'm using for Angular work right now:
- The model (our LLM): Opus—the intelligence (and yes, I'm hoping for Fable 5 to return soon 😏).
- The harness: Claude Code—supplies Opus with its tools and manages the loop described above.
- The app: the Claude Desktop application—the interface I happen to be viewing everything through.
What throws many people off is this: you can change the app without affecting the harness or model. The same Claude Code + Opus combination runs in multiple environments:
- in the Claude Desktop app,
- in the Claude Code CLI, operating directly in the terminal—its original home,
- as the official Claude extension in VS Code,
- as the official Claude plugin in WebStorm and other JetBrains IDEs,
- and even within Cursor—whose extension is essentially identical to the VS Code one, given Cursor's origins as a VS Code fork.
Same brain, same harness, five distinct windows. The app is mainly the UI you're looking at. Everything said about the Claude Code harness also applies to Codex—it works in the Codex app, directly in the terminal, or via extensions in VS Code, JetBrains IDEs, or Cursor.
Here's where it gets engaging. Inside Cursor, the Claude extension isn't the only option—you can switch to Cursor's own harness, still powered by Opus underneath. That gives you one app and one model but two different harnesses to pick from. It's the clearest way I've found to really sense the distinction: everything stays the same except the harness.
And harnesses vary in quality. Based on my experience—backed by some benchmarks—Cursor's own harness can draw noticeably more out of the same Opus model than the Claude extension does: better results, smoother interaction. The gap can be striking: in an independent benchmark cited in Paweł Józefiak's harness comparison, the same planning task with the same model improved from 77% with Claude Code to 93% with Cursor—only the harness changed. That's not to say Cursor dominates every harness benchmark; the Artificial Analysis chart below shows a different trend for another Opus comparison. The takeaway is more subtle and more meaningful: the wrapper affects the outcome.
The reason isn't mysterious—it comes down to fine-tuning. Teams like Cursor invest heavily in shaping their tools, system prompt, and tool descriptions for each new model, and that careful tuning is what extracts the extra gains. So why would anyone still choose the Claude extension inside Cursor? A major factor is cost. With the Claude extension, Opus runs on your existing Claude subscription, while Cursor's harness charges per API token. For substantial daily Angular work, that's the difference between a predictable monthly fee and a genuinely intimidating API charge.
So that's the full picture: the model is the intellect, the harness gives it capability and drives the loop, and the app is just the viewport. You can combine them with surprising flexibility—and as the rest of this post will demonstrate, the harness is the layer truly worth perfecting.
When the Claude Code Harness Was Exposed
If you had any doubt that the harness constitutes its own engineering discipline, April 2026 supplied an accidental demonstration. A Claude Code npm package shipped with source maps disclosing a substantial portion of the TypeScript source code, letting developers examine the harness from within.
What was visible? No hidden model, no secret API—mostly the harness itself. The leaked code revealed Claude Code's system prompt, the definitions and logic for its tools (bash, read, write, edit, glob, grep), the structure of its agentic loop, and how it integrates CLAUDE.md. In other words, precisely the components we've been calling "the harness" throughout. Anthropic's official response characterized it as a packaging issue rather than a customer-data breach.
For me, the most intriguing insight was the confirmation: a significant share of Claude Code's apparent capability resides in the system prompt and tool descriptions, not solely in the model weights. That's the harness functioning as intended—and a solid reminder that this layer is tangible, investigable, and absolutely worth getting right.
Which Harness Should Angular Developers Choose?
So if the harness is the layer worth perfecting, the natural follow-up is: which one do we pick for Angular? The honest answer is that I can't offer proof. No benchmark exists that isolates "best harness for Angular" as a metric, and I doubt one ever could – so what follows is my own subjective take, consistent with the rest of this series.
Still, there is one venue where we truly can evaluate setups while holding the model constant. The Artificial Analysis Coding Agent Index is among the rare benchmarks that permit this – for instance, the same Opus model at medium effort has been run through opencode, Cursor CLI, and Claude Code, as seen here:
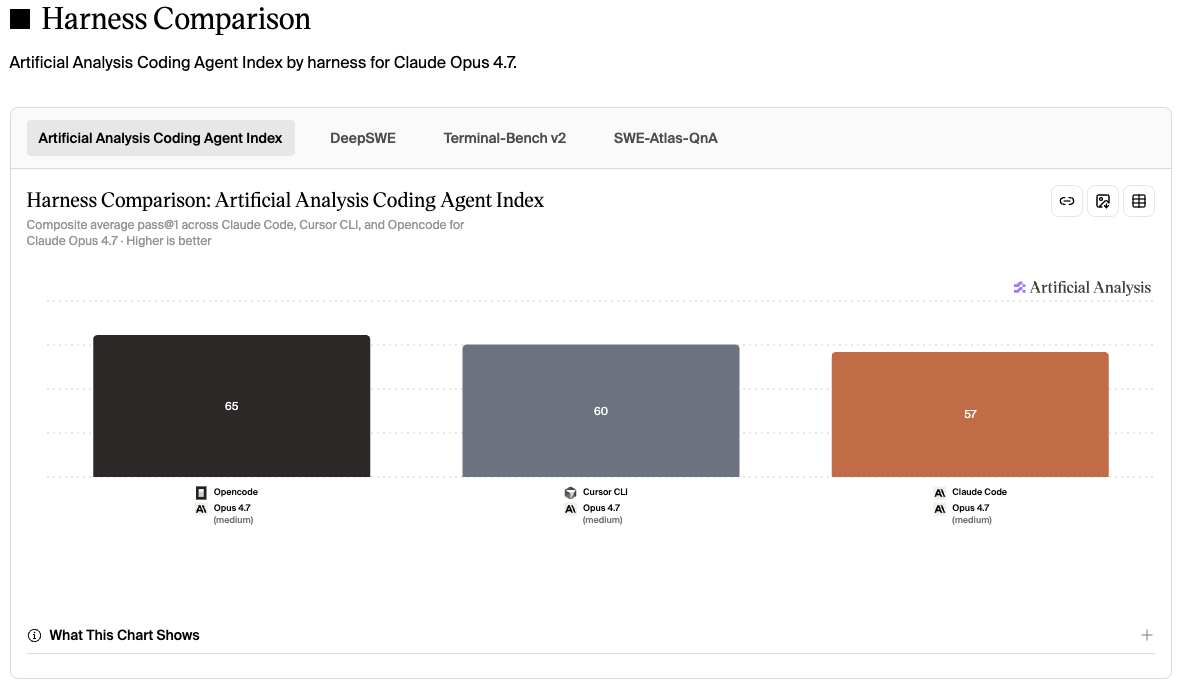
That chart, provided by Artificial Analysis, compares the same Opus model at medium effort across opencode, Cursor CLI, and Claude Code – follow the link for the live view. This is precisely why it qualifies as a harness benchmark rather than yet another model ranking.
Working in the Terminal
For those who spend their days in the terminal, these are the harnesses worth exploring, roughly in the order I'd try them today:
- opencode – if a single suggestion is all you want, begin here. It's the go-to open-source option – a slick, terminal-based harness with a large following, and it's fully bring-your-own-key and model-neutral, so you can direct it at Opus, GPT, Gemini, or even something local.
- Pi – the choice for those who like to tinker. A refreshingly lean harness built on a small core that you extend yourself through TypeScript extensions and skills. Great if reshaping your toolkit brings you joy; probably more than you need if you simply want to crank out code.
- Claude Code – a while back, this was the front-runner: among the best harnesses and one of the finest terminal experiences available, plain and simple. These days, though, I wouldn't pick it for terminal use. It's the same harness that now drives the Claude Desktop application, and the experience there – and in the other super apps – has improved so much that the bare CLI no longer feels worth it.
The Super Apps
That said, I find myself returning again and again to the super apps: Codex, the Claude Desktop app, and Cursor. As I covered in the apps and harnesses post, these three offer the broadest, most refined feature set – and they happen to bundle excellent harnesses alongside them. As far as apps go, my personal favorite is Codex.
So what does that leave us with? All three of my preferred super apps (Codex, the Claude Desktop app, and Cursor) are all solid picks. For me, it largely hinges on whether I want GPT or Opus handling the workload – and whether I'm in the mood to alternate between them based on the task at hand. If switching appeals to you, you can either manage several apps and harnesses (my usual approach) or simply route everything through Cursor, given that it accommodates all the major models under one umbrella.
Staying in Your IDE
Of course, not everyone wants to abandon their editor. If you prefer the harness to live inside your IDE, Cline is my recommendation: an open-source, model-agnostic extension that fits into VS Code (as well as its forks and JetBrains products) and executes whatever model you supply – Opus, GPT, Gemini, or something local. It shares the bring-your-own-key, vendor-neutral ethos of opencode, just embedded in your editor rather than the terminal.
Here's a pleasant surprise: you don't always need to pay per API token. Cline can operate on the subscriptions you already hold instead of metered API charges – log in with your OpenAI credentials to tap into your ChatGPT plan via the OpenAI Codex provider, or connect a locally authenticated Claude Code CLI to leverage your Claude plan. Either route delivers the same flat-fee, no-surprise-billing benefit I highlighted earlier, now within your editor. (The Claude path sacrifices token-by-token streaming and some prompt caching to get there, but for everyday Angular tasks that's a fair bargain.)
One configuration I'd gently caution against, despite it being the most widespread I encounter: plain VS Code with GitHub Copilot. The GPT model within is more than capable – this isn't a model issue. The problem is that Copilot's roots are in autocomplete, and its agent functionality still lags behind the purpose-built harnesses, in my view. Tellingly, even the VS Code team now describes Copilot in terms of "the harness" – "The model is the engine. The harness is the car." – and notes it's where their engineering focus lies. They're spot on. So if your entire AI stack is still VS Code plus Copilot, that's precisely the setup worth moving beyond.
The Fourth Factor: Your Existing Codebase
Up to this point, the post has centered on three components you put together: the model, the harness, and the app. Yet a fourth element quietly influences everything the agent generates, and it's the one you can't select from a dropdown: the codebase you already have.
Here's the reason it carries so much weight. An agent doesn't produce Angular in isolation – it first examines the code surrounding a change, then mirrors it. Hand it a clean, contemporary, consistent codebase and it receives the ideal template: it sees your actual components, your signal stores, your services, and crafts new code that resembles what's already in place. In such a codebase, honestly, the harness configuration matters less – the style guide, the AGENTS.md, the lint rules are still useful, but the code itself is already doing a significant portion of the instruction.
Now invert that picture. Aim the same agent at a legacy codebase – any scattered everywhere, NgModules, *ngIf, RxJS where signals belong, loose typing, a minimal ESLint setup – and it will mirror that instead. It will happily replicate the disorder, because that's all it perceives. This is where configuration shifts from a luxury to the core defense: a robust style guide, strict TypeScript, a comprehensive ESLint configuration, and a definitive AGENTS.md are what counteract the poor patterns in the existing code and elevate the output to the quality you genuinely seek.
So there's an inverse dynamic worth remembering: the messier your codebase, the more your configuration matters. On a spotless greenfield project, a lighter approach suffices. On the brownfield systems most of us deal with, the guardrails and style guide aren't optional extras – they're the sole barrier between you and an agent that happily produces 2019-era Angular because that's the pattern it discovered.
With a harness chosen – and a realistic understanding of the codebase you're directing it at – the real effort now begins: configuring it to generate Angular the way we intend. That's the focus of the remainder of this post.
Putting the Harness Together: A Step-by-Step Setup
Let's move from concept to configuration. All of the pieces I describe below are collected in the companion repository, ng-agentic: a minimal Angular workspace created from scratch with Angular CLI 22 and then evolved, one commit at a time, into an environment where any agent can operate effectively. Clone the repo, examine the commit history, or build the same structure directly into your project — the destination is a workspace where the harness delivers the Angular code we're after.
The configuration consists of five main elements:
- begin with a clean CLI scaffold, or take stock of your existing brownfield baseline
- make formatting and linting mandatory, not optional
- provide the agent with your Angular style guide
- transform
AGENTS.mdinto a binding operating agreement - connect every IDE, app, and agent back to the same set of rules
The greenfield versus brownfield decision surfaces right away, in the very first command. For this repo I chose the greenfield path — a fresh ng new — simply because it allows each step to be demonstrated cleanly in isolation. Yet the reality for most of us is different: we're integrating the agent into an existing Angular application — brownfield, legacy or otherwise — which is by far the more frequent scenario. The encouraging part is that nearly every step remains the same regardless of your starting point. The sole greenfield-exclusive action is the ng new command itself — on an existing project you skip that step and instead layer the identical tooling and practices on top of your current codebase.
Begin with a Standard ng new
The greenfield route is straightforward — a fresh project generated directly from the Angular CLI:
ng new ng-agenticThis produces the familiar scaffold — configuration files, dependencies, a starting component, and an initialized Git repository. The CLI can also bootstrap agent configuration for us, either when ng new prompts us about which AI tools we intend to use, or subsequently through ng generate ai-config — and this is where the initial AGENTS.md comes from, the file that every agent consults first. We'll elevate that file to do meaningful work shortly; at this stage it simply needs to be present.
The sole cleanup in that first commit involved removing a few redundant instructions from the generated AGENTS.md and applying the formatter across the board:
pnpm format # runs prettier --write .Handling that manually with every commit becomes tedious quickly — which brings us directly to the next area to automate.
Enforce Quality: Make Formatting and Linting Unavoidable
When you hand an agent the keys to the codebase, it will produce code in whatever style the prompt happens to steer it toward, and it will just as readily commit partially formatted output if there's nothing to prevent it. So before I teach the harness how I want my Angular structured, I establish a baseline it cannot go below — formatting and linting that execute automatically on every commit, regardless of whether the changes originated from me or from the model.
The enforcement mechanism is a Husky pre-commit hook:
pnpm add -D husky
pnpm exec husky init
husky init creates the .husky/pre-commit file; I configure it to run the project's format script, ensuring every commit gets prettier-formatted before it's finalized. No more "fix formatting" commits, and no more back-and-forth with the agent over quote styles and trailing commas.
Formatting addresses only part of the equation. For meaningful code quality, I integrate Angular ESLint, which has awareness of Angular specifics beyond what plain TypeScript linting provides:
ng add @angular-eslint/schematicsRunning a full-project lint on each commit is inefficient, so I limit it to the staged files with lint-staged and invoke that through the hook instead:
{
  "lint-staged": {
    "*.{html,js,ts}": ["eslint --fix", "prettier --write"],
    "*.{css,json,md,scss}": ["prettier --write"]
  }
}
The default Angular ESLint preset is relatively lenient, so I refine eslint.config.js with the stricter rules that genuinely matter to me, followed by a one-time cleanup using ng lint --fix.
And here's a small detail that encapsulates the entire point of this article. After the auto-fix runs, two issues remain that ESLint won't address on its own — a component lacking OnPush and a function missing its return type. Both are mechanical fixes, so rather than resolving them manually, I pass them to the agent and let the harness close its own loop. The guardrail flags the problem, the model applies the fix, and the hook verifies the resolution on the way back in.
A quick note for the brownfield folks: that first ng lint won't report two warnings — it'll show a few hundred. Don't attempt to --fix the entire pile in one monumental commit — treat that output as your honest baseline, the true starting point of your code, and work through it methodically. That's precisely the kind of backlog the agent can tackle effectively later, though that's a topic for another article.
Give the Agent Your Style Guide
If there's one concept to take away from this entire post, this is it. The style guide is the most impactful file in the entire setup — it outweighs the linting, the MCP servers, and even the carefully crafted AGENTS.md we'll cover next.
Here's the reasoning. A capable model already understands Angular — at a general level. Ask it for a component and you'll get something perfectly acceptable, perfectly standard: maybe Jest where you've adopted Vitest, maybe outdated NgModule patterns from 2021, maybe RxJS where you'd choose a signal. What the model doesn't have is insight into how your team writes Angular — your specific stack, your established practices, your preferences. The style guide is where you transmit exactly that. And once you do, the harness stops producing generic Angular and starts producing yours.
In the repository, this lives in a style-guide/ directory. A general style-guide.md establishes the foundation — it locks in the target stack (Angular v22+, TypeScript 6, zoneless, Vitest + Playwright) and outlines straightforward Do / Should / Don't guidelines. This is also a dynamic document — versioned (2.0.1 at the time of writing), not a one-time effort.
Surrounding that foundation are specialized, file-type-specific guides. Begin with the Angular Coding Style Guide itself, then jump directly to whichever particular guide is relevant:
- TypeScript (Angular) files
- HTML view templates
- SCSS styling files
- Accessibility (a11y)
- Testing (Vitest & Playwright)
- Git commits
- Markdown files
- NPM packages
Two design decisions here are particularly worth adopting:
- It's written for humans and agents together. Same document, single source of truth. A new colleague reviews it on their first day; the agent consults it on every assignment. No separate set of conventions that gradually falls out of sync.
- It's intentionally split by file type. When the agent modifies a template, it should load the HTML guide — not the SCSS rules, not the testing checklist, not the entire wall of conventions simultaneously. This isn't just about tidiness: a model's accuracy actually degrades as its context window fills up, and burying the one relevant rule among hundreds of irrelevant ones creates the worst needle-in-a-haystack challenge you can present. Think of debugging when shown the two files where the issue might be versus all two thousand. Narrower, pertinent context yields sharper focus and superior results, and this benefit compounds as the guide expands.
This is the section worth investing real effort in. Borrow the structure from the repo if it suits you, but populate it with your rules — the ones you'd provide to a skilled new hire during their first week. That document is what transforms a capable-but-generic harness into one that writes Angular the way your codebase genuinely wants it written.
And mine truly is never complete. I continue refining this style guide as Angular evolves and as I discover what holds up in real-world practice — so if you notice something absent, something you'd handle differently, or a rule that hasn't aged well, I'd genuinely welcome your input. Open an issue or pull request on the repo, or simply reach out and share your thoughts. Good conventions are a collaborative effort, and this one improves each time someone challenges it.
Transform AGENTS.md Into an Operating Contract
While the style guide addresses how the code should appear, AGENTS.md addresses how the agent should operate — the rules of engagement it reviews before interacting with anything. The version the CLI generates is acceptable but generic. So I rewrote it into a repo-specific operating contract: a concise document that communicates to the harness exactly how to behave within this codebase.
The aspect I prioritize most is the workflow rules, because this is where a model transitions from "powerful but somewhat reckless" to "dependable teammate." A few rules that demonstrate their value:
- Preserve my edits. Before modifying a file, examine its current state and don't revert, rewrite, or remove my changes or comments unless explicitly requested. It's the same expectation I'd have for any human collaborator — and the one I aim to meet myself.
- Keep fixes localized. When resolving a bug, make the minimal necessary changes. No reactive refactors, no "while I'm here" cleanups snuck into the diff. Identified a worthwhile refactor? Propose it; don't embed it.
- Respect your boundaries. Don't modify unrelated files, favor minimal diffs, and run lint along with the applicable tests before declaring a task complete.
- Don't launch the dev server. Never start
ng serveindependently — I typically already have one running on:4200.
This is also where the two tiers connect. AGENTS.md serves as the primary instruction — the one file the agent consistently loads, on every task, without exception. The style guides are not; they're brought in through progressive disclosure, just-in-time, only when the agent actually works with a corresponding file. Create or modify a template and the HTML guide loads; touch a .scss file and the styling guide loads; nothing else competes for the model's attention. AGENTS.md articulates that agreement in one decisive statement — read only the most specific relevant guide — plus a precedence rule: project rules override generic Angular guidance and any skill's examples. That precedence is what prevents a confident model from quietly falling back on the Angular it learned years ago.
There's a deeper rationale for why this file carries its weight. An agent begins each session with no knowledge of your repository — and if something isn't present in its context, it might as well not exist for the model — so without AGENTS.md, it must expend tool calls rediscovering the project's structure, every single time. AGENTS.md preloads just enough to avoid that: not the entire codebase, but the consistently valid orientation — your conventions, where things reside, which specific guide to consult next — so the agent starts moving in the right direction rather than guessing.
It also standardizes the modern Angular v22+ defaults so I don't need to restate them in every prompt: standalone and zoneless, signals over decorators (input(), output(), computed(), .set()/.update() — never .mutate()), native @if/@for instead of *ngIf/*ngFor, resource()/rxResource() for data operations, inject() over constructor injection, strict TypeScript with no any, ever, AXE/WCAG AA compliance on every template, and no .spec.ts files unless a genuine Vitest or Playwright setup is in place. (Always worth mentioning: computed() is may favorite feature in modern Angular.)
One note of caution drawn from experience, though. Once you have three tiers of rules — AGENTS.md, the style guides, and the ESLint configuration — they can gradually start to conflict with each other, and a conflict is worse than having no rule at all. If AGENTS.md specifies "Signal Forms" while a style guide still demonstrates a Reactive Forms example and ESLint enforces neither, the agent selects one almost at random and wastes a round-trip second-guessing itself. So I approach the three as a unified system: they must communicate the same message, and wherever a rule can become an ESLint rule, I convert it — a check the harness actually executes outperforms a sentence it merely reads. Manfred carries this same principle all the way up to architecture-level — transforming layer and domain boundaries into constraints the agent must satisfy, using Sheriff and feedback hooks.
The entire document fits on a screen or two — you can review the complete AGENTS.md in the repository. Take what fits, discard what doesn't; the goal isn't my exact rules, it's that the agent should enter every task already understanding how your team functions rather than speculating.
A caveat before we connect everything: this setup is calibrated for a specific model generation. The style guide, the AGENTS.md, and the level of granularity in both were developed and validated against Opus 4.5 to 4.8 and GPT-5.2 to 5.5. Newer, more capable models trained on the latest Angular and TypeScript best practices — think Fable 5 or GPT-5.6 — will likely require less steering, and I'll need to reassess which of these detailed rules still earn their place and which the models will have internalized by then. So treat all of this as an evolving instruction set, not a finished product.
Connect Every Agent
The final step is straightforward plumbing, but it's what makes everything portable. All the configuration so far resides in AGENTS.md and the style guide, so the last move is simply to ensure every tool reads them. Each assistant — Claude Code, Codex, Cursor, Cline, Junie, Gemini, Windsurf, GitHub Copilot, or plain VS Code — gets a minimal configuration file (.cursorrules, .clinerules, .gemini/GEMINI.md, .github/copilot-instructions.md and similar) that does nothing but reference AGENTS.md. Yes, that includes the ones I'd advise against — if a teammate still uses Copilot, it should at least adhere to the same rules as everyone else. One governing principle, multiple interfaces: switch tools and the rules transfer with you.
Two additional elements complete the picture — and the first genuinely deserves more fanfare than the passing mention I was about to give it. I register the project's MCP servers once in .mcp.json (Angular CLI, Spartan UI, Chrome DevTools, Figma) so any agent can access the same supplemental tools. That sounds like mere plumbing, but it quietly resolves a model limitation nothing else in this configuration addresses: the knowledge cutoff. Every model stopped learning at some point in the past — ask it about an Angular v22 API that arrived after that date and it will confidently invent something v18-style instead. The Angular CLI MCP server bridges exactly that gap: it provides the agent with live documentation search and carefully curated, current code examples, so it can look up what it cannot know. Think of it as the counterpart to the style guide: the style guide teaches the harness our conventions, while the MCP server keeps it factual about the framework itself.
Alongside that, I ensure no agent ever accesses secrets or environment files — .env, *.pem, *.key, Angular's environment*.ts. Fair caution: there's no .gitignore-style standard for this yet (ironic, given how cleanly AGENTS.md came together), so this requires per-tool configuration. For Claude Code, that's permissions.deny rules in .claude/settings.json — a version-controlled file, so the entire team receives the same policy:
{
  "permissions": {
    "deny": ["Read(./.env)", "Read(./.env.*)", "Read(*.pem)", "Read(*.key)", "Read(./src/environments/**)"]
  }
}
For Codex, it's a permissions profile in .codex/config.toml, enforced through its sandbox:
default_permissions = "no-secrets"

[permissions.no-secrets]
description = "Block reads of secrets and environment files"

[permissions.no-secrets.filesystem.":workspace_roots"]
"**/.env" = "deny"
"**/.env.*" = "deny"
"**/*.pem" = "deny"
"**/*.key" = "deny"
"**/*.p12" = "deny"
"**/*.pfx" = "deny"
"**/secrets/**" = "deny"
"**/credentials/**" = "deny"
"**/service-account*.json" = "deny"
"src/environments/**" = "deny"
Not elegant — the same rule written twice — but these are checks the harness actually enforces, and you probably recognize how much I prefer those over conventions the agent merely agrees to follow. The remainder is maintenance: a .prettierrc.json rename and an ng:update script for upgrades. It's all available in the repo if you want the precise files.
And that's the setup — or at least the static portion of it. None of these final components is particularly clever on its own, but together they ensure the harness behaves consistently whether I open Codex today or Cursor tomorrow — and that each of them writes Angular the way I actually prefer. What's still absent is the dynamic half: all these rules communicate to the agent what good Angular looks like, but they don't reveal whether the code it just authored actually functions. For that, it needs feedback.
Feedback Loops
Think back to the loop introduced earlier in this post – the agent proposes an action, the harness executes it, the model processes the output and determines its next move? That loop only functions as well as the information flowing back through it. Everything configured thus far communicates to the agent what high-quality Angular looks like; feedback loops are how it learns whether it actually succeeded. The more loops the agent can execute independently, the less it has to speculate – so I provide several, arranged here from least to most costly. (The agent-facing side of these loops – lint and static verification, ownership of the dev server, test setup boundaries – is documented in AGENTS.md, naturally.)
One point before examining each loop, because it's what transforms these loops from suggestions into a proper system: the most effective feedback is the kind the harness enforces, not the kind the agent merely pledges. My AGENTS.md states "run lint and the relevant tests before declaring a task done" – but that's merely a sentence the model reads, and a model under time pressure will happily disregard it and claim success regardless. Most harnesses can instead make the check deterministic. Claude Code, for instance, supports hooks: I can register a Stop hook that triggers whenever the agent believes it has finished, executes ng lint or the tests, and – if anything fails – prevents the "done" status and feeds the error output straight back into the loop. The agent doesn't get to decide when it's finished; the check does. That's the same principle as the ESLint moment earlier – a check the harness genuinely runs beats a sentence it merely reads – applied at the moment it matters most: precisely when the model would claim "it should work now".
Linting
The lowest-cost loop, and the first one the agent should encounter. ng lint converts all the static rules configured above into immediate feedback – style, accessibility, and TypeScript concerns surface before anything actually executes, and the diagnostics flow directly back into the agent's next step. This is the guardrail-fixes-itself scenario from the ESLint section, operating on every task.
Building
ng build addresses the larger question: does the entire Angular graph still compile successfully? Strict TypeScript, templates, imports, bundling – if any element broke, the error output provides the agent with the exact files and symbols requiring fixes. No guesswork, no "it should work now".
Serving
The dev server serves as the live loop: manual checks, browser inspection, debugging. However, this one comes with my personal rule from AGENTS.md: the agent does not launch the dev server – I handle that. I want complete control over that process, and there's typically one already running on :4200 anyway. The agent should utilize the application that's already active rather than starting its own instance.
Chrome Debugger
Certain tools, including Codex, include an internal browser the agent can use to inspect browser state, console errors, network activity, and interaction bugs. Honestly, I still prefer my own Chrome running in debugging mode: launch it with a remote debugging port – the Chrome DevTools remote debugging documentation describes the setup in greater detail – for example open -na "Google Chrome" --args --remote-debugging-port=9222 --user-data-dir=/tmp/chrome-agent-debug – and then attach Chrome DevTools or the agent's browser tool to http://localhost:9222. Same philosophy as the dev server rule: my browser, my process, my control.
E2E Testing
The most resource-intensive loop, and the one that captures what all others miss: genuine user flows in an actual browser. When a Playwright (or Cypress) run fails, the screenshots, traces, logs, and error messages represent exactly the kind of targeted feedback an agent can use to fix the feature – far better than me describing the bug in text.
Agentic Engineering Workshop
Everything discussed in this post – the guardrails, the Angular Coding Style Guide, the opinionated AGENTS.md, and the effort of maintaining all three in alignment – is precisely the type of setup we construct collaboratively, with hands-on practice.
If you'd like to build this kind of environment for your own Angular projects – an AI-ready workspace, genuine guardrails, and a strict human-in-the-loop process where every generated line still appears handcrafted – join our Agentic Engineering Workshop, offered in both English and German.
In the workshop we advance this exact foundation further: spec-first and plan-first workflows, UX and component prototyping, code review, testing, and brownfield refactoring – guiding advanced Angular teams from vibe coding to traceable Agentic Software Engineering processes.
- 🤖 Agentic Engineering Workshop – 2 days, remote
Conclusion
If there's a single takeaway, it's the same concept this post opened with: the harness, not the model, is where your day-to-day Angular quality comes from. The model will continue improving whether you take any action or not – that aspect is beyond your control, and as models internalize current Angular best practices, portions of this setup will become lighter, not heavier. The harness is the part you control, and it determines whether a strong model writes generic Angular or writes yours.
And configuring it isn't complicated. A clean baseline, formatting and linting that operate automatically, a style guide that genuinely captures your preferences, an opinionated AGENTS.md, and every tool wired back to the same rules – that's the entire approach. If you invest in only one element, make it the style guide: it's the most affordable, highest-impact way to transform a capable-but-generic harness into something that feels like a colleague who already understands your codebase.
One candid note on the human-in-the-loop element, because attentive readers of the Fable 5 post might detect tension here: yes, I wrote there that human review might eventually become obsolete, and I maintain that position. For the moment, though, reviewing every diff remains essential – and here's the beneficial aspect: this setup doesn't depend on who the reviewer is. Guardrails, style guide, and feedback loops improve the diff before anyone examines it, and they retain equal value on the day a more powerful model takes over more of the reviewing from me.
The most rewarding aspect is that none of this is tied to a specific vendor. The same AGENTS.md and style guide function whether I'm in Codex today, Cursor tomorrow, or some application that doesn't exist yet – so when the next model or the next super app appears, I simply direct it to the setup I already have. That's precisely why I'd rather invest in the harness than chase the model leaderboard.
Everything covered here resides in the ng-agentic repository – clone it, borrow what's useful, and adapt it to your needs. And this truly represents just the starting point: in upcoming posts I'll expand on it with reusable agent skills, the workflows that determine how much structure a task requires, and the aspect I'm most enthusiastic about – applying all of this to real brownfield refactoring of legacy Angular code.
And if you want to explore the harness as its own discipline – beyond Angular – the open-source Learn Harness Engineering course provides a solid, practical starting point for the fundamentals.
Thank you for reading 🙏 this blog post was written by Alexander Thalhammer. For feedback, remarks or questions, please reach out to me ❤️