
This article serves as a comprehensive, hands-on manual for diving into Angular Universal.
Our journey begins with an already-built Angular app, and we’ll systematically transform it into an Angular Universal application, unpacking each move as we go!
Initially, we’ll explore the primary scenarios where Angular Universal shines, clarifying both the “when” and the “why” behind its adoption.
Next, we’ll leverage the Angular CLI to add a Universal bundle to an existing project with ease. Following that, we’ll construct our own Angular Universal Express Server line by line from the ground up!
We’ll ensure our app is optimized for search engines (SEO) and plays nicely with social media bots (e.g., Facebook or Twitter).
Afterwards, we’ll demonstrate how to apply several widely-used Angular Universal performance tweaks:
-
we’ll craft a granular Application Shell to reuse server-side rendering exclusively for chosen content (based on the route)
-
we’ll enhance the initial load experience by tapping into the Angular State Transfer API
Table of Contents
Here’s what we’ll delve into throughout this post:
- What is Angular Universal?
- How does Angular Universal Work?
- Why Angular Universal? - Reason 1: Performance
- Why Angular Universal? - Reason 2: Search Engine Optimization (SEO)
- Why Angular Universal? - Reason 3: Social Media Crawlers
- Does the Google Search Engine index well Single Page Applications?
- Scaffolding a Universal bundle using the Angular CLI
- Pre-Rendering our Application using the Universal bundle and
renderModuleFactory() - Implementing an Angular Universal Express Server from scratch
- Optimizing our Angular Universal application for SEO (Search Engine Optimization)
- Integration with Social Media Crawlers using Angular Universal
- Implementing a fine-grained Application shell using custom structural directives
- Leveraging the Angular State Transfer API
- Code Sample (Github Repo)
- Conclusions
Alright, enough talk—let’s kick off our deep dive into Angular Universal!
What is Angular Universal?
Put simply, Angular Universal is a Pre-Rendering mechanism tailored for Angular.
To grasp that concept, recall that in a typical single-page app, data is fetched on the client and the HTML reflecting that data is constructed at the very last moment in the browser.
Yet, under specific conditions and for sound reasons, you might prefer to perform this rendering in advance—like on the server or during the build step. That’s precisely what Angular Universal empowers you to achieve.
How does Angular Universal work?
With Angular Universal, the initial HTML and CSS displayed to the user are rendered ahead of time. This can happen either during the build phase or in real-time on the server as the page is requested.
That pre-rendered HTML and CSS get delivered first to the user, providing a fast, visible snapshot on screen. But full server-side rendering isn’t the entire solution!
Here’s why: along with the server-rendered HTML, we also send to the browser a standard client-side Angular application.
From there, this client app takes over the page, and everything proceeds like any ordinary single-page app—all runtime rendering happens directly on the client as expected.
This naturally prompts the question: when exactly should we turn to Angular Universal, and what’s the rationale?
Why Angular Universal? - Performance
A few justifications exist for adopting Angular Universal in a project, though the standout one often centers on boosting the app’s startup performance.
Typically, a single page loads with an essentially bare index.html file containing minimal markup. Consequently, when the browser first renders that file, the user sees nothing but a completely empty screen!
Take, for instance, a snapshot from the Chrome Dev Tools performance tab: here’s what you usually see with a locally running Angular app:
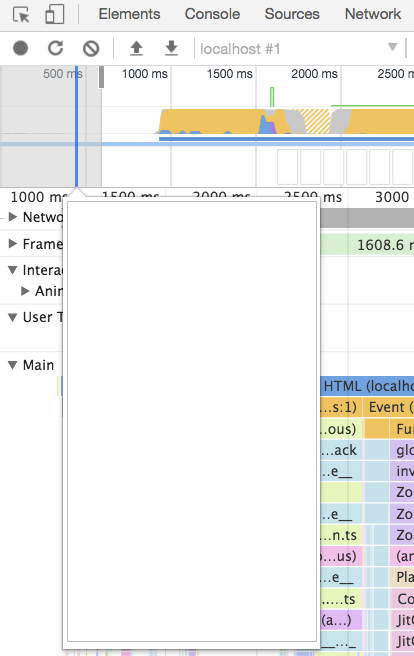
The screenshot taken from the performance tab timeline reveals that the application renders with an entirely empty viewport right from the start.
For certain projects, this blank screen might persist for multiple seconds, which inevitably creates a serious issue:
Roughly 53% of users will leave an app behind if its load time exceeds 3 seconds!
This initial visibility gap, therefore, clearly has a substantial impact on the overall user experience.
Should you wish to dive deeper into recoding the blank-screen duration with Chrome’s DevTools, we suggest reviewing the accompanying video for guidance:
How Server-side Rendering Enhances User Experience
Angular Universal lets us render the HTML on the server and deliver it with the initial request, so instead of a blank index.html file, the user spots useful content right away.
This gives the user a much quicker look at the initial view, which significantly boosts the user experience, especially on mobile devices — that's a prime reason to adopt server-side rendering.
However, performance isn't the only benefit that motivates us to use server-side rendering.
What Drives Angular Universal? SEO Benefits
Another reason to rely on server-side rendering is to make the application easier for search engines to crawl and rank.
In practice, most search engines pull the title and description that appear in search results from metadata tags located in the page's header section.
For instance, here's what a Google search for "Angular Universal" looks like in the results:
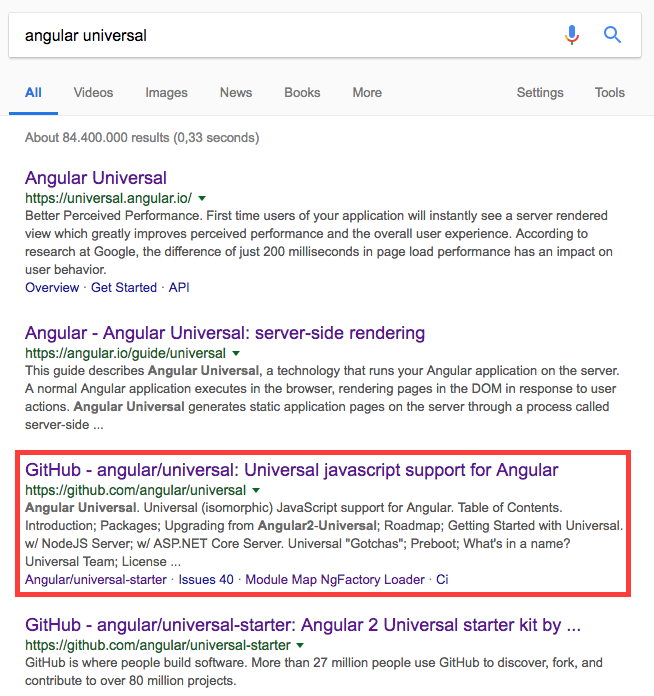
What determines the page titles shown here?
Every blue hyperlink title appearing in this set of search results gets populated from the metadata tags attached to the destination pages.
Take the third result in the list (outlined in red): its title lives inside an HTML title element, which sits in the head portion of the linked page.
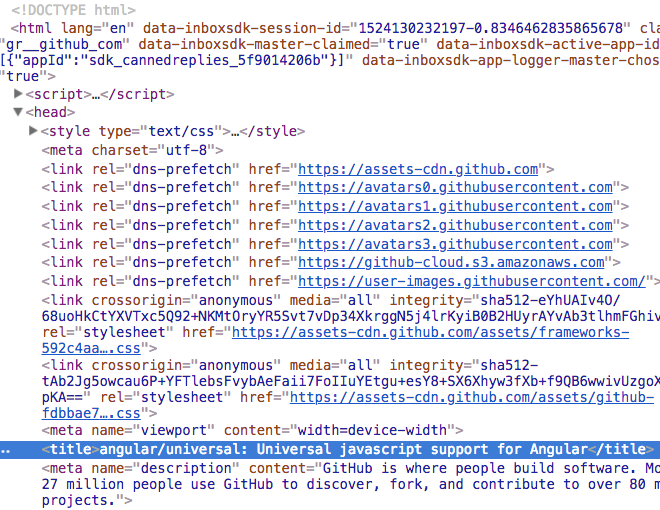
Notice how the title element, highlighted in blue, matches the entry title from the search results.
What do search engines expect to find in a page?
Crawlers from most search engines require these essential SEO meta tags to be delivered directly in the server response, rather than being injected later via Javascript.
This also holds for the rest of the page's content—most search engines will only index what the server returns, ignoring anything loaded through Javascript.
Thus, having these metadata tags rendered on the server is critical for achieving good rankings across many search engines.
However, this is not true for Google!
Does the Google Search Engine index well single page applications?
Today, Google's search engine successfully indexes the majority of Javascript-driven pages—a strong example is the Angular Docs site, which is itself an Angular-built SPA.
For lengthy queries targeting dynamically loaded content, the Angular Docs site ranks flawlessly. It even sets the title and description meta tags on the fly using Javascript (we will adopt a similar approach), and these are displayed correctly in search results.
To see this in action, paste any long sentence from an Angular Docs page into a Google search—here’s a sample search:
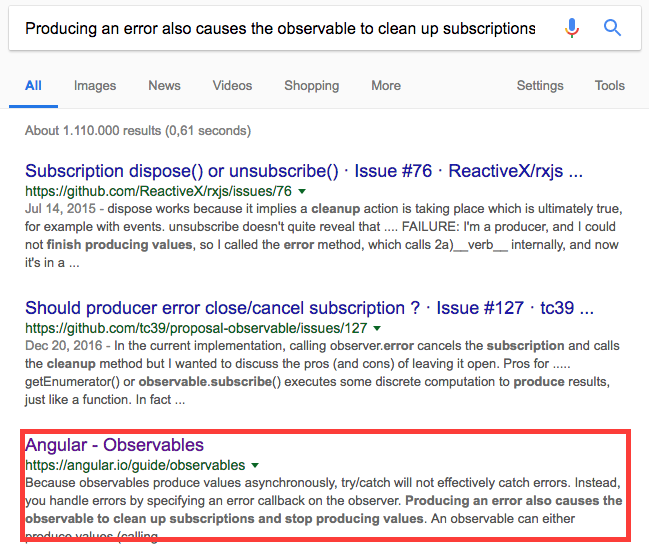
The Angular Docs SPA achieves top rankings in Google for this lengthy search phrase, even though all of its content is generated dynamically through Javascript.
Does every search engine handle Javascript the same way?
Yet, running the identical search on alternative search engines tells a different story. Check here for the Bing results corresponding to that query.
Notice that the same Angular Docs page, which holds the third position on Google, fails to appear in Bing listings at all, since Bing currently skips indexing dynamic Javascript content; numerous other engines, such as DuckDuckGo, follow the same approach.
Is SEO still a compelling argument for adopting Angular Universal?
When our focus is solely on Google, we've demonstrated that server-side rendering isn't necessary to secure proper indexing, given that Google today successfully indexes the majority of Javascript-driven content.
Conversely, if our goal is broader visibility across all search engines, server-side rendering becomes essential, as illustrated by the Bing search outcomes.
Next, we'll examine another rationale for choosing Angular Universal: social media crawlers.
The Case for Angular Universal: Social Media Crawlers
Just as search engines scan our pages for titles and descriptions, social media crawlers from platforms like Twitter perform a similar function.
When we share a link on social media, the platform automatically fetches the page content, potentially pulling key details to enhance how the shared post appears.
Below is a sample Twitter post that the Twitter crawler enriched:
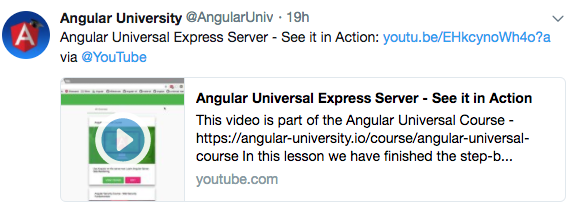
Social Media benefits of server-side rendering
The original tweet carried nothing more than the text and the URL, yet the Twitter crawler pulled out an image, a heading, some wording, and assembled a preview card from the page contents.
For the Twitter crawler to assemble this card, we currently need the application rendered on the server and have some dedicated meta tags inserted (the how-to will be covered shortly).
Therefore, this gives us yet another motivation to adopt Angular Universal: boosting our application's social media footprint. With that, we now have a solid grasp of both the reasons for employing Angular Universal and the context in which it makes sense.
Now, let's move forward and integrate Angular Universal into an existing Angular app.
How to add Universal rendering with the Angular CLI
We begin with an existing Angular application built via the Angular CLI (find it in this Github branch).
Let's get started by adjusting the application so it can produce an Angular Universal bundle. The quickest route to add a Universal bundle is through this Angular CLI command:
ng generate universal --client-project <name of your client project>
What is the Universal bundle, how does it work?
When you build this newly scaffolded app, the output is a main.bundle.js file—that output is the Universal bundle.
This bundle carries essentially the same codebase as the browser-side app, but with one key swap: the rendering engine is replaced through dependency injection.
Rather than using the client-side renderer (which creates DOM elements straight away), a server-side renderer is put in its place. That server renderer produces plain text HTML, not DOM structures.
To get a clear picture of what's in this bundle, let's examine what the earlier command actually created in the file system and walk through each change.
Configuration for the new Universal Bundle
A key step done by the previous CLI was inserting a new build target into our angular.json configuration file:
In contrast to the client-side setup, only a few properties differ, namely:
- this target uses a distinct entry point:
main.server.ts - it relies on its own Typescript settings file:
tsconfig.server.json - output files land in the
dist-serverdirectory instead of the standarddistdirectory - the renderer is sourced from
@angular/platform-server - the product of this build is the Universal bundle proper
How does this new Universal Application Work?
To see this new app in action, we can inspect its starting file main.server.ts:
At first glance, it looks much like the client-side starting file. However, instead of exporting the browser root module AppModule, it exports the newly created AppServerModule.
Next, let's check out this AppServerModule:
The server-side root module imports both the client AppModule and ServerModule from platform-server.
Consequently, this server version has the complete set of app-level components and services identical to the browser version, with one exception: several Angular internal services—notably the renderer—are swapped in via dependency injection.
Apart from that, both apps are identical; they differ only in their rendering layers and in the implementations of select services.
How to Build the Angular Universal Bundle?
Now, let's actually build the Universal bundle and find out how we can use it for quick pre-rendering of our main route.
The development bundle won't suffice here, so we need the production build. Run the following command to generate it:
ng run your-project-name:server
Executing this command produces a bundle.js file inside the dist-server directory. That file represents our Universal bundle, which we will later leverage to pre-render the application.
Pre-Rendering our Application using the Universal Bundle
To grasp how Angular Universal operates, the most straightforward approach is to take that Universal bundle and run it to render, say, the main root route of the application.
As a next step, we will create a compact command-line utility. Its purpose will be to pre-render the HTML for our primary route and write that output to a text file. Building the Express Server afterward will be a straightforward task.
This utility will live in a file called prerender.ts, placed at the root of the application.
To pre-render the main application route, our utility simply invokes the renderModuleFactory() function. This function stands as the core of Angular Universal's pre-rendering mechanism.
The program we need looks like this:
How to call renderModuleFactory()
Now, let's examine what happens in detail here. Along with various imports necessary for Universal to operate in a node environment, we also bring in the application root module factory from the Universal bundle:
The module factory, referred to as AppServerModuleNgFactory, represents a key product of the build process. It carries all the data needed to render the application from the server side.
Following that, we take this module factory and hand it over to renderModuleFactory() for rendering the application. In addition to that argument, we supply a few extra options to the call:
Choosing what document to render using the Universal Bundle
The document property holds a string that defines the template we intend to render. In this scenario, because the goal is to render the application's root component, our template consists solely of that root component and nothing else:
<app-root></app-root>
Since the internal structure of this component changes significantly based on the router's current state, the url property must also be supplied to indicate the specific route intended for rendering.
Here, we're targeting the base route (/). Interestingly enough, this is all it takes to implement Angular pre-rendering!
Upon executing this program, a prerender.html file will be produced, containing the output from that rendering operation.
For a video walkthrough covering everything discussed so far, check out the accompanying YouTube clip:
Executing the Pre-Rendering CLI Tool
Should you want to execute this utility and inspect its result, a live example is available in this GitHub repository branch.
To launch our command line tool, let’s proceed with ts-node:
ts-node ./prerender.ts
Shortly after, a fresh prerender.html file will be created, holding the result produced by invoking renderModuleFactory().
Below is a sample of the file's contents:
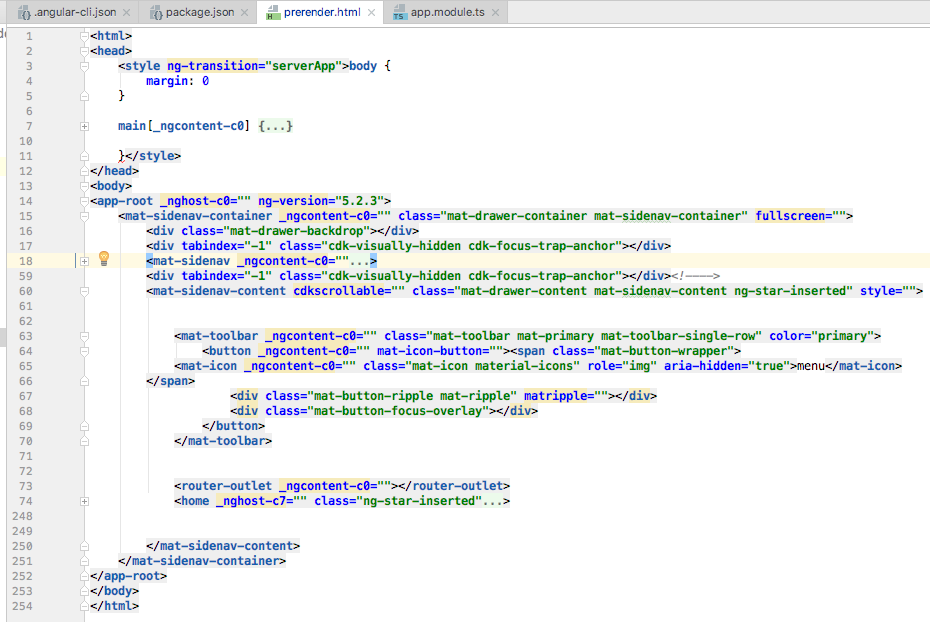
Clearly, this is a substantial amount of markup and styling—254 lines in total—all originating from the seemingly minimal <app-root></app-root> placeholder in the initial template.
While rendering, the Universal bundle made its server-side request, fetched the necessary data, and produced the complete output as standard HTML, just as intended.
At this point, when you open the prerender.html file directly in a browser, the resulting display will appear as follows:

Looking at the output, the HTML for the main route is present along with all the server-queried data, yet a significant number of styles remain absent.
Moreover, this is just static HTML—no Angular app boots up once the file is opened!
The reason is straightforward: we have exclusively rendered the HTML for <app-root>, whereas our universal application extends far beyond just the root component's markup. Server-side rendering addresses merely one segment of the overall picture.
Why the frontend build remains essential
To achieve a fully operational application, the browser must receive not only the <app-root> HTML but also the complete CSS and the client-side app that takes control of the page once all assets finish loading.
We don't want just the <app-root> component to serve as our rendering foundation—instead, we should include every script and link tag responsible for pulling in all application styles and the client-side application.
And all those tags, together with the <app-root> component, reside in a single location: the client-side index.html file!
Consequently, we also require the output from the client-side build. Let's proceed to produce that:
ng build --prod
At this stage, we can examine the full set of build outputs. Two distinct directories exist — one corresponding to the client build and another for the Universal build:
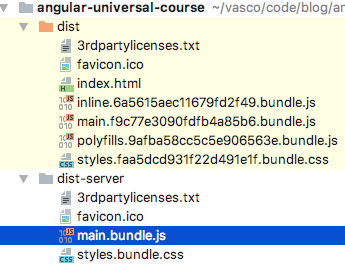
Let's examine one key asset: the production index.html file located inside the dist folder.
This file already contains everything required to craft a server-rendered page:
-
inside it, the
<app-root>element holds the entire application -
all the application's CSS is being loaded
-
the client-side application is loaded through several script tags
Now let's see how we can leverage these pieces to build an Angular Universal Express Server from the ground up.
Angular Universal Express Server (from scratch)
By this point, the most critical part of the server is already in place! The server will look a lot like the small command-line utility we built earlier.
If you're eager to see the server in action, here's the full implementation all at once:
There's quite a bit happening in this code, though. Let's walk through it piece by piece, beginning with the setup section of the script:
As you might notice, this mirrors the opening of our pre-rendering command-line utility:
-
we're also bringing in the production Universal bundle
main.bundle.jsfrom thedist-serverfolder -
next, we activate the Angular production mode, so the application doesn't run its change detection twice (check out this explanation for more on Angular Production Mode)
-
then, we set up our Express Server
-
the final preparatory step involves reading the production
index.htmlfrom thedistfolder and storing it as a string
With those setup steps complete, we'll dive right into the core of the implementation.
Express Middleware for Universal Rendering
We'll begin by creating an Express middleware that catches every single HTTP request that comes its way.
Imagine, for instance, that a user enters http://yourdomain.com/courses/03 into the browser's address bar: that request would arrive at our server and wind up in this middleware.
This middleware will determine exactly what response gets sent back to the browser:
How does the Universal Middleware work?
Here, the wildcard * signals that we're dealing with a catch-all middleware.
Within it, we figure out which route needs rendering by examining the req.url property.
Using that information, we server-side render the app via renderModuleFactory(), just as we did earlier. The key difference is that this time, we're using our production client-side index.html as the template for rendering!
Keep in mind this file will never be sent as a static asset by the Express Server; it's exclusively used as the base template for server-side rendering.
Another change from before: rather than writing the result to a file, we send it back to the browser directly, putting it in the response body:
res.status(200).send(html);
In addition, we're handling errors by returning a 500 Internal Server Error status when something goes wrong:
res.sendStatus(500);
Trying out our Universal middleware
At this point, we've constructed the HTML reply for the initial browser request http://yourdomain.com/courses/03.
What follows is the actual output: a mix of extensive HTML and CSS, alongside multiple CSS and Javascript bundle files.
Serving the static CSS and Javascript client bundles
Once the browser receives this response, it starts parsing the HTML. Eventually, it encounters various link and script tags.
For every one of these tags, the browser initiates a separate request to fetch the associated file. For instance, the following tag causes a request for the file located in its src attribute:
These files must be delivered by the Express server as plain static resources. To achieve this, a new middleware needs to be added, and it must be placed before our catch-all (*) middleware.
Since all static bundle requests share a common feature—their URLs contain a file extension (*.js, *.css)—we introduce a middleware that will act on any URL containing a dot, which we match with the pattern *.*.
Here, this middleware sits before the server-side rendering one. Its role is pretty straightforward: it attempts to serve static components from the dist folder (the client-side build output) when a matching file for the requested URL exists there.
If no matching static file is found, the request simply falls through, and our catch-all (*) middleware takes over.
On the other hand, when a corresponding static bundle does exist, the middleware chain halts right there. Consequently, the server-side rendering middleware (*) never gets invoked for that request.
Finishing up our Universal Express Server
To tie everything together, the final step is kicking off the Express server so it starts listening for HTTP requests on port 9000:
That's it—our server is fully set up! Now it's time to see it in action. To do so, we spin it up locally via ts-node:
ts-node ./server.ts
We should now see this in the console:
Angular Universal Node Express server listening on http://localhost:9000
To observe the application running locally on your server, you can access it via this Github branch.
Below is a visual capture of the app in operation:

Angular Universal SEO - Search Engine Optimization
Now we can move on to improving our app's visibility in search results. As an example, we'll configure the page's title and description fields specifically for the Course view.
It's worth pointing out that the SEO metadata we define can vary depending on which route the user is currently viewing.
For this particular scenario, our goal is to assign the course's name to the page title while also filling in the description meta tag. The Title and Meta services are our tools for this task:
How do the Title and Meta services work?
These services handle the task of setting the title and description tags, and their behavior adapts to the runtime context they're executed in.
When running on the server, the tags are generated as straightforward text output. Conversely, in the browser, the same services modify the actual DOM elements for the title and meta tags as soon as the component initializes.
Keep in mind that Google can interpret the title and description meta tags even when they're produced entirely on the client side, yet this capability isn't universal across search engines.
To ensure compatibility with other search engines, rendering these tags on the server becomes a critical SEO requirement. By leveraging these two services, the resulting runtime markup for the title and description looks like this:
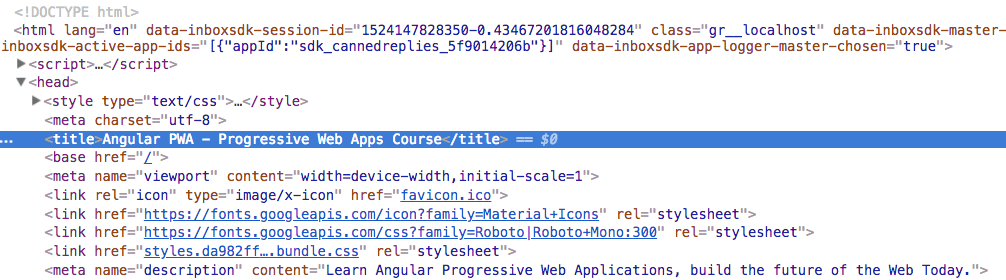
Those who want to inspect a running version of the app with these meta tags already set up can check out this branch of the example repository.
Working with Social Media Crawlers
Just as we handled SEO meta tags, other tags aimed at social media crawlers can be added here to determine how the page is displayed across social platforms.
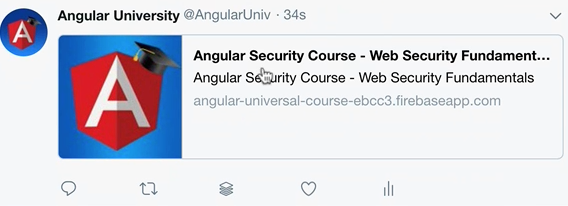
For instance, let's enhance the course page's appearance on Twitter by setting up a Twitter summary card:
At this point, the Twitter crawler has everything it needs to build a summary card for this page, resulting in a tweet that looks like this:
Why a Fine-Grained Universal Application Shell?
Now that the application runs successfully, we'll introduce several performance tweaks commonly paired with server-side rendering.
Currently, the server renders every piece of content unconditionally. In certain scenarios, this approach can even hurt performance rather than help it.
Consider a page packed with scrollable data below the fold: a smarter strategy might involve rendering on the server only the content visible to the user, then handling the remainder on the client once the app boots.
What is an Application Shell?
Keep in mind that SSR exists to display content to the user immediately. Sending a massive HTML payload might contradict that goal, depending on the page.
Our aim is to deliver some HTML instead of a blank screen, while not necessarily sending all the HTML upfront.
That initial piece of HTML delivered to the user is referred to as an Application Shell — it could be as minimal as a top navigation bar and a spinner, or far more elaborate based on the page requirements.
How to choose what gets rendered or not?
To generate the ideal amount of HTML on the server for an optimal experience, we need precise control over what is rendered server-side.
This will be achieved using two custom structural directives: appShellRender and appShellNoRender.
First, let's examine how these directives are applied. For instance, in the main component we might conditionally display a loading indicator using appShellRender:
Consequently, a rendering indicator appears at the bottom of every page, but only during server-side rendering.
Choosing what get's rendered per container component
Next, within each top-level component, we'll specify which parts render on the server. For example, on the course page, we might server-render just the course title and thumbnail, while omitting the lessons list.
This is done by applying the appShellNoRender directive to the element we want to exclude during server rendering:
Note that both appShellRender and appShellNoRender are inert on the client! In the browser, the full template renders each time as you navigate through the single page application.
Implementing a fine-grained App Shell
With an understanding of how these two directives function, let's dive into their implementation. We'll begin with appShellRender:
As shown, this is a standard custom structural directive — identifiable by the injection of viewContainer and templateRef, typical of structural directives.
The templateRef points to the template snippet where the directive is applied. For example, when appShellRender is used on a loading indicator, the injected template looks like this:
Another dependency injected here is platformId, which lets us check whether the directive runs on the server or client.
The rendering logic then executes in this part:
In essence, it means: "render the target template only on the server; on the client, skip rendering this element".
The companion directive appShellNoRender operates almost identically. For reference, here is its full code:
Armed with these simple directives, we already gain substantial power in selectively server-rendering parts of the app.
They serve as a strong foundation for flexible SSR, and we could easily build similar directives to extend flexibility further.
The core idea behind a fine-grained Application Shell is to control, on a page-by-page basis, which parts remain unrendered server-side—all while keeping client functionality intact.
Understanding The State Transfer API
With the App Shell complete, let's shift to another frequent SSR optimization: transferring state from server to client when the app starts.
First, let's outline the issue the State Transfer API addresses. At startup, our Angular Universal app displays a large portion of content already rendered server-side, visible to the user immediately.
Keep in mind that the server-side rendered app delivers a standard client-side application to the browser, which then assumes control of the page from there.
Once this Angular client-side application boots up, what does it do first? It initiates contact with the server and retrieves all of the data a second time!
Moreover, the client-side app will activate loading spinners while the data is being fetched. To the user this appears odd, since the markup received from the server was already populated—so why is the app reloading it?
Subsequently, the client renders the data anew, injects it into the page, and presents it to the user.
This entire sequence raises a question: the server already fetched and rendered the data, so why repeat that operation on the client? It amounts to redundant work, hitting the server twice and degrading the user experience—which is precisely the issue Universal was meant to resolve.
How does the Transfer API work?
To address this redundant fetching, we need a mechanism for the Universal app to stash its data directly within the page, thereby making it accessible to the client application without triggering another backend request.
That's exactly what the State Transfer API offers! This API provides a dedicated container designed for seamlessly moving data between the server and the client, thus eliminating the client’s need to re-contact the server for the same information.
To illustrate the problem, here’s a sample server call inside a Router Resolver that might lead to the initial issue:
This resolver extracts a course identifier from the active URL and uses it to pull data from the server. That data will subsequently be exposed to all components via the router.
Suppose we navigate to a route that activates this resolver. The drawback of this setup is that, in a Universal app, the data request findCourseById() executes twice: once during server rendering and again on the client when the app boots and the router processes the route.
To prevent this duplication, we'll modify the resolver to utilize the State Transfer API:
There's a lot happening here, so let's examine the implementation piece by piece, starting with the injected dependencies:
-
First, we inject
platformIdto detect whether the resolver runs on the client or the server -
Second, we inject the new
TransferStateservice
The State Transfer API In Action
The logic unfolds as follows: we begin by establishing a key that uniquely marks the piece of state we intend to send between client and server:
Next, we verify whether the required course data already resides in the transfer state container:
Let's consider the scenario where the data is absent from the container—in that case, we fetch the information first, regardless of whether we're on the server or client.
However, when executing on the server, after retrieving the data we also save it, ensuring it can be sent back to the client.
We achieve this by populating the transfer state container with the help of the tap operator:
At this point, the data has been safely stored in the transfer state container.
Where does the TransferState service store the data?
Wondering where the state transfer service keeps its data? It's straightforward: the information is embedded directly into the page itself!
If you examine the source code of the server-generated page, you'll spot a script tag at the bottom that stores the transferred data:

Retrieving Data from the State Transfer Service
Now, we need to handle the client-side scenario within our Router Resolver. Our goal is to pull the data from the state transfer service whenever it exists, thus avoiding an unnecessary server request.
It is exclusively the client application that will encounter data stored in the state transfer container:
Should the state container hold the data, we will retrieve it and emit it directly through the of operator. After that, we will purge the data from the state container, thereby finalizing the state transfer procedure.
At this point, we have a clear understanding of the State Transfer API and the specific issue it addresses.
Additionally, we have successfully converted this standard Angular application into a Universal one! Let's proceed to recap everything we've covered and underline the essential lessons.
Code Samples - Github Repo
You can find the fully finished code from this article in this Github repository, allowing you to execute the application and observe the results firsthand.
The client-side code is deployable to Firebase Hosting (which serves only the static assets), while the server-side logic is deployable as a Firebase Cloud Function.
Conclusions & Summary
Throughout this guide, we observed that the primary motivation for adopting server-side rendering today is to enhance the initial load performance of the application, as it delivers at least some HTML to the browser during startup.
Following this, the page will load a client-side Angular application that eventually takes control of the page, functioning as a standard SPA.
The SEO advantages traditionally linked to server-side rendering have diminished, given that Google's search engine now effectively indexes JavaScript-driven pages.
However, many other search engines across the globe do not handle JavaScript efficiently, so to ensure proper indexing there, adopting server-side rendering becomes necessary.
The core argument for server-side rendering centers on performance and user experience, which also indirectly contributes to SEO gains: faster-loading pages are rewarded with better search rankings.
Moreover, we discovered that for certain applications, server-side rendering is only part of the equation. We may require a means to dictate which portions render on the server (the App Shell), and for an ideal user experience, we will also likely need the State Transfer API.
I trust this post aids in your initial steps with Angular Universal and that you found it valuable!
To deepen your knowledge of Angular Universal, we suggest exploring the Angular Universal In Depth Course, where we delve much further into server-side rendering and pre-rendering.
Should you have any inquiries or feedback, feel free to share them in the comments below, and I will respond as soon as possible.
To stay updated on future posts related to Angular Universal and other Angular topics, we encourage you to subscribe to our newsletter:
If you are new to Angular, you might find the Angular for Beginners Course helpful:
