
The @ViewChild decorator is typically among the first Angular features developers encounter, and it remains one of the most frequently used decorators in the framework.
Despite its popularity, this decorator includes a number of capabilities that are not widely known, yet they can be remarkably practical.
This guide will walk through every feature available with this decorator, offering concrete examples for each scenario to illustrate how they work in practice.
It's worth noting that a signal-based alternative to this decorator now exists: the viewChild() signal query. You can explore that topic in detail here:
Angular Signal Queries: viewChild, contentChild, viewChildren, contentChildren (Complete Guide)
Outline of Topics
Below is a summary of what will be discussed in this post:
- When is the @ViewChild decorator necessary?
- Understanding the AfterViewInit Lifecycle Hook
- Defining the scope of @ViewChild template queries
- Injecting a component with @ViewChild
- Injecting a standard HTML element using @ViewChild
- Injecting the underlying HTML element of a component
- Injecting one of the multiple directives associated with an element or component
- Code Samples (GitHub Repository)
- Conclusion
With that roadmap set, let's dive right into the @ViewChild decorator.
When is @ViewChild required?
In Angular, a component's template is built by combining ordinary HTML tags with other Angular components.
For instance, consider the AppComponent template below, which integrates both standard HTML and custom components:
This template contains a variety of element types, such as:
- standard HTML tags like
h2anddiv - custom application components, for example the
<color-sample>component - third-party components, such as a color picker
- multiple Angular Material components as well
Here’s how the AppComponent renders on screen:
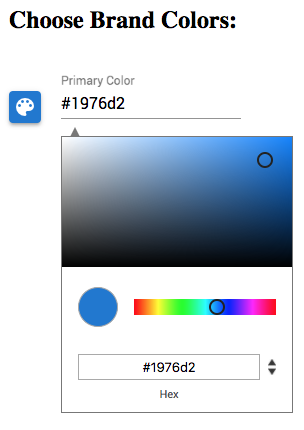
All the examples in this guide will be based on this initial template. The <color-sample> component appears as the small blue palette square, and next to it is an input connected to a color picker popup.
Why use the @ViewChild decorator?
Often, it's possible to coordinate the various components and HTML elements directly within the template using template references like #primaryInput or #primaryColorSample, without involving the AppComponent class.
However, this isn't always sufficient. There are instances where the AppComponent does require references to the elements within its own template to manage interactions between them.
In such cases, we can query the template to obtain references to those elements and have them injected into the AppComponent class—this is precisely the purpose of @ViewChild.
Injecting a reference to a component with @ViewChild
Suppose AppComponent needs a reference to the <color-sample> component used in its template to invoke a method directly on it.
To achieve this, we can use @ViewChild to inject a reference to the <color-sample> instance, identified by the template reference #primaryColorSample:
With @ViewChild, the primarySampleComponent member variable will be populated by Angular with a ColorSampleComponent instance.
This instance is the exact same one linked to the <color-sample> custom element present in the template.
When do variables injected via @ViewChild become available?
It's important to note that the injected member variable is not immediately accessible when the component is constructed!
Angular populates this property automatically, but only later in the component lifecycle, specifically after the view has finished initializing.
The AfterViewInit Lifecycle Hook
To write initialization code that relies on references injected by @ViewChild, such code should be placed within the AfterViewInit lifecycle hook.
Here's an example demonstrating how to use this hook:
When running this program, the console output is as follows:
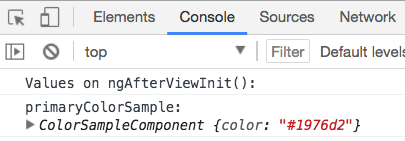
As shown, Angular automatically populates our member variable primaryColorSample with a reference to the component.
Is ngOnInit() a viable alternative to ngAfterViewInit()?
To guarantee that the references provided by @ViewChild are available, initialization logic should always be placed in ngAfterViewInit().
Although the template references might be available during ngOnInit() in some situations, relying on that is not recommended.
Scope of @ViewChild template queries
The @ViewChild decorator allows the injection of any component, directive, or HTML element located in a component's template into that same component.
However, how deep down the component tree can queries reach? Let's attempt to use @ViewChild to fetch a component nested further within the tree.
For example, let's examine the structure of the <color-sample> component:
This component internally uses the <mat-icon> component to render the small palette icon.
Let's see if we can query that <mat-icon> component and inject it directly into AppComponent:
Upon running this, the console shows the following:
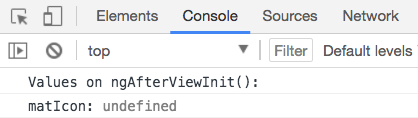
As observed in the console output:
The @ViewChild decorator cannot access elements across component boundaries!
Visibility scope of @ViewChild template queries
This implies that queries with @ViewChild can only see elements within the component's own template. It's crucial to understand that @ViewChild cannot be used to inject:
- Anything from the templates of child components
- Nor anything from the templates of parent components
In summary, the @ViewChild decorator serves as a template querying mechanism that is local to the individual component.
That covers the most typical use of @ViewChild, but there's much more to explore. Let's look at some additional use cases.
Injecting a reference to a DOM element with @ViewChild
Sometimes, instead of injecting a child component, you may want to directly interact with a plain HTML element in the template, like the h2 title tag in AppComponent.
To do this, first assign a template reference to the HTML tag you wish to inject:
As shown, we've assigned the #title template reference to the h2 tag. Now, we can have the h2 element injected directly into our component class like so:
Notice that we pass the string 'title' to the @ViewChild decorator, which matches the name of the template reference on the h2 tag.
Since h2 is a plain HTML element, and not an Angular component, we get an ElementRef wrapping the native DOM element:
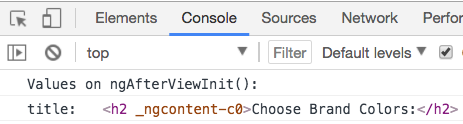
ElementRef is a wrapper around the native DOM element, accessible via the nativeElement property.
By accessing nativeElement, we can perform any native DOM operations on the h2 tag, such as addEventListener().
This demonstrates using @ViewChild to interact with standard HTML elements. But what if we need the DOM element associated with an Angular component instead?
After all, the <color-sample> HTML tag is a DOM element, even though it has a ColorSampleComponent instance attached to it.
Injecting the DOM element of a component with @ViewChild
Let's illustrate this with an example. Consider the <color-sample> component inside AppComponent:
The <color-sample> component is given a template reference #primaryColorSample.
What happens if we try to use this template reference to inject the <color-sample> DOM element, as we did with the h2 tag?
Surprisingly, running this program shows that we do not get the native DOM element this time:
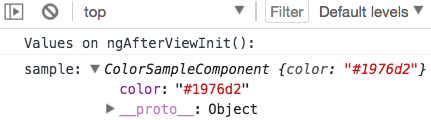
Default behavior of @ViewChild injection by template reference
Instead, we receive the ColorSampleComponent instance! This is indeed the default behavior of @ViewChild when injecting by template reference name:
-
a reference on a component yields the component instance
-
a reference on a plain HTML element yields the wrapped DOM element
The @ViewChild options argument
But in our case, we want the DOM element linked to the component. This remains possible by using the second argument of the @ViewChild decorator:
Here, we pass a second argument containing a configuration object with the read property set to ElementRef.
The read property defines exactly what should be injected when multiple injectables might be available.
By setting read to ElementRef, we're explicitly asking for the DOM element (wrapped in ElementRef) of the matched template reference, rather than the component.
Running the program now yields the following result:
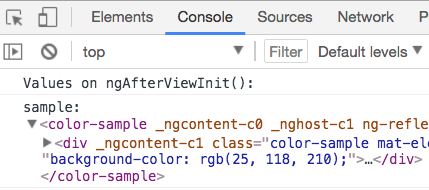
Let's explore another scenario where the read property proves beneficial.
Injecting one of several directives with @ViewChild
As your application grows with more directives and libraries, the need for the read property often becomes more frequent.
For instance, returning to the color picker example, let's try to open the color picker when the color sample is clicked:
This example attempts to integrate components using only template references.
The click on <color-sample> is detected, and then the #primaryInput reference is used to access the colorPicker directive and open the dialog.
Using template references is often effective, but not in this particular case!
Here, the template reference #primaryInput points to the <input> DOM element, and not to the colorPicker directive applied to that element.
If you run this version, you'll encounter the following error:
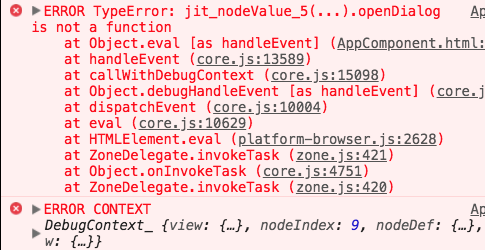
This error arises because, by default, the template reference primaryInput refers to the input box DOM element rather than the colorPicker directive.
Injecting Directives using @ViewChild
Clearly, this isn't the right way to obtain a reference to a directive, especially when multiple directives are applied to the same HTML element or component.
To resolve this, let's first modify the template to delegate the click event handling to the AppComponent class:
Then, in the AppComponent class, we inject the color picker directive as follows:
Now we have a correct reference to the colorPicker directive!
Clicking the small palette icon will now open the color picker as expected:
With this final example, we've covered all the features of the @ViewChild operator and their typical use cases. Let's summarize what we've learned.
Code Samples (GitHub Repository)
All the runnable code from these examples is available in the following GitHub repository.
Conclusion
The @ViewChild decorator enables the injection of references to elements within a component's template directly into the component class—that is its primary function.
With @ViewChild, we can easily inject components, directives, or standard DOM elements. The decorator also allows overriding its defaults to specify precisely what should be injected when multiple options exist.
@ViewChild serves as a local template querying mechanism that cannot see into the internals of child components.
By injecting references into the component class, we can easily implement coordination logic involving multiple template elements.
Why @ViewChild isn't always necessary
Remember, there are many cases where this decorator isn't strictly needed. Simple interactions can often be handled directly in the template using template references, bypassing the component class altogether.
I hope this post helps clarify @ViewChild, and I trust you found it useful!
For those interested in exploring more advanced Angular Core features like @ViewChild, we suggest checking out the Angular Core Deep Dive course, which covers Angular core in greater depth.
If you have any questions or comments, please share them below, and I'll respond promptly.
To stay updated on future posts about Angular Universal and other Angular topics, feel free to subscribe to our newsletter:
If you're new to Angular, consider taking a look at the Angular for Beginners Course:
