
Pipeline structure
In the previous segment, you set up jobs for dependency installation, compilation, and verification. Now we’ll expand that foundation into a full pipeline with a dedicated release stage.

Full pipeline for an Angular project
This setup works for both Angular applications and libraries — only the final release and publishing steps differ.
You’ll see two distinct release approaches for your app. The first involves creating a Docker image with your compiled application inside. The second uses GitLab Pages to serve your app’s static files directly from the repository.
For an Angular library, the pipeline publishes the package to the GitLab Package Registry. As a final enhancement, we’ll look at optimizing build times with custom Docker images.
Docker image creation and publishing
Delivering an Angular app means handing over something that can be deployed and executed in a production environment. A straightforward approach is to supply the compiled files and let your infrastructure team place them on a server with a web server installed.
But what if you could ship a fully-configured environment with your app ready to go? You’d have complete authority over the setup and could tweak the web server exactly how you want. That’s the power of Docker.
A quick look at Docker
Docker lets you define your server configuration as code. You pick a base like Alpine or Ubuntu and then run a list of commands to prepare your application.
FROM nginx:alpine

COPY ./my-app /usr/share/nginx/html
COPY ./my-app.conf /etc/nginx/conf.d/default.conf
Sample Dockerfile for a web application
This Dockerfile, once executed, produces a Docker image — essentially a frozen snapshot of the server with your app installed.
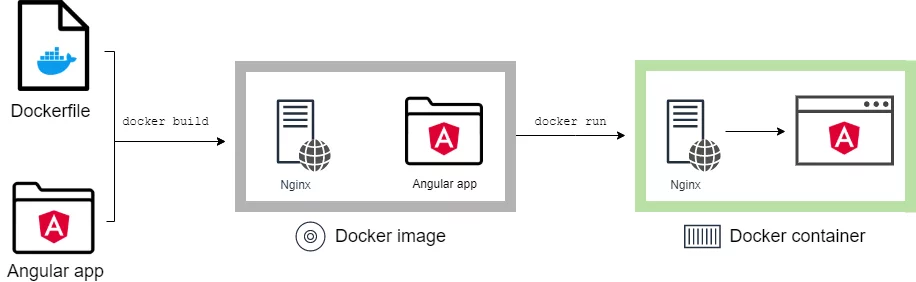
How an Angular app travels through Docker
Images alone aren’t runnable. You need to create a Docker container from the image as a template. Once that container launches, you get an isolated environment where your Angular app runs.
If you want more detail on how Dockerfiles, images, and containers differ, this explainer covers it thoroughly.
Planning the GitLab job
This job’s job is to build and upload a Docker image that contains our Angular application. In a container-based setup like a Kubernetes cluster, the deliverable must be a Docker image, not just the raw app files.
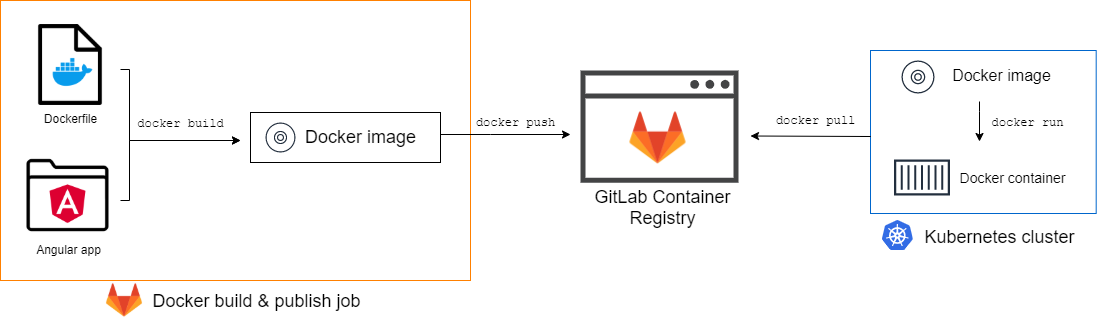
The image gets pushed to the Container Registry, where tools like Docker or Kubernetes can fetch and run it during deployment.
In a typical Kubernetes workflow, the cluster pulls the image from the registry, creates a container from it, and then runs your app inside that container. Starting the container is effectively starting your application.
Preparing the Docker image
Recall the build_app job from part one. It compiled your app and stored the output in artifacts/app, along with the Dockerfile and an Nginx configuration file.
variables:
  APP_OUTPUT_PATH: "$CI_PROJECT_DIR/artifacts/app"

build_app:
  script:
    - yarn ng build --prod
  after_script:
    - cp $PROJECT_PATH/nginx.conf $APP_OUTPUT_PATH
    - cp $PROJECT_PATH/Dockerfile $APP_OUTPUT_PATH
Relevant part of the build_app job
If you inspect the produced bundle, you’ll see it’s a single-page application with primarily JavaScript files and some CSS.
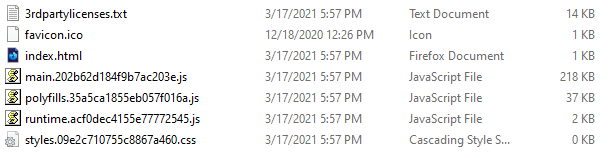
Contents of the artifacts/app directory
All you need now is an HTTP server to serve those files. Rather than manually configuring a server, we’ll bake it into the image. Nginx is a solid, well-known choice, so let’s use it.
FROM nginx:alpine

COPY . /usr/share/nginx/html
COPY ./nginx.conf /etc/nginx/conf.d/default.conf
Dockerfile designed for Angular apps
The COPY directive moves your app bundle into the image, replacing both the default static site and the default configuration. The container will launch with Nginx serving your content on port 80.
Angular apps are mostly simple static sites, but the stock Nginx config won’t work. If you go to something like https://localhost:4200/test, it returns a 404 because Nginx looks for a folder called test that doesn’t exist.
server {
  listen 80;

  location / {
    root /usr/share/nginx/html;
    index index.html;
    try_files $uri $uri/index.html /index.html =404;
  }
}
An Nginx config tailored for Angular routing
The fix is to supply your own Nginx configuration. The try_files directive sends any unrecognized path to index.html, effectively letting Angular’s router handle the request.
Writing the build and push jobs
As the documentation for the container registry explains, three steps are required:
- Authenticate with the project’s container registry
- Assemble the image from the Dockerfile
- Transmit the image to the registry
variables:
  DOCKER_IMAGE_NAME: "$CI_REGISTRY_IMAGE/app"

publish_image:
  stage: publish
  tags:
    - shell
  before_script:
    - docker login -u $CI_REGISTRY_USER -p $CI_REGISTRY_PASSWORD $CI_REGISTRY
    - cd $APP_OUTPUT_PATH
  script:
    - docker build --tag $DOCKER_IMAGE_NAME:$CI_COMMIT_SHORT_SHA .
    - docker push $DOCKER_IMAGE_NAME:$CI_COMMIT_SHORT_SHA
  dependencies:
    - build_app
  only:
    - master
Earlier, you used predefined variables for the project path. Many are available, but the registry credentials are what matter here. Everything else is standard docker build and push commands.
Pay attention to the image tag: it uses $CI_COMMIT_SHORT_SHA. You might be tempted to tag everything latest, but that’s generally frowned upon. Each pipeline run that qualifies will create a unique tag based on the git SHA.
This job shouldn’t trigger on every single pipeline. Use the only keyword to restrict it to commits on the master branch. Also, set up a cleanup policy to keep the registry from ballooning. Tighten the job's dependencies so it only fetches the artifact from build_app.
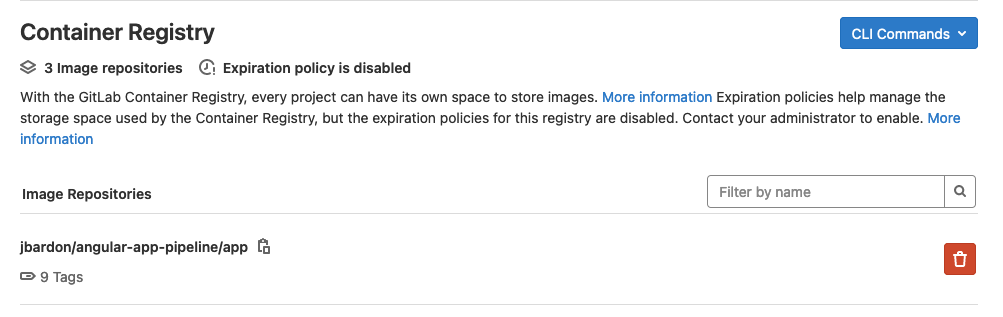
Images stored in the GitLab Container Registry
Running the image
A polished pipeline would move straight into a deployment that consumes this image. For example, Kubernetes could pull it and spin up the necessary containers.
That’s outside the scope here, but GitLab’s Kubernetes integration is worth exploring. It adds deploy pipelines, logs, monitoring, and review apps directly into the interface. GitLab supports managed clusters on several clouds like GCP and AWS EKS.
For now, let’s execute the image locally. Log into the registry first, then use the appropriate docker commands.
$ docker login registry.gitlab.com
$ docker pull registry.gitlab.com/jbardon/angular-app-pipeline/app:YOUR_TAG
$ docker run --rm -i -p 4200:80 registry.gitlab.com/jbardon/angular-app-pipeline/app:YOUR_TAG
Look up the tags you have registered and swap YOUR_TAG accordingly. Refer to the official registry guide for the exact URL format.
Setting up Docker-in-Docker
Notice which executor this job uses. It depends on a shell executor rather than the typical docker executor. That’s intentional: you can’t simply run a docker build inside a docker container without special handling. The GitLab docs detail a few options for building images:
- point the job at a runner configured with a shell executor that already has Docker running
- adopt the
docker:dindapproach from this example — though the official image docs advise against it since it requires privileged mode - switch to Kaniko, which avoids privileged mode entirely
GitLab’s shared runners come with privileged execution already enabled. Any of these techniques will work today. We’ll stick with the shell executor route, since most enterprise setups have their own runners where installing Docker is straightforward.
To experiment locally, you can register your own runner. GitLab provides shared runners on the free tier, but they don’t come with a shell executor or preinstalled Docker.
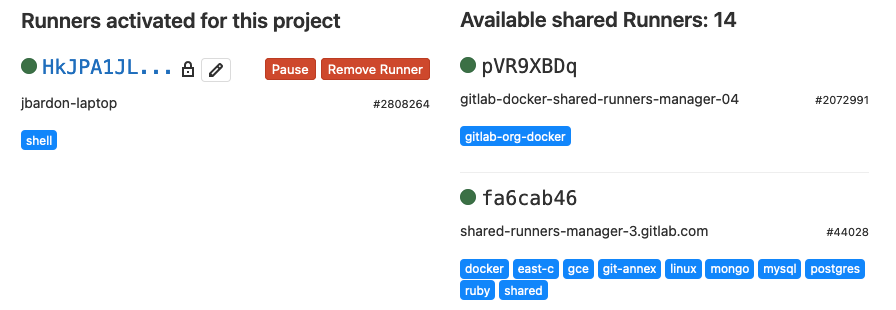
Runner configuration page (Settings > CI/CD > Runners)
To use your own machine, install gitlab-runner, then register it with your project. After that, the pipeline will dispatch this job to your local box. Keep in mind this is just for testing — your computer needs to stay on and the Docker daemon must be running, or the pipeline will sit idle waiting for a tagged runner.
Set Up a GitLab Pages Deployment
A straightforward hosting option exists for your bundled Angular application. Instead of running a Docker container, GitLab Pages can serve static content at no cost.
Adjust the build for a subpath
The default domain assigned to your Pages site depends on your GitLab username and project name, as described in the official documentation. For the sample project from the first installment, the project is angular-app-pipeline, owned by user jbardon.
The live site for this example is available at:
https://jbardon.gitlab.io/angular-app-pipeline
Since the application isn't located at the root domain, you must inform the Angular CLI of this path. The default build process won't account for the additional directory.
$ ng build --prod --base-href /angular-app-pipeline/ --deploy-url /angular-app-pipeline/
These flags configure the base href within index.html. Consequently, all generated script and style references will be prefixed with the specified path.
<html lang="en">
<head>
  <base href="/angular-app-pipeline/">
  <link rel="stylesheet" href="/angular-app-pipeline/styles.css">
</head>
<body>
  <script src="/angular-app-pipeline/runtime.js" type="module"></script>
</body>
</html>
Here's a look at the resulting index.html inside the dist folder.
In the Docker image pipeline, a custom Nginx setup handled routing for the Angular Router. GitLab Pages doesn't offer this level of configuration, so a different workaround from the Angular deployment guide is necessary.
The approach involves duplicating index.html as 404.html. While this isn't a production-grade strategy, it functions because the server defaults to this file for any unmatched routes.
Create the deployment job
The pages keyword simplifies the process. The only requirement is that the website's output lands in the public directory, which must also be defined as an artifact.
variables:
  APP_OUTPUT_PATH: "$CI_PROJECT_DIR/artifacts/app"

pages:
  stage: deploy
  tags:
    - shell
  script:
    - mv $APP_OUTPUT_PATH $CI_PROJECT_DIR/public
  artifacts:
    paths:
      - public
  dependencies:
    - build_app
  environment:
    name: prod
    url: https://jbardon.gitlab.io/angular-app-pipeline
  when: manual
  only:
    - master
This is the job configuration for deploying to GitLab Pages.
With the application now on GitLab Pages, you can use Environments to monitor deployments across various stages.

The environment overview can be found in the Operations menu.
Start by creating a prod environment in the Operations/Environment section. Then, apply the environment keyword to the job handling the deployment. In this case, the pipeline only manages a prod environment for Pages.
Be aware: If Kubernetes is enabled, the deployment job might attempt to interact with your cluster. Verify that no cluster's environment scope contains
prod.

An example pipeline execution for the Pages deployment.
Incorporating the when:manual keyword is a prudent practice. It pauses the pipeline, awaiting a human interaction before proceeding. This allows for a final review of the deployment job and a post-deployment sanity check.
Publish a Library
Deploying an application involves serving it. Deploying a library, however, means uploading it to a package registry. This is distinct from the container registry, which is exclusively for Docker images.
Various registries exist, including public platforms like npmjs and private solutions such as Artifactory or Nexus. GitLab also provides a package registry for every project. If you need a step-by-step guide for creating an Angular library, you can consult this separate article.
variables:
  LIBRARY_OUTPUT_PATH: "$CI_PROJECT_DIR/dist/angular-library"

publish_library:
  stage: publish
  tags:
    - docker
  variables:
    REGISTRY_URI: "gitlab.com/api/v4/projects/$CI_PROJECT_ID/packages/npm/"
  before_script:
    - npm config set "@jbardon:registry" "https://$REGISTRY_URI"
    - npm config set "//$REGISTRY_URI:_authToken" "$CI_JOB_TOKEN"
/projects/$CI_PROJECT_ID/packages/npm/"
  script:
    - cd $LIBRARY_OUTPUT_PATH
    - npm publish
  dependencies:
    - build_library
  only:
    - master
The job definition for library publication.
The core command is npm publish. However, we must override two default configuration values to redirect from the standard npmjs registry. The before_script section is used to establish these settings, which the main script will then utilize.
NPM registry configuration
The following keys need to be adjusted:
- registry directs npm to the GitLab instance.
- authToken grants the necessary publishing permissions.
The commands below use config set to modify these values. The registry URL is not identical for both keys.
$ REGISTRY_URI="gitlab.com/api/v4/projects/$CI_PROJECT_ID/packages/npm/"
$ npm config set "@jbardon:registry" "https://$REGISTRY_URI"
$ npm config set "//$REGISTRY_URI:_authToken" "$CI_JOB_TOKEN"
These are the NPM commands used to configure the publishing parameters.
Multiple options exist for changing the registry. Let's examine the config command approach. The full name of the example library is @jbardon/angular-lib-pipeline, where @jbardon is the scope.
The library's naming must comply with GitLab's conventions. Ensure the package scope aligns with your account or group name.
Thus, the job needs to override the @jbardon:registry key. It employs the project-level endpoint, which permits publishing. Another safeguard for manual publication can be added to the library's own package file.
{
  "name": "@jbardon/angular-lib-pipeline",
  "version": "0.0.1",
  "publishConfig": {
    "@jbardon:registry": "https://gitlab.com/api/v4/projects/YOUR_PROJECT_ID/packages/npm/"
  },
  "peerDependencies": {
    "@angular/common": "^10.1.0",
    "@angular/core": "^10.1.0"
  }
}
The library's package.json configuration.
Here, the publishConfig block serves the same function as the CLI configuration. It's an optional safeguard for manual publishing. The Project ID is displayed on the main project page, just below the title.
The authToken is sourced from the $CI_JOB_TOKEN environment variable. The relevant configurations are comparable if you're using a different registry. The critical detail is that authToken isn't your API key; it's the token that npm login normally stores in your ~/npmrc file.
Retrieve the package
After the job completes, the library appears in the project's registry. The latest tag identifies the most recent version, which is what npm downloads by default. If you forget to bump the version, you'll encounter an error, as it's not possible to republish the same version number.

A view of the project's package registry.
For testing purposes, adopting semver is wise. Publishing pre-release tags like 1.0.0-alpha.1 is ideal for multiple test cycles without impacting other users, while signaling a stable 1.0.0 release is forthcoming.
Avoid the temptation to unpublish and re-publish the same version.
npm uses its local cache and may install the old version despite the registry having the new one. The version number would be identical, but the package contents could be corrupt.
 $ yarn config set @jbardon:registry https://gitlab.com/api/v4/packages/npm/
 $ yarn login
 $ yarn add @jbardon/angular-lib-pipeline
Instructions for installing the library.
Within the Package registry, selecting your library reveals relevant commands. GitLab shows the proper way to install the library with NPM peer dependencies. The initial two commands set the registry and authToken as we discussed. The instance-level endpoint shown here is sufficient for installation and works across all libraries you host on the same GitLab instance.
Building a tailored Docker image for pipeline jobs
The docker executor runs most jobs using the image keyword. In the install_dependency job, the full node environment gets provisioned.
For certain jobs, such as test_app, the before_script keyword becomes necessary to run extra configuration steps ahead of the job. That added setup can be time-consuming — pulling in Chrome for unit tests, for instance, might take up to 30 seconds on every run.
test_app:
  image: node:12-alpine
  tags:
    - docker
  before_script:
    - apk add chromium
    - export CHROME_BIN=/usr/bin/chromium-browser
gitlab-ci.yml
Docker offers a way around this bottleneck: create a fresh image from node:12-alpine with everything the before_script handles baked in. Jobs using that image get all required tools ready without any additional installation.
FROM node:12_alpine

RUN apk add chromium
ENV CHROME_BIN /usr/bin/chromium-browser
The runner fetches docker images from the docker.io registry by default. But GitLab ships a Container Registry with every project — why not use that and publish the image there?
$ docker build --tag=ci-tests:latest .
$ docker login registry.gitlab.com
$ docker push registry.gitlab.com/jbardon/angular-app-pipeline/ci-tests:latest
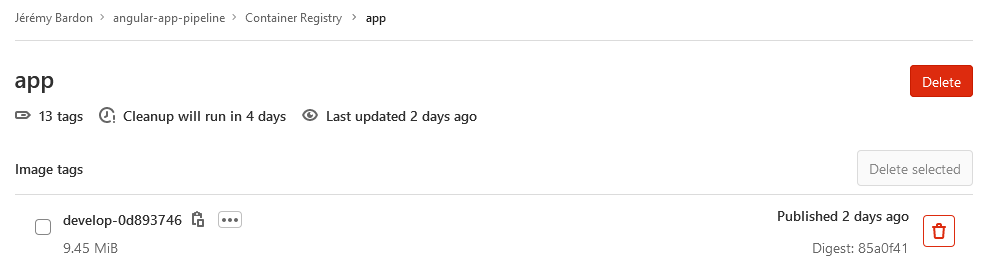
Finally, point the job at the project registry. Append the image name with the right environment variable and you're set.
image: $CI_REGISTRY_IMAGE/ci-node:latest
The pipeline now runs quicker since environment setup no longer eats time. Still, manually updating CI images and pushing them into the project registry isn't exactly a sustainable process.
Keeping the custom image current automatically
You can push further and let the pipeline build and upload images itself whenever required.
Building and publishing a Docker image to the project container registry is something you've already done. The job script stays the same here: sign in, build, push. Pay attention to the parallel:matrix keyword — it lets the same job execute multiple times with varying parameters.
update_ci_images:
  stage: .pre
  tags:
    - shell
  before_script:
    - docker login -u $CI_REGISTRY_USER -p $CI_REGISTRY_PASSWORD $CI_REGISTRY
    - cd $PROJECT_PATH/.ci
  script:
    - docker build --tag $CI_REGISTRY_IMAGE/$STAGE_IMAGE:latest
                   --target $STAGE_IMAGE $PROJECT_PATH/.ci

    - docker push $CI_REGISTRY_IMAGE/$STAGE_IMAGE:latest
  parallel:
    matrix:
      - STAGE_IMAGE: [ci-node, ci-tests]
  only:
    changes:
      - .ci/Dockerfile
The concept: keep the Dockerfile for every pipeline image inside the repository. A single .ci/Dockerfile holds all image definitions. It sits in an empty folder so each image gets its own context.
With the Dockerfile checked into the repo, you can trigger image builds only when that file changes using the only:changes keyword. Since image building must happen before anything else, the .pre keyword makes sure it's always first in the pipeline.
FROM node:12-alpine AS ci-node

FROM ci-node AS ci-tests

RUN apk add chromium
ENV CHROME_BIN /usr/bin/chromium-browser
Multi-stage Dockerfile
This setup uses multi-stage builds so one file can describe multiple images. By picking a target during docker build, you get two distinct images out of it: ci-node and ci-tests.
Final thoughts
There you have it — you now know how to assemble a full GitLab pipeline for Angular apps and Angular libraries, deployment included.

Complete pipeline for Angular app
This pipeline lets you ship your Angular app to static hosting platforms like GitLab pages at no cost. When you need something closer to production, the docker image route is the better fit. Both the Container and package registries in GitLab come into play — they host the Angular app, the pipeline docker image, and the Angular library all at once.
Two GitLab projects run this pipeline
– https://gitlab.com/jbardon/angular-app-pipeline
– https://gitlab.com/jbardon/angular-lib-pipeline
Before wrapping up, a couple of suggestions for growing your pipeline. Debug it with the CI Lint tool and dig into the documentation on pipeline efficiency. There's likely room to refine what's shown here — feel free to share your thoughts in the comments.
Enjoyed the read or curious about our work at Smart AdServer? Head over to the official Smart AdServer blog. Catch you there!
Thanks to the reviewers who helped me to make this article better : Gaurav Dasgupta and Max Koretskyi from InDepthDev community.