
Understanding Custom Catalogs in A2UI
A Custom Catalog gives A2UI a mechanism for adding your own domain-specific components and functions, which the language model can reference just like any built-in element. In practice, a Custom Catalog often extends the Basic Catalog, so it keeps the familiar UI building blocks while also adding new ones tailored to your use case. From the renderer's perspective, nothing changes internally; the LLM simply gets a broader set of tools to work with.
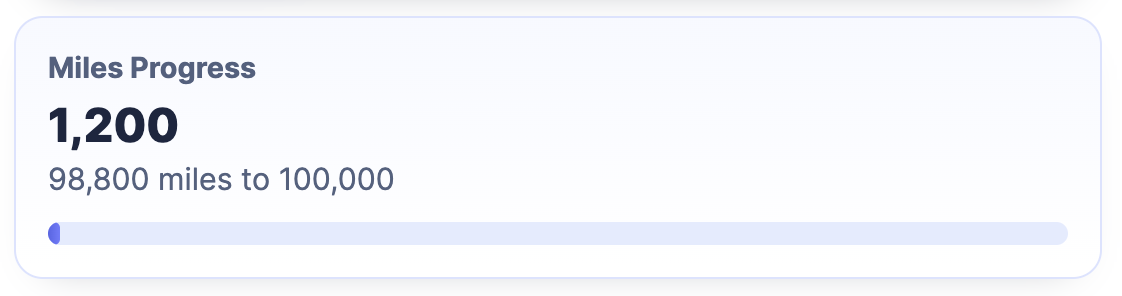
For this walkthrough, we'll extend the passenger card from the first part of this series with a custom MilesProgress component that shows how far a passenger is from their next bonus tier:
Building a Custom A2UI Component
At its heart, an A2UI component in Angular is just a regular Angular component. What makes it special is the context object it receives — that's how the agent's inputs are passed in via A2UI. The listing below defines a context for our MilesProgress component. The passenger property is declared as a BoundProperty, which means it can hold either a concrete value or a reference to a path in the data model:
import type { BoundProperty } from '@a2ui/angular/v0_9';

export interface MilesProgressContext {
  passenger: BoundProperty<Passenger>;
}
The component itself reads this context through the InputSignal named props:
@Component({
  selector: 'app-miles-progress',
  changeDetection: ChangeDetectionStrategy.OnPush,
  imports: [DecimalPipe],
  template: `
    <section class="miles-progress">
      <p class="eyebrow">Miles Progress</p>
      <p class="current">{{ passenger().bonusMiles | number }}</p>
      <p class="remaining">
        {{ remainingMiles() | number }} miles to {{ nextThreshold() | number }}
      </p>
      <div aria-hidden="true" class="track">
        <div class="fill" [style.width.%]="progressPercent()"></div>
      </div>
    </section>
  `,
  styleUrl: './miles-progress.css',
})
export class MilesProgress {
  readonly props = input<MilesProgressContext>(initialContext);
  readonly surfaceId = input.required<string>();
  readonly componentId = input.required<string>();
  readonly dataContextPath = input('/');

  protected readonly passenger = computed(() => this.props().passenger.value());

  protected readonly nextThreshold = computed(() =>
    calcNextThreshold(this.passenger().bonusMiles),
  );

  protected readonly remainingMiles = computed(() =>
    calcRemainingMiles(this.nextThreshold(), this.passenger().bonusMiles),
  );

  protected readonly progressPercent = computed(() =>
    calcProgressPercent(this.nextThreshold(), this.passenger().bonusMiles),
  );
}
Beyond props, the renderer also supplies three additional inputs when it dynamically creates the component: surfaceId identifies the surface the component belongs to, componentId locates it within that surface, and dataContextPath provides the base path in the data model used to resolve relative bindings. Our MilesProgress component doesn't need these extras, but they become important for widgets that modify the data model or trigger actions.
There's currently no dedicated interface for this set of inputs.
The MilesProgress component reads the current bonus miles from the context and uses a computed signal to calculate how many miles remain before reaching the next tier. It also displays a progress indicator for that goal.
For the renderer to recognize and instantiate MilesProgress, it also needs a schema that describes the component's inputs. The renderer built by the A2UI team uses the popular Zod library for this purpose:
import type { AngularComponentImplementation } from '@a2ui/angular/v0_9';
import { z } from 'zod/v3';

[...]

const passengerSchema = z.object({
  id: z.number(),
  firstName: z.string(),
  lastName: z.string(),
  bonusMiles: z.number(),
});

const milesProgressSchema = z
  .object({
    passenger: binding(passengerSchema).optional(),
  })
  .strict();

export const milesProgressEntry = {
  name: 'MilesProgress',
  component: MilesProgress,
  schema: milesProgressSchema as unknown,
} as unknown as AngularComponentImplementation;
// ^^^ Cast umgeht ein Typing-Problem in der aktuellen Version
According to the schema, the passenger property can either be a full object (validated against passengerSchema) or a data binding with a path property. The constant milesProgressEntry bundles the component's name, implementation, and schema into a single unit that the catalog can later include.
Since each property can be a concrete value or a binding, the sample project includes a small helper called binding — it takes a value schema and adds the option of a path-based binding alongside it:
export function binding<T extends z.ZodTypeAny>(schema: T) {
  return z.union([schema, z.object({ path: z.string() }).strict()]);
}
Check out: Agentic UI with Angular
If you're ready to go beyond simply integrating A2UI and want to embed it cleanly into larger architectures:
My book Agentic UI with Angular covers these patterns and trade-offs in depth.
Adding Custom Functions to the Catalog
Custom Catalogs aren't limited to components — you can also register your own functions. These work alongside the standard ones from the Basic Catalog, like formatNumber and formatDate. The following listing shows a small utility called formatId, which turns a numeric ID into a readable string like P-0042. The factory createFunctionImplementation from @a2ui/web_core takes the metadata — name, return type, and a Zod schema for the expected arguments — along with the actual implementation:
import {
  createFunctionImplementation,
  type FunctionImplementation,
} from '@a2ui/web_core/v0_9';
import { z } from 'zod/v3';

const formatIdSchema = z
  .object({
    value: z.number(),
  })
  .strict();

export const formatIdImplementation = createFunctionImplementation(
  {
    name: 'formatId',
    returnType: 'string',
    schema: formatIdSchema as unknown as FunctionImplementation['schema'],
  },
  ({ value }) => {
    const normalizedValue = Math.max(0, Math.trunc(value));

    return `P-${String(normalizedValue).padStart(4, '0')}`;
  },
);
With both components and functions in place, the two core pieces of a Custom Catalog are defined. Next, we need to make the catalog available to the renderer.
Registering a Custom Catalog with the Renderer
A Custom Catalog is simply an instance of BasicCatalogBase. Its constructor takes a unique id, a list of additional components, and a list of functions:
import { BASIC_FUNCTIONS, BasicCatalogBase } from '@a2ui/angular/v0_9';

import { formatIdImplementation } from './format-id';
import { milesProgressEntry } from './miles-progress';

export const customCatalog = new BasicCatalogBase({
  id: 'https://example.com/catalogs/flights42-a2ui-demo',
  extraComponents: [milesProgressEntry],
  functions: [...BASIC_FUNCTIONS, formatIdImplementation],
});
One thing to note: the API in this version is a bit inconsistent. extraComponents adds to the standard components, but functions replaces the standard functions entirely. That means you'll need to manually spread BASIC_FUNCTIONS into the list if you want to keep them.
To put the new catalog to work, you just reference it in the renderer's configuration — no custom Angular service required:
import {
  A2UI_RENDERER_CONFIG,
  A2uiRendererService,
  provideMarkdownRenderer,
} from '@a2ui/angular/v0_9';
import {
  ApplicationConfig,
  provideBrowserGlobalErrorListeners,
} from '@angular/core';
import { marked } from 'marked';

import { customCatalog } from './custom-catalog/custom-catalog';

export const appConfig: ApplicationConfig = {
  providers: [
    provideBrowserGlobalErrorListeners(),
    {
      provide: A2UI_RENDERER_CONFIG,
      useValue: {
        catalogs: [customCatalog],
      },
    },
    provideMarkdownRenderer(async (markdown) =>
      marked.parse(String(markdown ?? '')),
    ),
    A2uiRendererService,
  ],
};
Once the catalog is registered, the sample app can use MilesProgress in any A2UI message just like a standard component. The listing below shows part of an updateComponents message where MilesProgress appears alongside the existing passenger card:
updateComponents: {
  surfaceId,
  components: [
    {
      id: 'root',
      component: 'Column',
      children: ['passenger-card', 'miles-progress'],
    },
    [...]
    {
      id: 'miles-progress',
      component: 'MilesProgress',
      passenger: { path: '/passenger' },
    },
  ],
}
Integrating Custom Components with CopilotKit
So far, we've registered custom components for the standalone A2UI renderer. When working with the CopilotKit integration from the second part, the approach is similar but a bit more convenient. The sample project includes helper functions in the util-copilotkit folder that encapsulate both the component description and its provisioning. The internal structure of these helpers is covered in the "Under the hood: Schema helpers in detail" section at the end of this article.
To let the A2UI renderer in the sidecar display not just Basic Catalog components but also your own widgets, you can add Custom Components. The sample project includes a TicketWidget that renders a boarding pass:
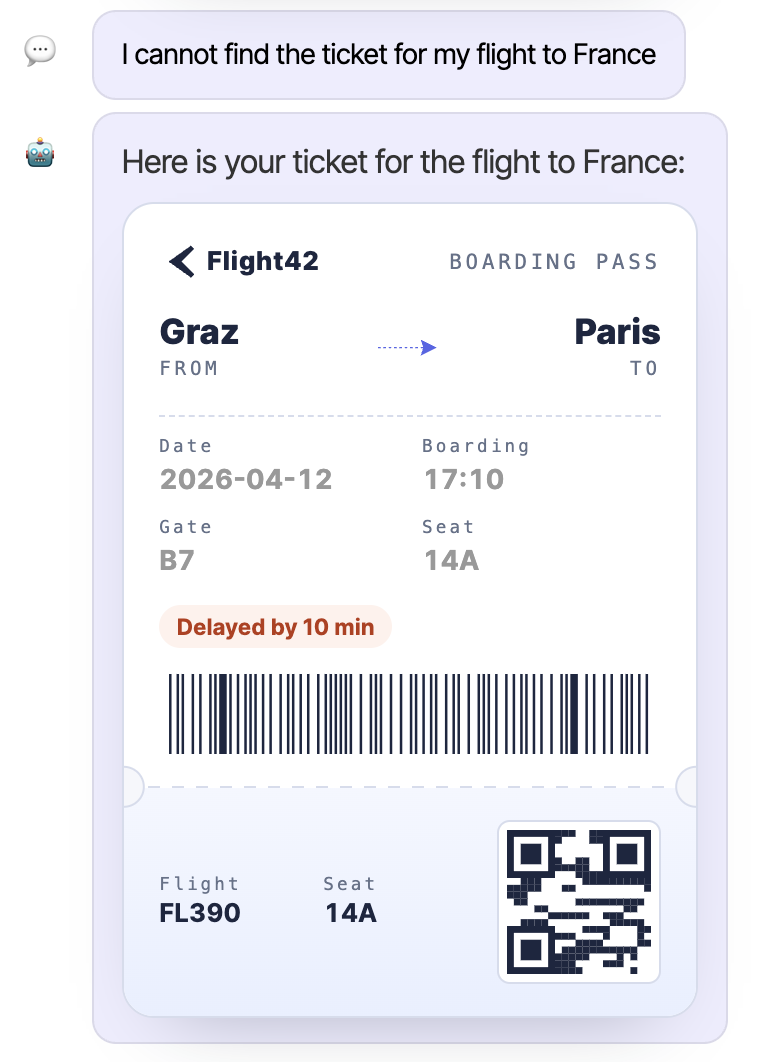
The helper function createCustomComponent takes the component's name, description, implementation, and a Zod schema describing its properties:
import { z } from 'zod/v3';

import {
  binding,
  createCustomComponent,
} from '../../../shared/util-copilotkit/a2ui/a2ui-schema';
import { A2uiCustomCatalogComponent } from '../../../shared/util-copilotkit/a2ui/types';
import { TicketWidget } from './ticket/ticket-widget';

export const ticketWidgetEntry = createCustomComponent({
  name: 'TicketWidget',
  description: 'A boarding-pass-style widget ...',
  component: TicketWidget,
  schema: z
    .object({
      ticketId: binding(z.union([z.string(), z.number()])),
      from: binding(z.string()),
      to: binding(z.string()),
      date: binding(z.string()),
      delay: binding(z.number()).optional(),
    })
    .strict(),
});

export const ticketingExtraComponents: A2uiCustomCatalogComponent[] = [
  ticketWidgetEntry,
];
The binding helper works just like the one shown earlier – it marks which fields the LLM can set directly or bind to values in the data model via a path. On top of that, createCustomComponent uses its type parameters to ensure the props signal of the given component matches the supplied schema.
If you look at the full description in the sample project, you'll notice it's more than a simple label. It explains what the widget does and also gives the language model clear usage rules — for example, that the TicketWidget should only be used when explicitly requested and at most once per query. In effect, the description becomes part of the prompt.
The helper createCustomCatalog wraps the components and the catalog id into a single catalog descriptor:
import { createCustomCatalog } from '../../../shared/util-copilotkit/a2ui/types';
import { ticketingExtraComponents } from './ticketing-extra-components';

export const customCatalog = createCustomCatalog({
  id: 'https://example.com/catalogs/flights42-a2ui-demo',
  components: ticketingExtraComponents,
});
For the id, the sample project uses a URL from its own domain — a common convention for A2UI catalogs, since it guarantees uniqueness. But this id is more than just a label. The renderer looks up the catalog by this id, and the agent has to use it in its createSurface operations. To make that work, the client sends the id along with the catalog description to the agent; the following sections show how that information ends up in the system prompt.
For registration, you can use the provideA2uiCatalog function from the second part, which now accepts the catalog descriptor:
import { provideMarkdownRenderer } from '@a2ui/angular/v0_9';
import { provideCopilotKit } from '@copilotkit/angular';
import { marked } from 'marked';

import { a2uiActivityRendererConfig } from './domains/shared/util-copilotkit/a2ui/a2ui-activity-renderer';
import { provideA2uiCatalog } from './domains/shared/util-copilotkit/a2ui/provide-a2ui-catalog';
import { customCatalog } from './domains/ticketing/ai/custom-catalog/catalog';

[...]

export const appConfig: ApplicationConfig = {
  providers: [
    [...]
    provideCopilotKit({
      renderActivityMessages: [a2uiActivityRendererConfig],
    }),
    provideA2uiCatalog(customCatalog),
    provideMarkdownRenderer(async (markdown) =>
      marked.parse(String(markdown ?? '')),
    ),
  ],
};
Called without arguments, provideA2uiCatalog just registers the Basic Catalog. When you pass a descriptor, it extends the catalog with the provided components and functions:
export const A2UI_CUSTOM_CATALOG = new InjectionToken<A2uiCustomCatalog>(
  'A2UI_CUSTOM_CATALOG',
);

export function provideA2uiCatalog(
  catalog?: A2uiCustomCatalog,
  options?: ProvideA2uiCatalogOptions,
): EnvironmentProviders {
  if (!catalog) {
    return makeEnvironmentProviders([
      {
        provide: A2UI_RENDERER_CONFIG,
        useFactory: (): RendererConfiguration => ({
          catalogs: [inject(BasicCatalog)],
        }),
      },
      A2uiRendererService,
    ]);
  }

  const { sendCatalogDescription = true } = options ?? {};

  const rendererCatalog = new BasicCatalogBase({
    id: catalog.id,
    extraComponents: catalog.components.map(toAngularComponentImplementation),
    functions: [
      ...BASIC_FUNCTIONS,
      ...(catalog.functions ?? []).map(toFunctionImplementation),
    ],
  });

  const storedCatalog: A2uiCustomCatalog = sendCatalogDescription
    ? catalog
    : { id: catalog.id, components: [] };

  return makeEnvironmentProviders([
    { provide: A2UI_CUSTOM_CATALOG, useValue: storedCatalog },
    {
      provide: A2UI_RENDERER_CONFIG,
      useValue: { catalogs: [rendererCatalog] },
    },
    A2uiRendererService,
  ]);
}
The local helpers toAngularComponentImplementation and toFunctionImplementation are simple mappings from descriptor entries to the renderer structures we saw earlier; their details are in the source code. The function also takes care of merging in BASIC_FUNCTIONS, so the asymmetry mentioned earlier stays an implementation detail. Additionally, it stores the descriptor in the A2UI_CUSTOM_CATALOG injection token; you'll see what role that plays in the next section. The sendCatalogDescription option determines whether the full catalog description or just its id gets sent to the server.
The Activity Renderer from the second part doesn't need any changes. It continues to pass received A2UI operations to the A2uiRendererService, which resolves custom components through the registered catalog.
Informing the Agent About Custom Components
The renderer is now capable of displaying the TicketWidget — but how does the language model learn that this component exists in the first place? That responsibility falls to the initAgentStore glue function introduced in the second part: when an agent is registered, it reads the descriptor stored in the A2UI_CUSTOM_CATALOG injection token and registers it as a context entry for that agent (abbreviated):
import { type Context } from '@ag-ui/core';
import { inject } from '@angular/core';
import { connectAgentContext } from '@copilotkit/angular';

import {
  catalogIdToContextEntry,
  catalogToContextEntry,
} from './a2ui/catalog-context';
import { A2UI_CUSTOM_CATALOG } from './a2ui/provide-a2ui-catalog';

[...]

export function initAgentStore(config: InitAgentStoreConfig): void {
  [...]

  connectCatalogContext(config.agentId, config.catalogIdOnly ?? false);

  [...]
}

function connectCatalogContext(agentId: string, idOnly: boolean): void {
  const catalog = inject(A2UI_CUSTOM_CATALOG, { optional: true });
  if (!catalog) {
    return;
  }

  const entry = idOnly
    ? catalogIdToContextEntry(catalog.id)
    : catalogToContextEntry(catalog);

  connectAgentContext(() => ({ ...entry, agentIds: [agentId] }) as Context);
}
Context entries are a generic mechanism provided by AG-UI for supplying additional information to the agent. The connectAgentContext function from @copilotkit/angular registers a factory with the CopilotKit runtime whose result flows into the context when requests are assembled. Through the agentIds property, the entry is scoped to the agent currently being registered — in an application with multiple agents, each one receives exactly its own catalog entry. Since the catalog remains unchanged at runtime, it is serialized once during initialization.
Individual agent stores consequently have no knowledge of the catalog: the injectTicketingAgentStore function shown in part two stays as-is; the catalog is incorporated automatically as soon as provideA2uiCatalog places it in the injection token. For agents that don't require component descriptions but only need to reference the catalog ID, initAgentStore additionally offers the catalogIdOnly: true option.
The serialization is handled by the catalogToContextEntry helper: it converts the catalog ID, the names and descriptions of the custom components, and — via zodToJsonSchema — their schemas into a context entry. Its implementation can also be found in the section at the end of the article.
The Server-Side View: Consuming the Custom Catalog from Context
On the server side, the agent must evaluate the received context entry. In the sample project, the addCustomCatalogInstructions function from the libs/ag-ui-server directory handles this task. The Mastra agent used here integrates it directly into its instructions:
export const ticketingAgent = new Agent({
  id: 'ticketingAgent',
  name: 'Flight42 Ticketing Assistant',
  instructions: addCustomCatalogInstructions({
    systemInstructions: ticketingAgentPrompt,
  }),
  [...]
});
What's particularly notable is the signature of ticketingAgentPrompt: the system prompt is no longer a static string but a factory that takes the catalog ID and weaves it into the instructions — for instance, where the prompt specifies the structure of the createSurface operations:
export function ticketingAgentPrompt(catalogId: string): string {
  return `
[...]
- renderA2uiTool expects { messages: A2uiMessage[] } — one self-contained A2UI
  v0.9 surface that MUST contain:
  - one createSurface message with a fresh surfaceId and catalogId
    "${catalogId}";
[...]
`;
}
Behind the call to addCustomCatalogInstructions lies an instructions factory that extracts the catalog ID from the runtime context, builds the base prompt with it, and appends the component description as an additional section (abbreviated):
import {
  A2UI_DEFAULT_CATALOG_ID,
  catalogToPromptSection,
  extractCatalogId,
} from './catalog-to-prompt.js';

[...]

export interface AddCustomCatalogInstructionsOptions {
  /** Builds the system prompt for the catalog id the client registered. */
  systemInstructions: (catalogId: string) => string;
  [...]
}

export function addCustomCatalogInstructions(
  options: AddCustomCatalogInstructionsOptions,
): (params: InstructionsParams) => string {
  const { systemInstructions } = options;

  return ({ requestContext }) => {
    const agUi = requestContext.get('ag-ui') as AgUiRuntimeContext | undefined;
    const catalogId =
      extractCatalogId(agUi?.context) ?? A2UI_DEFAULT_CATALOG_ID;
    const catalogSection = catalogToPromptSection(agUi?.context);
    const baseInstructions = systemInstructions(catalogId);

    return catalogSection
      ? `${baseInstructions}\n\n${catalogSection}`
      : baseInstructions;
  };
}
The context entries transmitted by AG-UI are available in the Mastra runtime context under the ag-ui key. The extractCatalogId helper reads the ID of the client-registered catalog from there; if the client doesn't report a custom catalog, the A2UI_DEFAULT_CATALOG_ID from the Basic Catalog serves as a fallback. The catalogToPromptSection helper searches the same context entries for the one described as A2UI Custom Catalog, parses the serialized catalog definition, and formulates a prompt section from it. This lists the available custom components along with their descriptions and derives simple example props from the JSON schemas to guide the model.
This closes the loop: the client describes its custom components along with the catalog ID, the agent incorporates both into the prompt, the language model references the ID and components in its A2UI messages, and the renderer displays them via the registered catalog.
Security Considerations: sendCatalogDescription and Prompt Injection
By default, the presented solution transmits the textual descriptions and schemas of the components to the agent, which embeds them into the system prompt. While this approach is very convenient during development, it can be exploited for prompt injection in production. In such an attack, a malicious actor smuggles harmful instructions into the system prompt, tricking the language model into unwanted actions.
Therefore, in production environments it's advisable to set the sendCatalogDescription option of provideA2uiCatalog to false:
provideA2uiCatalog(customCatalog, { sendCatalogDescription: false }),In this case, the client retains the complete catalog definition only for local rendering; as a context entry, it transmits solely the catalog ID, which the agent needs for its createSurface operations anyway. The agent instead determines the catalog's schema via this ID from a trusted registry — for example, an internal API or database — and validates the ID against a list of approved catalogs.
Under the Hood: The Schema Helpers in Detail
To conclude, it's worth examining the implementation of the helper functions that handle the custom catalog's schema on the client side. Those who simply adopt them from the sample project can safely skip this section; those who want to adapt them to their own project will find the central building blocks here.
The implementation of createCustomComponent is deliberately simple:
export interface CustomCatalogEntry<
  TName extends string = string,
  TSchema extends z.ZodObject<z.ZodRawShape> = z.ZodObject<z.ZodRawShape>,
> {
  name: TName;
  description: string;
  schema: TSchema;
  component: Type<{
    props: Signal<ContextFromSchema<TSchema>>;
  }>;
}

export function createCustomComponent<
  const TName extends string,
  const TSchema extends z.ZodObject<z.ZodRawShape>,
>(
  entry: CustomCatalogEntry<TName, TSchema>,
): CustomCatalogEntry<TName, TSchema> {
  return entry;
}
The function returns the passed entry unchanged — its value lies in type checking: the ContextFromSchema mapped type derives the context type that the component must accept via its props signal from the Zod schema; each property is expected to be a BoundProperty. If the schema doesn't match the component, compilation already fails.
createCustomCatalog is likewise a pure typing helper that returns the passed descriptor unchanged. The descriptor includes the ID along with the components and optional functions:
export interface A2uiCustomCatalog {
  id: string;
  components: A2uiCustomCatalogComponent[];
  functions?: A2uiCustomCatalogFunction[];
}
The catalogToContextEntry function ultimately serializes this descriptor for transmission to the agent:
import { type Context } from '@ag-ui/core';
import { zodToJsonSchema } from 'zod-to-json-schema';

import { type A2uiCustomCatalog } from './types';

export const A2UI_CATALOG_CONTEXT_DESCRIPTION = 'A2UI Custom Catalog';

export function catalogToContextEntry(catalog: A2uiCustomCatalog): Context {
  const components = Object.fromEntries(
    catalog.components.map((component) => [
      component.name,
      {
        description: component.description,
        schema: zodToJsonSchema(component.schema, { $refStrategy: 'none' }),
      },
    ]),
  );

  return {
    description: A2UI_CATALOG_CONTEXT_DESCRIPTION,
    value: JSON.stringify({ catalogId: catalog.id, components }),
  };
}
The $refStrategy: 'none' option keeps the generated JSON schemas free of $ref references, allowing the server side to process them without additional resolution. The A2UI_CATALOG_CONTEXT_DESCRIPTION constant serves as a identifying marker: it's precisely by this description that the server side identifies the catalog entry among the transmitted context entries.
It's worth noting that the function also delivers an entry for a catalog without components: the catalog ID reaches the server in any case — for instance, when sendCatalogDescription: false withholds the descriptions. For agents that only need the ID from the outset, the sample project additionally offers the shorthand catalogIdToContextEntry(catalogId), which initAgentStore uses when the catalogIdOnly: true option is set.
Summary
Custom Catalogs extend A2UI with dedicated components and functions that the language model can use like any other building block. This allows generic responses to be translated into domain-appropriate interfaces without losing the character of a lean, declarative protocol. Schema validation via Zod ensures clean contracts between agent and client, while the division into components and functions keeps the catalog flexible.
Combined with the CopilotKit integration, custom components can be described compactly with createCustomComponent and integrated with a single call to provideA2uiCatalog. The catalog description travels along with the catalog ID as an AG-UI context entry to the agent, which weaves the ID into its system prompt and subsequently uses it in its createSurface operations — the activity renderer from part two remains unchanged. Those planning the step into production should keep the security aspect around sendCatalogDescription in mind and source catalog schemas from a trusted source.
By combining protocol, renderer, CopilotKit integration, and custom catalogs, you have a solid foundation for letting language models deliver not just text but actual UI responses — in a way that fits your own application.
Interested in production-ready agentic UI architectures?
In my workshop, we explore AG-UI, A2UI, MCP Apps, HITL patterns, and modern Angular architectures for real-world agentic systems.

FAQ
What is a Custom Catalog in A2UI?
A Custom Catalog extends A2UI with custom, domain-driven components and functions. It often subsumes the Basic Catalog and provides the language model with domain-specific building blocks that the renderer processes like any other A2UI component.
How do you describe a custom A2UI component?
The implementation is a regular Angular component that receives its inputs via a Context object. In addition to the component itself, a Zod schema is defined that describes the expected properties. Component, name, and schema are collectively added as an entry to the Custom Catalog — in the CopilotKit integration, type-safely via the createCustomComponent helper function.
How do you register a Custom Catalog in Angular?
For the standalone renderer, an instance of BasicCatalogBase referenced in the A2UI_RENDERER_CONFIG token is sufficient. In the CopilotKit integration, the provideA2uiCatalog function handles this, to which a descriptor created with createCustomCatalog — containing components and optional functions — can be passed directly.
How does the agent learn about the custom components?
The initAgentStore glue function, which registers the agent stores, reads the catalog stored in the A2UI_CUSTOM_CATALOG token, serializes it with catalogToContextEntry, and reports it via connectAgentContext as an AG-UI context entry for the respective agent. On the server side, addCustomCatalogInstructions extracts the catalog ID, builds the system prompt with it, and appends the component descriptions along with derived example props.
What is sendCatalogDescription for and when should you disable it?
By default (sendCatalogDescription: true), the client transmits the component descriptions and schemas to the agent, which embeds them into the system prompt. This is very convenient but can lead to prompt injection. In production, it is therefore recommended to set the option to false: the client then transmits only the catalog ID, and the server obtains the schemas from a trusted registry.