What this series covers
End-to-end testing is a technique for validating an application from the end user's perspective. The objective is to confirm that the product behaves as expected across the full stack, from the frontend through to the backend. In this multi-part series, we demonstrate how to create e2e tests for an Angular application with Cypress.
The original author would like to extend thanks to Mateusz Stefanczyk for co-authoring and supporting the writing process, as well as to Norbert Pioterczak for revising the material and covering the most recent releases.
The structure of the series
The subject of testing—and Cypress itself—is broad enough that splitting the content into multiple installments made sense. Each part can be read independently, letting you focus on one area at a time.
Installments
- Introduction
an overview of the tool, installation steps, configuration, desktop GUI, basic UI tests, and recommended anti-patterns to avoid.
- Integration tests
working with fixtures, integration scenarios, and the associated dos and don'ts.
- Expanding e2e coverage
custom commands and authenticating via GitHub as a social provider.
- Is another e2e tool necessary?
comparing Cypress with Selenium and considering it as a replacement for Protractor.
Introducing Cypress
Cypress is an open-source framework geared toward integration and e2e testing, noted for its level of completeness. Once installed, everything required to write tests is instantly available—no extra packages are needed. Several aspects set it apart from competing solutions:
- it does not depend on Webdriver (Selenium, for contrast, is built on Webdriver; details in a later installment).
- bundled nature—Cypress ships with a test runner, assertion support, and utilities for stubbing and mocking:
- built-in waiting behavior (we will expand on this later):
-
- waits for elements to become visible in the DOM
- waits for animations to complete
- waits for XHR and AJAX requests to finish.
-
- time travel – Cypress captures snapshots throughout execution. Each command's step is inspectable, so when a failure occurs the root cause is often quickly identifiable—for example, whether the right button was clicked.
- all API methods are exposed through the single global
cyobject, keeping test authoring straightforward. - tests can be authored in JavaScript or TypeScript.
- a desktop GUI that gives a live preview of tests as they run, along with debugging through DevTools.
- automatic test reload whenever the spec file is modified.
Setting up Cypress in a project




Install Cypress into an existing Angular app with the following command:
npm install cypress --save-devDirectory layout
/cypress
  /fixtures
    - example.json
  /integration
    /examples
      - actions.spec.js
      - aliasing.spec.js
      - assertions.spec.js
      - connectors.spec.js
      - cookies.spec.js
      - cypress_api.spec.js
      - files.spec.js
      - local_storage.spec.js
      - location.spec.js
      - misc.spec.js
      - navigation.spec.js
      - network_requests.spec.js
      - querying.spec.js
      - spies_stubs_clocks.spec.js
      - traversal.spec.js
      - utilities.spec.js
      - viewport.spec.js
      - waiting.spec.js
      - window.spec.js
  /plugins
    - index.js
  /support
    - commands.js
- index.js- Fixtures – static data used inside tests. These are most commonly employed to stub out web requests (xhr/ajax), specifying which fixture file should supply the response payload. For instance:
server.route('GET', '**/example/**', 'fx:example.json')The snippet above intercepts every GET request whose URL contains /example/ and replies with the contents of example.json from the fixtures folder.
Fixtures can also be fetched manually through the cy.fixture() command. This is especially convenient when the data is needed for assertions.
- .js
- .jsx
- .coffee
- .cjsx
-
- Plugins– the generated
index.jsin this folder houses the default plugins and executes before each test. This is the place where Cypress's internal behavior can be extended or altered.
Starting with Cypress 10, this mechanism was deprecated in favor of .js and .ts configuration files. JSON-based configuration was phased out too. The replacement is the setupNodeEvents() method along with the devServer setting. Through setupNodeEvents(), the previous plugins file can still be imported, though it's not advised due to missing type definitions—a factor that matters when testing Angular projects.
- Support – reusable logic belongs here, such as custom commands, global settings, or common intercepts for the test suite.
Additional folders may appear at runtime, containing things like videos and screenshots from test runs. Adding those to .gitignore is generally a good practice.
With version 11, the initial directory structure is not created automatically (following the installation method above). The folder layout only appears after running cypress open and choosing the testing mode (e2e is used for simplicity here). At that point, Cypress indicates which files and directories it plans to generate:
– cypress.config.ts – the central configuration file where options are defined to alter Cypress's defaults—the base settings are sufficient for running tests as-is
– cypress/fixtures/example.json – a sample fixture included for illustration
– cypress/support/commands.ts – an empty file that will eventually hold custom commands extending the cy object
– cypress/support/e2e.ts – a file loaded prior to the e2e suite execution.
Adding a spec from the GUI creates an e2e folder containing the spec.ts files (the standard naming used with Angular) that define individual tests.
This whole layout is adjustable; the folder paths can be configured as needed.
Using the desktop GUI
The desktop interface is an Electron-based app that streamlines test creation and debugging. In a typical project it's started via cypress open, while for Nx workspaces the command is ng e2e app-e2e (the --watch flag is handy during development).
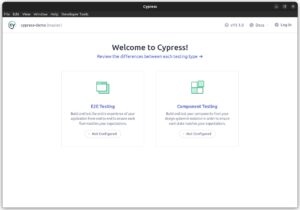
Once launched, a window appears asking which test type to run. Apart from the familiar e2e option, Cypress 10 introduced Component Testing. Our focus is the e2e path. The first time you click E2E Testing, a prompt explains the files that will be created—such as the configuration file.
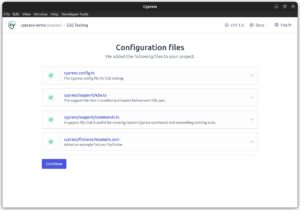
That informational screen shows up just once; the next launch goes directly to browser selection.
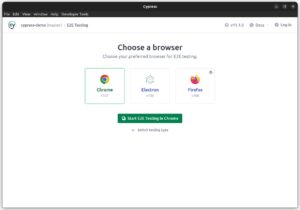
Several browsers are available, including Chrome, Firefox, and Electron. Picking one leads to the test list. If no specs exist yet, Cypress offers to scaffold an example suite.
For this article, we use the 'Scaffold example specs' bundle, which produces sample scenarios.
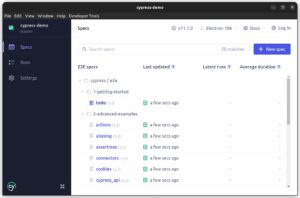
Selecting a spec opens the actual Cypress runner, showing each test within the loaded application page.
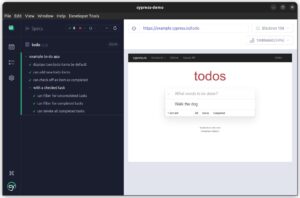
The running view is packed with features. Every command is logged with full details, and hovering over a step reveals a snapshot of the app from that exact moment—an excellent aid during troubleshooting.
The Selector Playground is another tool worth noting; it generates element selectors on the fly that follow Cypress's recommended conventions.
Testing the UI layer
To begin, we'll concentrate on interface-level tests that do not involve the API (integration scenarios come in part two). If Cypress hasn't been set up in your Angular project yet and you're not using Nx, schematics available here can handle it. The demo used for the examples is a compact app built specifically to showcase these tests (https://bit.ly/2WSNCsS), and following along with it is recommended.
The repository ships with an older Cypress version. Once you've gotten comfortable with the tool, feel free to upgrade to the latest release and put your knowledge to the test.
Let's say the target view is a straightforward login page like the one below:
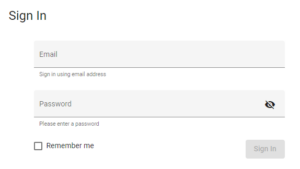
Inside e2e/src/integration, create a new file named signing.spec.ts and add the initial block:
describe(“login form”, () => {
  //
});
The describe function groups multiple related tests under a common heading. Every suite of tests for a feature starts with this block.
Next up is the it function, which defines the actual test case:
describe(“login form”, () => {
  it('show error when email is empty', () => {
    cy.visit('/');
    cy.get(‘[data-test=”login-email-input”]’).click();
    cy.get(‘[data-test=”'login-password-input”]’).click();
    cy.get(‘[data-test=”login-email-error”]’).should('be.visible').contains('Email address is required');
  });
});
While it wraps an individual test, cy is the global entry point to all Cypress commands.
The cy.visit(…) command navigates to the path given as an argument, much like typing a URL into the address bar. That's a good mental model—treat each command as a user interaction.
To pick elements, use cy.get(…), passing a selector just like those generated by Selector Playground. On the returned object, additional assertions can be chained—for instance, should accepts the condition being validated. More on selectors can be found in the good and bad practices section.
This test ensures that leaving the email field blank produces an error with specific text.
A fundamental rule: each test must be able to run independently. That means including cy.visit('/') on its own in every test, or better yet, using a beforeEach hook inside the describe block to avoid duplication.
beforeEach(() => {
  cy.visit('/');
});
It's also useful to verify that the login button is disabled while the form is invalid and becomes enabled once validation passes. To keep things tidy, create a small utility file at e2e/src/support/get-data-test.util.ts:
export const getDataTest = (dataTestId: string) => `[data-test=${dataTestId}]`;With that helper, the button test becomes:
describe('sign in button', () => {
  it('sign in button should be disabled when form is invalid', () => {
    cy.get(getDataTest('login-password-input')).click();
    cy.get(getDataTest('login-email-input')).click();
    cy.get(getDataTest('login-sing-in-button')).should('be.disabled');
  });

  it('sign in button should be enabled when form is valid', () => {
    cy.get(getDataTest('login-password-input')).type('test@email.com');
    cy.get(getDataTest('login-email-input')).type('test@email.com');
    cy.get(getDataTest('login-sing-in-button')).should('be.not.disabled');
  });
});
Try replicating similar tests in your own project.
The login page is supposed to show lorem ipsum once the "Remember me" box is checked. Attempt writing a test for it yourself—it should look very much like the empty-email error test.
Once the specs are written, run them from the Desktop GUI.
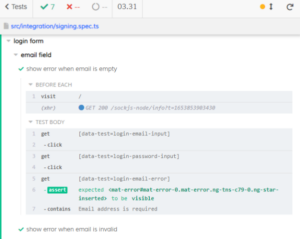
The output lists each step and shows which assertions were satisfied and which tests passed.
Common selector patterns
cy.get('input') – targets any element with the input tag
cy.get('.menu') – targets the element carrying the .menu class
cy.get('#menu') – targets the element with the id of .menu
cy.get('a[href="login"]') – finds an a tag whose href attribute is "login"
cy.get('[data-test="sidebar"]') – finds the element where data-test equals "sidebar"
Automatic waiting
We touched on this earlier; Cypress automatically retries commands until the expected condition is met. With the basics of UI testing in hand, this behavior becomes clearer.
When an assertion like .should('be.disabled') is used, Cypress polls the element until it reaches the desired state, saving us from manually adding waits or timeout logic. This automatic retrying re-evaluates the assertions over time until they pass or the timeout is reached; details are covered in the official docs.
A number of commands come with default waiting conditions. For example, .get() and .find() wait for the element to exist in the DOM, .type() waits until an element is writable, and .click() ensures an element is actionable before acting. When using .click(), Cypress verifies that the element is:
- not hidden,
- not overlapped,
- not disabled,
- not mid-animation.
This frees the developer from thinking about timing concerns and greatly improves the authoring experience. For further reading, see the official documentation on element interaction.
Recommended patterns and anti-patterns
How to select elements
good: rely on the data-* attribute so tests are resistant to CSS or JS modifications.
bad: depend on attributes that are prone to change in the markup.
Almost every test relies on selectors. By adhering to the data-* convention, you protect yourself from issues that might arise when, say, a CSS class is renamed.
How to steer clear of brittle selectors?
- avoid CSS-based attributes (id, class, tag) for locating elements,
- don't match elements by their textContent,
- prefer the data-* attribute.
What does it look like in practice?
Consider this button we intend to test:
<button mat-button id="call-button" class="call-button" name="call-button" data-cy="call-button">
    Call me
</button>| Selector | When to use |
| cy.get('button') | never – lack of context, heavily generic |
| cy.get('.call-button') | never – attached to the styles, high probability of change |
| cy.get('#call-button') | rarely – but still attached to styles |
| cy.get('[name=call-button]') | rarely – violates HTML semanticity |
| cy.contains('Call me') | dependently – based on the value |
| cy.get('[data-cy=call-button') | always – isolates from all changes |
Text Content
The table above might raise a question:
> If we just said not to select by textContent, why is cy.contains considered acceptable?
The distinction is subtle but important: do you want the test to fail if the text changes?
> When the failure is desired, use cy.contains()
>When it's not, stick with the data-* attribute
A side note
Selector Playground always suggests identifiers that follow recommended best practices.
Interacting with external sites
good: only test things within your control. Avoid invoking external servers unless necessary; when the need arises, prefer cy.request().
bad: opening or asserting on resources outside your control.
A common habit is pulling an external service into a test. You might be tempted to verify things like:
- OAuth flows against external authentication providers,
- changes propagated to a remote server,
- arrival of the "password reset" email.
Reaching out to such sites via cy.visit() is the obvious approach at first glance, but baking external dependencies into tests is inadvisable, because:
- the cost in time and execution speed is significant
- you have no control over the remote, which might:
- change its markup,
- corrupt state or render unpredictably,
- detect the automation and lock you out (GitHub is known to do so),
- run an A/B experiment,
- legally forbid automated interaction.
There are multiple strategies for avoiding those pitfalls; they will be covered in the next part of this series on Cypress.
Source: https://www.cypress.io/