Why Run Schematics From Within Schematics?
A schematic acts as a code generator that follows predefined instructions to modify or extend a project. Schematics collections are valuable for generating consistent code, enforcing architecture, and automating repetitive tasks in Angular projects.
There are scenarios where you need to invoke other schematics—either from the same collection or from an external one. Let's examine some common cases.
Common Scenarios
Here are typical situations where calling other schematics becomes necessary:
- Reusing boilerplate patterns
This approach enforces team-wide consistency by building upon existing templates. @maciej_wwojcik covered this topic in detail: Extend Angular Schematics to customize your development process – Angular inDepth - Combining features from other schematics
Your schematic might need to incorporate functionality already available elsewhere. For instance, building a universal library generator that works with both Angular and NX could leverage their respective library generator schematics. - Splitting instructions for flexibility
When a single schematic handles multiple tasks, you might want to let users run only specific parts. You can create separate schematics for individual tasks and refactor your main schematic to call them.
Now that we understand the motivation, let's explore how to instruct a schematic to execute another.
Ways to Execute Other Schematics
There are two primary approaches to run a schematic from within the current one:
- Create a rule – A
Ruleis a function that takes aTree, applies changes, and returns an updatedTree. The schematic's main file,index.ts, defines rules that implement its logic. - Add a task to the context – Each schematic runs within a
SchematicContext. Adding tasks here is helpful for operations on the generated tree, such as installing packages or running linters.
Schematics can originate from two sources:
- The current collection
- An external collection
This gives us four combinations to explore:
- Rule to run a schematic from the same collection
- Rule to run a schematic from an external collection
- Context task to run a schematic from the same collection
- Context task to run a schematic from an external collection
Setting Up the Schematics Project
Start by creating a new schematics project called run-schematics:
npm install -g @angular-devkit/schematics-cli
schematics blank --name=run-schematics
cd ./run-schematics
This command generates a collection named run-schematics along with a blank schematic of the same name. The resulting project structure looks like this:
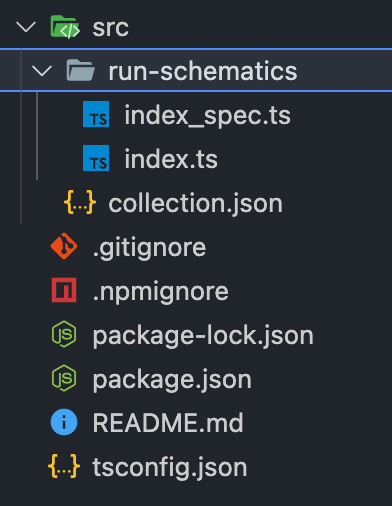
Initial project structure
Now add another schematic to this collection:
schematics blank --name=child-schematic
This adds a schematic named child-schematic.
Let's update child-schematic with new content:
// src/child-schematic/index.ts

import { Rule, SchematicContext, Tree } from '@angular-devkit/schematics';

export function childSchematic(_options: any): Rule {
  return (tree: Tree, _context: SchematicContext) => {
    _context.logger.info('Hi from child-schematic');
    return tree;
  };
}
Next, build the run-schematics collection:
npm run build
Remember to rebuild the collection after every change to the schematics.
Link the collection for use in other projects:
npm link
At this point, the project directory appears as follows:
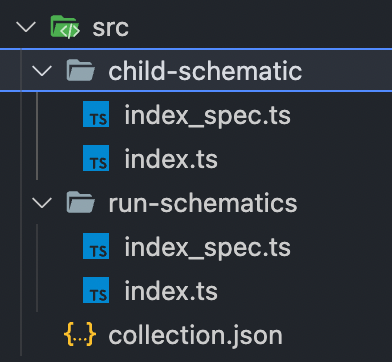
Project structure with child-schematic added
Now move to your Angular project, link the schematics, and run it:
cd ./path/to/angular/project
npm link run-schematics

ng g run-schematics:run-schematics
# Nothing to be done

ng g run-schematics:child-schematic
# Hi from child-schematic
# Nothing to be done
Using Rules
The schematic and externalSchematic functions from @angular-devkit/schematics are used to create rules.
Rule for schematics in the same collection
Modify run-schematics as follows:
// src/run-schematics/index.ts

export function runSchematics(_options: any): Rule {
  return (_tree: Tree, _context: SchematicContext) => {
    const rule = schematic("child-schematic", _options);
    return rule;
  };
}
The schematic function returns a Rule and accepts two arguments:
schematicName– Name of the schematic to executeoptions– Options passed to theRuleFactory
Run the schematic to see it in action:
ng g run-schematics:run-schematics
# Hi from child-schematic
# Nothing to be done
Rule for schematics from an external collection
// src/run-schematics/index.ts

export function runSchematics(_options: any): Rule {
  return (_tree: Tree, _context: SchematicContext) => {
    const rule1 = schematic("child-schematic", _options);

    const rule2 = externalSchematic(
      "@schematics/angular",
      "component",
      _options
    );

    return chain([rule1, rule2]);
  };
}
The externalSchematic function also returns a Rule but takes three arguments:
collectionName– Name of the collection containing the target schematic- The remaining two arguments match those of the
schematicfunction
Execute it to verify:
ng g run-schematics:run-schematics
            Hi from child-schematic
? What name would you like to use for the component? hero
CREATE src/app/hero/hero.component.ts (259 bytes)
UPDATE src/app/app.module.ts (738 bytes)
Using Context Tasks
To add tasks within the SchematicContext, use its addTask method, which accepts a TaskConfigurationGenerator.
There are four task classes that implement this interface:
NodePackageInstallTaskNodePackageLinkTaskRepositoryInitializerTaskRunSchematicTask
The RunSchematicTask class is relevant to our needs, with two constructor overloads:
constructor(schemaName: string, options: T)– Runs a schematic from the same collectionconstructor(collectionName: string, schemaName: string, options: T)– Runs a schematic from an external collection
Our objective is to create a sub-application and then lint it. Here's the plan:
- Build
lint-schematic– handles linting for the newly created app - Build
lint-caller-schematic– creates the sub-app and invokeslint-schematicvia a context task
First, create lint-schematic:
schematics blank --name=lint-schematic
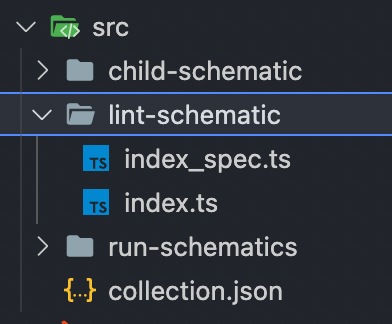
Project structure with lint-schematic
Replace its contents with the following:
// src/lint-schematic/index.ts

import { Rule, SchematicContext, Tree } from "@angular-devkit/schematics";
import { execSync } from "child_process";

export function lintSchematic(_options: { name: string }): Rule {
  return (_tree: Tree, _context: SchematicContext) => {
    _context.logger.info(`Executing: npm run lint -- --fix ${_options.name}`);
    execSync("npm run lint -- --fix " + _options.name);
  };
}
Next, create lint-caller-schematic:
schematics blank --name=lint-caller-schematic

Project structure with lint-caller-schematic
Update its content with the code below:
// src/lint-caller-schematic/index.ts

import {
  externalSchematic,
  Rule,
  SchematicContext,
  Tree,
} from "@angular-devkit/schematics";
import { RunSchematicTask } from "@angular-devkit/schematics/tasks";

export function lintCallerSchematic(_options: any): Rule {
  return (_tree: Tree, _context: SchematicContext) => {
    const rule = externalSchematic(
      "@schematics/angular",
      "application",
      _options
    );

    _context.addTask(new RunSchematicTask("lint-schematic", _options));

    return rule;
  };
}
Run the schematic:
ng g run-schematics:lint-caller-schematic --name=sub-app --defaults
This schematic creates a sub-app in your workspace and executes npm run lint --fix sub-app after creation.
To run an external schematic via a context task, use the same RunSchematicTask class but include the collection name as an additional argument:
_context.addTask(new RunSchematicTask("@schematics/angular", "service", _options));
Summary
We've covered several scenarios where calling other schematics proves beneficial. This knowledge will help you build more advanced library schematics.
Here's a quick recap of the four approaches.
Running a schematic from the same collection
- Create a rule
rule = schematic(schemaName, options)
2. Add a context task
context.addTask(new RunSchematicTask(schemaName, options))
Running a schematic from an external collection
- Create a rule
rule = externalSchematic(collectionName, schemaName, options)
2. Add a context task
context.addTask(new RunSchematicTask(collectionName, schemaName, options))
The complete source for these schematics is available on GitHub.
Acknowledgments
Special thanks to @kasparovairina for creating the banner for this article.