
Connecting form controls to date inputs
This article walks through the practical implementation of the [ControlValueAccessor](https://angular.io/api/forms/ControlValueAccessor) and [Validator](https://angular.io/api/forms/Validator) interfaces. The first interface creates a bridge between a FormControl from the Forms package and a native DOM element, while the second supplies custom validation logic. Although these interfaces can be used separately, here we combine both into a single directive that brings two capabilities to the app:
- Two-way conversion between the value shown in the UI and the value stored in the control
- Validation that rejects invalid dates
If you're new to ControlValueAccessor, a good starting point is this resource: Never again be confused when implementing ControlValueAccessor in Angular forms.
Bridging the UI and control values
We'll begin by building the directive that handles the transformation between the UI representation and the control's value.
// src/app/directives/date-input.directive.ts

import { Directive } from '@angular/core';
import { ControlValueAccessor, NG_VALUE_ACCESSOR } from '@angular/forms';

@Directive({
  selector: 'input[type=date]',
  providers: [
    {
      provide: NG_VALUE_ACCESSOR,
      useExisting: DateInputDirective,
      multi: true
    }
  ]
})
export class DateInputDirective implements ControlValueAccessor {
  constructor() {}
  writeValue(obj: any): void {}
  registerOnChange(fn: any): void {}
  registerOnTouched(fn: any): void {}
}
Three key choices were made for this directive:
- The selector is set to
input[type=date], so every date input automatically gets the conversion and validation behavior without any extra wiring. - The
DateInputDirectiveclass is registered as a value accessor via theNG_VALUE_ACCESSORtoken. This tells Angular to use our directive for syncing with theFormControl. - We explicitly
implemented theControlValueAccessorinterface.
For this scenario, only two methods on the interface matter:
writeValue– This method pushes a value into the native DOM element. In practice, it's where we convert theFormControlvalue into something the UI can display.registerOnChange– This method stores a callback that we invoke when the UI value changes. Through it, we can translate the UI value back into a format suitable for theFormControl.
The graphic below, taken from the article referenced above, clarifies the flow:
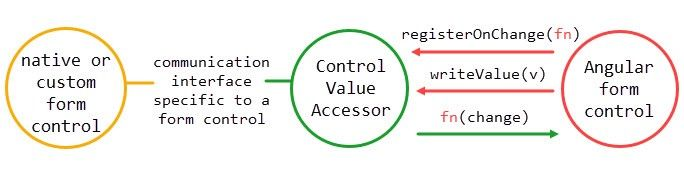
This illustration from the linked article above demonstrates this mechanism
Pushing a value into the DOM with writeValue
When the FormControl updates, we want the date input to display the correct, properly formatted date.
Suppose the API returns an ISO date string like 1994-11-05T08:15:30-05:00. When this value lands in the FormControl bound to the date input, we want the input[type=date] element to show the date in the right format.
Here's how we transform the ISO string into YYYY-MM-DD before assigning it to the native HTML date input:
// src/app/directives/date-input.directive.ts

import { formatDate } from '@angular/common';

// ...
export class DateInputDirective implements ControlValueAccessor {
  writeValue(dateISOString: string): void {
      const UIValue = formatDate(dateISOString, 'YYYY-MM-dd', 'en-IN');

      this._renderer.setAttribute(
        this._elementRef.nativeElement,
        'value',
        UIValue
      );
  }
}
Let's break that down:
- We create a string called
UIValuethat stores the date in `YYYY-MM-DD` format. TheformatDateutility from@angular/commonis used to produce this formatted output. - We then use
Renderer2to assign that formatted string to theinputelement'svalueattribute.
Let's see the changes in action:
// src/app/app.component.ts

@Component({
  selector: 'app-root',
  templateUrl: './app.component.html',
})
export class AppComponent {
  fg = new FormGroup({
    date: new FormControl(new Date().toISOString()),
  });

  get date() {
    return this.fg.get('date');
  }
}
Notice two points in that snippet:
- The date
FormControlis initialized with the current date's ISO string — in a real scenario, that would typically come from an API. - We define a
dategetter to retrieve theFormControl. In reactive forms, you can access any control via thegetmethod of its parent group, but shorthand getters like this can makes templates cleaner.
<!-- src/app/app.component.html -->

<form [formGroup]="fg">
  <input
        type="date"
        id="birthDate"
        formControlName="date"
      />
  <div>
    <code>
        <b>Control Value: </b>{{ date.value }}
    </code>
  </div>
</form>
Running this code, the input will now display the correct date:
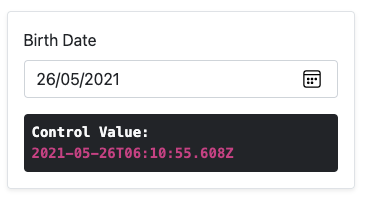
Output after setting writeValue
Reading the value from the DOM with registerOnChange
The native element stores the date as a formatted string. When the user changes it, we need to convert back to a proper ISO string.
First, let's add a HostListener:
// src/app/directives/date-input.directive.ts

export class DateInputDirective implements ControlValueAccessor {

  @HostListener('input', ['$event.target.valueAsNumber'])
  onInput = (_: any) => {};

  // ...
}
The value is read using $event.target.valueAsNumber. This property returns the timestamp in milliseconds, which is handy because we can create a date with new Date(valueAsNumber). Also note that onInput is currently just a placeholder.
Now let's fill in the conversion logic inside registerOnChange:
// src/app/directives/date-input.directive.ts

// …

export class DateInputDirective implements ControlValueAccessor {

  // …

  registerOnChange(fn: (_: any) => void): void {
      this.onInput = (value: number) => {
        fn(this.getDate(value).toISOString());
      };
  }
}
Angular invokes registerOnChange once, passing a function we're calling fn. This callback lets us update the FormControl whenever the DOM element changes. We tie it to the input event through the onInput handler.
We also need to set up a couple of helpers — feel free to adapt them to your needs:
getDate(value: number) {
    if (value) {
      const dateObj = new Date(value);
      return this.isValidDate(dateObj) ? dateObj : { toISOString: () => null };
    }
    return { toISOString: () => null };
}

isValidDate(d: Date | number | null) {
    return d instanceof Date && !isNaN(d as unknown as number);
}
Here's how it works now:

Output after setting registerOnChange
As shown, the control's value is now updated with a valid ISO string.
Adding validation
Next, we'll build validation into the date input so it works out of the box.
First, we add [NG_VALIDATORS](https://angular.io/api/forms/NG_VALIDATORS) to the providers:
// src/app/directives/date-input.directive.ts

// …

@Directive({
  selector: 'input[type=date]',
  providers: [
    {
      provide: NG_VALUE_ACCESSOR,
      useExisting: DateInputDirective,
      multi: true,
    },
    {
      provide: NG_VALIDATORS,
      useExisting: DateInputDirective,
      multi: true,
    },
  ],
})
Then we implement the Validator interface by adding a validate method:
export class DateInputDirective implements ControlValueAccessor, Validator {

  // ...

  validate(control: AbstractControl): ValidationErrors | null {
    const date = new Date(control.value);
    return control.value && this.isValidDate(date) ? null : { date: true };
  }
}
Angular calls validate every time the control's value changes.
Now let's update the template to display validation errors:
<form [formGroup]="fg">
  <input
        type="date"
        id="birthDate"
        formControlName="date"
      />
  <div class="invalid-feedback" *ngIf="(date?.touched || date?.dirty) && date?.invalid">
        Invalid Date
  </div>
</form>
We've added a div that shows a message when validation fails. It relies on the date getter defined in the component class.
Let's dissect the *ngIf condition:
*ngIf="(date?.touched || date?.dirty) && date?.invalid"
- The message is hidden until the user interacts with the field — hence
date?.touched || date?.dirty. - It only appears when the value is invalid — hence
date?.invalid.
For more details, check the Validating form input section on Angular docs.
Let's review the result:

Output after implementing Validator
Wrapping up
Here's what we covered:
Using ControlValueAccessor for
- Converting the UI value into a valid ISO string and passing it to the form-control
- Converting the form-control's ISO string value into a `YYYY-MM-DD` format and displaying it in the UI
Using the Validator interface for date validation on user input
The complete source is available on Stackblitz and GitHub.
Thanks for reading!