Why component state gets messy
It is not uncommon to end up with a container component that orchestrates a number of presentational child components. When you have several of these containers, each wired up with multiple inputs and outputs, keeping track of local UI state changes quickly turns into a maintenance burden. There is a cleaner way to handle this.
The fix: use @ngrx/component-store
The NgRx team maintains @ngrx/component-store, and here is the official description:
“A stand-alone library that helps to manage local/component state. It's an alternative to reactive push-based 'Service with a Subject' approach.”
With this library, you can move all the business logic out of your components. The component then only needs to subscribe to the state and re-render when something changes.
The service you build by extending ComponentStore is scoped to a single component and its descendants. To enforce that boundary, you should provide it directly in the component's providers array.
Global store vs. component store: which one do you pick?
You are not forced to choose between @ngrx/store and @ngrx/component-store; they are meant to be used together in the same application.
- If the state must survive a route change, put it in your global store.
- If the state should be discarded when the route changes, keep it in your component store.
See the official comparison of ComponentStore and Store for more details.
A practical suggestion
If your app currently has no state management layer, my advice is to begin with @ngrx/component-store. You can introduce it in specific parts of the codebase and only reach for a more powerful solution if the requirements actually call for it. This way you keep the implementation effort low while still gaining a clear and scalable state pattern.
The three building blocks
There are only three core concepts you need to grasp:
- Selectors: Used to read and subscribe to the state, either in full or in slices.
- Updater: Used to modify the state, either partially or entirely.
- Effects: Also update the state, but only after running some side effect—like calling an HTTP API—first.
Setting Up the Application
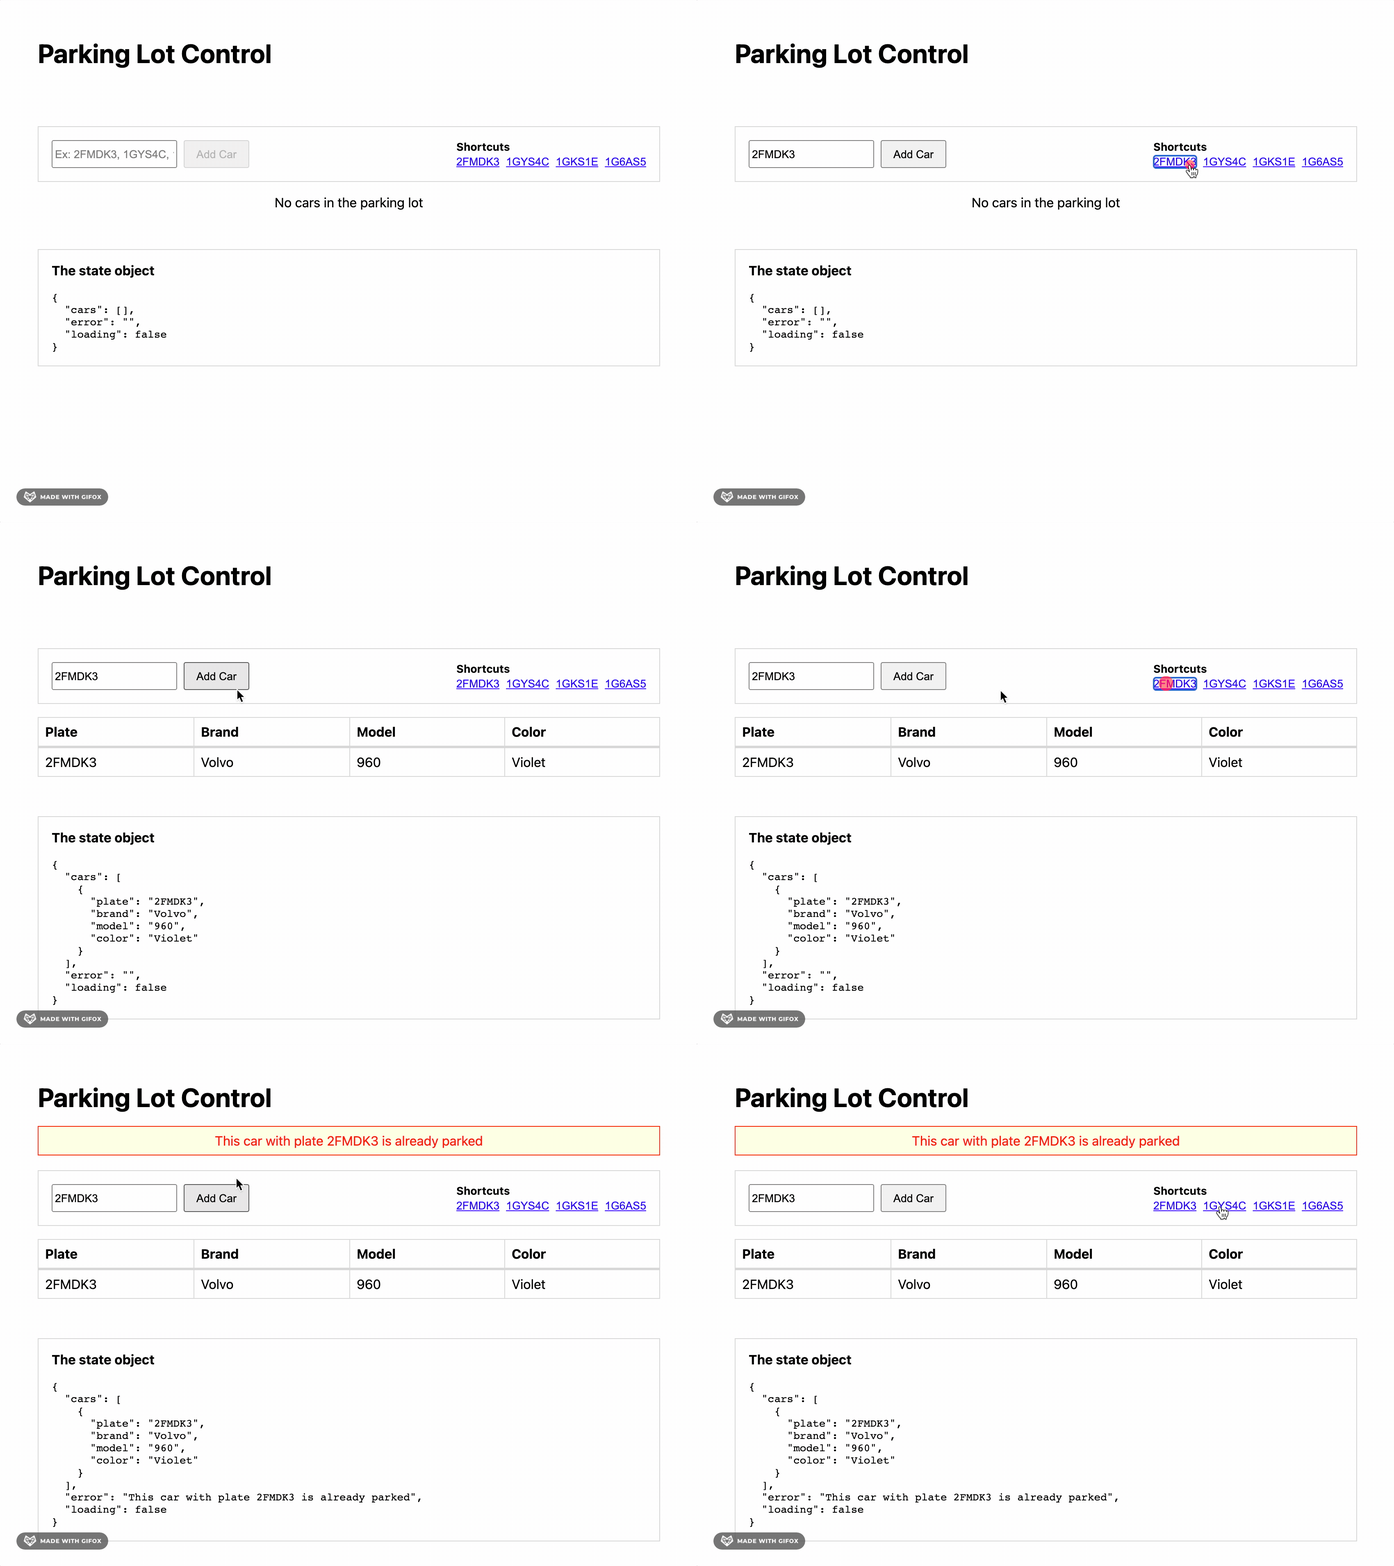
The user interface is organized into three distinct areas:
- A form for registering a vehicle
- A table displaying currently parked vehicles
- A section for surfacing error messages
Utility creation
Begin by defining a Car interface:
export interface Car {
    plate: string
    brand: string
    model: string
    color: string
}
This represents the fundamental structure of a vehicle in our system.
Next, a service is created to handle communication with the mock "backend". Execute the command:Inside the parking-lot.service.ts file, the following logic is added:
import { Injectable } from '@angular/core'
import { Observable, of, throwError } from 'rxjs'
import { delay } from 'rxjs/operators'
import { Car } from '../models/car'

const data: Car[] = [
    {
        plate: '2FMDK3',
        brand: 'Volvo',
        model: '960',
        color: 'Violet',
    },
    {
        plate: '1GYS4C',
        brand: 'Saab',
        model: '9-3',
        color: 'Purple',
    },
    {
        plate: '1GKS1E',
        brand: 'Ford',
        model: 'Ranger',
        color: 'Indigo',
    },
    {
        plate: '1G6AS5',
        brand: 'Volkswagen',
        model: 'Golf',
        color: 'Aquamarine',
    },
]

const FAKE_DELAY = 600

@Injectable({
    providedIn: 'root',
})
export class ParkingLotService {
    private cars: Car[] = []

    constructor() {}

    add(plate: string): Observable<Car> {
        try {
            const existingCar = this.cars.find((eCar: Car) => eCar.plate === plate)

            if (existingCar) {
                throw `This car with plate ${plate} is already parked`
            }

            const car = this.getCarByPlate(plate)
            this.cars = [...this.cars, car]

            return of(car).pipe(delay(FAKE_DELAY))
        } catch (error) {
            return throwError(error)
        }
    }

    private getCarByPlate(plate: string): Car {
        const car = data.find((item: Car) => item.plate === plate)

        if (car) {
            return car
        }

        throw `The car with plate ${plate} is not registered`
    }
}
data: An array of all vehicles known to the system. This serves as the mock database for the demo.
FAKE_DELAY: A constant used to introduce a simulated latency to API requests via RxJS's delay operator.
Functions:
add: This method takes a license plate. If the vehicle is found in the database, it's added to the parked list; otherwise, an error is returned.
getCarByPlate: A private helper that looks up a vehicle by its plate in the database. It throws an error if no match is found.
Data:
car: A property holding the current list of parked vehicles in the mock backend.
Defining the state
To establish the state shape, let's review the functional needs:
Users submit a car's license plate, which triggers an API call.
Two types of errors must be communicated to the user:
- The plate does not exist in the system
- The vehicle is already parked
The interface needs to reflect any ongoing API operations:
- Loading state: The submit button's text changes while the request is processing
- Disabled state: Both the button and input field are disabled during the request
- Error display: Any error message is shown to the user
Given these specifications, the application state is structured as follows:
export const enum LoadingState {
  INIT = "INIT",
  LOADING = "LOADING",
  LOADED = "LOADED"
}
export interface ErrorState {
  errorMsg: string;
}

export type CallState = LoadingState | ErrorState;

// The state model
interface ParkingState {
  cars: Car[]; // render the table with cars
  callState: CallState;
}
ParkingState
- An array of parked cars
- A
callStateproperty responsible for tracking loading and error statuses
Installing @ngrx/component-store
To incorporate @ngrx/component-store into your project, use the following npm command:
npm install @ngrx/component-store --save
Creating the store service
Create a new file at app/store.service.ts and populate it with this initial code:
export const enum LoadingState {
  INIT = "INIT",
  LOADING = "LOADING",
  LOADED = "LOADED"
}
export interface ErrorState {
  errorMsg: string;
}

export type CallState = LoadingState | ErrorState;

// The state model
interface ParkingState {
  cars: Car[]; // render the table with cars
  callState: CallState;
}

// Utility function to extract the error from the state
function getError(callState: CallState): LoadingState | string | null {
  if ((callState as ErrorState).errorMsg !== undefined) {
    return (callState as ErrorState).errorMsg;
  }

  return null;
}
@Injectable()
export class StoreService extends ComponentStore<ParkingState> {
  constructor(private parkingLotService: ParkingLotService) {
    super({
      cars: [],
      callState: LoadingState.INIT
    });
  }
}
This snippet establishes the foundation for your StoreService:
- The
Injectabledecorator is applied just like with any standard service, and the class extendsComponentStore. - A
ParkingStateinterface is defined to outline the shape of your component's state. - The
StoreServiceclass is created by extending theComponentStore<ParkingState>. - Initializing the UI state within the constructor ensures it's available immediately to all consumers of the
ComponentStore.
Now, the remaining pieces—selectors, updaters, and effects—are added. The complete service code is shown below:
import { Injectable } from "@angular/core";

import { ComponentStore, tapResponse } from "@ngrx/component-store";
import { EMPTY, Observable } from "rxjs";
import { catchError, concatMap, tap } from "rxjs/operators";
import { Car } from "./models/car";
import { ParkingLotService } from "./services/parking-lot.service";

export const enum LoadingState {
  INIT = "INIT",
  LOADING = "LOADING",
  LOADED = "LOADED"
}
export interface ErrorState {
  errorMsg: string;
}

export type CallState = LoadingState | ErrorState;

// The state model
interface ParkingState {
  cars: Car[]; // render the table with cars
  callState: CallState;
}

// Utility function to extract the error from the state
function getError(callState: CallState): LoadingState | string | null {
  if ((callState as ErrorState).errorMsg !== undefined) {
    return (callState as ErrorState).errorMsg;
  }

  return null;
}

@Injectable()
export class StoreService extends ComponentStore<ParkingState> {
  constructor(private parkingLotService: ParkingLotService) {
    super({
      cars: [],
      callState: LoadingState.INIT
    });
  }

  // SELECTORS
  private readonly cars$: Observable<Car[]> = this.select(state => state.cars);
  private readonly loading$: Observable<boolean> = this.select(
    state => state.callState === LoadingState.LOADING
  );
  private readonly error$: Observable<string> = this.select(state =>
    getError(state.callState)
  );


  // ViewModel for the component
  readonly vm$ = this.select(
    this.cars$,
    this.loading$,
    this.error$,
    (cars, loading, error) => ({
      cars,
      loading,
      error
    })
  );

  // UPDATERS
  readonly updateError = this.updater((state: ParkingState, error: string) => {
    return {
      ...state,
      callState: {
        errorMsg: error
      }
    };
  });

  readonly setLoading = this.updater((state: ParkingState) => {
    return {
      ...state,
      callState: LoadingState.LOADING
    };
  });

  readonly setLoaded = this.updater((state: ParkingState) => {
    return {
      ...state,
      callState: LoadingState.LOADED
    };
  });

  readonly updateCars = this.updater((state: ParkingState, car: Car) => {
    return {
      ...state,
      error: "",
      cars: [...state.cars, car]
    };
  });

  // EFFECTS
  readonly addCarToParkingLot = this.effect((plate$: Observable<string>) => {
    return plate$.pipe(
      concatMap((plate: string) => {
        this.setLoading();
        return this.parkingLotService.add(plate).pipe(
          tapResponse(
            car => {
              this.setLoaded();
              this.updateCars(car);
            },
            (e: string) => this.updateError(e)
          ),

          catchError(() => EMPTY)
        );
      })
    );
  });
}
This is a substantial block of code, so I'll break it down, beginning with selectors.
Selectors
Selectors are created using the select method in this way:
private readonly cars$: Observable<Car[]> = this.select(state => state.cars);
private readonly loading$: Observable<boolean> = this.select(
  state => state.callState === LoadingState.LOADING
);
private readonly error$: Observable<string> = this.select(state =>
  getError(state.callState)
);
The select method expects a function that receives the complete state. From there, the function can return the specific slice of state the component requires, which in this case is the entire state object.
This application uses three private selectors:
cars$: Retrieves the array of parked vehicles.loading$: Exposes a boolean indicating whether the state isLoadingState.LOADING.error$: Provides any stored error message.
// ViewModel for the component
readonly vm$ = this.select(
  this.cars$,
  this.loading$,
  this.error$,
  (cars, loading, error) => ({
    cars,
    loading,
    error
  })
);
Finally, the vm$ selector acts as a View Model, consolidating all data needed by the template. It uses the select method to combine other selectors—a powerful and supported feature.
Updaters
Three distinct updaters are necessary to modify the state:
- To add or clear the error message
- To manage the loading status
- To add a vehicle to the parking list
Updaters are defined using the update method from the ComponentStore class.
This method takes a function with two parameters: the current state and the payload sent by the component. It should return the newly updated state object.
Error and loading updaters
// UPDATERS
readonly updateError = this.updater((state: ParkingState, error: string) => {
  return {
    ...state,
    callState: {
      errorMsg: error
    }
  };
});
readonly setLoading = this.updater((state: ParkingState) => {
  return {
    ...state,
    callState: LoadingState.LOADING
  };
});
readonly setLoaded = this.updater((state: ParkingState) => {
  return {
    ...state,
    callState: LoadingState.LOADED
  };
});
The updateError method accepts an error string and uses the spread operator to merge it with the existing state, producing the next state.
Similarly, setLoading and setLoaded modify the callState property using the LoadingState enum.
Adding a car to the parking lot
This updater takes a Car object and appends it to the cars array using the spread operator. It also resets the error to an empty string, since a successful add implies no errors are outstanding.
readonly updateCars = this.updater((state: ParkingState, car: Car) => {
  return {
    ...state,
    error: "",
    cars: [...state.cars, car]
  };
});
CRITICAL: When updating state, never mutate the existing object. Always return a new object instance.
Effects
Adding a car to the parking lot requires an effect, as it involves an API call with the provided license plate. Once the API responds, the state is updated accordingly.
The effect method receives a callback that accepts the value passed to the effect as an Observable. Each invocation of the effect pushes a new value into this Observable stream.
// EFFECTS
readonly addCarToParkingLot = this.effect((plate$: Observable<string>) => {
  return plate$.pipe(
    concatMap((plate: string) => {
      this.setLoading();
      return this.parkingLotService.add(plate).pipe(
        tapResponse(
          car => {
            this.setLoaded();
            this.updateCars(car);
          },
          (e: string) => this.updateError(e)
        ),
        catchError(() => EMPTY)
      );
    })
  );
});
In this effect, the following actions occur:
- It receives the car plate as an
Observable. - It updates the
loadingstate to indicate an ongoing request. - It calls the API through the
ParkingLotServiceto park the car.
The concatMap operator is used to ensure that if multiple calls are made before a request completes, they are handled sequentially. This RxJS operator queues incoming requests and processes them one at a time.
The tapResponse helper, also from @ngrx/component-store, simplifies handling the effect's response. It ensures the error case is addressed and prevents the effect from terminating prematurely if an error occurs.
Additionally, catchError is used to manage any potential errors within the inner observable pipeline.
Component development
In the components/car-list.component.ts file, insert the following:
import { Component, Input } from '@angular/core'
import { Car } from '../../models/car'

@Component({
    selector: 'app-car-list',
    templateUrl: './car-list.component.html',
    styleUrls: ['./car-list.component.css'],
    providers: [],
})
export class CarListComponent {
    @Input() cars: Car[] = []

    constructor() {}
}
And for the template in components/car-list.component.html, add this markup:
<table *ngIf="cars.length; else noCars">
    <tr>
        <th>Plate</th>
        <th>Brand</th>
        <th>Model</th>
        <th>Color</th>
    </tr>
    <ng-template ngFor let-car [ngForOf]="cars" let-i="index">
        <tr>
            <td>{{car.plate}}</td>
            <td>{{car.brand}}</td>
            <td>{{car.model}}</td>
            <td>{{car.color}}</td>
        </tr>
    </ng-template>
</table>

<ng-template #noCars>
    <p>No cars in the parking lot</p>
</ng-template>
Ensure the car-list component is registered in your module. Check the app/app.module.ts file; if CarListComponent is missing from the declarations array, add it manually.
Enabling FormModule
Since the app.component will use a form with [(ngModel)], the FormsModule must be imported.
Open app/app.module.ts and add FormsModule to the imports array. The resulting module configuration looks like this:
import { BrowserModule } from '@angular/platform-browser'
import { NgModule } from '@angular/core'

import { AppComponent } from './app.component'
import { CarListComponent } from './components/car-list/car-list.component'
import { FormsModule } from '@angular/forms'

@NgModule({
    declarations: [AppComponent, CarListComponent],
    imports: [BrowserModule, FormsModule],
    bootstrap: [AppComponent],
})
export class AppModule {}
Using the store service
The StoreService is provided specifically for the app.component and its child components.
app/app.component.ts
Replace the existing code with the following:
import { Component } from '@angular/core'
import { StoreService } from './store.service'

@Component({
    selector: 'app-root',
    templateUrl: './app.component.html',
    styleUrls: ['./app.component.css'],
    providers: [StoreService],
})
export class AppComponent {
    plate = ''
    vm$ = this.store.vm$

    constructor(private store: StoreService) {}

    onSubmit($event: Event) {
        $event.preventDefault()
        this.store.addCarToParkingLot(this.plate)
        this.plate = "";
    }

    addPlate($event: Event) {
        const target = $event.target as HTMLButtonElement

        if (target.nodeName === 'BUTTON') {
            this.plate = target.innerHTML
        }
    }
}
The StoreService manages all business logic, keeping the component remarkably concise. Here's a breakdown:
Dependency Injection
providers: [StoreService]: The service is injected at the component level, providing a dedicated instance for this component and its children.
Properties
plate: Bound to the form input, capturing the plate number the user wishes to park.
vm$: This observable, sourced from our StoreService, emits whenever the state changes. The template will subscribe to it in the next step.
Functions
constructor(private store: StoreService) {}: The StoreService is injected via the constructor, similar to any typical service.
onSubmit(): Triggered on form submission; it solely invokes the store's addCarToParkingLot effect with the user-entered plate.
addPlate(): This is a helper for the demo, allowing users to quickly fill in a plate by clicking pre-defined buttons.
app/app.component.html
Replace the template with the code below:
<header>
    <h1>Parking Lot Control</h1>
</header>

<ng-container *ngIf="vm$ | async as vm">
    <div class="messages">
        <p class="error" *ngIf="vm.error">{{vm.error}}</p>
    </div>

    <div class="box">
        <form (submit)="onSubmit($event)">
            <input
                type="text"
                [(ngModel)]="plate"
                [ngModelOptions]="{standalone: true}"
                placeholder="Ex: 2FMDK3, 1GYS4C, 1GKS1E,1G6AS5"
                [disabled]="vm.loading"
            />
            <button type="submit" [disabled]="vm.loading || !plate.length">
                <ng-container *ngIf="vm.loading; else NotLoading">
                    Loading...
                </ng-container>
                <ng-template #NotLoading>
                    Add Car
                </ng-template>
            </button>
        </form>
        <div class="shortcuts">
            <h5>Shortcuts</h5>
            <p (click)="addPlate($event)" class="examples">
                <button>2FMDK3</button>
                <button>1GYS4C</button>
                <button>1GKS1E</button>
                <button>1G6AS5</button>
            </p>
        </div>
    </div>

    <app-car-list [cars]="vm.cars"></app-car-list>
</ng-container>
<ng-container *ngIf="vm$ | async as vm">: This subscribes to the vm$ ViewModel using the async pipe and assigns it to a template variable, vm, for use throughout the HTML.
Displaying Errors
Since the error is a string, it's displayed directly with interpolation and a conditional directive:
<p class="error" *ngIf="vm.error">{{vm.error}}</p>
Form Structure
A form is created to accept the plate number, and its submission is bound to the onSubmit method.
<form (submit)="onSubmit()">
This simple form consists of a text input for the plate and a submit button.
<input>: Its disabled state is tied directly to the loading property from the state.
<button>: This is disabled based on the loading state, and also when the plate property is empty to prevent submitting blank values.
When onSubmit is invoked, the component calls the effect with the plate. From there, the ComponentStore takes over all state management and API interactions.
Wrapping up
Navigate to https://localhost:4200 in your browser to see the application in action.
Key takeaways
- The
ParkingLotServicewas created to manage API communication. - The
StoreService, extendingComponentStore, was established to handle all business logic and state. - The UI subscribes to the
StoreService's state; any changes trigger automatic UI updates.
This pattern gives you a single, centralized source of truth for the UI, making updates and improvements easier without having to modify code in multiple locations.
Final thoughts
As demonstrated, it's beneficial to manage state at the component level before scaling up to a full-blown architecture.
A state is simply a representation of your interface's condition. With @ngrx/component-store and its core concepts—select, update, and effect—you can implement this in a straightforward, organized, and less error-prone manner.