Prerequisites: you should be familiar with the NgRx Store management system and Angular CLI.
Objective
Some time ago, I was tasked with setting up an Angular 7 CLI monorepo starter that follows a specific project layout:
- A single CoreApp is the main shell.
- There are two sub-applications: App1 and App2.
- Both App1 and App2 can be lazy-loaded as routes within CoreApp. They can also be launched and developed standalone, though with additional setup overhead.
- Each sub-application integrates NgRx for state management, enabling inspection of their respective stores via Redux-Dev-Tools.
- A shared component library named Admin-lib is available; it can be built and reused across CoreApp, App1, or App2.
- All of this must be accomplished using Angular CLI 7.2.x.
Here is a simplified visual representation of the project structure:
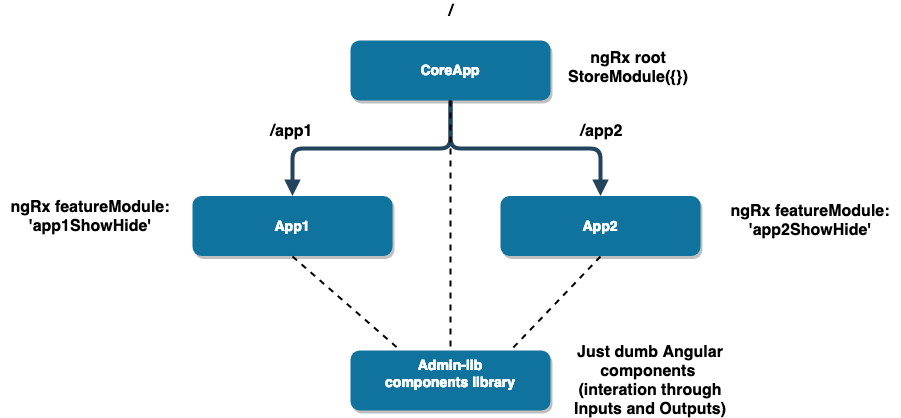
With Angular CLI 7, you can generate not only the primary application (its source resides in the src folder) but also additional sub-applications and libraries (which are placed under the project directory of the main repository).
To create the structure described above, use the following Angular CLI commands:
npm install -g @angular/cli    # in case you don't have it installed
ng new CoreApp --routing=true  # creates main CoreApp with routing
ng generate application app1   # creates app1 applciation
ng generate application app2          # creates app2 applciation
ng generate lib admin-lib     # creates admin-lib component library
Once these commands are executed, your project directory should mirror this layout:
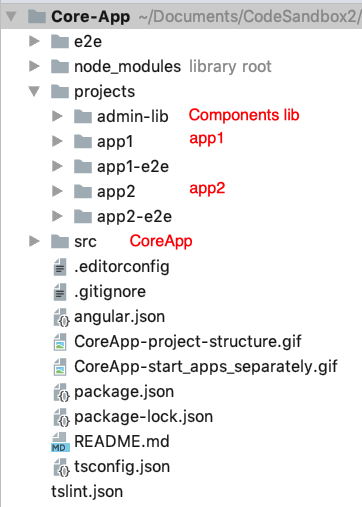
Project folder layout
At this point, each of these components exists as a separate entity. Our next step is to wire them together. However, before we do that, we need to set up scripts in package.json that allow us to start, build, test, and lint each application individually.
If you inspect the scripts section of package.json, you will find the default commands listed below:
"scripts": {
  "ng": "ng",
  "start": "ng serve",
  "build": "ng build",
  "test": "ng test",
  "lint": "ng lint",
  "e2e": "ng e2e"
},
These commands are only configured for the main CoreApp application.
You can execute them via npm start or npm run build (and similarly for other commands) from the terminal. Note that, except for start, every script must be prefixed with npm run like so: npm run <commandName>.
In the scripts block, you are free to define additional commands tailored to your sub-applications or libraries.
"scripts": {
  "ng": "ng",
  "start:Core": "ng serve --port 4444",  #start CoreApp in dev mode*
  "start:app1": "ng serve app1 --port 4422", #start App1 in dev mode
  "start:app2": "ng serve app2 --port 4423", #start App2 in dev mode
  "build:core": "ng build --prod --stats-json", #build CoreApp
  "build:admin-lib": "ng build admin-lib", #build admin-lib library
  "build:app1": "ng build app1", # build App1
  "build:app2": "ng build app2", # build App2
  "test:core": "ng test",  # run jasmine unit tests for CoreApp
  "test:app1": "ng test app1", # run jasmine unit tests for App1
  "test:app2": "ng test app2", # run jasmine unit tests for App2
  "lint:core": "ng lint",  # run lint unit tests for CoreApp
  "lint:app1": "ng lint app1", # run lint unit tests for App1
  "lint:app2": "ng lint app2", # run lint unit tests for App2
  "e2e": "ng e2e"
},
*Remember to remove any comment text beginning with # before adding these to package.json
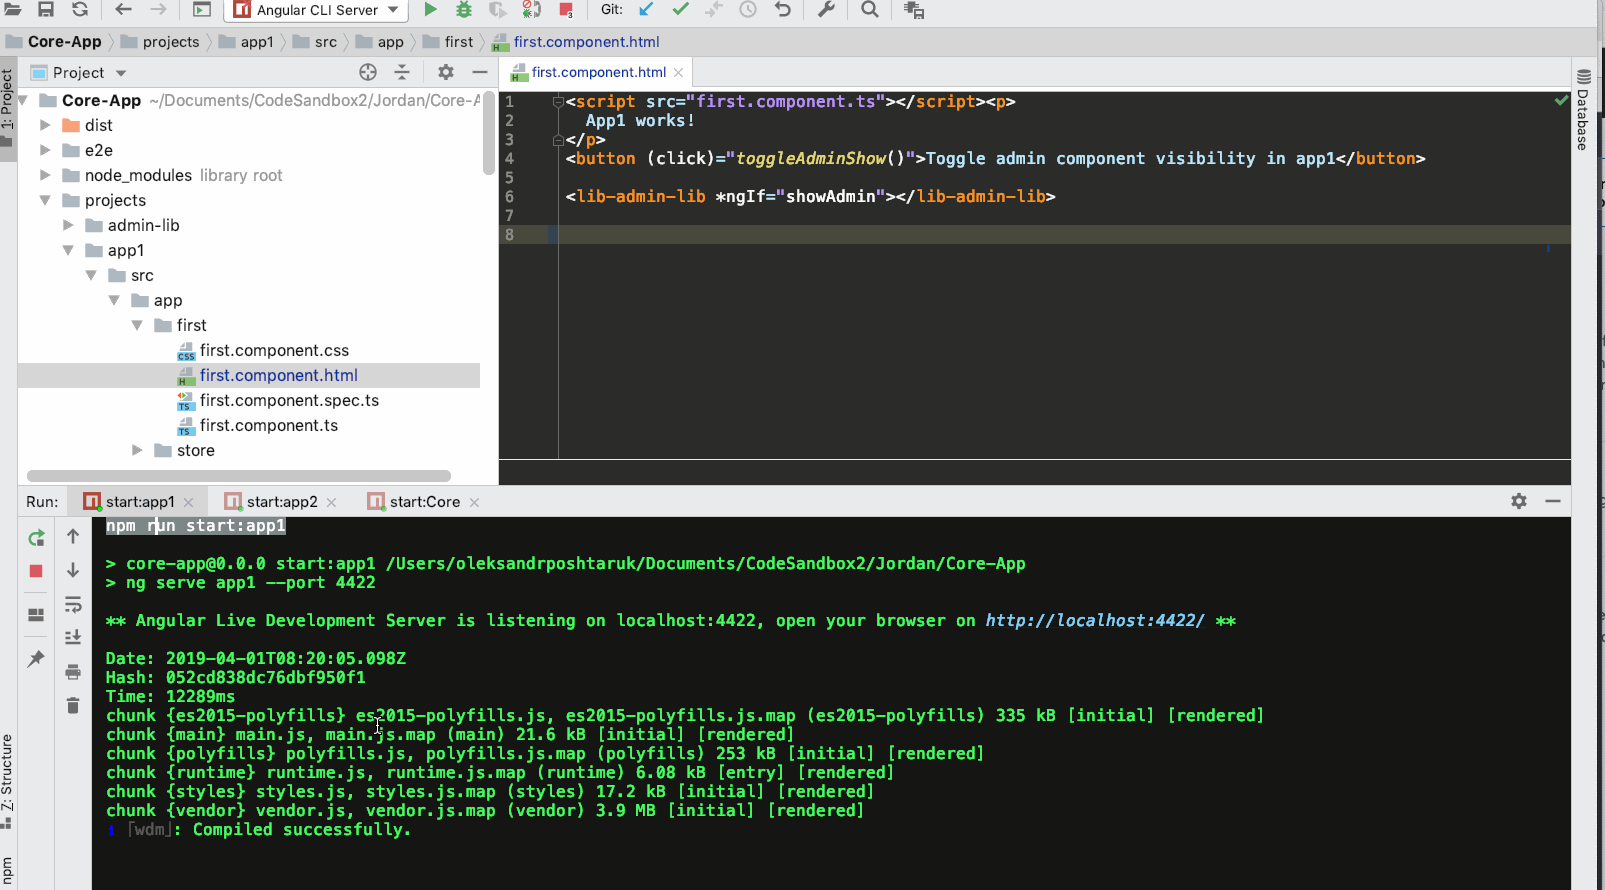
With these scripts in place, you can now launch any application using its corresponding command. For instance:
npm run start:Core
Alternatively:
npm run start:app1
Now that the primary scripts are set up in package.json, our remaining tasks are:
- Develop a component within admin-lib, build the library, and then import it into App1 and App2.
- Set up routing and integrate NgRx in both App1 and App2.
- Define /app1 and /app2 paths in the CoreApp routing configuration so that App1 and App2 can be accessed as lazy-loaded modules.
- Adjust the TypeScript configuration in CoreApp's src/tsconfig.app.json to allow compilation of code originating from App1 and App2 within CoreApp.
Let's proceed by creating a component inside the admin-lib that we will later reuse across our applications. Here is the demo component:
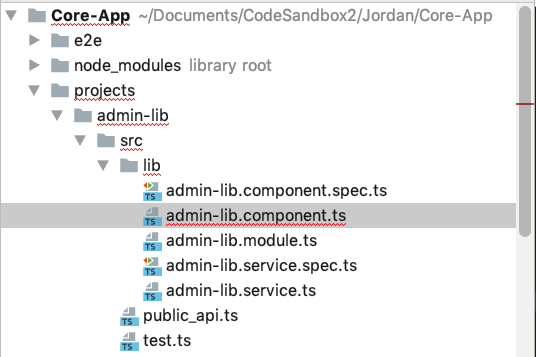
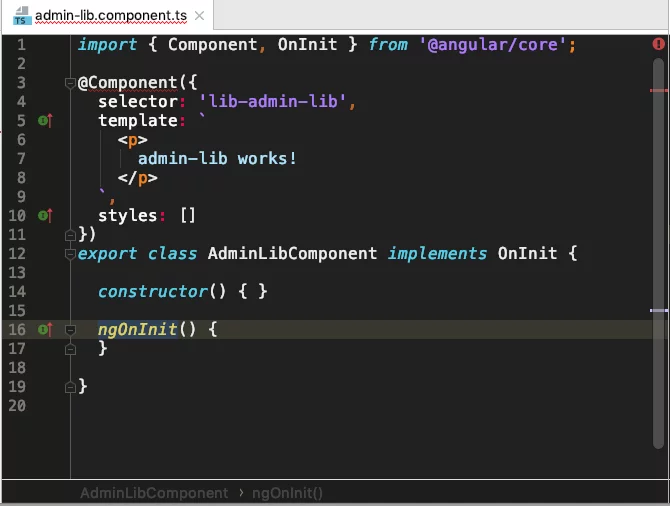
Next, ensure this component is declared and exported in the admin-lib.module.ts file.
When the admin-lib was generated, Angular CLI automatically updated the main project's tsconfig.json with the following entries:
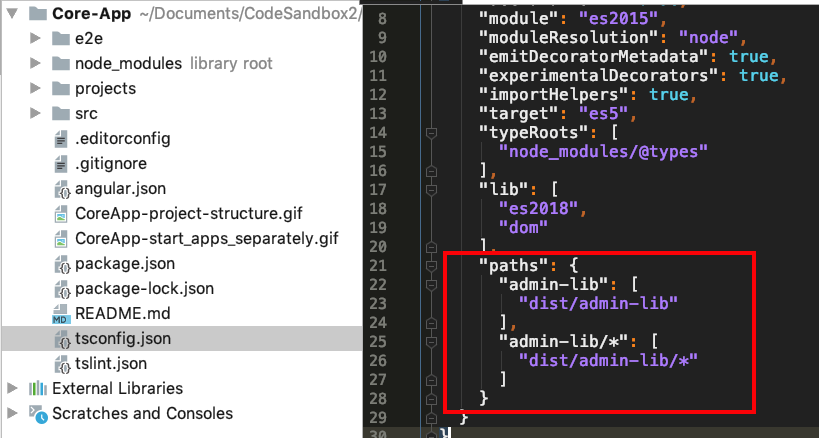
Refer to the full tsconfig.json source here.
This implies that we must build the admin-lib first; once built, we can import it using syntax like:
import {AdminLibModule} from 'admin-lib';
To compile the admin-lib, execute this command:
npm run build:admin-lib
This is one of the commands we added to package.json:
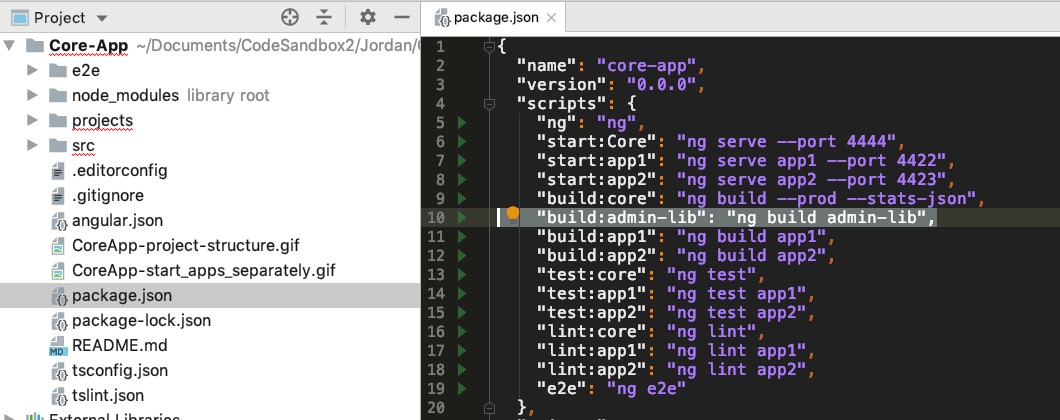
build:admin-lib
Running this will generate a dist/admin-lib directory. After that, you can import admin-lib.module into any of your applications.
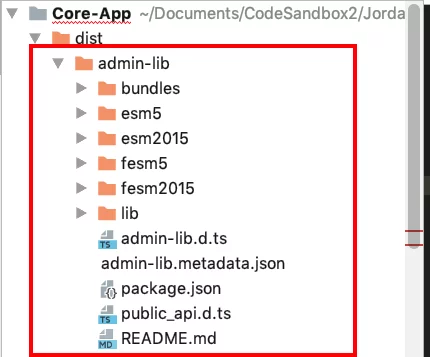
dist/admin-lib
NgRx relies heavily on RxJS internally. If you'd like to strengthen your skills in this area, Packtpub.com and I have put together a full RxJS review course covering many more approaches to solving everyday development challenges with this powerful library. Check it out!
Our plan for this section is:
- Set up routing
- Integrate NgRx with dedicated feature modules
- Incorporate the component from the admin-lib
Setting up routing
We'll begin by creating a default component in App1, which will serve as the entry point for routing. Additionally, we'll import the admin-lib module (built earlier) into App1's app.module.

Routing configuration for App1 app.module.ts
Integrating NgRx and feature modules
For the NgRx setup, I lean on NgRx Schematics. A deep dive into Schematics is outside the scope here; you can explore it here. Additionally, this piece by Wes Grimes offers a solid NgRx file organization pattern for enterprise-scale Angular projects.
To demonstrate, I implemented a simple boolean toggle that flips its value on every dispatched action. In the app1/src/app directory, I created a store folder containing hide-show.reducer.ts, hide-show.selectors.ts, and hide-show.actions.ts.

NgRx wired into App1
The App1 store now takes on the following shape:
{
  app1ShowHide: boolean;
}
Next, I placed admin-lib-component (exported from the shared library) inside the template of App1's first component. By toggling app1ShowHide in the Store, we control whether that component renders in App1.
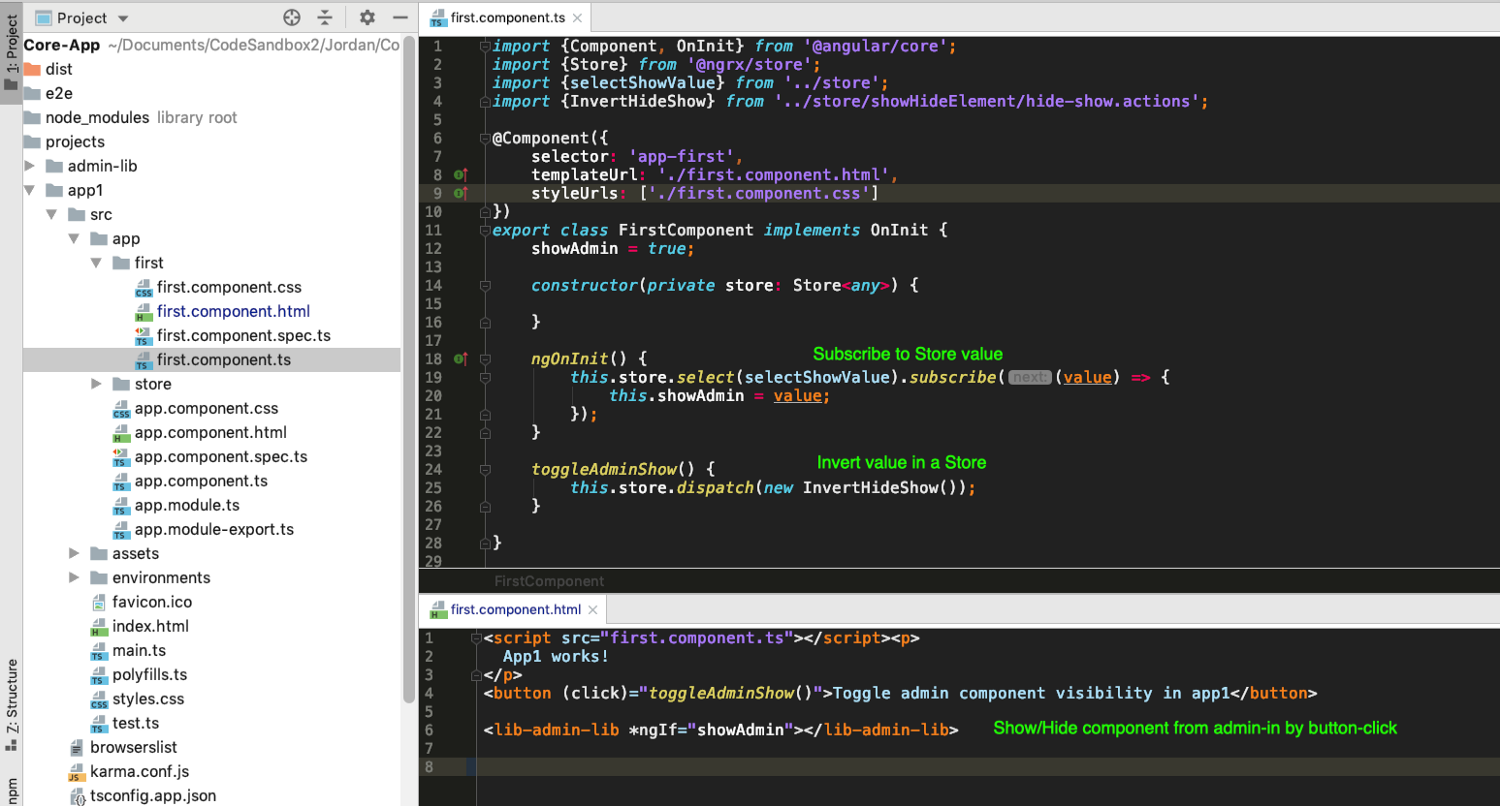
With that in place, let’s boot App1 and see the result:
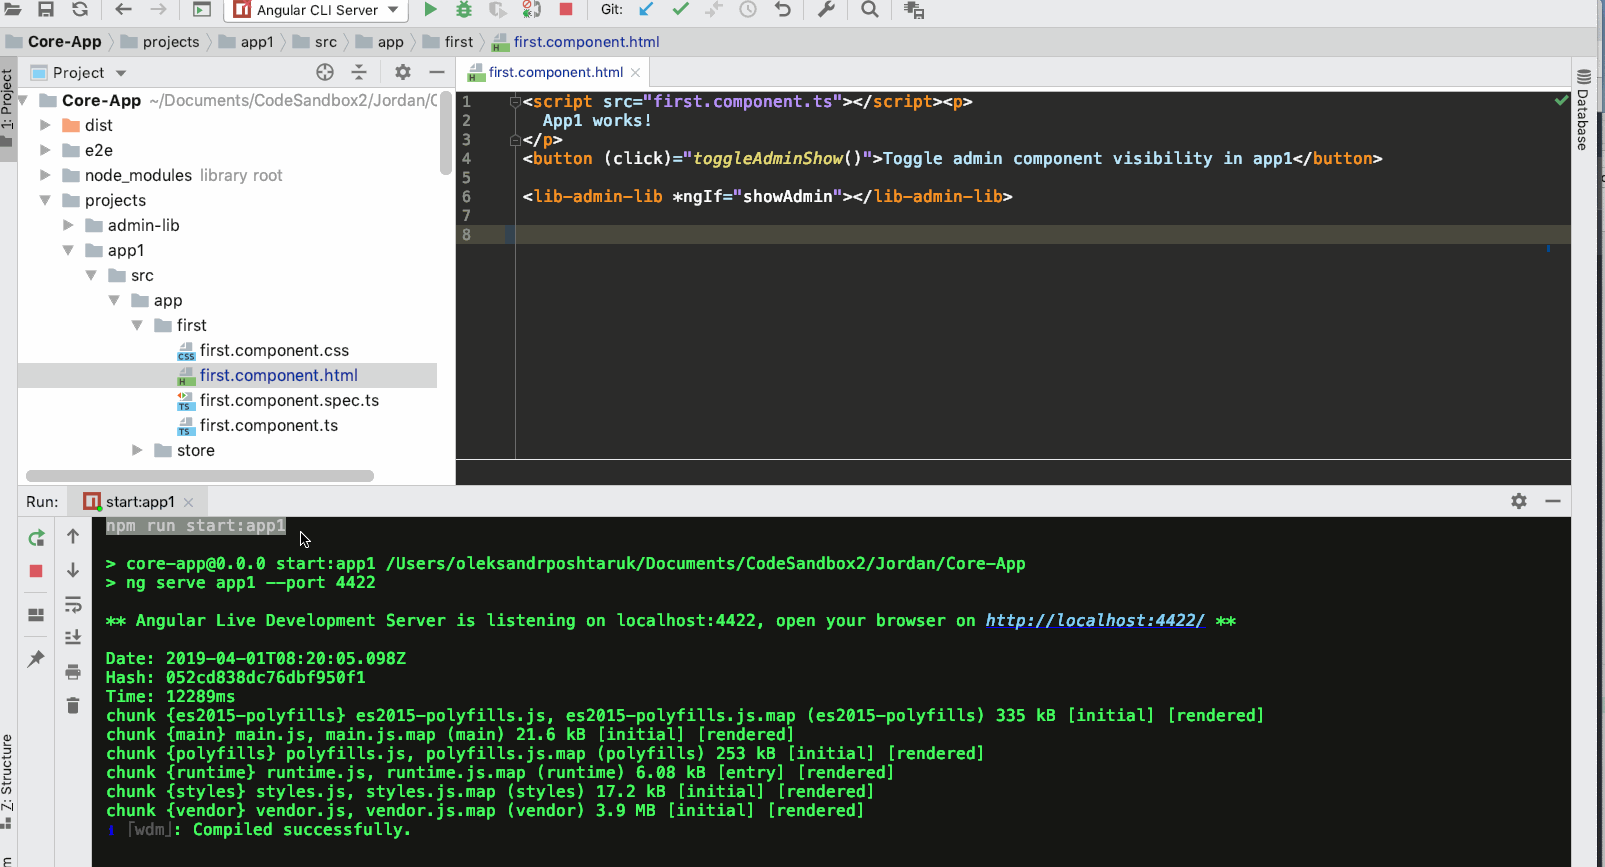
Launching App1
Haven't got the ReduxDevTools Chrome extension yet to inspect ngRxStore activity?:-O Grab it here:)
App2 can follow the same pattern: add its own NgRx feature slice, introduce a Second component, subscribe it to the Store, and conditionally display admin-lib-component inside its view.
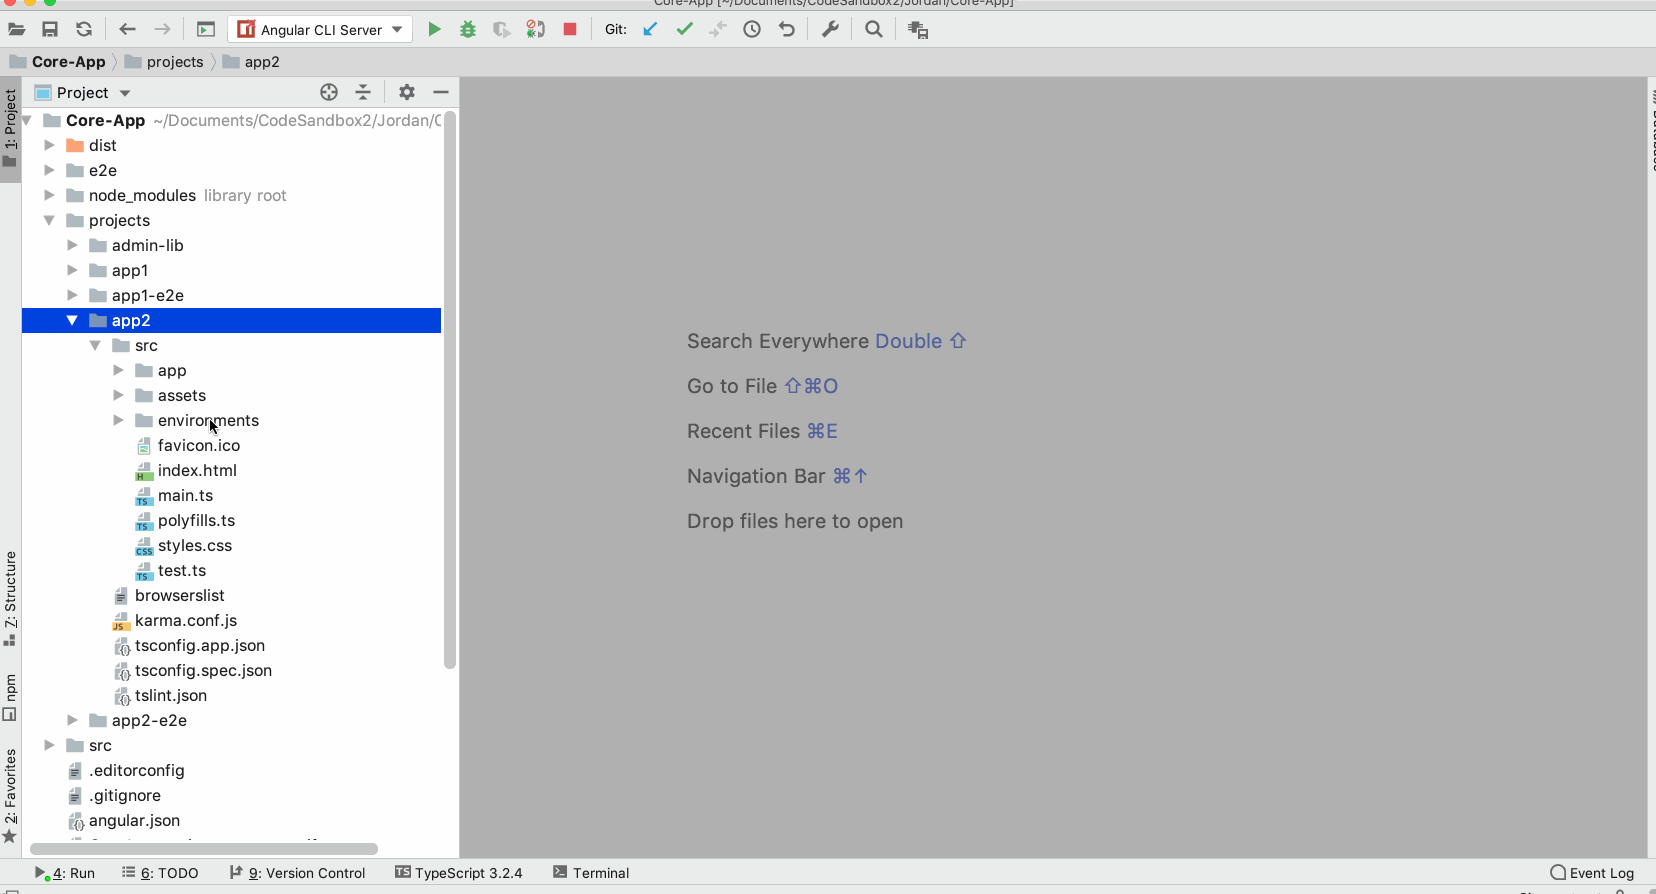
App2 setup
Setting up routes in CoreApp
Now we need App1 and App2 to be treated as lazy-loaded modules within the CoreApp router. Let's update the main app-routing.module.ts in CoreApp accordingly.
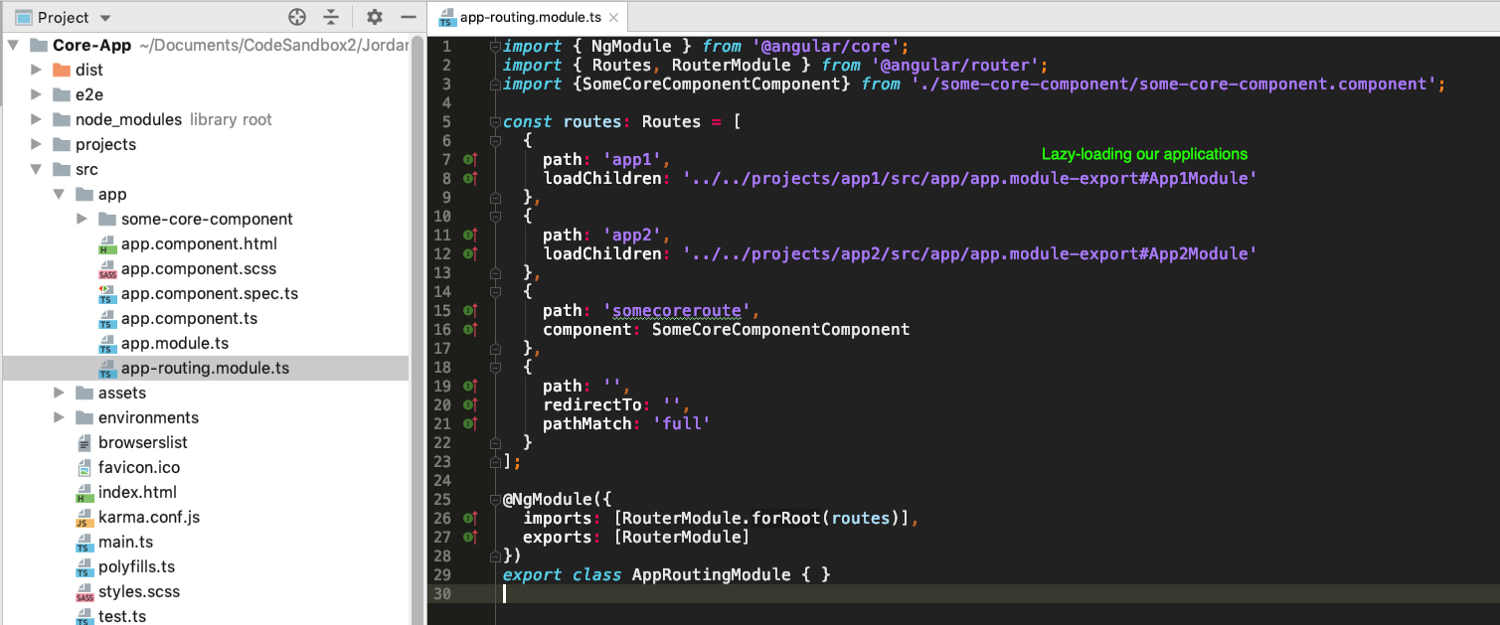
CoreApp app-routing.module.ts
A note: Angular 8 with Ivy will introduce a fresh style for defining lazy-loaded routes using dynamic import. Further details are available here.
Did you spot that in the loadChildren param I skipped app.module.ts (the one for each application) and pointed instead to app.module-export.ts?
That choice is deliberate. When the app runs in standalone mode, it needs every module for full functionality. But when the same app functions as a module inside CoreApp, its root module has to be swapped.
Each sub-application (app1 and app2) therefore ships with:
- app.module.ts — destined for standalone operation
- app.module-export.ts — reserved for use within Core-App
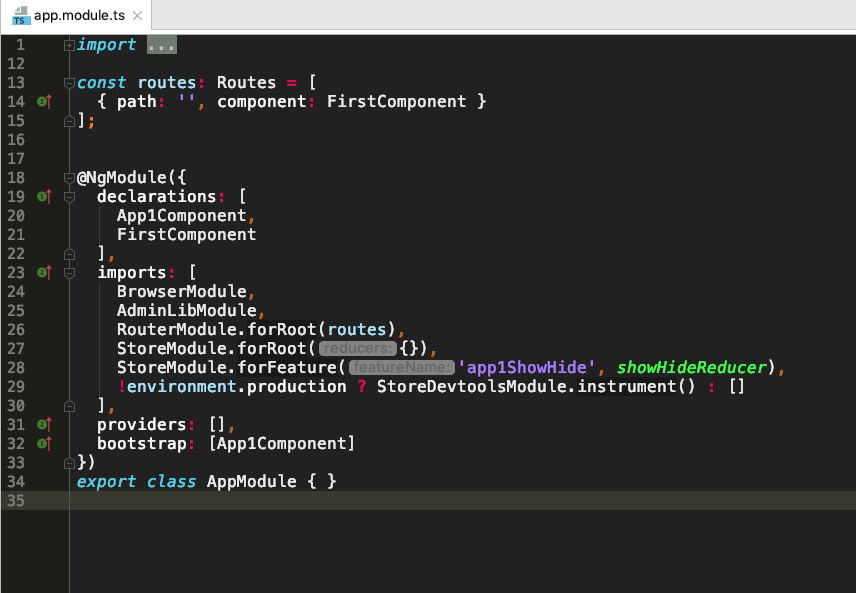
App1 app.module.ts
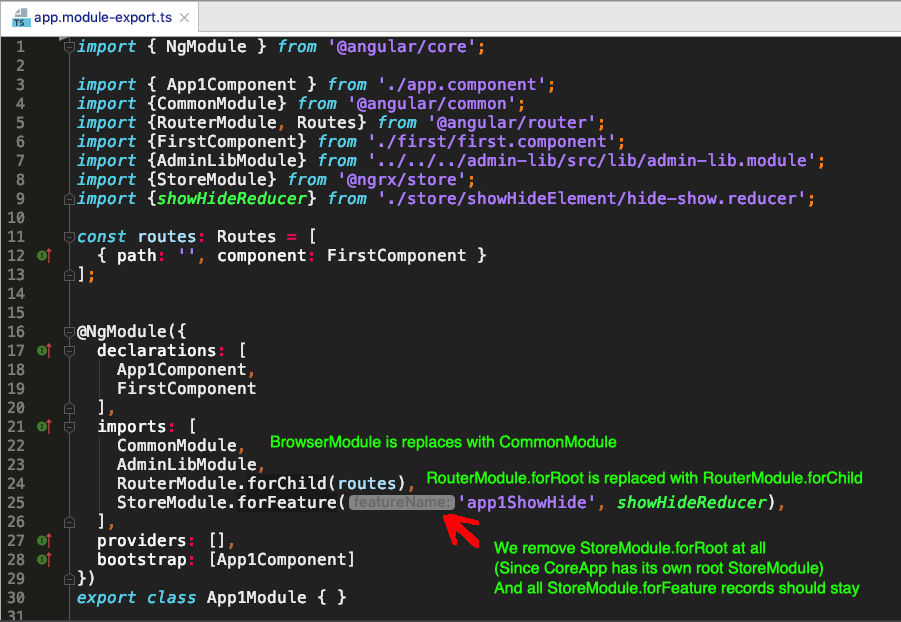
App1 app.module-export.ts
Strictly speaking, these two could be merged into a single file (a nice todo for later), letting an environment.ts variable in CoreApp decide which modules are included or excluded.
Time to attempt a build!
Actually, these two files can be easily merged into one (todo for the future), the used modules can be attached and detached just by using some CoreApp environment.ts variable.
OK, let's try to build it!
A failed compilation leaves the troll unhappy…
And exactly what we expected — an error:
Error:
/<some_path>/Core-App/projects/app1/src/app/app.module-export.ts is missing from the TypeScript compilation. Please make sure it is in your tsconfig via the ‘files’ or ‘include’ property.
App2 reports something identical.
By default, TypeScript sources from App1 and App2 are outside the main CoreApp project scope. That needs fixing in the src/tsconfig.json file.
Configuring TypeScript in CoreAppsrc/tsconfig.app.json
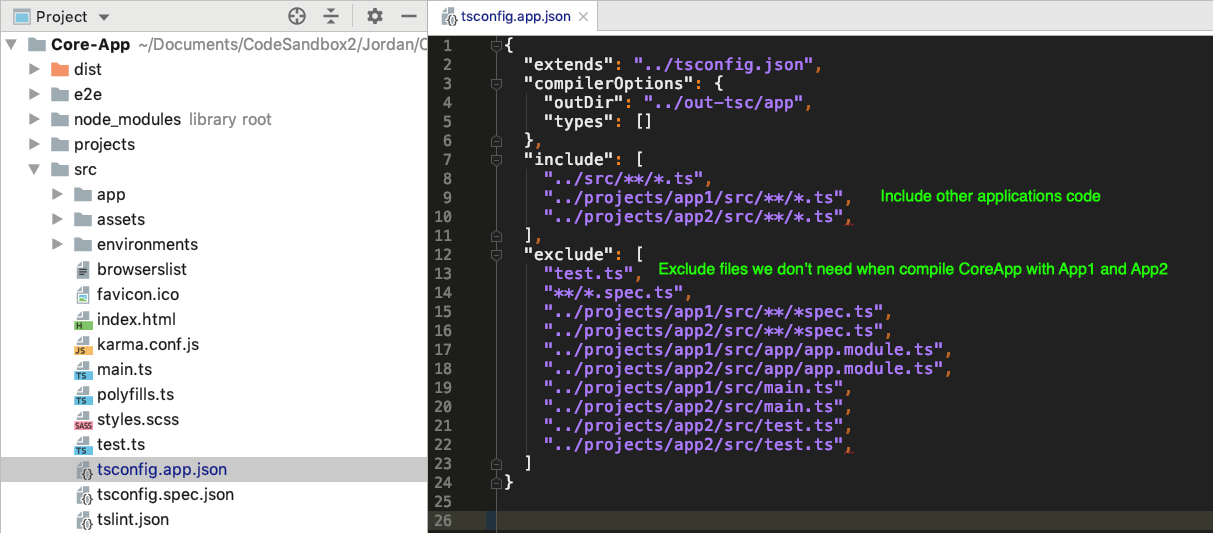
src/tsconfig.app.json
All I did was add the App1 and App2 TypeScript paths to the include array. I also excluded the files irrelevant to the host app (for instance, main.ts, test.ts, and the standard app.module.ts for both sub-apps — remember, the app.module-export.ts variant is what we rely on).
Running everything individually as well as together.
Let’s fire up App1 and App2 on their own first, then load CoreApp to confirm the combined experience.
Once both sub-apps are mounted, the shared Store consolidates into this shape:
{
  app1ShowHide: boolean;
  app2ShowHide: boolean;
}
Now it’s worth summarizing what this setup delivers!
Advantages of this architecture
- Each feature app has a clear division of responsibilities.
- A monorepo’s biggest win: shared visibility and consistent code versioning (modify one piece and the dependent code is immediately obvious).
- Every app works through its own NgRx feature state, which then integrates cleanly into the CoreApp Store.
- App1 and App2 can be reused in other codebases (wherever appropriate), and even deployed separately — although some caveats apply, as listed next.
Trade-offs and pitfalls
- Keeping app.module.ts and app.module-export.ts in sync demands discipline.
- The app.module-export.ts for App1 or App2 may depend on something CoreApp doesn't supply — the sub-app might run independently while the host app breaks (smoke testing is the safeguard). Preferably, compile all sub-apps inside the CoreApp build, which spares you the re-integration hassle.
- Deploying a sub-app on its own is not included in this design and could prove awkward. If you're curious to try anyway, an interesting and fairly robust demo is this one.
Closing thoughts
There we have it: App1 and App2 on the same repo, loading lazily inside CoreApp when needed!
The full source used throughout is on GitHub.
Share how mono repo and micro-frontend strategies have worked out in your projects — curious to hear in the comments!
Grateful to Alex Okrushko, Michael Karén, Wes Grimes, Tim Deschryver for their careful review and insightful feedback on this article.
I am Angular and RxJS mentor on codementor.io. Have an Angular or RxJS issue or need mentorship? Let me know.
Additionally, from section 4 of my RxJS video course onwards, the content tackles more advanced territory — so if you’re already comfortable with RxJS basics, there’s plenty to gain: higher-order observables, common pitfalls, schedulers, unit testing, and beyond! Take a look!