NgRx at a Glance
Data management is often the toughest part of building an application. In Angular, developers typically lean on decorators such as Input and Output, or rely on RxJS Observables to track data changes. But NgRx offers a reactive state management solution that directly tackles this issue.
NgRx is an open-source library designed to bring reactive state management to Angular applications. Drawing inspiration from Redux, it establishes a single source of truth for your application's data. NgRx leverages streams to interact with a central data store. This store is connected to your components and services, simplifying the whole data flow process. Instead of injecting services all over the place and managing their interactions, NgRx centralizes state management. You start thinking in terms of your application's overall state, not individual components.
I recently built an application called Goose Weather, which you can check out at https://www.gooseweather.com. It was a great project for exploring the latest Angular and NgRx features. The app pulls weather data from NOAA APIs and the OpenWeatherMapAPI service. While using NgRx for this particular app might be a bit overkill, seeing how the weather data flows to the display cards demonstrates the pattern's power for larger, more complex applications.
For those wondering about the name, I call it Goose Weather for my wife. She always wanted to be a meteorologist, and my nickname for her has always been Goose. So the name was a natural fit. For the record, she ended up as a tax accountant instead of a meteorologist.
Let's dive into how NgRx works and how I integrated it into Goose Weather.
Core Concepts of NgRx
NgRx is built on five main parts:
- Store
- Reducers (and Meta-Reducers)
- Actions
- Selectors
- Effects
A basic implementation looks like this:
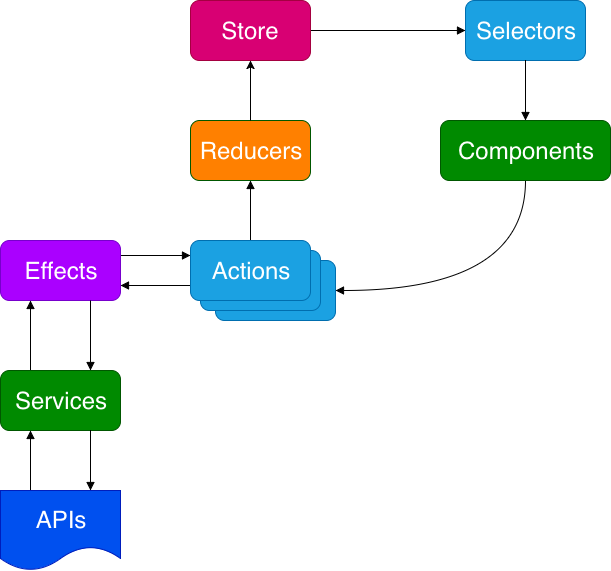
- Your application's state lives in the store, which is immutable.
- Components can subscribe to the store and receive automatic state updates through selectors.
- Selectors let components grab a slice (a part) of the application's state and even modify it with selector functions.
- Actions change the store's state by going through reducers (functions) that apply changes while preserving immutability.
- Meta-Reducers (not shown) act as hooks where you can pre or post-process actions before they are invoked.
- Effects are triggered by actions and can also generate new actions. Their main job is to handle async side-effects (like API calls) that eventually dispatch other actions.
This represents a significant shift from traditional application architecture and provides a pattern that simplifies complex applications considerably.
NgRx can also reshape your app's structure by replacing property and event bindings. This isn't a one-size-fits-all solution; you can opt for a hybrid approach or skip NgRx altogether. For solid architectural guidance, I recommend the Pluralsight course "Angular NgRx: Getting Started" by Duncan Hunter and Deborah Kurata.
Prerequisites Before You Code
Be aware that NgRx has a learning curve. It's best to be comfortable with RxJS Operators and Observables. You can brush up on these by checking out the Reactivex Overview site and Angular's Documentation on RxJS. I'll also assume you have a basic grasp of Angular 2+ projects and the CLI. If not, it's a good idea to review the official documentation first.
I personally found that error handling was the key to understanding observables. I wrote a post on this topic, Exception Handling with NgRx Effects, which offers a solid introduction to observables vs. promises if you're still getting the hang of RxJS.
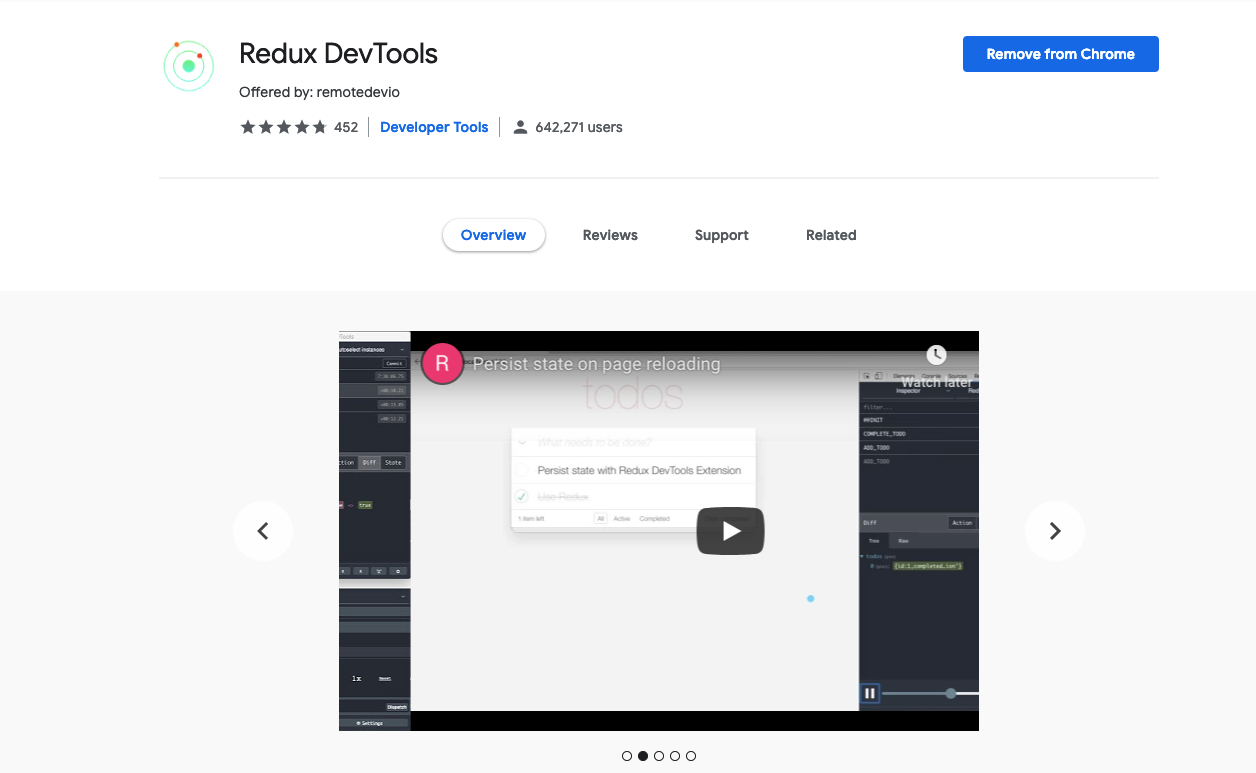
The final piece of setup is to install the NgRx Redux Devtools Extension for Chrome. You won't be able to use it until NgRx is set up, but it will let you inspect the store data while developing.
The Goose Weather Implementation
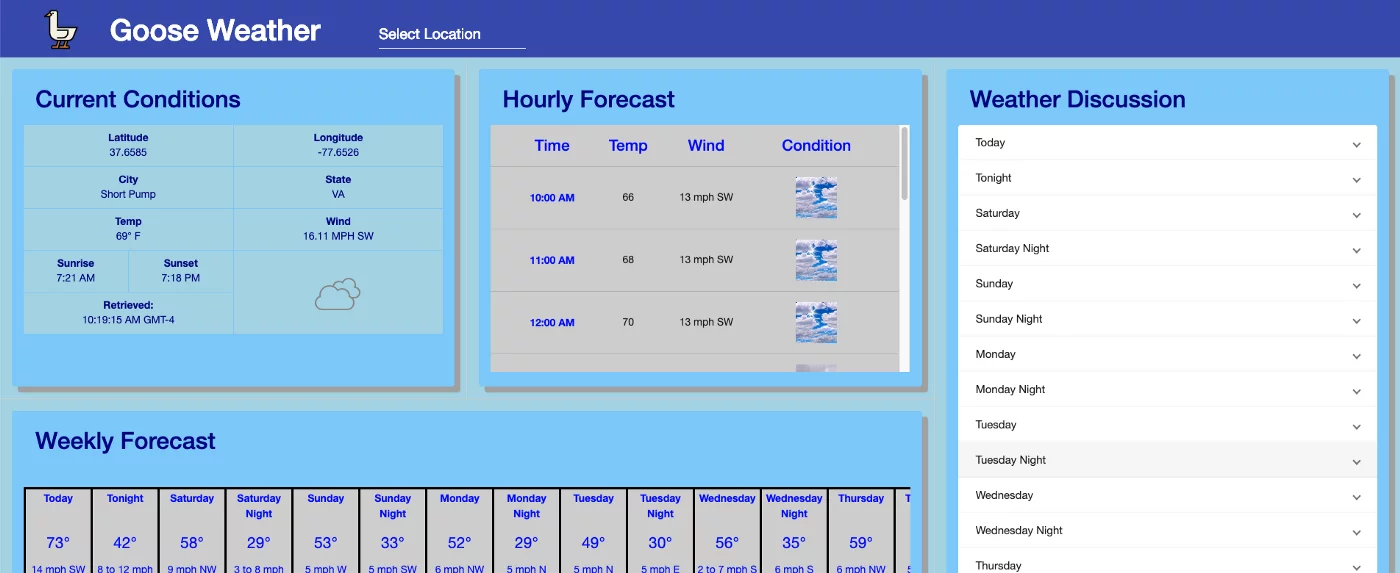
The Goose Weather app is structured around a main weather component that hosts several child components, each a Material Card. There's also an input in the main toolbar to change the location. The selectable locations are the capital cities of all 50 US states, as we're using the NOAA APIs.
Our main objectives are to:
- Dispatch the initial weather data to the store when the app starts.
- Dispatch new weather data to the store whenever the location is changed via the toolbar.
- Connect all display cards so they automatically update when the store's state changes.
The live Goose Weather app already has NgRx implemented. To follow along, I've made an older branch available on my GitHub repo. We'll start from that state and work our way forward, implementing NgRx step by step.
Let's start coding!
- First, clone the repository from GitHub and check out the learn-ngrx branch:
git clone - single-branch - branch learn-ngrx https://github.com/andrewevans02/goose-weather.git
- Navigate into the project with
cd goose-weather. - Install the project dependencies by running
npm i. - The app uses the Open Weather Map API for forecasts. You'll need a free account and an API key, which you can get from their getting started guide.
- Once you have your API key, set it as an environment variable named
$OPEN_WEATHER_MAP_API_KEY:
export OPEN_WEATHER_MAP_API_KEY='<your_open_weather_map_api_key>'
- With the key in place, run
npm run environment-variablesto inject the key into theenvironment.tsandenvironment.prod.tsfiles. Be sure to save the export command in your bash profile to keep it persistent. - Now, start the development server with
ng servefrom the project root. - Open your browser to
[http://localhost:4200/](http://localhost:4200/)to see the Goose Weather page.
In the next sections, I'll guide you through the NgRx setup. To keep things straightforward and quick, I'll provide GitHub Gists for you to copy and paste. I'll explain each piece as we go.
Project Setup and Dependencies
We'll start by installing the NgRx packages and using the NgRx Schematics to scaffold the core files. Angular Schematics are a powerful tool for quickly generating code. The Angular Blog has a good introduction to them.
- Run this command to install the necessary libraries for the store, effects, store-devtools, and the schematics:
npm i @ngrx/store @ngrx/effects @ngrx/store-devtools @ngrx/schematics --save
- Next, configure the Angular CLI to use the NgRx Schematics by default:
ng config cli.defaultCollection @ngrx/schematics
- Generate the basic actions and reducers for the store with this schematic command:
ng generate store AppState --root --module app.module.ts
- We'll also need specific actions for the weather and location features. Run these two commands to generate them:
ng generate action actions/weather
ng generate action actions/location
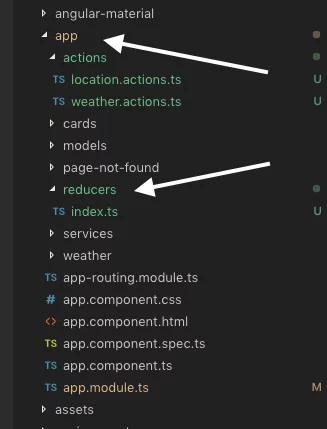
- After this, you should see an
actionsfolder and areducersfolder in your project, like so:
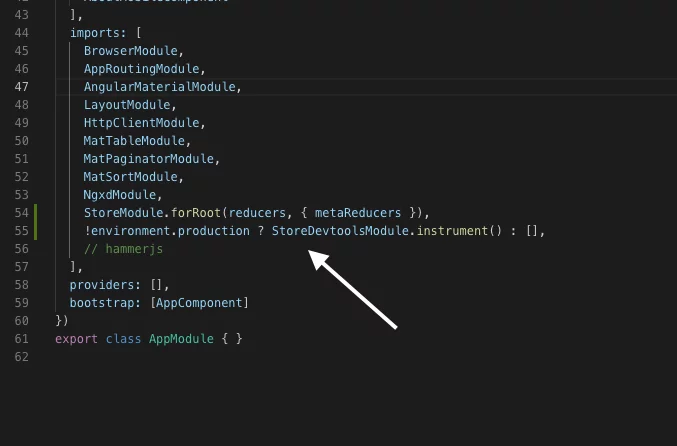
- Check the
app.module.tsfile; it should now include an import for the store module and a conditional import for the store-devtools that disables it in production.
Defining State and Reducers
Now that the project is scaffolded, we'll define the application state. This involves creating the state objects and the reducers that control how state changes when actions are dispatched.
As mentioned earlier, actions flow through reducers to modify the store's state. Actions can work independently of reducers, but a typical pattern is to dispatch an action and have a reducer manage its impact on the store.
Open the reducers/index.ts file and replace its contents with the following:
import { ActionReducerMap, MetaReducer, Action} from '@ngrx/store';
import { environment } from '../../environments/environment';
import { WeatherData } from '../models/weather-data/weather-data';
import { WeatherActionTypes, WeatherAction } from '../actions/weather.actions';
import { LocationActionTypes, LocationAction } from '../actions/location.actions';
import { LocationData } from '../models/location-data/location-data';

export interface WeatherState {
  weatherData: WeatherData| null;
}

const initialWeatherState: WeatherState = {
  weatherData: null
};

export interface LocationState {
  location: LocationData| null;
  error: string| null;
}

const initialLocationState: LocationState = {
  location: null,
  error: null
};

export interface AppState {
  weather: WeatherState;
  location: LocationState;
}

export function weatherReducer(state: WeatherState = initialWeatherState, action: WeatherAction): WeatherState {
  switch (action.type) {
    case WeatherActionTypes.LoadWeather:
      return {
        weatherData: action.payload.weatherData
      };

    default:
      return state;
  }
}

export function locationReducer(state: LocationState = initialLocationState, action: LocationAction): LocationState {
  switch (action.type) {
    case LocationActionTypes.LoadLocations:
      return {
        location: action.payload.locationData,
        error: null
      };

    case LocationActionTypes.LocationsError:
      return {
        location: null,
        error: action.payload.error
      };

    default:
      return state;
  }
}

export const reducers: ActionReducerMap<AppState> = {

  weather: weatherReducer,
  location: locationReducer
};

export const selectWeather = (state: AppState) => state.weather.weatherData;

export const selectError = (state: AppState) => state.location.error;

export const metaReducers: MetaReducer<any>[] = !environment.production ? [] : [];
This code might seem like a lot, but it's fairly straightforward. Let's break it down step by step.
export interface WeatherState {
  weatherData: WeatherData| null;
}

const initialWeatherState: WeatherState = {
  weatherData: null
};

export interface LocationState {
  location: LocationData| null;
  error: string| null;
}

const initialLocationState: LocationState = {
  location: null,
  error: null
};

export interface AppState {
  weather: WeatherState;
  location: LocationState;
}
This first part defines the shape of your application state. There are many ways to structure this, and I'm using a simple approach that fits this app's needs. The state includes:
- Location
- Weather
export function weatherReducer(state: WeatherState = initialWeatherState, action: WeatherAction): WeatherState {
  switch (action.type) {
    case WeatherActionTypes.LoadWeather:
      return {
        weatherData: action.payload.weatherData
      };

    default:
      return state;
  }
}

export function locationReducer(state: LocationState = initialLocationState, action: LocationAction): LocationState {
  switch (action.type) {
    case LocationActionTypes.LoadLocations:
      return {
        location: action.payload.locationData,
        error: null
      };

    case LocationActionTypes.LocationsError:
      return {
        location: null,
        error: action.payload.error
      };

    default:
      return state;
  }
}

export const reducers: ActionReducerMap<AppState> = {

  weather: weatherReducer,
  location: locationReducer
};
Here, we define two reducers: (1) weather and (2) location. Note that they return payload objects, which is a common NgRx pattern. The payload is the new data the store should adopt. If an action only has one value, it's sometimes conventional to skip the payload wrapper and return the value directly (like action.locationData). Using payload here shows a convention used in larger applications.
export const selectWeather = (state: AppState) => state.weather.weatherData;

export const selectError = (state: AppState) => state.location.error;
Next, we set up selectors. These provide a way for components to access state directly. You can select the whole state or a specific slice of state. Selectors can also transform state and have other functions for interacting with the store. This application is simple, so we only need a selectWeather selector for weather data and a selectError selector for errors. More complex apps often have multiple selectors with custom functions. The official documentation has more detailed information on selectors.
export const metaReducers: MetaReducer<any>[] = !environment.production ? [] : [];
Finally, we define meta-reducers. These are hooks for pre-processing actions or adding middleware. They can be used to listen for default actions like INIT or UPDATE that NgRx dispatches on startup or store changes. Meta-reducers are also handy for integrating with localStorage. I haven't added any for this app, but they are powerful. There's a great post by Alex Okrushko with more tips on using NgRx effectively here.
Defining Actions
The next phase is to define the actions that will trigger state changes using the reducers we've just created. Actions should be thought of as events and should be defined close to where they are dispatched. It's also recommended to include the page name in the action type, like “[Home Page] load locations”, to clarify where the action comes from.
Let's start with the location actions. Open actions/location.actions.ts and copy in the code below:
import { Action } from '@ngrx/store';
import { LocationData } from '../models/location-data/location-data';

export enum LocationActionTypes {
  LoadLocations = '[Home Page] Load Locations',
  LocationsError = '[Home Page] Locations Error'
}

export class LocationAction implements Action {
  type: string;
  payload: {
    locationData: LocationData,
    error: string
  };
}

export class LoadLocations implements Action {
  readonly type = LocationActionTypes.LoadLocations;

  constructor(readonly payload: {locationData: LocationData}) {

  }
}

export class LocationsError implements Action {
  readonly type = LocationActionTypes.LocationsError;

  constructor(readonly payload: {error: string}) {

  }
}


export type ActionsUnion = LoadLocations | LocationsError;
This file defines the types of location actions. First, we declare the action types:
export enum LocationActionTypes {
  LoadLocations = '[Home Page] Load Locations',
  LocationsError = '[Home Page] Locations Error'
}
Then, we define a class for each action type. Notice the use of payload to carry data with the action. As I mentioned, if there's only one value, the payload wrapper is often unnecessary. I've used it here to show a common pattern for larger apps.
export class LocationAction implements Action {
  type: string;
  payload: {
    locationData: LocationData,
    error: string
  };
}

export class LoadLocations implements Action {
  readonly type = LocationActionTypes.LoadLocations;

  constructor(readonly payload: {locationData: LocationData}) {

  }
}

export class LocationsError implements Action {
  readonly type = LocationActionTypes.LocationsError;

  constructor(readonly payload: {error: string}) {

  }
}
Finally, we export all these action classes so they can be used throughout the project:
export type ActionsUnion = LoadLocations | LocationsError;
These actions serve as the protocol for your application to interact with the reducers and the store.
Now, let's do the same for the weather actions. Open actions/weather.actions.ts and paste in the following. The weather actions follow the same conventions as the location actions, so I won't explain them in detail.
import { Action } from '@ngrx/store';
import { WeatherData } from '../models/weather-data/weather-data';

export enum WeatherActionTypes {
  LoadWeather = '[Home Page] Load Weather'
}

export class WeatherAction implements Action {
  type: string;
  payload: {
    weatherData: WeatherData
  };
}

export class LoadWeather implements Action {
  readonly type = WeatherActionTypes.LoadWeather;

  constructor(readonly payload: {weatherData: WeatherData}) {

  }
}


export type WeatherActions = LoadWeather;
A quick note: The LoadWeather action is a "fetch" action in NgRx terms. Such actions typically have three variants: (1) Load, (2) LoadSuccess, and (3) LoadFailed, to handle the request, success, and failure cases. Goose Weather has a single load for weather data, so it's just called "LoadWeather". In a more complex app, this would probably be split into separate actions.
Building an Effect to Handle Actions
With actions and reducers in place, we now need an effect to react to location changes and fetch new weather data. The goal is to trigger a weather forecast retrieval whenever a location is set or changed.
Let's recap the role of effects:
Effects are triggered by actions and can also dispatch new actions. Their main purpose is to perform async side-effects, like API calls, which ultimately lead to more actions being dispatched.
For Goose Weather, we have two main scenarios:
- On initial app load, we need to fetch a forecast for the default location using the weather service.
- When the user picks a new location, we need to fetch a forecast for that specific location.
We'll use a schematic to create the effect. From the project root, run:
ng generate effect effects/weather - root -m app.module.ts
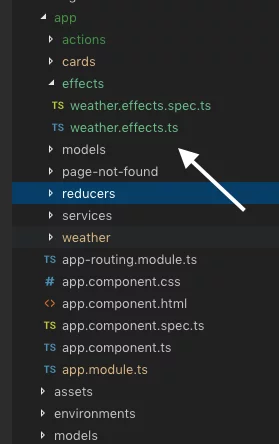
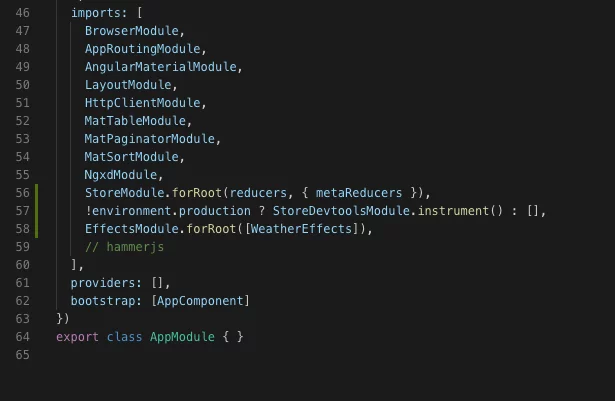
This will create a WeatherEffects file in the /effects folder and update the app module with the necessary imports, as shown here:
Now, let's populate the effect file. Copy the following code into weather.effect.ts:
import { Injectable } from '@angular/core';
import { Actions, Effect, ofType } from '@ngrx/effects';
import { LoadWeather } from './weather.actions';
import { map, mergeMap, catchError } from 'rxjs/operators';
import { AppState } from '../reducers';
import { Store } from '@ngrx/store';
import { WeatherService } from './weather.service';
import { LocationActionTypes, LocationsError, LoadLocations } from './location.actions';
import { of } from 'rxjs';

@Injectable()
export class WeatherEffects {

  @Effect()
  loadLocation$ = this.actions$
    .pipe(
      ofType<LoadLocations>(LocationActionTypes.LoadLocations),
      mergeMap((action) => this.weatherService.getWeather(action.payload.locationData)
      .pipe(
        map(weather => {
          return (new LoadWeather({weatherData: weather}));
        }),
        catchError((errorMessage) => of(new LocationsError({error: errorMessage})))
      ))
  );

  constructor(private actions$: Actions, private store: Store<AppState>, private weatherService: WeatherService) { }

}
Here's what this effect does:
- It uses the
Effectdecorator so NgRx registers it when the app starts. - It listens for actions of type LoadLocations. When one arrives, it uses mergeMap to pass the location data from the action into a call to the weather service.
- After the service call returns, it dispatches a LoadWeather action with the new forecast data.
- This dispatch updates the store.
- If the service call fails, it dispatches a LocationsError action with the error details.
If you want a deeper dive into the error handling pattern, check out my post on Exception Handling with NgRx Effects. Thanks to Tim Deschryver and Alex Okrushko for their help on that front.
Connecting NgRx to Components
Now that the core NgRx pieces are ready, we can connect our Angular components to the store's data stream.
First, open src/weather/weather.component.ts and inject the store into the constructor. The injection should look like private store: Store<AppState>.
Next, modify the savePosition and onSelectionChanged methods to look like this:
savePosition(position) {
    this.locationData.latitude = position.coords.latitude.toFixed(4).toString();
    this.locationData.longitude = position.coords.longitude.toFixed(4).toString();
    for (const city of this.cities) {
      if (city.combinedName === '(your location)') {
        city.latitude = this.locationData.latitude;
        city.longitude = this.locationData.longitude;
      }
    }

    this.store.dispatch(new LoadLocations({locationData: this.locationData}));
  }

  onSelectionChanged(event: MatAutocompleteSelectedEvent) {
    for (const city of this.cities) {
      if (city.combinedName === event.option.value) {
        const latitude = parseFloat(city.latitude);
        const longitude = parseFloat(city.longitude);
        this.locationData.latitude = latitude.toFixed(4).toString();
        this.locationData.longitude = longitude.toFixed(4).toString();
        this.store.dispatch(new LoadWeather({weatherData: null}));
        this.store.dispatch(new LoadLocations({locationData: this.locationData}));
        break;
      }
    }
  }
What we've done here is straightforward: in both methods, any location change dispatches a LoadLocations action to update the store. This action then triggers the WeatherEffect we created, which fetches the forecast for that location.
Note that in _onSelectionChanged_, we also dispatch a _LoadWeather_ action with a _null_ value for _weatherData_. This is to show the progress spinners on the cards while new data is being fetched. I could have also set _weatherData_ to _null_ when dispatching _LoadLocations_; I kept them separate to clearly show the distinct actions.
We also need to handle and display errors. Add an observable for errors in the component and subscribe to it in the ngOnInit lifecycle hook:
ngOnInit(): void {
    this.error$ = this.store.pipe(select(selectError));

    try {
      navigator.geolocation.getCurrentPosition((position) => {
        this.savePosition(position);
      });
    } catch (error) {
      alert('Browser does not support location services');
    }
  }
Then, update the weather.component.html template to show the error message at the top if there is one:
<div *ngIf="error$ | async as error">
  <h1 class="error-message"><mat-icon>error</mat-icon> {{ error }}</h1>
</div>
Now that the main weather component is wired up, we need to update the child card components that display the forecast. The card components are located in the "/cards" directory:

For this guide, I'll walk you through the weekly-forecast component. You'll need to apply the same changes to the other cards as well.
First, replace the contents of weekly-forecast.component.ts with:
import { Component, OnInit, OnDestroy } from '@angular/core';
import { WeatherData } from 'src/app/models/weather-data/weather-data';
import { Store, select } from '@ngrx/store';
import { AppState, selectWeather } from 'src/app/reducers';
import { Observable } from 'rxjs';

@Component({
  selector: 'app-weekly-forecast',
  templateUrl: './weekly-forecast.component.html',
  styleUrls: ['./weekly-forecast.component.css']
})
export class WeeklyForecastComponent implements OnInit {

  data$: Observable<WeatherData>;

  constructor(private store: Store<AppState>) { }

  ngOnInit(): void {
    this.data$ = this.store.pipe(select(selectWeather));
  }

}
This sets up an observable that streams data from the store using the selectWeather selector.
Next, update the weekly-forecast.component.html template:
<div class="forecast-tile">
  <table class="table-responsive-sm" *ngIf="data$ | async as data; else elseBlock">
    <tbody>
      <td *ngFor="let weekday of data.weeklyForecast">
        <tr class="name">{{weekday.name}}</tr>
        <tr class="temp">{{weekday.temp}}°</tr>
        <tr class="wind">{{weekday.windSpeed}} {{weekday.windDirection}}</tr>
        <tr class="weather-image"><img src={{weekday.icon}}></tr>
      </td>
    </tbody>
  </table>
</div>
<ng-template #elseBlock>
  <mat-spinner></mat-spinner>
</ng-template>
The async pipe here handles the observable subscription for you and only renders the data when it's available, showing a spinner otherwise.
Using the async pipe to unwrap observables is a recommended best practice because it automates subscription and unsubscription.
Organizing Your Files
As a final step, let's reorganize the file structure to keep related files together. The schematics created separate folders for effects, reducers, and actions. There's also a services folder for the main weather service. To improve cohesion, we'll move the action, effect, and service files into the weather component folder, since that's where they are practically used. After this move, your weather folder should look like this:

Running the Finished App
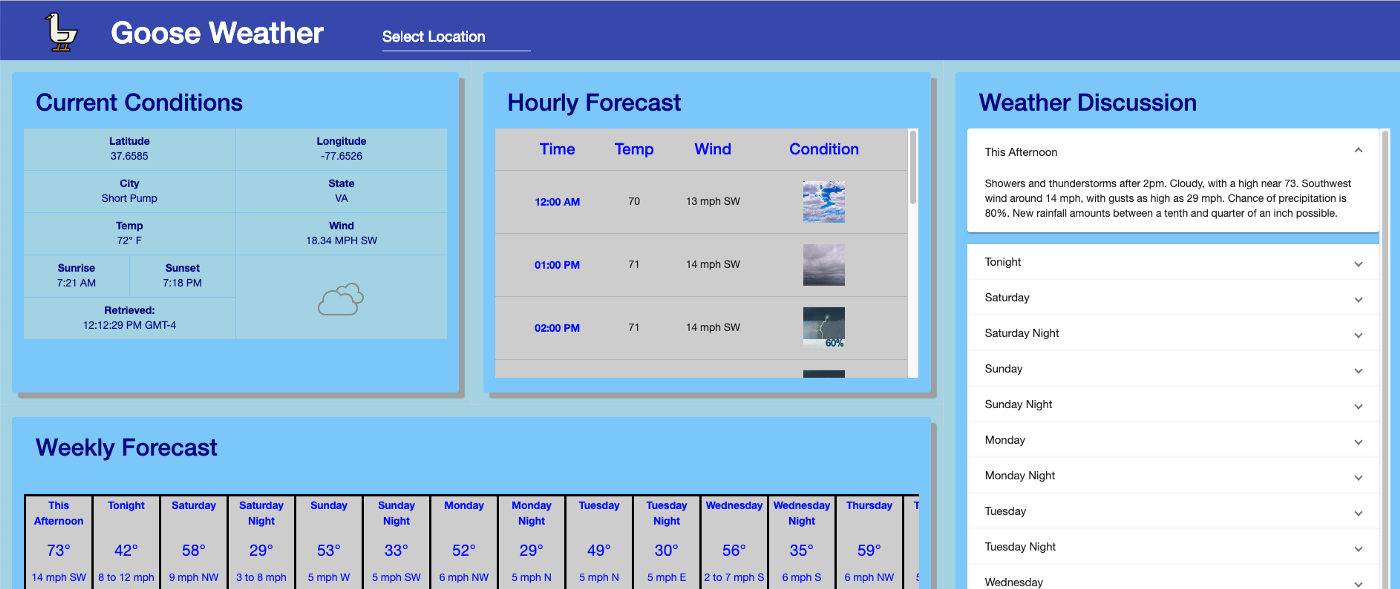
With NgRx fully integrated and connected to the components, run ng serve in your terminal to see the result. The app should function as expected, loading weather data and updating when you change locations:
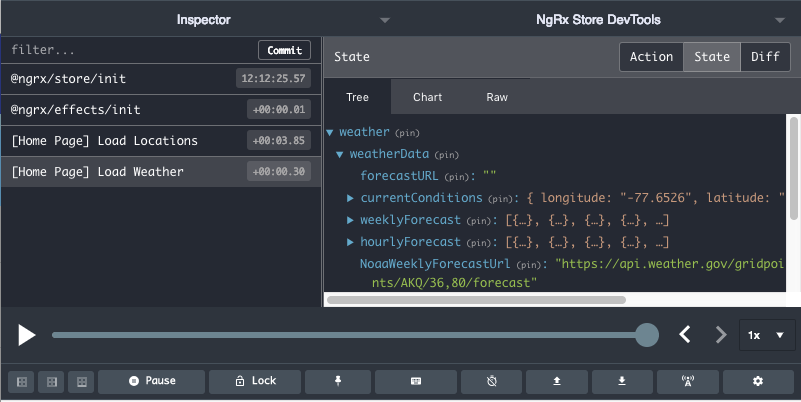
With the Redux Devtools extension open, you can now watch the state change in real time when the app runs:
Final Thoughts
I hope this post gives you a solid foundation for using NgRx. My weather app is a fairly simple use case, but NgRx is capable of much more. I encourage you to explore the official NgRx documentation to learn more about its features. Feel free to reach out to me on Twitter at @AndrewEvans0102 or visit my site at andrewevans.dev!
Special thanks to Alex Okrushko, Tim Deschryver, and Jean-Etienne Lavallee for all their help with this article!