Setting the Stage
Before jumping into the refactoring, let’s take a moment to understand what we’re working with.
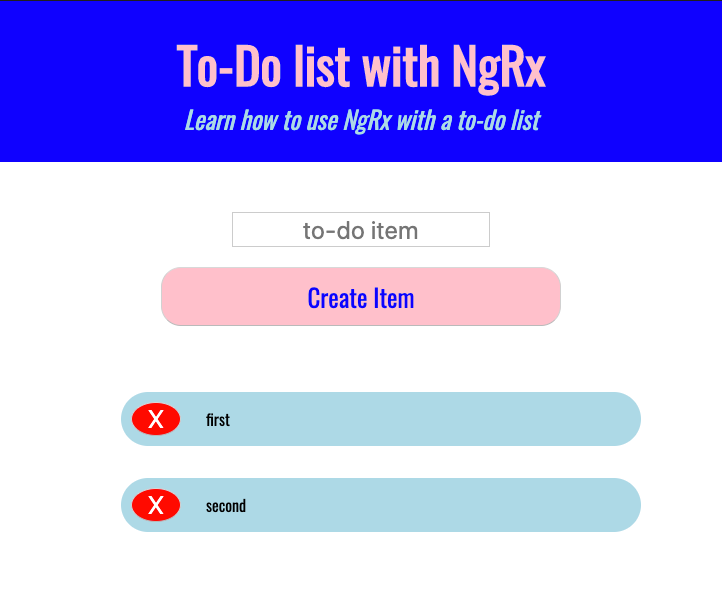
The "to-do-with-ngrx" project is a minimal application that relies on your browser’s localStorage for creating, editing, and removing "to-do" entries. It’s intentionally straightforward, consisting of just one component paired with one "to-do" service.
The "to-do service" we’re dealing with looks like this:
import { Injectable } from '@angular/core';
import { Item } from '../models/item';
@Injectable({
  providedIn: 'root'
})
export class ToDoService {

    constructor() {}

    getItems() {
        let items = JSON.parse(window.localStorage.getItem('items'));
        if (items === null) {
          items = [];
        }
        return items;
      }

    addItem(addItem: string) {
        const itemsStored = window.localStorage.getItem('items');
        let items = [];
        if (itemsStored !== null) {
          items = JSON.parse(itemsStored);
        }
        const item: Item = {
          id: items.length + 1,
          name: addItem
        };
        items.push(item);
        window.localStorage.setItem('items', JSON.stringify(items));
      }

    deleteItem(deleteItem) {
        const items = JSON.parse(window.localStorage.getItem('items'));
        console.log(items);
        console.log(deleteItem);
        const saved = items.filter(item => {
          return item.id !== deleteItem.id;
        });
        window.localStorage.setItem('items', JSON.stringify(saved));
      }
}
As you’ll notice, the functions in this service interact directly with the browser’s localStorage to persist the "to-do items." In its current state, the component invokes these service methods directly. Our goal is to rewire these same service methods through actions, reducers, selectors, and effects — giving us more maintainable code and easier state control.
NgRx: A Quick Look
Let’s go over some core NgRx concepts before we start making changes.
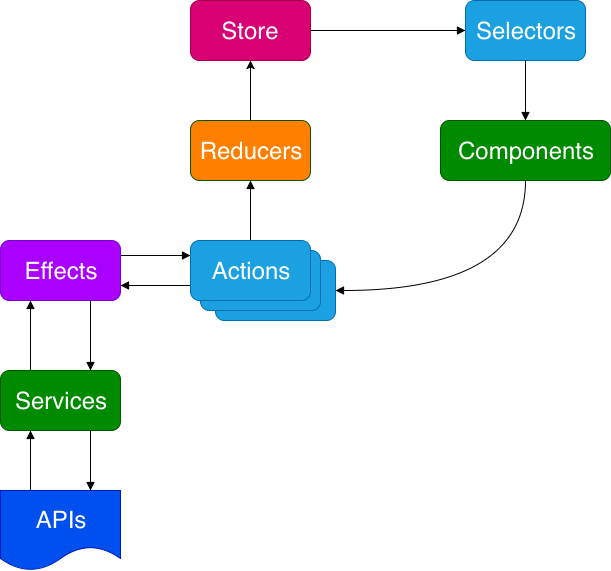
I’ve reused this diagram from my earlier piece How to Start Flying with Angular and NgRx to support the discussion here.
The key idea is that every change in your app — whether it’s data itself, or something as small as a button click — should be treated as a change in state.
It helps to frame this in terms of mutable versus immutable state.
- Mutable state means that your application’s state can be modified after it’s created, which is how service-oriented architectures typically operate.
- Immutable state, by contrast, is state that stays the same once created. With a flux pattern like NgRx, you don’t modify state in place; you use functions called reducers to compute brand-new state values.
With NgRx, your app’s state is housed in a single place, making it the single source of truth. The NgRx store, actions, reducers, selectors, and effects work together to maintain this central state.
- store = the central repository where your application’s state is held.
- actions = messages that describe events; they can initiate new actions, interact with the store by triggering reducers, or spawn side effects.
- reducers = functions that derive new state by responding to actions. They don’t mutate state piecemeal — instead of updating individual slices, they return entirely new state objects, which keeps the data immutable.
- selectors = the mechanism your components use to read (or subscribe to) data from the store.
- effects = listeners that tap into external services and APIs, then dispatch new actions based on the results. They’re essentially how your app connects to anything outside its own boundaries.
That’s a lot of terminology, but it becomes clearer when you think about what happens without this structure — say, when your components directly call services. In that setup, debugging is harder because you must mentally trace through every possible flow that led to a state change.
With NgRx, every state change is a complete swap — the entire state is replaced with newly computed values. This makes it easy to revisit exactly how each interaction influenced the data over time.
The real strength of NgRx is that it gives you a single, consistent pattern for handling all state changes. Each change goes through the same pipeline: an action is dispatched, reduced, and reflected in state. This consistency simplifies development, eases maintenance, and gives you a clear event trail to follow.
Installing NgRx and Preparing the Project
As mentioned in the opening, we’re going to add NgRx to an existing Angular project. NgRx is the Angular flavor of Redux, and it comes with strong community backing.
First things first — let’s get the sample project onto your machine. I’ve tagged a version without NgRx on the "before-ngrx" branch. Use the command below to pull it down:
git clone --branch before-ngrx https://github.com/andrewevans0102/to-do-with-ngrx.git
For a shortcut, you can use "git clone –branch after-ngrx https://github.com/andrewevans0102/to-do-with-ngrx.git" to get the finished version right away.
Once everything is cloned, navigate into the folder in your terminal. Run the usual npm install steps, then execute npm run serve to see it in action locally.
For this refactor, we need to bring in the following NgRx packages:
You can get them set up by running:
npm install @ngrx/store @ngrx/effects @ngrx/store-devtools --save
With those packages in place, create these three new files inside src/app:
- ToDoActions.ts
- ToDoEffects.ts
- ToDoReducers.ts
In a larger project, these files would sit alongside the components they relate to. But since this project uses only one component, they all live together with the standard app root component.
Now, wire up these files by updating app.module to look like this:
import { BrowserModule } from '@angular/platform-browser';
import { NgModule } from '@angular/core';
import { AppComponent } from './app.component';
import { ReactiveFormsModule } from '@angular/forms';
import { EffectsModule } from '@ngrx/effects';
import { ToDoEffect } from './ToDoEffects';
import { StoreModule } from '@ngrx/store';
import { ToDoReducer } from './ToDoReducers';
import { StoreDevtoolsModule } from '@ngrx/store-devtools';
import { environment } from '../environments/environment';
@NgModule({
  declarations: [AppComponent],
  imports: [
    BrowserModule,
    ReactiveFormsModule,
    StoreModule.forRoot({ toDo: ToDoReducer }),
    EffectsModule.forRoot([ToDoEffect]),
    StoreDevtoolsModule.instrument({
      maxAge: 25,
      logOnly: environment.production
    })
  ],
  providers: [],
  bootstrap: [AppComponent]
})
export class AppModule {}
Pay special attention to this block:
StoreModule.forRoot({ toDo: ToDoReducer }),
EffectsModule.forRoot([ToDoEffect]),
StoreDevtoolsModule.instrument({
  maxAge: 25,
  logOnly: environment.production
})
That chunk is where we declare our store, effects, and reducers so the app instance knows they exist.
Now that the infrastructure is set up, let’s add the actual logic.
Defining Actions
Our app has a small set of user-facing needs:
- Fetching the initial list of items
- Adding a new "to-do" item
- Deleting a "to-do" item
- Capturing and surfacing any errors
Drop the following code into your ToDoActions.ts file:
import { createAction, props } from '@ngrx/store';
import { Item } from './models/item';
export const getItems = createAction('[to-do] get items');

export const loadItems = createAction(
  '[to-do] load items',
  props<{ items: Item[] }>()
);

export const addItem = createAction(
  '[to-do] add item',
  props<{ name: string }>()
);

export const deleteItem = createAction(
  '[to-do] delete item',
  props<{ item: Item }>()
);

export const errorItem = createAction(
  '[to-do] error item',
  props<{ message: string }>()
);
You’ll see that these actions map directly to everything we need to do in the UI. We’re taking advantage of the create functions to keep things concise and readable. The pattern is straightforward: call createAction with (1) a unique string identifier for the action, followed by (2) optional props (or payload) you want to pass along when the action is dispatched.
For a deeper dive into this syntax, I suggest checking out Tim Deschryver’s “NgRx Creator Functions 101” post.
Building Reducers
Now that our actions are defined, it’s time to build reducers that respond to them and update state.
Paste this into ToDoReducers.ts:
import { loadItems, errorItem } from './ToDoActions';
import { on, createReducer } from '@ngrx/store';
import { Item } from './models/item';

export interface State {
  toDo: { items: Item[]; error: string };
}

export const initialState: State = {
  toDo: { items: [], error: '' }
};

export const ToDoReducer = createReducer(
  initialState,
  on(loadItems, (state, action) => ({
    ...state,
    items: action.items
  })),
  on(errorItem, (state, action) => ({
    ...state,
    error: action.message
  }))
);

export const selectItems = (state: State) => state.toDo.items;

export const selectError = (state: State) => state.toDo.error;
Here’s what’s happening in this file. The core job of reducers is to define how the application state shifts in response to actions.
We start by describing the shape of our global state:
export interface State {
  toDo: { items: Item[]; error: string };
}

export const initialState: State = {
  toDo: { items: [], error: '' }
};
Next, we wire up reducers for the [to-do] load items and [to-do] error item actions:
export const ToDoReducer = createReducer(
  initialState,
  on(loadItems, (state, action) => ({
    ...state,
    items: action.items
  })),
  on(errorItem, (state, action) => ({
    ...state,
    error: action.message
  }))
);
Finally, we expose selectors so components can subscribe to specific portions of state:
export const selectItems = (state: State) => state.toDo.items;

export const selectError = (state: State) => state.toDo.error;
You might wonder why we don’t have a reducer for every action. The reason is that reducers are only needed when you want to produce a brand-new state snapshot in the store. The reducers above are attached to actions that we expect to culminate in a state change.
In our "to-do" app, state updates occur in two spots: (1) after the items are loaded from the service and (2) when an error is encountered. The other actions poke their corresponding effects, which, in turn, return yet another action that triggers a reducer to finally update state. That flow becomes clearer in the next section.
Creating Effects
With actions and reducers in place, we need to orchestrate the side-effect-laden parts — things that happen as a result of an action. In NgRx (and Redux), we call these effects.
Add the following to ToDoEffects.ts:
import { Injectable } from '@angular/core';
import { Actions, createEffect, ofType } from '@ngrx/effects';
import { addItem, getItems, deleteItem } from './ToDoActions';
import { switchMap, catchError } from 'rxjs/operators';
import { of } from 'rxjs';
import { ToDoService } from './services/to-do.service';
@Injectable()
export class ToDoEffect {
      loadItems$ = createEffect(() =>
        this.actions$.pipe(
          ofType(getItems),
          switchMap(action => {
            const itemsLoaded = this.toDoService.getItems();
            return of({
              type: '[to-do] load items', items: itemsLoaded
            });
          }),
          catchError(error => of({
            type: '[to-do] error item', message: error
          }))
        )
      );

    addItem$ = createEffect(() =>
        this.actions$.pipe(
          ofType(addItem),
          switchMap(action => {
            this.toDoService.addItem(action.name);
            const itemsLoaded = this.toDoService.getItems();
            return of({
              type: '[to-do] load items', items: itemsLoaded
            });
          }),
          catchError(error => of({
            type: '[to-do] error item', message: error
          }))
        )
      );

    deleteItem$ = createEffect(() =>
        this.actions$.pipe(
          ofType(deleteItem),
          switchMap(action => {
            this.toDoService.deleteItem(action.item);
            const itemsLoaded = this.toDoService.getItems();
            return of({
              type: '[to-do] load items', items: itemsLoaded
            });
          }),
          catchError(error => of({
            type: '[to-do] error item', message: error
          }))
        )
      );

    constructor(
        private actions$: Actions,
        private toDoService: ToDoService
      ) {}
}
As you can see, we’ve created effects for three scenarios:
loadItems$ = createEffect(()— fetches the items through the “to-do service”addItem$ = createEffect(()— tells the “to-do service” to add an item and then reloads the full item list (which will refresh state)deleteItem$ = createEffect(()— instructs the “to-do service” to delete an item and then reloads the list (again setting up a state refresh)
These are the side effects I discussed earlier. Take the [to-do] add item action as an example: when it gets dispatched, its corresponding effect invokes the “to-do” service, and afterwards it dispatches the [to-do] load items action, which lands right here:
addItem$ = createEffect(() =>
  this.actions$.pipe(
    ofType(addItem),
    switchMap(action => {
      this.toDoService.addItem(action.name);
      const itemsLoaded = this.toDoService.getItems();
      return of({
        type: '[to-do] load items',
        items: itemsLoaded
      });
    }),
    catchError(error =>
      of({
        type: '[to-do] error item',
        message: error
      })
    )
  )
);
That freshly returned [to-do] load items walks into our ToDoReducer via the on(loadItems… handler, and a new state is computed. Any component listening in on the store picks up this updated state through the selectors.
The flow for deletion mirrors this pattern, though I’ve trimmed that explanation here to save space.
Updating the Application Component
Now that all the building blocks are in place, the application component needs to be adjusted so it works with the actions and selectors we created.
Update src/application.component.ts to match this:
import { Component } from '@angular/core';
import { FormGroup, FormControl } from '@angular/forms';
import { Item } from './models/item';
import { Store, select } from '@ngrx/store';
import { getItems, addItem, deleteItem } from './ToDoActions';
import { Observable } from 'rxjs';
import { selectItems, selectError } from './ToDoReducers';
@Component({
  selector: 'app-root',
  templateUrl: './app.component.html',
  styleUrls: ['./app.component.scss']
})
export class AppComponent {

    toDoForm = new FormGroup({
      name: new FormControl('')
    });
    items$: Observable<any>;
    error$: Observable<any>;

    constructor(private store: Store<{ toDo: { items: Item[] } }>) {
        this.store.dispatch(getItems());
        this.items$ = this.store.pipe(select(selectItems));
        this.error$ = this.store.pipe(select(selectError));
      }

    onSubmit() {
        this.store.dispatch(
          addItem({ name: this.toDoForm.controls.name.value })
        );
        this.toDoForm.controls.name.reset();
      }

    deleteItem(deleted: Item) {
        this.store.dispatch(deleteItem({ item: deleted }));
      }
}
First, take note of the NgRx imports:
import { Store, select } from '@ngrx/store';
import { getItems, addItem, deleteItem } from './ToDoActions';
import { Observable } from 'rxjs';
import { selectItems, selectError } from './ToDoReducers';
This brings in the actions and selectors defined in the previous sections.
Next, observe the observable declarations:
items$: Observable<any>;
error$: Observable<any>;
These subscribe to the store so the component receives any updates to the state.
Also examine the constructor:
constructor(private store: Store<{ toDo: { items: Item[] } }>) {
    this.store.dispatch(getItems());
    this.items$ = this.store.pipe(select(selectItems));
    this.error$ = this.store.pipe(select(selectError));
  }
On initialization, the items are fetched, and then subscriptions are set up for both the items and the error values.
Finally, look at the modifications to onSubmit and deleteItem:
onSubmit() {
  this.store.dispatch(addItem({
    name: this.toDoForm.controls.name.value }));
  this.toDoForm.controls.name.reset();
}

deleteItem(deleted: Item) {
  this.store.dispatch(deleteItem({ item: deleted }));
}
Both methods previously called services directly. Now they dispatch actions instead. Once an action is dispatched, a “side effect” invokes the “to-do” service method and updates the store state, which then triggers the [to-do] load items action.
With the component updated, the last task is to adjust the HTML template so it picks up changes from the store:
<header class="c-header">
  <h1 class="c-header__title">To-Do list with NgRx</h1>
  <p class="c-header__subtitle">Learn how to use NgRx with a to-do list</p>
</header>
<section class="c-error" *ngIf="error$ | async as error">
  <h1>{{ error }}</h1>
</section>
<form class="c-form" [formGroup]="toDoForm" (ngSubmit)="onSubmit()">
  <input
    class="c-form__input"
    type="text"
    formControlName="name"
    placeholder="to-do item"
    required
  />
  <button class="c-form__button" type="submit" [disabled]="!toDoForm.valid">
    Create Item
  </button>
</form>
<section class="c-list" *ngIf="items$ | async as items">
  <ul *ngFor="let item of items">
    <li class="c-list__item">
      <button class="c-list__button" (click)="deleteItem(item)">X</button>
      <span class="c-list__item-label">{{ item.name }}</span>
    </li>
  </ul>
</section>
First, note the section that listens to the items observable:
<section class="c-list" *ngIf="items$ | async as items">
  <ul *ngFor="let item of items">
    <li class="c-list__item">
      <button class="c-list__button" (click)="deleteItem(item)">X</button>
      <span class="c-list__item-label">{{ item.name }}</span>
    </li>
  </ul>
</section>
Also check the added block for displaying error messages:
<section class="c-error" *ngIf="error$ | async as error">
  <h1>{{ error }}</h1>
</section>
These changes allow the template to react to state changes via selectors (subscriptions to the state). They also make it possible to add and remove items by dispatching NgRx actions.
How the Pieces Fit Together
With everything wired up, run npm run serve to see the app in action. The patterns are consistent across operations; let's walk through the "add item" flow introduced earlier.
Instead of the component calling the service directly, adding an item now works like this:
- The user types the text for the item.
- The user clicks the “create item” button.
- The component dispatches a
[to-do] add itemaction. - An effect picks up the value from the action's props and sends it to localStorage via the "to-do service." The effect then returns a
[to-do] load itemsaction. - When the
[to-do] load itemsaction is dispatched, the store's state is updated, and the template receives the new data through the selectors.
This walkthrough shows the flux pattern at work. To see it visually, I also suggest installing the Chrome Redux Devtools Extension to observe the events as they occur.
If you run into issues, you can skip ahead to a working version of the code by running “git clone — branch after-ngrx https://github.com/andrewevans0102/to-do-with-ngrx.git”
Closing Thoughts
I hope this article was helpful and that you feel encouraged to experiment with NgRx in your own projects. The flux pattern can appear daunting initially, but once you've gone through the process of adding it, it becomes much more intuitive.
Keep in mind that flux isn't the only approach. It's one design that scales effectively and simplifies maintaining large applications. Many projects rely on other architectures, or even fully custom solutions. Building good software depends on the requirements and context of the work. My hope is that this guide illustrates the value of flux as one option for structuring your application.
There are many excellent resources on flux and NgRx out there—I encourage you to explore them. You can also start with the official NgRx Getting Started docs for further reading.