Core Concepts
This guide walks through constructing an API with Google’s Firebase, relying on Firebase Cloud Functions and ExpressJS for the back end.
The following prerequisites are recommended before getting started:
- A terminal environment on Windows, Linux, or macOS
- Node 10.10 installed
- NVM installed, following the instructions available here
- A Google Account
- Postman installed
- Firebase CLI installed by running
npm install -g firebase-toolsin the terminal
All code referenced throughout this post is available in this GitHub repository. The repository includes a Postman Collection; importing it is highly recommended for testing purposes. Keep in mind that the app id found in the URL paths belongs to a specific deployed project. You will need to replace the app id with one that matches a project you create in the Firebase Console. If that doesn't make sense yet, don't worry — it will be covered after the initial project setup.
Foundational Knowledge
Before diving in, let's cover some fundamental concepts about APIs and the technologies involved. This section is entirely introductory, so feel free to skip ahead if you are already familiar with these topics.
API stands for Application Programming Interface and describes the way computer systems communicate with each other. A common definition, as provided by Google, is:
a set of functions and procedures allowing the creation of applications that access the features or data of an operating system, application, or other service.
In essence, an API is built so that your system can interact with whatever you are creating. APIs can range from basic REST endpoints for a website to the methods that define a software library. This leads to the next key topic: RESTful Services.
RESTful services, which refer to Representational State Transfer, leverage the HTTP protocol to transmit data through an API. The HTTP protocol is the foundation of everyday websites and internet applications. RESTful services utilize various HTTP verbs (or methods) to exchange data between systems. The typical HTTP verbs you'll encounter are:
- GET = retrieving data
- POST = creating or updating data
- PUT = updating data
- DELETE = deleting data
Earlier, the term "endpoints" was mentioned. This simply refers to the address of a website or service that receives an HTTP request. For a more detailed explanation of HTTP requests, please visit the relevant Wikipedia page.
The Firebase Platform
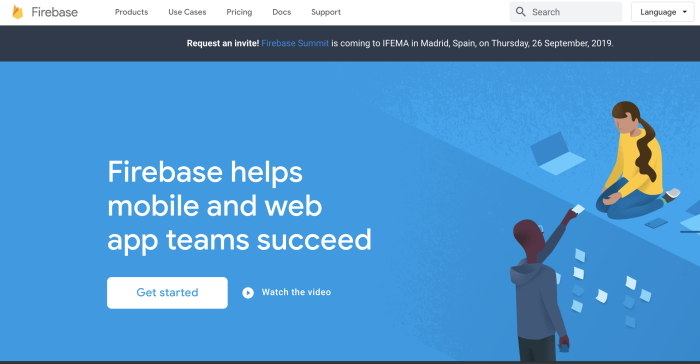
This post relies on Google's Firebase platform. Firebase is a robust platform that enables developers to build applications rapidly. It offers a range of common services, including:
- Hosting
- Realtime Database
- NoSQL Database
- Functions (similar to AWS lambdas)
- File Storage
- and much more!
Using Firebase only requires a Google account, which is why having one set up was included in the prerequisites.
The rest of this post will walk through setting up the backend for an API built with Firebase. For a deeper dive into Firebase itself, check out this dedicated post.
Getting Started
First, navigate to the Firebase Console using this link. The view should look similar to the one below:
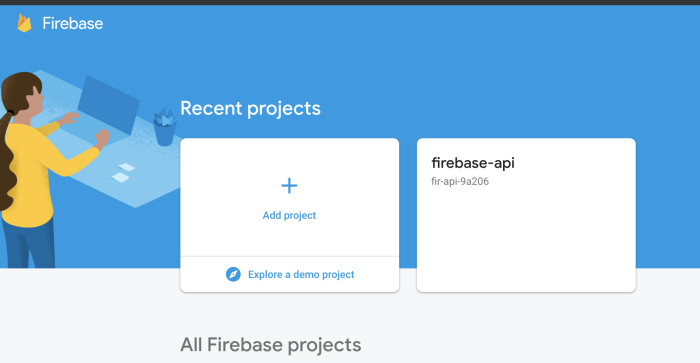
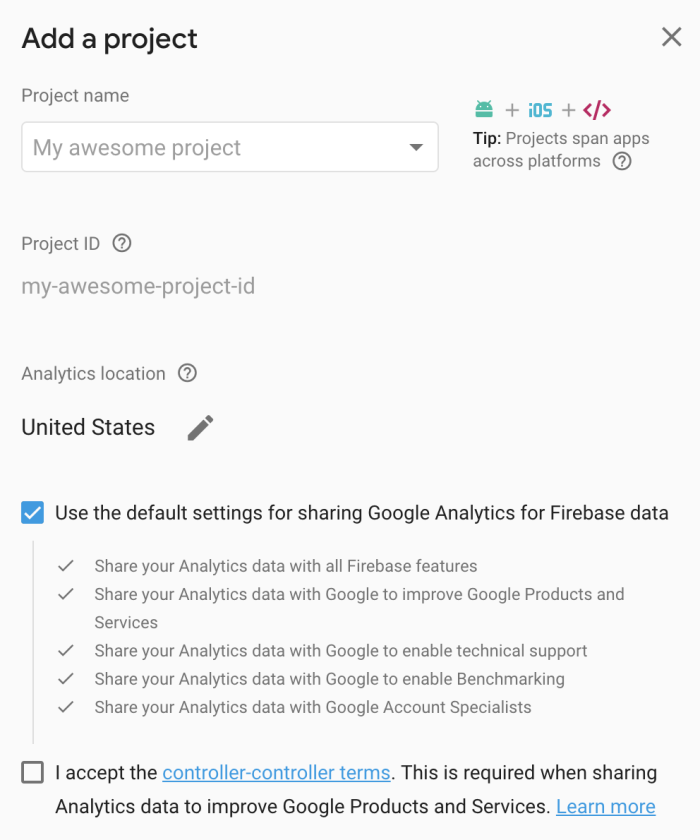
Click the "add project" button and provide a name for your project. It is recommended to accept the analytics steps, as it can be helpful for both you and Google. You can review the analytics data later in the console after the project has been created.
After the project is created, open it in the console and select "database" from the left-hand navigation to see the following screen:
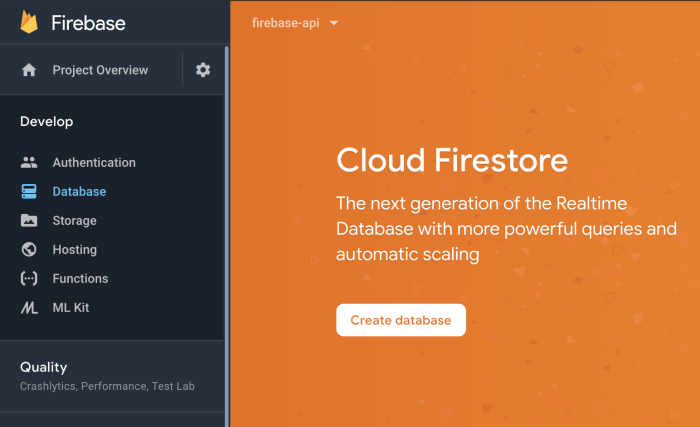
Under "Cloud Firestore," click "Create database" to set up your initial database. Choose "test mode" to allow all reads and writes. You can establish security rules for your database later to restrict access. Consult the Firebase documentation for guidance on securing your database. You will also be prompted to select a location; the default is generally fine, but you can choose a datacenter closer to you. Refer to this page for more details on datacenter locations.
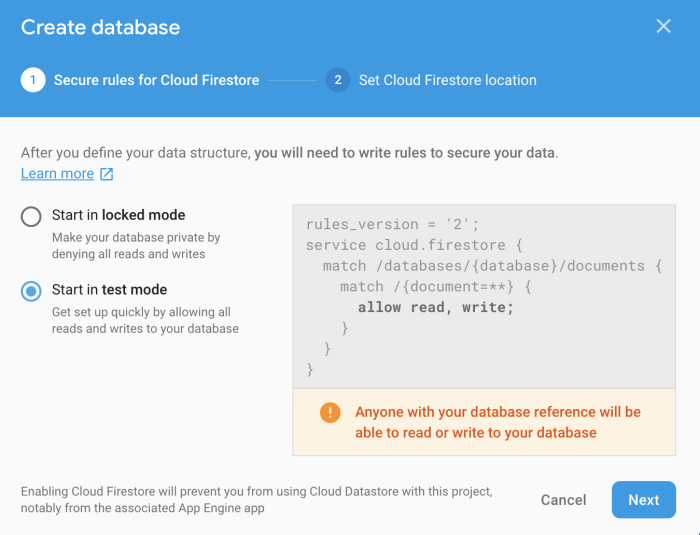
With the basic project components set up in the console, it's time to move to your computer and start writing code.
Code Setup
This step assumes you have the Firebase CLI installed on your machine. If not, follow the instructions here to get it set up.
Navigate to your terminal and create a folder for your project using mkdir my-project.
Next, cd into that folder and run firebase init. The terminal output should resemble the following:
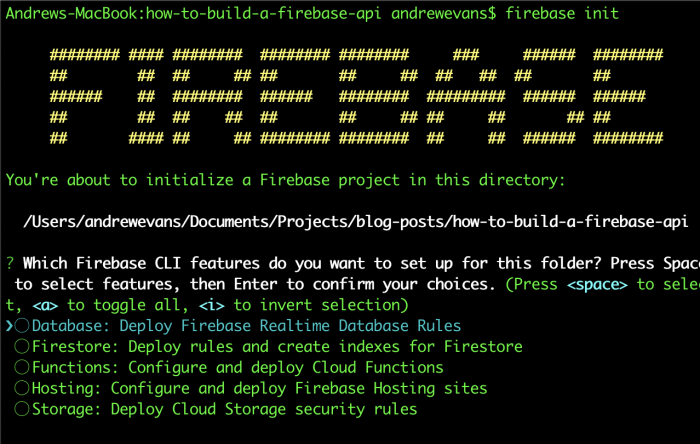
From the options menu, select "Functions." Then, pick the Firebase App you created earlier from the list in the next terminal output.
The subsequent options are mostly straightforward:
- Choose JavaScript
- Select yes for linting
- Select yes to install dependencies
- You're all set!
Now, cd into the newly generated functions folder. The init command creates this folder for you, containing the following files:
- index.js
- node_modules folder
- package-lock.json
- package.json
Open the index.js file in your preferred editor (VSCode is highly recommended) and take a look at its contents.
Serverless APIs and Your First Endpoint
Firebase Functions allows you to leverage the ExpressJS library to host a Serverless API. The term Serverless refers to a system that operates without physical servers managed by you. It's a bit of a misnomer since it technically runs on a server, but the provider handles the hosting infrastructure. Traditional APIs require you to set up and maintain a server, whether in the cloud or on-premises, which involves managing OS patches, alerts, and more. In a Serverless world, you only need to worry about your code. This is one of the most appealing aspects of Firebase!
To use ExpressJS with your project, replace the contents of index.js with the code below:
const functions = require('firebase-functions');
const admin = require('firebase-admin');
const express = require('express');
const cors = require('cors');
const app = express();
app.use(cors({ origin: true }));

app.get('/hello-world', (req, res) => {
  return res.status(200).send('Hello World!');
});

exports.app = functions.https.onRequest(app);
The initial require statements import the necessary dependencies. Since express and cors are not yet installed, run the following two commands in your terminal:
npm i express
npm i cors
Here's a detailed breakdown of the imported libraries:
- firebase-functions is an npm module used to create serverless functions
- firebase-admin is the Firebase admin SDK, giving your functions control over all your backend Firebase services
- express is the ExpressJS library for creating a server instance
- cors is an npm module that enables your functions to run separately from your client. The
app.useline simply enables CORS for your Express server instance.
The app.get block creates a "hello world" endpoint using Express routing. While there are many approaches, routes are defined explicitly here for clarity. In an enterprise setting, you'd likely use the Express router, resulting in less verbose code. For a deeper look into Express routing, this tutorial is a great resource.
For our purposes, the app.get function handles an HTTP GET request, capturing the request in req and the response in res. When this endpoint is called, it returns a "Hello World!" string with the HTTP status code 200. HTTP status codes determine the outcome of a request. Among the many codes, 200 signifies success, while 500 denotes an error.
The line exports.app = functions.https.onRequest(app); exposes your Express application so it can be accessed externally. Without this exports statement, your application will not run properly.
With the packages installed and initial code in place, start your project locally with npm run serve. This command serves your functions locally and should produce output like the following:

Note the warning about the node version. We'll address that when we start connecting to the database.
Notice that the terminal displays the localhost address of your API. This is the "address" you'll call directly from Postman. When running on localhost, the URLs for your app look like this:
[<------domain---->]/[<-app id--->]/[<-zone-->]/app/[<-endpoint->]
http://localhost:5000/fir-api-9a206/us-central1/app/create
For deployment, the only difference in the URL is that [http://localhost:500](http://localhost:500/) is replaced with zone + app id + "cloudfunctions.net", similar to this:
[<--zone + app id + cloudfunctions.net--->] / app / [<--endpoint-->]
https://us-central1-fir-api-9a206.cloudfunctions.net/app/hello-world
You'll need to update the Postman collection from the intro with your own app id values. To find your app id, go to the Firebase Console and click "project settings" as shown in the screenshot:

Your project id (along with other settings) will be listed there. It's circled in this screenshot:
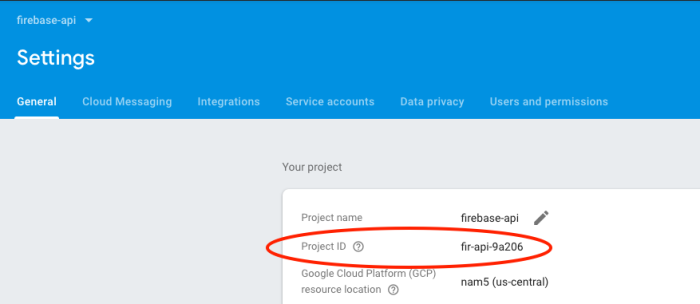
Open the Postman collection and edit the "hello-world localhost" request under the "localhost" folder.
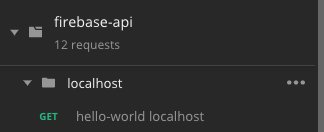
If you're having trouble with Postman, please refer to the official instructions here.
As mentioned, modify the id value to match your project. The address from the terminal when you ran npm run serve should contain this information as well. Once updated, execute the request from Postman and you should see the following result:
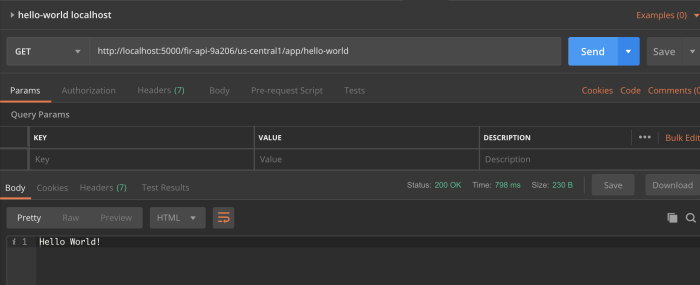
With the initial endpoint working, let's proceed to add database calls.
Working with the Database
The API being built here handles operations for a list of items. This involves setting up Create, Read, Update, and Delete (CRUD) functions for that list.
Firebase provides two database options: a traditional database or Cloud Firestore. This tutorial uses Cloud Firestore because it's easier to work with and more versatile. Cloud Firestore is a NoSQL database, meaning data is stored as documents within collections. This is somewhat analogous to how data is stored in rows and tables in a SQL database. NoSQL databases often perform better and are easier to scale due to their data access and storage model.
During setup, a Cloud Firestore instance was added to the project. Now we'll access it. To interact with Cloud Firestore locally using the admin SDK, you'll need a service account. Service accounts use keys, which are provided by downloading a key file. Here's how:
Open the Firebase Console, select your application, click the gear icon, and choose "users and permissions" as shown:
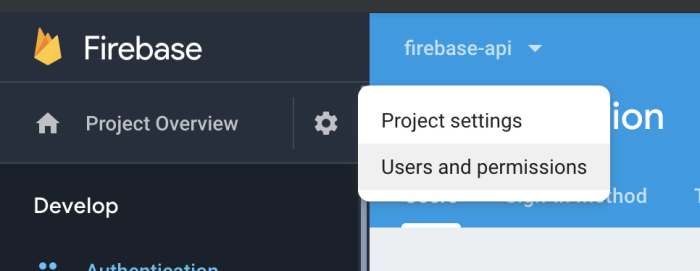
Then, navigate to the "service accounts" tab, where you should see something like this:
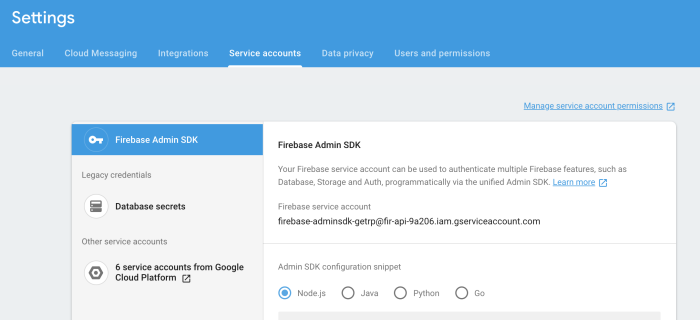
At the bottom of the screen, there's code provided to run in your project. What you need is the permissions file. Click "Generate new private key" to download it. Store this file in the functions folder next to index.js. You can name it whatever you like; in this example, it's named permissions.json. Then, add the following lines to the top of your index.js file:
var serviceAccount = require("./permissions.json");
admin.initializeApp({
  credential: admin.credential.cert(serviceAccount),
  databaseURL: "https://fir-api-9a206..firebaseio.com"
});
const db = admin.firestore();
These lines do two things: (1) load your permissions file and (2) use it to initialize your application. A variable db is also created to represent your Firestore instance. While not strictly necessary, it keeps the code cleaner.
With those values loaded, let's add a create endpoint to the application. Place the following code below the hello-world endpoint:
// create
app.post('/api/create', (req, res) => {
    (async () => {
        try {
          await db.collection('items').doc('/' + req.body.id + '/')
              .create({item: req.body.item});
          return res.status(200).send();
        } catch (error) {
          console.log(error);
          return res.status(500).send(error);
        }
      })();
  });
This code creates an endpoint called "/api/create-item" that responds to a POST call. When the POST call is made, it adds the "item" from the request body to a collection called "items" in the database, using the "id" value you provide. Collections in a NoSQL database are simply groups of documents. While you could add to a specific document, collections are often preferred in Firestore because they're easy to understand. You can think of collections in a similar way to tables in a SQL database.
Notice that the endpoint is prefixed with "/api". This isn't required, but it's a common convention for APIs. The "id" value is also explicitly specified in the requests here. Firebase can generate this automatically, but defining it explicitly makes the process easier to follow.
With this code added, stop the server in the terminal (if it's still running) and restart it with npm run serve.
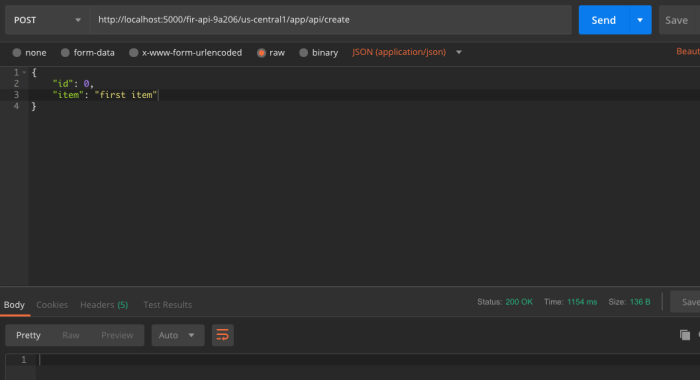
In the Postman collection, find the "create localhost" POST request. Replace the app id value as you did before, and then send the request.
When you run it, the following error should appear:
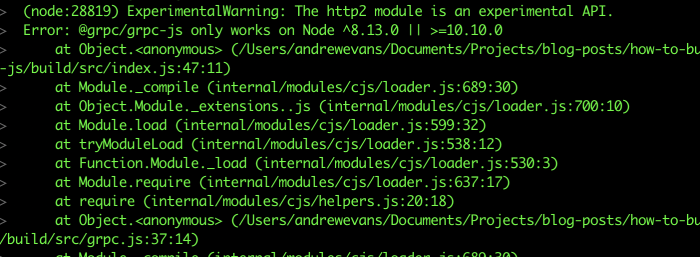
The Firebase admin SDK requires node version 8.13.0 or 10.10. This is why installing nvm was mentioned earlier. This issue is easily resolved. nvm allows you to quickly switch node versions in your terminal. Run nvm use 10.10 and you should see this:

Now, restart your server with npm run serve and hit the endpoint in Postman. You should receive a 200 success. You can also see the API request in the terminal output.
If you encounter an error about onRequestWithOpts or something similar, run npm i firebase-tools. A recent CLI issue was fixed in version 7.1.0. While writing this post, an outdated Firebase CLI caused this exact problem. Check out this GitHub issue for more details.
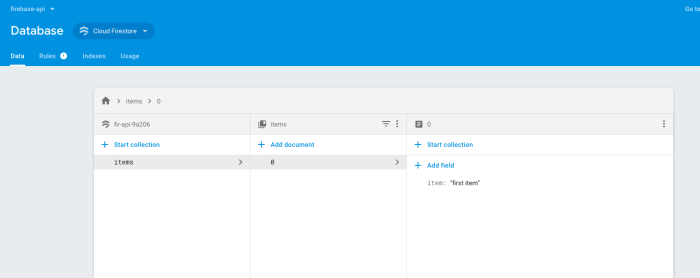
One great feature is the ability to view your data directly in Cloud Firestore. Switch to the Firebase console, click the "database" link on the left, and you should see something like this:
Adding Remaining DB Endpoints
With the "create" endpoint working, the rest of the CRUD operations can be added. We'll implement the following:
/read-item/:item_id= read a specific item (by ID)/read-items= read all items (entire collection)/update-item/:item_id= update an itemdelete-item/:item_id= delete an item
These endpoints are largely similar, except for those that use the item_id query parameter. This follows standard routing patterns found in the ExpressJS documentation. For interacting with the Firebase Admin SDK, the Firestore API reference is a valuable resource.
For a complete example of what these endpoints should look like, refer to the index.js file in the GitHub repository.
Here's the code for all the remaining endpoints:
// read item
app.get('/api/read/:item_id', (req, res) => {
    (async () => {
        try {
            const document = db.collection('items').doc(req.params.item_id);
            let item = await document.get();
            let response = item.data();
            return res.status(200).send(response);
        } catch (error) {
            console.log(error);
            return res.status(500).send(error);
        }
        })();
    });

// read all
app.get('/api/read', (req, res) => {
    (async () => {
        try {
            let query = db.collection('items');
            let response = [];
            await query.get().then(querySnapshot => {
            let docs = querySnapshot.docs;
            for (let doc of docs) {
                const selectedItem = {
                    id: doc.id,
                    item: doc.data().item
                };
                response.push(selectedItem);
            }
            });
            return res.status(200).send(response);
        } catch (error) {
            console.log(error);
            return res.status(500).send(error);
        }
        })();
    });

// update
app.put('/api/update/:item_id', (req, res) => {
(async () => {
    try {
        const document = db.collection('items').doc(req.params.item_id);
        await document.update({
            item: req.body.item
        });
        return res.status(200).send();
    } catch (error) {
        console.log(error);
        return res.status(500).send(error);
    }
    })();
});

// delete
app.delete('/api/delete/:item_id', (req, res) => {
(async () => {
    try {
        const document = db.collection('items').doc(req.params.item_id);
        await document.delete();
        return res.status(200).send();
    } catch (error) {
        console.log(error);
        return res.status(500).send(error);
    }
    })();
});
Deployment
Now that the CRUD API is fully functional, it's time to deploy! For enterprise applications or those you plan to maintain, it's standard practice to build a Continuous Integration Continuous Deployment (CICD) pipeline. This automates a set of steps to deliver your application to production.
There's a lot of documentation available on CICD best practices. My Angular-In-Depth article on deploying an app with Firebase and CircleCI is a great starting point.
For this API, the focus is on the deployment step itself. The Firebase CLI simplifies this with just a single command: firebase deploy.
When you ran firebase init to create your project, the CLI set up the deploy step as an NPM script. You can now deploy the project by running npm run deploy from the functions folder.
NPM scripts are quite powerful. Most modern JavaScript applications use them in some capacity. Check out the npm documentation for more information.
Running npm run deploy from the functions folder should produce output similar to the following:
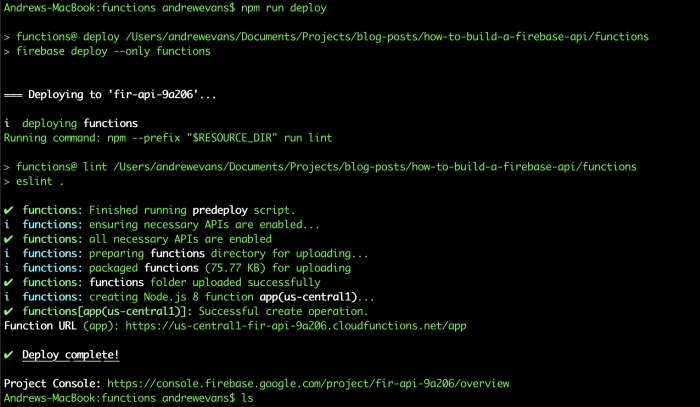
The Function URL line in the terminal output provides the endpoint for your deployed functions. Return to the Postman collection and check the deployed folder for a set of requests to test your deployed API.
Frontend Integration
With the API built, let's see what it looks like when used by a client application.
In API terminology, there's typically a producer and a consumer. The producer is the API itself, providing the endpoints. The consumer is anything that uses those endpoints. Application developers often build a client application using JavaScript frameworks such as Angular, React, EmberJS, Vue, and others.
Client applications run in the browser, allowing JavaScript code to be interpreted on the fly. This is particularly useful as developers often just need a location to statically host their JavaScript "bundle." This approach takes advantage of the JavaScript language and modern browser capabilities.
Remember, this project uses code from the GitHub repo mentioned earlier. This repository contains both the backend API code and a frontend Angular application designed to interact with it. The frontend is essentially a Single Page Application (SPA) with one main page, performing basic CRUD operations on list items.
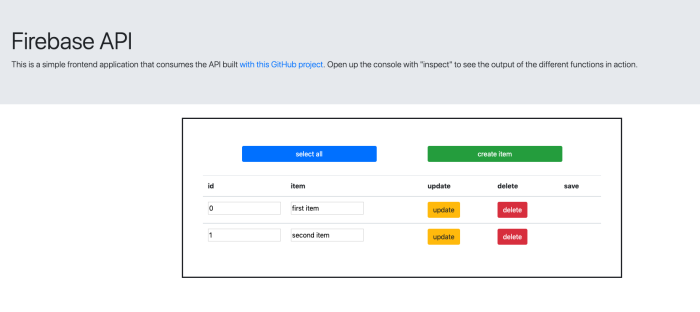
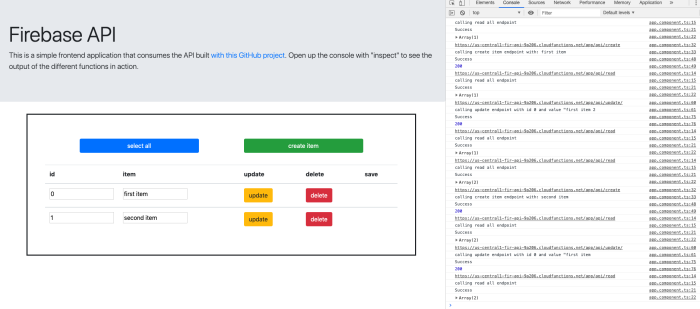
While the application is running, you can observe its activity in the browser's console. Open the console (right-click and select "inspect" in Chrome) and you should see the following:
To use the provided client, first cd into the frontend folder of the GitHub project. To configure the application to use the endpoints of your deployed API, you need to open the /frontend/src/environments/environment.ts file.
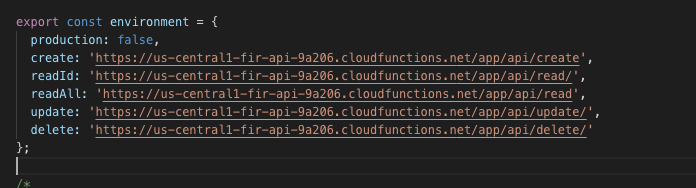
In this file, there's a set of endpoints. Replace these values with the URLs from your project. Just change those values to match your deployed API's URLs.
Recall that after deploying, the Firebase CLI prints a domain to the terminal. The hosted endpoint format is quite intuitive:
[<--zone + app id + cloudfunctions.net-->] / app / [<--endpoint-->]
https://us-central1-fir-api-9a206.cloudfunctions.net/app/hello-world
Update the endpoints in the environments file with the ones from your project. Be sure to append the appropriate endpoint path, such as /api/create or /api/read, to the base URL.
Once the values are replaced, cd into the frontend directory and run npm install to install the dependencies. After installation, start the app using the Angular CLI command ng serve.
If you run into CLI errors, consult the Angular CLI documentation.
After running ng serve, you should see output similar to this:
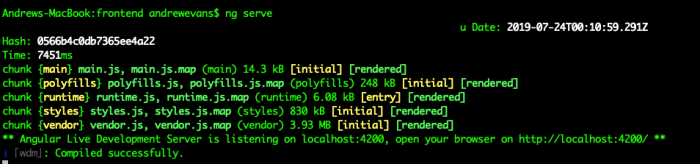
This message indicates that the CLI has built the application (using webpack) and that it's running on port 4200. Open your browser to localhost:4200 to see the app in action.
Looking at the project's app component, you'll see that the actions are simply JavaScript fetch calls to various endpoints of the API we created:
async selectAll() {
    try {
      console.log(environment.readAll);
      console.log('calling read all endpoint');

      this.exampleItems = [];
      const output = await fetch(environment.readAll);
      const outputJSON = await output.json();
      this.exampleItems = outputJSON;
      console.log('Success');
      console.log(outputJSON);
    } catch (error) {
      console.log(error);
    }
  }

  // really this is create but the flow is that
  // click the "create item" button which appends a blank value to the array, then click save to actually create it permanently
  async saveItem(item: any) {
    try {
      console.log(environment.create);
      console.log('calling create item endpoint with: ' + item.item);

      const requestBody = {
        id: item.id,
        item: item.item
      };

      const createResponse =
        await fetch(environment.create, {
          method: 'POST',
          body: JSON.stringify(requestBody),
          headers:{
            'Content-Type': 'application/json'
          }
        });
      console.log('Success');
      console.log(createResponse.status);

      // call select all to update the table
      this.selectAll();
    } catch (error) {
      console.log(error);
    }
  }

  async updateItem(item: any) {
    try {
      console.log(environment.update);
      console.log('calling update endpoint with id ' + item.id + ' and value "' + item.item);

      const requestBody = {
        item: item.item
      };

      const updateResponse =
        await fetch(environment.update + item.id, {
          method: 'PUT',
          body: JSON.stringify(requestBody),
          headers:{
            'Content-Type': 'application/json'
          }
        });
      console.log('Success');
      console.log(updateResponse.status);

      // call select all to update the table
      this.selectAll();
    } catch (error) {
      console.log(error);
    }
  }

  async deleteItem(item: any) {
    try {
      console.log(environment.delete);
      console.log('calling delete endpoint with id ' + item.id);

      const deleteResponse =
        await fetch(environment.delete + item.id, {
          method: 'DELETE',
          headers:{
            'Content-Type': 'application/json'
          }
        });

      console.log('Success');
      console.log(deleteResponse.status);

      // call select all to update the table
      this.selectAll();
    } catch (error) {
      console.log(error);
    }
  }
Since the primary focus of this post is creating the API, the inner workings of this Angular application won't be covered in detail. For learning more, I highly recommend the Angular Documentation and available tutorials. A quick web search will yield many great "getting started" resources on Angular fundamentals. The Angular-In-Depth blog is also an excellent resource for advanced topics.
Final Thoughts

Congratulations! You've successfully deployed an API using Firebase. There are many additional features you can add, but this demonstrates the fundamentals. The client application shown here provides a starting point for ways to consume your API. I recommend exploring the ExpressJS tutorials for more advanced routing and middleware techniques. Be sure to check out my other posts on Firebase:
- Firebase
- Why Firebase Cloud Functions are Awesome
- How the AngularFire Library makes Firebase feel like Magic
- Why Building with a JAMstack is Awesome
I hope this post has helped you get started with building APIs on Firebase. Feel free to leave comments, and thanks for reading!